There are two kinds of people in this world: people who see a bag of mini marshmallows and think “hot cocoa,” and people who think, “I bet I can launch this across the room with science.” This article is for the second group. A marshmallow catapult is one of those wonderfully silly projects that sneaks real learning into a fun afternoon. You get a hands-on build, a quick lesson in force and motion, and the rare opportunity to say, “I’m not making a mess. I’m doing engineering.”
If you want a project that is cheap, easy, and weirdly satisfying, a marshmallow catapult checks every box. Most designs use ordinary materials like craft sticks, spoons, rubber bands, paper cups, and tape. Better yet, you can make more than one design and compare which launches farther, straighter, or with the least dramatic collapse. That turns a simple craft into a mini STEM challenge without making your kitchen feel like a physics lab that has gone rogue.
In this guide, you’ll learn three ways to make a marshmallow catapult, along with setup tips, testing ideas, troubleshooting advice, and a few ways to stretch the fun into a full game. These designs are best used with mini marshmallows only. They are soft, lightweight, and much less likely to send your indoor fun into outdoor regret.
Why a Marshmallow Catapult Is Such a Great DIY Project
A homemade marshmallow catapult is more than a rainy-day craft. It is a simple way to explore how stored energy turns into motion. When you bend a craft stick, stretch a rubber band, or pull back a spoon arm, you are storing energy. When you let go, that energy turns into movement and sends your marshmallow flying. That is the science part. The fun part is trying to hit a cup from across the table like you are competing in the world’s tiniest snack-based Olympics.
It is also flexible. Younger kids can focus on building and launching. Older kids can experiment with angle, force, distance, and design changes. Adults can pretend they are “just helping,” then become suspiciously competitive five minutes later. Everybody wins, except maybe the marshmallows.
Before You Start: Materials and Safety Basics
Basic Supplies You May Need
Depending on the design you choose, gather some or all of the following:
- Craft sticks or jumbo popsicle sticks
- Plastic spoons
- Rubber bands
- Paper cups
- Tape or masking tape
- String or yarn
- Scissors
- Mini marshmallows
- Optional targets like paper cups, bowls, or cardboard boxes
Quick Safety Rules
- Use soft mini marshmallows only as your launcher material.
- Never aim at faces, pets, lamps, or anyone holding a drink they care about.
- Use scissors carefully and get help if needed.
- Test in an open area with breakable items moved out of range.
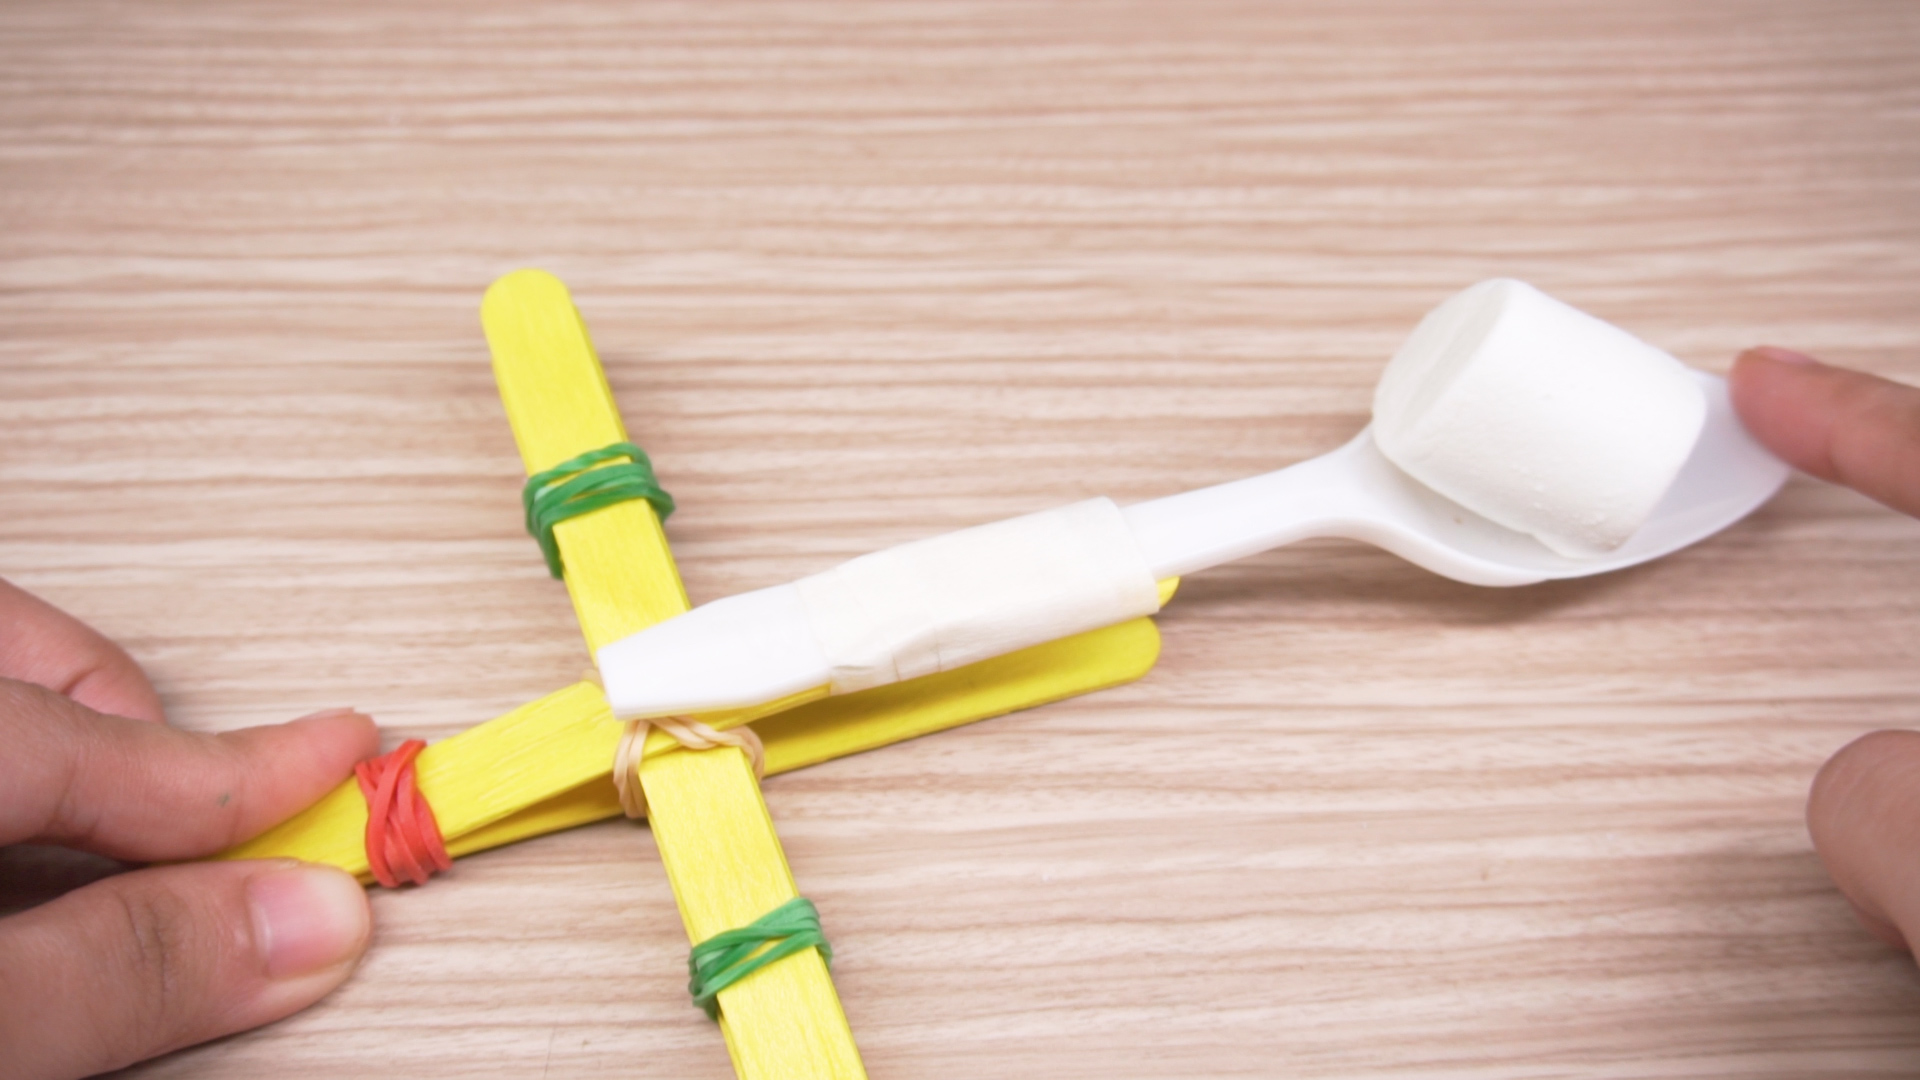
Method 1: Make a Classic Craft Stick Marshmallow Catapult
This is the classic version many people picture first. It uses stacked craft sticks, rubber bands, and a spoon. It is simple, sturdy, and ideal if you want a reliable catapult that looks like a tiny medieval invention built by someone who shops in the school supply aisle.
What You Need
- 7 to 10 craft sticks
- 1 plastic spoon
- 4 to 6 rubber bands
- Mini marshmallows
How to Build It
First, stack 5 to 8 craft sticks neatly and wrap a rubber band around each end to hold the stack together. This thick bundle becomes the base spacer that creates tension for the launcher.
Next, take 2 more craft sticks and bind them together at one end with a rubber band. Open them like a narrow “V,” then slide the larger stick bundle between them near the bound end. Once the stack is in place, use another rubber band in a crisscross pattern around the middle to keep the structure snug.
Now attach the plastic spoon to the top stick. The bowl of the spoon should hang over the front edge. Secure the spoon handle with one or two rubber bands so it does not wiggle around like it is reconsidering its career path.
Place a mini marshmallow in the spoon, gently press the spoon arm downward, and release. Congratulations: you have built a DIY marshmallow catapult.
Why This Design Works
The upper stick and spoon act as a lever arm. The bundle in the middle creates spacing and resistance, so when you push down, the top arm bends and stores energy. When released, that stored energy becomes motion and launches the marshmallow forward.
Tips for Better Launches
- Move the center stack slightly forward to increase leverage.
- Use tighter rubber bands for stronger tension.
- Try a bottle cap instead of a spoon if you want a flatter launching cup.
- Test one variable at a time so you can see what really improves distance.
Method 2: Make a Paper Cup Marshmallow Catapult
If you want something even easier, the paper cup version is a great choice. This one feels more like a fast-build STEM project. It is excellent for classrooms, parties, or family activity time because the parts are cheap and the build does not take long.
What You Need
- 2 paper cups
- 2 to 4 craft sticks or sturdy cardboard strips
- 1 plastic spoon
- Tape
- Rubber bands
- Mini marshmallows
How to Build It
Turn one paper cup upside down to use as the base. Tape two craft sticks across the top so they form a support platform. If you do not have craft sticks, a strip of folded cardboard can work too.
Attach the spoon so the handle is anchored to the top support and the spoon bowl extends beyond the edge of the cup. You can secure it with tape or a rubber band, depending on what feels more stable.
For extra spring, wrap a rubber band around part of the spoon handle and support area so the spoon has some tension when pressed down. Add a marshmallow, pull back gently, and launch.
What Makes This Version Useful
This catapult is great for quick experiments. Because it is easy to assemble, you can build several versions and test different cup sizes, spoon lengths, or support heights. It is also handy if you want to create a target game without spending half your afternoon constructing one launcher.
Best Uses
- Indoor STEM activities
- Birthday party game stations
- Fast classroom engineering challenges
- Simple family competitions
Method 3: Make a String-and-Cup Marshmallow Catapult
This third design is for people who like their projects with a little extra flair. It is still simple, but it adds a playful launcher style by combining a cup-shaped holder with tension from rubber bands or string. Think of it as the “I want something different” option.
What You Need
- 1 small paper cup
- 2 pencils, skewers, or sturdy sticks
- Rubber bands or string
- Tape
- Mini marshmallows
- Optional cardboard base
How to Build It
Make a stable frame using two pencils or sturdy sticks taped to a cardboard base or anchored against a small box. Attach a small paper cup between the supports so it can flex backward a little, or tape it to an arm that bends when pulled.
Use rubber bands or string to create the pull-back tension. The cup becomes the launching holder for the marshmallow. Load a mini marshmallow into the cup, pull the cup back slightly, and release.
This design works best when the frame is balanced and the tension is even. If one side pulls harder than the other, your marshmallow may launch sideways like it suddenly got stage fright.
Why It Is Worth Trying
This version gives you more room to experiment with structure. You can test wider frames, stronger bands, lighter cups, or different base shapes. It also makes the project feel a little more like engineering design and a little less like “I taped a spoon to a stick and called it innovation.” Both are valid, but variety is fun.
How to Test Your Marshmallow Catapult
Once your catapult is built, the real fun starts. Testing is where this project becomes more than a craft. Set up simple challenges and compare results across designs.
Distance Challenge
Measure how far each marshmallow travels. Use a ruler, measuring tape, or floor tiles if you are improvising. Record the best and average distances for each design.
Accuracy Challenge
Set out cups or bowls as targets. Start close, then move them farther away. Give each launcher five tries and count the hits. This is where people suddenly become very serious about “adjusting trajectory.”
Consistency Challenge
Launch from the same spot with the same amount of pullback each time. Which catapult produces the most repeatable results? A launcher that goes far is fun. A launcher that goes where you want is even better.
Common Problems and Easy Fixes
The Marshmallow Barely Moves
Your tension may be too weak. Tighten the rubber bands, shorten the lever, or reduce the weight of the launching cup.
The Catapult Falls Apart
Reinforce joints with extra rubber bands or tape. A shaky frame wastes energy and makes launches unpredictable.
The Marshmallow Flies Straight Up
Your launch angle may be too steep. Lower the arm angle or reposition the support stack so the marshmallow travels forward instead of trying to achieve orbit.
The Spoon Twists Sideways
Secure the spoon handle more tightly and make sure it is centered. Off-center launch arms tend to send marshmallows off on their own mysterious journey.
Fun Ways to Turn It Into a Full Activity
Want to stretch this project beyond one quick build? Try turning it into a mini event.
- Build-off: Everyone makes a different design and competes for best distance, accuracy, or style.
- Target tower: Stack paper cups and try to knock them down with the fewest shots.
- Design upgrade challenge: Start with a basic catapult, then allow one modification at a time.
- STEM journal: Write down each change and what effect it had.
- Theme day: Decorate your catapult like a castle, spaceship, or snack-powered race car.
Which Marshmallow Catapult Design Is Best?
If you want the easiest and most dependable option, go with the classic craft stick catapult. It is the best all-around choice for most people. If you want a fast, low-prep activity, the paper cup catapult is hard to beat. If you like experimenting and building something a little different, the string-and-cup catapult gives you more room to tinker.
The best part is that you do not have to choose only one. Making all three gives you a better sense of how design affects performance. It also gives you more excuses to launch marshmallows in the name of learning, which is a sentence that deserves to exist.
Conclusion
Learning how to make a marshmallow catapult is one of those projects that feels delightfully low-stakes and surprisingly rewarding. With a few common materials, you can create a fun launcher, explore basic physics, and invent games that turn your table into a tiny engineering arena. Whether you choose a craft stick catapult, a paper cup launcher, or a string-and-cup design, the project is affordable, approachable, and easy to customize.
The real magic is not just in the launch. It is in the testing, adjusting, laughing, rebuilding, and trying again. A marshmallow catapult is the perfect blend of creativity and problem-solving. One minute you are wrapping rubber bands around craft sticks. The next minute you are debating launch angle like you are preparing for a scientific conference hosted in a snack aisle.
So gather your supplies, clear a little space, and start building. Your marshmallows may be small, but your catapult dreams do not have to be.
Experiences and Ideas From Making a Marshmallow Catapult
One of the funniest things about making a marshmallow catapult is how quickly it changes the mood of a room. At first, everyone acts calm and reasonable. People sort supplies, ask where the tape is, and say practical things like, “Let’s build this carefully.” Then the first marshmallow launches across the table and suddenly the whole project becomes a championship event. Someone starts measuring distance. Someone else insists their launcher has “better engineering.” Another person begins decorating their catapult like it is about to enter a design competition on television. It escalates in the best possible way.
The first time many people build the classic craft stick catapult, they usually underestimate the importance of tight rubber bands. The launcher may look correct, but if the bands are loose, the marshmallow sort of flops forward with all the power of a sleepy snowflake. Once you tighten the structure, everything changes. The spoon snaps back better, the marshmallow travels farther, and suddenly you feel like a genius for discovering what every basic physics lesson has been trying to say all along: tension matters.
Another common experience is realizing that “simple” projects are often the most fun because they invite experimentation. You can build one catapult in a few minutes, but then curiosity takes over. What happens if you move the middle stack of craft sticks forward? What if you use a bigger spoon? What if you change the launch angle? What if you set up three paper cups and turn the whole thing into a target game? Before long, the project is no longer just about making a catapult. It becomes a challenge, a game, and a little design lab all in one.
Families often enjoy this project because it works for mixed ages. Younger kids can help sort materials, stack sticks, and load marshmallows. Older kids can handle design changes and testing. Adults can supervise, participate, and pretend they are not deeply invested in winning the distance contest. The project also creates a nice balance between structure and creativity. There is a clear goal, but there is no single perfect final result. That means people can solve the same problem in slightly different ways and still feel successful.
Teachers and group leaders also like marshmallow catapults because they turn abstract ideas into visible results. It is one thing to talk about force, motion, leverage, and stored energy. It is another thing entirely to watch a marshmallow launch two feet farther after a small design adjustment. That immediate feedback keeps people engaged. It also encourages critical thinking without making it feel like a formal lesson. The question changes from “What is potential energy?” to “Why did this one go farther?” That is often a much more exciting place to begin.
Some of the best moments happen during the failures. A spoon twists sideways. A cup collapses. A marshmallow pops straight up and lands almost exactly where it started, which is not ideal for distance but excellent for comedy. Those small mishaps are part of the experience. They give builders a reason to revise the design, laugh a little, and try again. In fact, that trial-and-error process is part of what makes the activity so valuable. It rewards patience, observation, and small improvements.
In the end, making a marshmallow catapult is memorable because it combines building, testing, science, and play in one low-cost project. It does not require special tools or fancy materials. It does not need a huge setup. Yet it still manages to feel creative and exciting. Whether you are making one catapult for a quick afternoon activity or building several for a full competition, the experience tends to leave people with the same thought: “That was way more fun than it had any right to be.” And honestly, that is the sweet spot for any great DIY idea.