

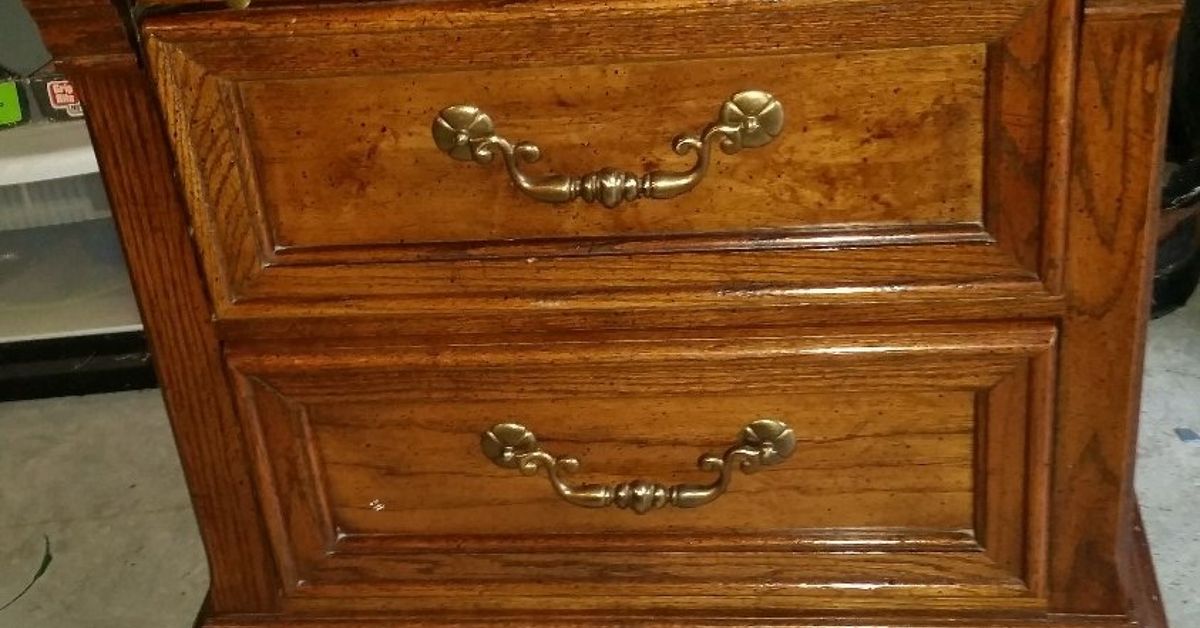
Some furniture pieces whisper, “I am timeless.” An 80’s nightstand usually shouts, “I came with a waterbed, a brass lamp, and a cassette of power ballads.” But here is the beautiful truth: those chunky, glossy, slightly dramatic bedroom side tables are makeover gold. With the right prep, paint, hardware, and styling, an outdated nightstand from the 1980s can become a custom-looking accent piece that feels modern, expensive, and completely intentional.
An 80’s nightstand makeover is one of the most satisfying DIY furniture projects because the piece is small enough to finish in a weekend but big enough to change the mood of a room. Whether you found a laminate nightstand at a thrift store, inherited a wood veneer bedside table, or pulled a dusty relic from the garage, this guide walks you through how to transform it without turning your home into a sawdust snow globe.
Why 80’s Nightstands Are Perfect for Makeovers
Furniture from the 1980s often has a few recognizable features: glossy finishes, rounded edges, brass-toned hardware, laminate tops, thick bases, and sometimes a whole lot of decorative trim. At first glance, that can feel dated. Look again, though, and you may notice sturdy drawers, solid proportions, and interesting shapes that newer flat-pack furniture often lacks.
That is why a vintage nightstand makeover works so well. You are not starting from scratch; you are editing. Think of it as giving your furniture a haircut, a better outfit, and maybe telling it to stop wearing shoulder pads to brunch.
Common 80’s Nightstand Materials
Before grabbing a paintbrush, identify what you are working with. Many 80’s nightstands are made from solid wood, wood veneer, MDF, particleboard, or laminate. Each material can be painted, but each needs slightly different preparation. Solid wood is usually the most forgiving. Veneer requires gentle sanding because the top layer is thin. Laminate needs a bonding primer so paint has something to grip. Particleboard and MDF need careful sealing, especially on raw or swollen edges.
Step 1: Inspect the Nightstand Before You Begin
A good furniture flip starts with a boring but important inspection. Open the drawers. Wiggle the legs. Check the back panel. Look for peeling veneer, swollen particleboard, missing screws, cracked drawer tracks, water rings, and mystery sticky spots. If the drawer smells like an old perfume bottle had a dramatic breakup in there, do not panic. Odors can often be reduced with cleaning, fresh air, baking soda, or a shellac-based primer.
If the nightstand has an existing painted finish and you suspect it may be very old, treat it carefully. Furniture from the 1980s is less likely to contain lead paint than much older pieces, but secondhand furniture can have unknown layers. Avoid aggressively sanding suspicious old paint. When in doubt, use a lead test kit or consult a professional before disturbing the finish.
Step 2: Choose a Makeover Style
The best DIY nightstand makeover begins with a clear design direction. Otherwise, you may end up with a piece that has farmhouse distressing, modern gold pulls, coastal blue paint, and boho cane webbing all fighting for custody of the bedroom.
Modern Minimalist
Paint the nightstand in matte black, warm white, greige, mushroom, or deep charcoal. Replace ornate hardware with simple bar pulls or round knobs. Keep the lines clean and let the shape of the piece do the work.
Vintage Cottage
Use a soft color such as sage green, dusty blue, cream, or muted blush. Add ceramic knobs, lightly distressed edges, and a satin or waxed finish. This style works especially well if the nightstand has curved legs or decorative drawer fronts.
Bold Postmodern
Instead of hiding the 80’s personality, celebrate it. Choose lacquer-inspired colors like cobalt, emerald, terracotta, or high-gloss black. Add chunky hardware or geometric drawer details. This approach says, “Yes, I know where I came from, and I brought confidence.”
Natural Wood and Paint Combo
If the drawer fronts are real wood veneer and still in good condition, consider stripping or sanding them lightly and staining them, while painting the frame. A two-tone nightstand makeover can look custom and high-end, especially with brass or matte black hardware.
Step 3: Gather Your Supplies
You do not need a professional workshop to refinish a nightstand, but good tools make the process smoother. For most projects, gather a screwdriver, drop cloth, painter’s tape, degreasing cleaner, microfiber cloths, wood filler, putty knife, sanding block or orbital sander, 120-grit and 220-grit sandpaper, tack cloth, bonding primer, furniture paint, small foam roller, angled brush, topcoat, and replacement hardware.
If you are painting laminate furniture, do not skip the bonding primer. Regular wall paint directly on slick laminate is like asking a cat to enjoy bath time. Technically possible for two seconds, then chaos.
Step 4: Remove Hardware and Clean Everything
Remove knobs, pulls, hinges, and drawers. Put screws in a small bag so they do not vanish into the same dimension as missing socks. Then clean the entire nightstand thoroughly. Use a mild degreaser or a mixture of warm water and gentle dish soap. Pay special attention to drawer edges, tops, and handles, because furniture collects hand oils, dust, polish, and old wax.
Paint adheres best to a clean surface. If you paint over grime, you are not refinishing furniture; you are laminating dirt.
Step 5: Repair Damage
Fill dents, chips, and old hardware holes with wood filler. Let it dry completely, then sand smooth. If veneer is lifting, use wood glue and clamps to secure it before painting. If the bottom edge has swelling from water damage, sand it carefully and seal it with primer. Badly swollen particleboard may need trimming, patching, or creative disguise with trim molding.
This is also the time to decide whether you want to change the hardware placement. For example, an 80’s nightstand may have two small knobs on each drawer. You can fill those holes and drill new ones for a single modern pull. Small change, big personality upgrade.
Step 6: Sand for Better Adhesion
Sanding does not always mean removing every bit of old finish. In many painted furniture projects, the goal is to scuff the surface so primer can grip. Use 120-grit sandpaper for glossy finishes, then smooth with 220-grit. Sand in the direction of the grain when working with wood or veneer. For laminate, lightly rough up the surface without digging into the material.
After sanding, remove all dust with a vacuum, tack cloth, or slightly damp microfiber cloth. This step matters. Dust trapped under paint creates texture that looks less “artisan handmade” and more “I painted this during a windstorm.”
Step 7: Prime the Nightstand
Primer is your insurance policy. It helps paint stick, blocks stains, evens out color, and prevents tannins or old finishes from bleeding through. For laminate or slick glossy furniture, use a high-adhesion bonding primer. For wood with stains or odors, a stain-blocking primer may be the better choice.
Apply primer in thin, even coats. Use an angled brush for corners and a foam roller for flat surfaces. Let it dry according to the product instructions. Lightly sand the primed surface with 220-grit sandpaper, then wipe away dust. If the original finish still shows through or the surface looks patchy, apply a second coat.
Step 8: Paint Like You Mean It
For a durable painted nightstand, choose paint made for furniture, cabinets, trim, or high-touch surfaces. Chalk-style paint is popular for vintage makeovers because it offers a soft matte look and requires less prep in some cases, but it usually needs a protective wax or topcoat. Acrylic enamel, cabinet paint, or waterborne alkyd paint can provide a harder finish for everyday use.
Apply two thin coats rather than one thick coat. Thick paint may drip, stay tacky, or show brush marks. Let each coat dry fully. On flat surfaces, a small foam roller can create a smoother finish. Use a brush for edges, corners, and details. If you want a very polished look, lightly sand between coats with fine-grit sandpaper.
Best Paint Colors for an 80’s Nightstand Makeover
Classic choices include warm white, soft black, navy, forest green, taupe, and charcoal. Trend-friendly colors include olive, clay, mushroom, muted blue, and creamy beige. For a playful makeover, try coral, mustard, emerald, or powder blue. The smaller size of a nightstand makes it a safe place to experiment with color. A neon orange dresser may be a commitment; a bold nightstand is just flirting.
Step 9: Protect the Finish
Nightstands work hard. They hold books, water glasses, phone chargers, lamps, midnight snacks, and occasionally a half-asleep elbow. A protective topcoat helps your makeover survive real life.
Use a water-based polyurethane, polycrylic, furniture wax, or clear furniture sealer depending on your paint type and desired finish. Satin is a popular choice because it offers durability without too much shine. Matte finishes look modern but may show smudges more easily. Glossy finishes can feel dramatic and retro, but they reveal imperfections faster than your honest friend at a dressing room mirror.
Let the final finish cure before heavy use. Dry paint is not the same as cured paint. A piece may feel dry after a few hours but still need days or weeks to fully harden. During that time, avoid placing heavy objects, lamps with rubber feet, or wet glasses directly on the surface.
Step 10: Upgrade the Hardware
Hardware can completely change the look of an old nightstand. Brass knobs add warmth. Matte black pulls feel modern. Acrylic handles bring a glam touch. Ceramic knobs lean cottage. Leather pulls feel relaxed and handcrafted. If your nightstand has awkward old hardware spacing, backplates can cover previous holes while adding style.
Measure carefully before buying new pulls. The center-to-center measurement is the distance between screw holes. If you do not want to drill new holes, choose hardware with the same measurement. If you do drill, use painter’s tape and a template to keep everything straight. Crooked hardware is small, but once you see it, it will wink at you forever.
Creative Ideas to Make the Makeover Stand Out
Add Cane Webbing or Reeded Trim
Flat drawer fronts can be upgraded with cane webbing, pole wrap, half-round molding, or reeded trim. These details add texture and make a basic 80’s nightstand look designer-inspired.
Use Wallpaper or Fabric on Drawer Fronts
Peel-and-stick wallpaper, grasscloth, or fabric can create a custom finish. Seal it well so edges do not peel. This works beautifully for a guest room, child’s room, or colorful bedroom corner.
Raise It with New Legs
Many 1980s nightstands sit low and heavy. Adding tapered legs or modern feet can instantly lighten the silhouette. Make sure the base can support the new legs securely.
Paint the Inside of the Drawer
A surprise color inside the drawer is a small detail that feels luxurious. Try blush inside a black nightstand, sage inside cream, or navy inside natural wood. Nobody needs a glamorous drawer interior, but nobody needs tiny decorative pumpkins either, and yet here we are.
Common Mistakes to Avoid
The biggest mistake is skipping prep. Cleaning, sanding, and priming may not be glamorous, but they are the difference between a lasting furniture makeover and a flaky regret sculpture. Another mistake is rushing dry time. If the paint label says wait four hours, wait four hours. Paint has boundaries, and we should respect them.
Avoid using wall paint without protection on a high-touch furniture piece. Wall paint is designed for walls, not drawer fronts that get pulled open every morning by someone searching for lip balm. Also avoid over-distressing unless it fits the style. A little worn edge can look charming; too much can look like the nightstand survived a raccoon uprising.
Budget Breakdown for an 80’s Nightstand Makeover
A thrifted nightstand can cost anywhere from $10 to $75 depending on quality and location. Paint samples or small quarts often cost less than buying a full gallon. Primer, sandpaper, wood filler, and a topcoat may add to the budget, but many supplies can be reused for future projects. Hardware can be the splurge or the bargain, with options ranging from a few dollars per knob to designer pulls that cost more than the nightstand itself.
In many cases, a complete makeover can be done for $40 to $150. Compared with buying a new solid wood nightstand, that is a strong value. Plus, you get a one-of-a-kind piece and the right to say, “Oh, I made that,” with exactly the amount of casual pride your guests deserve.
of Real-World Experience: What an 80’s Nightstand Makeover Teaches You
The first lesson from working on an 80’s nightstand is that furniture has a way of humbling your confidence. You may begin the project thinking, “I will simply paint this beige box and become a design legend by dinner.” Then you remove the drawer and discover three mystery staples, one stripped screw, a sticky ring from 1994, and hardware holes that are not centered. This is normal. DIY furniture flipping is part creativity, part problem-solving, and part politely negotiating with objects that have lived a full life before you met them.
One of the most useful experiences is learning how much prep affects the final result. On a small nightstand, it is tempting to rush. After all, it is not a giant dresser or a full kitchen cabinet project. But the small size actually makes flaws easier to notice. A rough patch on the top catches the light. A drip on the drawer front becomes the only thing your eyes can see. Taking extra time to clean, sand, prime, and lightly sand again makes the final paint coat smoother and more durable.
Another practical lesson is that hardware changes everything. Many 80’s nightstands have handles that instantly date them. Sometimes they are shiny brass, sometimes faux-antique, sometimes shaped like they belong on a pirate’s desk. Replacing them with clean modern pulls can make the same painted piece look completely different. If the original hardware is solid and interesting, spray painting it can also work. Gold, matte black, oil-rubbed bronze, or brushed nickel can give old pulls a second life.
Color choice is where personality enters the room. A safe neutral can make the nightstand blend beautifully with existing decor, while a bold color can turn it into a statement. In a small bedroom, a deep green or navy nightstand can feel rich without overwhelming the space. In a bright guest room, a soft blue or creamy white can make the piece feel fresh and welcoming. The trick is to test the color near the bed, flooring, and lighting before committing. Paint can look calm in the store and suddenly become “electric toothpaste” under a bedroom lamp.
The biggest emotional reward is seeing the piece shift from outdated to intentional. A nightstand that once looked like leftover furniture can become the thing that ties a room together. Add a small lamp, a stack of books, a tray, and maybe a plant that you promise not to overwater this time, and the makeover feels complete. More importantly, the project teaches confidence. Once you have transformed one 80’s nightstand, every thrift store starts looking like a treasure hunt. You stop seeing ugly furniture and start seeing potential. That is the real magic of furniture makeovers: they train your eye to imagine what something could become with patience, paint, and a little stubborn optimism.
Conclusion
An 80’s nightstand makeover is more than a quick paint project. It is a smart, budget-friendly way to rescue a sturdy piece of furniture and turn it into something stylish, functional, and personal. With careful cleaning, light sanding, the right primer, durable paint, fresh hardware, and a protective finish, an outdated bedside table can look like it came from a boutique furniture shop instead of the corner of a basement.
The key is to respect the process. Prep well, paint patiently, and choose details that match your room rather than every trend on the internet at once. Whether your finished nightstand is modern, cottage-inspired, bold, moody, or quietly classic, the best makeover is the one that makes you smile every time you reach for your phone charger.
Note: This article is written for web publication in standard American English and synthesizes practical furniture-painting, refinishing, safety, and design guidance from reputable U.S. home improvement, decor, and environmental safety resources.