

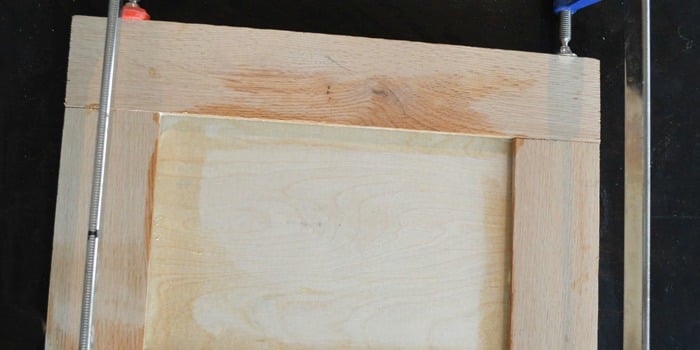
A well-made Shaker cabinet door has a funny way of making an entire kitchen look more expensive. Its design is almost aggressively simple: four straight frame pieces surrounding one recessed center panel. No carved vines, no swooping arches, and no decorative details that require a degree in medieval furniture restoration.
That simplicity is exactly why mistakes stand out. A rail that sits slightly proud, a panel that rattles, or a door that hangs out of square can turn “timeless craftsmanship” into “weekend project that fought back.” Fortunately, learning how to make a Shaker cabinet door is completely manageable when you measure carefully, mill straight stock, test your joinery, and resist the urge to glue everything that holds still.
This guide explains the traditional five-piece construction method using solid-wood rails and stiles, a recessed panel, and rail-and-stile joinery. It also covers measuring, material selection, finishing, hinge installation, common mistakes, and practical lessons that can save both lumber and colorful language.
What Is a Shaker Cabinet Door?
A traditional Shaker cabinet door is a frame-and-panel door made from five parts:
- Two vertical stiles
- One top rail
- One bottom rail
- One recessed center panel
The rails connect the two stiles, while grooves along the inside edges capture the panel. In a properly constructed solid-wood door, the center panel is usually allowed to float rather than being glued along all four edges. This lets the panel expand and contract as humidity changes without forcing the frame apart. Plywood and veneered MDF panels move much less than solid lumber, but they still should not be wedged tightly into the grooves.
Most DIY Shaker doors are approximately 3/4 inch thick, with rails and stiles between 2 and 2 1/2 inches wide. Those measurements are not laws passed by the Department of Cabinet Doors. They are simply balanced proportions that look good on many kitchen, bathroom, and furniture projects.
Tools and Materials
Recommended Tools
- Table saw or track saw
- Miter saw or crosscut sled
- Router table
- Matched Shaker rail-and-stile router-bit set
- Push blocks and featherboards
- Tape measure and combination square
- Digital caliper, if available
- Parallel clamps or bar clamps
- Random-orbit sander
- Drill or drill press
- 35 mm concealed-hinge jig or Forstner bit
- Eye, hearing, and respiratory protection
Recommended Materials
- Straight 3/4-inch hardwood for the frame
- 1/4-inch cabinet-grade plywood or MDF for the center panel
- Wood glue
- Sandpaper in 120-, 150-, 180-, and 220-grit
- Primer and cabinet-grade paint, or stain and clear finish
- Concealed hinges matched to the cabinet configuration
- Cabinet bumpers and knobs or pulls
Poplar and soft maple are popular choices for painted doors because they machine cleanly and provide a relatively smooth surface. Hard maple, cherry, white oak, red oak, and walnut are attractive options when the grain will remain visible. For a painted recessed panel, MDF offers a very smooth face. Cabinet-grade plywood is lighter and generally more resistant to accidental edge damage.
Choose the Door Type Before Measuring
Before cutting lumber, decide how the finished cabinet door will sit on the cabinet.
Full Overlay
A full-overlay door covers nearly the entire face frame or cabinet edge. This creates narrow, consistent gaps between neighboring doors and gives the cabinetry a clean, contemporary appearance.
Partial Overlay
A partial-overlay door covers only part of the face frame, leaving more of the cabinet structure visible. This style is common on older framed cabinets.
Inset
An inset door fits inside the cabinet opening and sits approximately flush with the face frame. It can look exceptionally refined, but it demands accurate sizing and carefully controlled reveals. A door that is 1/16 inch too large is not “extra custom.” It simply will not close.
Hinge selection depends on the cabinet type and door position. Concealed hinges are manufactured specifically for full-overlay, half-overlay, partial-overlay, inset, framed, and frameless applications, so purchase the hinges before drilling the door.
How to Calculate Shaker Cabinet Door Dimensions
Measure every cabinet opening individually. Even professionally installed cabinets can vary slightly, and older cabinets may have shifted enough to make one “universal” measurement an expensive fantasy.
For an overlay door, start with the opening dimensions and add the desired overlay. For example, if the cabinet opening is 15 inches wide and the hinge provides a 1/2-inch overlay on each side, the finished door width will be 16 inches.
For an inset door, subtract the desired reveal from both sides. A 15-inch opening with a 1/16-inch gap on each side would require a finished door width of 14 7/8 inches.
Example Cut List
Assume the finished door will measure 16 inches wide by 28 inches high. The frame members are 2 1/4 inches wide, the joinery uses 3/8-inch tongues, and the panel enters a 3/8-inch-deep groove.
- Stiles: two pieces at 28 inches long
- Rail length: 16 − 4 1/2 + 3/4 = 12 1/4 inches
- Rails: two pieces at 12 1/4 inches long
- Panel width: approximately 12 1/8 inches
- Panel height: approximately 24 1/8 inches
The panel dimensions include the portions hidden inside the grooves, minus a small amount of clearance. Exact calculations depend on the cutting profile of the router-bit set. Make test joints and measure the actual groove depth and tongue length instead of assuming every bit set follows the same geometry.
How To Make a Shaker Cabinet Door Step by Step
1. Select and Acclimate the Lumber
Choose dry, straight boards with minimal twist, cup, bow, or dramatic grain runout. Allow the material to acclimate in the workshop before final milling, especially when it has recently arrived from a warehouse, garage, or lumberyard.
Whenever possible, cut all frame parts from boards with similar color and grain. This matters most on stained doors, where mismatched pieces can make the frame look like it was assembled from five separate trees that were never properly introduced.
2. Mill the Rails and Stiles
Joint one face and one edge, plane the stock to a consistent thickness, and rip the pieces to their final width. If you do not own a jointer and planer, purchase surfaced lumber and inspect it carefully with a straightedge.
All rails and stiles must have the same thickness. Variations that seem tiny during milling become highly visible when the joints are assembled. Cut both stiles together and use a stop block to make the two rails exactly the same length.
3. Label Every Part
Arrange the pieces in their final positions and mark them with a cabinetmaker’s triangle. Label the front face and inside edge of each component. These marks prevent pieces from being routed backward or flipped halfway through machining.
This step takes about 30 seconds. Correcting a backward profile takes approximately one new piece of lumber.
4. Make Test Cuts
Prepare several scraps with the same thickness as the finished frame stock. Set up the rail-and-stile bits according to the manufacturer’s directions and test the fit before machining the actual door parts.
A matched router-bit set creates three important features: the coped profile on the rail ends, the matching profile along the inside edges, and the groove that captures the center panel. The goal is a joint that comes together by hand and sits flush on both faces. It should not require pounding, prayer, or a clamp used as a hydraulic press.
5. Cope the Rail Ends First
Cut the end profile on both ends of the top and bottom rails. A coping sled, miter gauge with a backer board, or another secure work-holding system keeps the rail square to the router-table fence and reduces tear-out.
Keep the workpiece firmly supported and feed it in the correct direction. Use push blocks, guards, featherboards, and dust collection whenever possible. Never make freehand cuts against a router bit unless the operation and equipment are specifically designed for it.
6. Cut the Sticking Profile and Panel Grooves
Install the matching sticking bit and use one of the coped test rails to adjust the cutter height. Rout the inside edges of both rails and both stiles, keeping the same reference face against the table.
Use steady pressure and a consistent feed rate. If the profile requires removing a large amount of material, make multiple passes rather than forcing the full depth in one heroic trip.
7. Cut the Center Panel
Cut the panel square and test its fit in the grooves. It should slide into place without excessive force. A plywood or MDF panel can fit fairly closely, provided it does not bind during assembly. A solid-wood panel needs additional room across the grain for seasonal movement.
For a classic flat-panel Shaker door, 1/4-inch plywood is an easy choice. If the groove is wider than the panel, use space balls or small flexible panel spacers to reduce rattling while preserving movement.
8. Sand Before Assembly
Sand the center panel and the inside edges of the frame before glue-up. These areas become awkward to reach once the door is assembled. For painted work, sanding the parts through 180-grit is usually sufficient before primer. For clear finishes, follow the finish manufacturer’s preparation schedule.
When using a solid-wood panel, applying the first stages of finish before assembly can prevent unfinished lines from appearing if the panel contracts during dry weather.
9. Dry-Fit the Door
Assemble the entire door without glue. Confirm that the joints close fully, the panel is not trapped, and both faces are flush. Measure diagonally from corner to corner. Equal diagonal measurements indicate that the frame is square.
Do not assume clamps will fix poorly fitting joinery. Clamps are excellent at holding a correct assembly together. They are also excellent at preserving an incorrect assembly in a more permanent form.
10. Glue and Clamp the Frame
Apply a thin, even coat of wood glue to the rail-and-stile joints. Avoid coating the long edges of a solid-wood panel. Slide the panel into the grooves, add the final stile, and bring the assembly together.
Use two clamps positioned across the rails. Tighten them gradually and alternate between clamps so pressure remains balanced. Too much clamping force can bow the door or squeeze out nearly all the adhesive.
Check the diagonal measurements again and confirm that the frame rests flat on the work surface. Remove wet squeeze-out with a damp cloth or allow it to become rubbery before lifting it away with a scraper. Follow the adhesive manufacturer’s clamping and curing instructions.
11. Sand the Completed Door
After the glue cures, inspect the joints and scrape away any remaining adhesive. Sand the faces flat, beginning with the least aggressive grit needed to remove machining marks. Work through progressively finer grits and lightly break the sharp outside edges.
Avoid aggressively sanding across the rail-and-stile joints. Excessive sanding can create dips, round the crisp Shaker profile, and make the joint line more visible after finishing.
12. Apply Paint or Clear Finish
Remove all dust before finishing. For painted cabinet doors, apply a compatible primer followed by a durable cabinet, trim, or millwork coating. Wall paint may look acceptable at first, but cabinet doors endure fingerprints, grease, repeated cleaning, and daily impact.
Apply thin coats and sand lightly between coats when the product instructions recommend it. Finishing both sides helps create a consistent appearance and reduces uneven moisture exchange. Proper cleaning, sanding, priming, and testing are especially important when refinishing an existing door or matching new doors to old cabinets.
13. Drill for Concealed Hinges
Most modern concealed cabinet hinges use a 35 mm cup hole, but the cup depth, setback, screw pattern, and mounting-plate position vary. Follow the hinge manufacturer’s template rather than copying measurements from an unrelated hinge.
A hinge jig simplifies drilling and helps keep the cup hole square to the door. Many standard systems use a cup depth near 1/2 inch, but confirm the exact requirement before drilling. A test hole in scrap is significantly cheaper than a decorative ventilation opening in a finished door.
14. Install and Adjust the Door
Attach the hinges, mount the door, and use the adjustment screws to control side-to-side position, depth, and height. Set consistent gaps between doors and drawer fronts. A simple spacer or setup jig can make installation much faster when hanging several doors.
After alignment, install knobs or pulls with a hardware jig. Add clear or felt bumpers to soften closing and prevent the finished frame from striking the cabinet.
Common Shaker Cabinet Door Mistakes
Using Twisted Frame Stock
A flat door begins with flat material. Clamps cannot permanently persuade badly twisted lumber to become responsible.
Forgetting the Joinery Allowance
Rails are longer than the visible opening because their tongues enter the stiles. Calculate the actual rail length from the finished door width and the measured router profile.
Routing Parts in Different Orientations
Mark one reference face and keep it against the router table during every pass. Flipping one piece can create joints that are offset or impossible to assemble.
Making the Panel Too Tight
A tight panel can prevent the joints from closing and may contribute to cracking or distortion later. The panel should be captured, not imprisoned.
Skipping the Dry Fit
Dry fitting reveals incorrect lengths, reversed profiles, binding panels, and out-of-square assemblies while corrections are still possible.
Applying Too Much Glue
Extra glue does not automatically create extra strength. It does create additional cleanup and can interfere with stain penetration.
Finishing Before Testing the Hinges
Confirm hinge placement on scrap and verify the overlay before drilling a completely finished door.
Experience Notes From Real-World Shaker Door Projects
The most useful lesson from repeated cabinet-door builds is that accuracy comes from repeatable setups, not from measuring every piece independently. Once a stop block is correctly positioned, every matching rail or stile should be cut without moving it. Measuring and marking each component separately introduces tiny differences, and tiny differences have a remarkable talent for becoming large, visible gaps during assembly.
Another common experience is discovering that router setup usually takes longer than the actual routing. That is normal. Ten careful minutes spent adjusting cutter height and testing scrap can save an hour of remaking parts. Test stock should match the final lumber in both thickness and species whenever possible. A bit can behave beautifully in poplar and then produce tear-out when introduced to highly figured oak.
Making one prototype door before cutting an entire kitchen is equally valuable. The prototype confirms the overlay, rail width, panel reveal, hinge position, hardware scale, and overall appearance. A 2 1/4-inch frame may look perfectly balanced on a tall pantry door but visually heavy on a small drawer front. Seeing a full-size sample is far more informative than staring at measurements on a notepad.
Glue-up is where calm preparation pays off. Arrange the clamps, glue, square, damp cloth, panel spacers, and cauls before opening the adhesive bottle. Once glue reaches the joints, the project develops a schedule of its own. A clean assembly surface and clamps adjusted close to the final opening reduce frantic turning of handles while the glue begins to tack.
Builders also learn that clamp pressure should be firm rather than theatrical. Crushing the assembly together can bow the rails, distort the frame, or force the panel against one side of its groove. Bring the joints closed, check for square, and stop tightening. The clamp does not receive a trophy for maximum effort.
Painted Shaker doors tend to expose preparation problems rather than hide them. Glue residue, torn grain, scratches, and unevenly sanded joints can become more obvious under smooth paint. Inspect the primed surface under angled light. Primer often reveals defects that bare wood politely concealed. Filling and sanding those flaws before the finish coats produces a much more professional result.
Finally, expect the installation stage to require patience. Even accurately built doors may need several rounds of hinge adjustment because cabinet boxes and face frames are not always perfectly square. Set the first door carefully, use it as the reference for neighboring doors, and work across the cabinet run. Consistent reveals matter more visually than whether every door is positioned according to an isolated measurement.
After the first successful door, the process becomes much faster. By the third or fourth, the labels, test cuts, dry fits, and setup blocks begin to feel less like extra work and more like what they truly are: the reasons the finished doors fit.
Conclusion
Learning how to make a Shaker cabinet door is largely an exercise in disciplined simplicity. Start with flat material, calculate the rail and panel dimensions carefully, machine every part from the same reference face, and test the joinery on scrap. Allow the recessed panel to fit comfortably, glue only the frame joints when wood movement must be accommodated, and check the assembly for square before the adhesive cures.
The result is a durable five-piece cabinet door that can suit traditional, farmhouse, transitional, or modern interiors. More importantly, it is a repeatable woodworking project. Once the first door fits correctly, the same setup can produce matching doors for a vanity, built-in cabinet, kitchen island, pantry, or full cabinet-refacing project.