

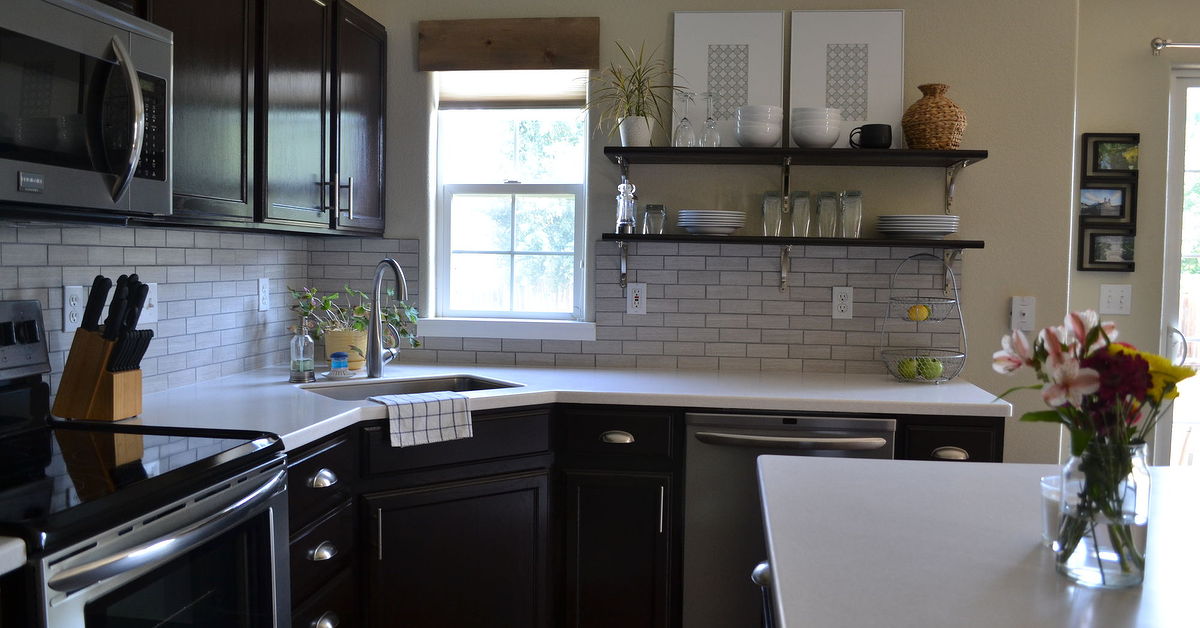
A window can be perfectly clean, beautifully trimmed, and still look a little unfinished. Often, the culprit is not the window itself. It is the cdware doing their best impression of exposed plumbing.
A DIY simple wooden valance solves that problem without requiring a custom workroom, advanced woodworking skills, or a suspiciously large collection of clamps. This small three-sided wood box sits above a window, hides the hardware, and gives the room a more intentional, built-in look. Think of it as a tiny roof for your curtainsminus the shingles, gutters, and neighborhood zoning dispute.
Whether you are updating a kitchen window, softening a bedroom shade, or making inexpensive blinds look less like they came free with a lease agreement, a wooden window valance can create a polished finish. Best of all, it is highly customizable. Paint it white for a classic trim look, stain it for warmth, add decorative molding for a traditional style, or keep it clean and flat for a modern farmhouse or minimalist room.
What Is a Wooden Valance?
A wooden valance is a decorative structure mounted above a window. It usually has a wide front board and two short side pieces called returns. Together, these pieces form a shallow box that covers curtain rods, blind headrails, roller shade mechanisms, or top brackets.
You may also hear this project called a DIY window cornice. While people often use “valance” and “cornice” interchangeably, a fabric valance is usually soft and gathered, while a wooden cornice or wood valance is rigid and box-shaped. For a beginner project, the terminology matters less than the result: you want a neat wooden frame that hides the hardware without blocking the window’s operation.
A simple wooden valance works especially well in rooms where a full curtain treatment feels too heavy. Kitchens, bathrooms, laundry rooms, offices, breakfast nooks, and small bedrooms are excellent candidates. It can also make basic blinds look more expensive without asking your wallet to enter a support group.
Why Build a DIY Simple Wooden Valance?
The biggest advantage is visual cleanup. Curtain brackets, blind mechanisms, and uneven hardware can interrupt an otherwise attractive room. A wood valance creates a horizontal line above the window, making the treatment feel more cohesive.
It also gives you design flexibility. A basic window can suddenly look more tailored when the valance matches your baseboards, cabinet color, wall paint, or nearby furniture. In a farmhouse kitchen, a stained pine valance can add warmth. In a bright bathroom, a crisp white painted valance can blend with existing trim. In a modern room, a smooth plywood face with a matte finish can look sleek and intentional.
Another reason to build one is cost control. Custom window cornices can be expensive, especially when upholstery, specialty fabrics, or professional installation are involved. A simple version made from common boards, plywood, or primed trim can often be completed with basic tools and a modest materials budget.
Plan Before You Cut: The Measurements That Matter
Before buying lumber, measure your window treatment rather than only the glass. The wooden valance must cover the full width of the curtain rod, blind headrail, or mounting brackets. A valance that is too narrow may leave awkward hardware peeking out at the sides like it is trying to escape.
Measure the Width
Measure the complete width you want the front board to cover. For an outside-mounted blind or curtain rod, this is usually the distance from the far left edge of the hardware to the far right edge. Add a little extra width on each side if you want a more generous, architectural appearance.
For example, if your curtain rod and brackets span 54 inches, a front board around 58 to 62 inches wide may create better coverage. The exact amount depends on your room, trim width, and whether you want the valance to feel subtle or more dramatic.
Measure the Depth
The depth determines how far the valance projects from the wall. Measure from the wall to the front-most point of the curtain rod, blind headrail, or shade mechanism. Then add about 1 to 2 inches of breathing room so the treatment can operate without rubbing against the wood.
For most simple curtain rods and blinds, a total depth between 4 and 7 inches works well. Deep drapery rods, layered curtains, or bulky Roman shades may require more space. This is not the moment to guess. Measure twice, admire your tape measure, then measure once more because wood has a remarkable ability to become shorter after the wrong cut.
Choose the Height
A valance height of 8 to 12 inches is common for many standard windows. Smaller windows often look balanced with a shorter face board, while large living-room windows can carry a taller piece. Avoid making the valance so tall that it blocks too much daylight or makes the window look like it is wearing a heavy wooden hat.
Materials for a Simple Wooden Window Valance
You do not need exotic lumber or a workshop that resembles a television renovation show. For a straightforward DIY simple wooden valance, use materials that match your skill level and finish plan.
- One front board or plywood panel for the face of the valance
- Two side boards for the returns
- Wood screws, finish nails, or a brad nailer
- Wood glue
- Sandpaper in medium and fine grits
- Paint, stain, primer, or clear protective finish
- Wall-mounting screws and appropriate anchors
- Optional trim molding, decorative brackets, or edge banding
For painted projects, smooth plywood or primed pine boards are practical choices. For a stained finish, select wood with grain you actually enjoy seeing, such as pine, oak, poplar, or birch plywood. Remember that stain highlights grain, knots, and personality. Sometimes that personality is charming. Sometimes it looks like a potato chip shaped like a cloud. Inspect the boards before bringing them home.
Tools You May Need
A miter saw makes quick work of cuts, but it is not the only option. A circular saw with a straightedge guide, a jigsaw for small adjustments, or a home improvement store cutting service may also work. You will also need a tape measure, pencil, drill, drill bits, level, screwdriver or impact driver, and safety glasses.
Use a stud finder when possible, especially for wider or heavier wooden valances. Mounting directly into wall studs provides a stronger connection than relying only on drywall anchors. If studs are not available where you need them, choose anchors rated for the finished weight of your project and follow the manufacturer’s directions carefully.
How to Build a DIY Simple Wooden Valance
Step 1: Cut the Front Board
Cut the front board to your final width. This is the piece everyone will see first, so take your time. Check that the board is square and that the cut ends are clean. If you plan to add decorative trim later, account for the trim width before finalizing your dimensions.
Step 2: Cut the Side Returns
Cut two identical return pieces. Their length should equal the depth you measured from the wall to the front of the hardware, plus a small amount of clearance. These side pieces connect the front board to the wall and give the valance its box shape.
For example, if your curtain rod projects 4 inches from the wall, you may choose returns that are 5 or 6 inches deep. That extra room prevents the wood from crowding the rod, curtain rings, or blind mechanism.
Step 3: Assemble the Box
Lay the front board face down on a protected work surface. Position one return piece perpendicular to each end of the front board. Apply wood glue along the joint, then secure the pieces with screws, finish nails, or brad nails.
Check the corners with a square before fastening everything permanently. A slightly crooked valance may not seem dramatic on the workbench, but once it is above a window, it can become the room’s most confident diagonal line.
For extra strength, predrill screw holes to reduce the chance of splitting narrow boards. If you are using plywood, place screws carefully and avoid drilling too close to the edge.
Step 4: Add Optional Decorative Details
This is where a plain box can become a custom window treatment. Add a narrow trim board across the lower edge for a more substantial appearance. Apply small crown molding for a traditional look. Use a scalloped edge for cottage charm, or keep the face perfectly flat for a clean modern style.
You can also attach decorative corbels beneath the returns, especially in a kitchen or farmhouse-style room. Keep the decoration proportional. One tasteful trim detail can look custom. Seven layers of molding can make the valance look like it is preparing for a royal coronation.
Step 5: Sand, Prime, and Finish
Sand all visible surfaces and edges until they feel smooth. Start with medium-grit sandpaper to remove rough areas, then use fine-grit sandpaper before painting or staining. Wipe away dust with a clean cloth before applying finish.
For paint, use primer first if the wood is bare or knotty. Two thin coats of paint generally look better than one thick coat that dries with the texture of an orange peel. For stain, test the color on a scrap piece of the same wood. Different boards can absorb stain differently, so the sample is your chance to prevent surprise “rustic pumpkin” results.
Step 6: Mount the Wooden Valance
Hold the assembled valance above the window and check its placement with a level. Make sure it fully covers the curtain rod or blind hardware before marking mounting points. If possible, fasten through the side returns into wall studs.
Another mounting method is to install small wood cleats or L-brackets on the wall first, then secure the valance to those supports from inside the box. This can make installation easier because the screw heads stay less visible from the front.
After mounting, test the curtains, blinds, or shades. They should open, close, and move freely. If the fabric rubs against the wood, add a thin spacer behind the returns or adjust the valance outward slightly.
Design Ideas for Your DIY Wood Valance
A simple wooden valance does not need to be boring. The most successful design usually connects with something already in the room.
Classic Painted Trim
Paint the valance the same white as your window casing, crown molding, or baseboards. This makes the valance feel like part of the home’s original architecture, even if it was built on a Saturday with coffee, optimism, and one missing drill bit.
Warm Stained Wood
Use a natural stain in kitchens, cabins, dining rooms, or rooms with wood furniture. A walnut, oak, or medium brown finish can add contrast against white walls and light curtains.
Modern Flat Panel
Use smooth plywood with square edges and paint it in a wall-matching color. This approach hides the hardware without drawing too much attention to the valance itself. It is ideal for a clean, understated room.
Farmhouse or Cottage Style
Add a small decorative trim along the bottom edge, use a weathered finish, or pair the wood valance with café curtains, striped panels, or woven shades. Reclaimed wood can work beautifully, but make sure it is clean, stable, and free of loose splinters before bringing it indoors.
Common Mistakes to Avoid
The most common mistake is building the valance before measuring the hardware. A beautiful front board is not very helpful if it does not cover the curtain rod brackets. Measure the total projection from the wall and leave clearance for fabric movement.
Another mistake is mounting the valance too low. It should hide the hardware, not sit directly on top of it. Give curtains and blinds enough space to operate without scraping or catching.
Also avoid overcomplicating the first project. A basic rectangular wood valance can look fantastic. You do not need carved scrollwork, complicated angles, or a finish that requires twelve specialty products and the patience of a museum conservator.
Cleaning and Maintaining a Wooden Valance
Dust the valance occasionally with a microfiber cloth or soft brush attachment on a vacuum. For painted finishes, wipe gently with a slightly damp cloth and dry the surface afterward. Avoid soaking the wood, especially near kitchen windows, bathroom windows, or areas with frequent condensation.
Check mounting screws once or twice a year, especially if the valance is wide or paired with heavy curtains. A quick inspection can keep your DIY window cornice looking polished and firmly attached.
Real-World Experience: What DIYers Learn From Building a Simple Wooden Valance
The first lesson most people learn is that the project looks easier after it is finished. Before installation, a wooden valance can seem like an oddly specific box with no obvious purpose. Once it is mounted above a window, however, it suddenly makes the curtain rod, blind hardware, and upper wall area look more organized. That transformation is one of the reasons this project feels so rewarding. The room may not change dramatically in square footage, but it can feel calmer and more complete.
Another common experience is discovering how important depth is. Beginners often focus on width and height because those are visible from the front. Depth feels like a minor detail until the valance is installed and the curtains begin rubbing against the inside edge. Measuring from the wall to the furthest part of the hardware is not glamorous, but it saves a lot of frustration. A little extra clearance is usually better than a valance that fits like a too-small hat.
Many DIYers also find that paint is more forgiving than stain for a first wooden valance. Paint can hide minor patches, nail holes, uneven grain, and the occasional tiny woodworking crime. Stain, on the other hand, reveals nearly everything. A stained project can look wonderful, but it asks for more careful sanding and more consistent lumber. That does not mean beginners should avoid stain; it simply means testing it on scrap wood is one of the smartest five-minute decisions in the whole process.
Installation is where patience matters most. Holding a valance above a window while checking level, checking clearance, finding studs, and avoiding curtain brackets can feel like a short audition for a circus act. Having a second person nearby makes the job easier, particularly with long boards. If you are working alone, temporary support blocks, clamps, or a carefully positioned step ladder can help keep the valance steady while you mark screw locations.
One practical lesson is that simple designs often look more expensive than complicated ones. A straight, smooth front board painted to match existing trim can blend into a room beautifully. It looks deliberate rather than homemade, which is usually the goal. Decorative molding can be lovely, but only when it suits the rest of the home. A minimal valance in a modern room may look more elegant than a heavily ornamented version trying to impersonate a nineteenth-century library.
Finally, this project teaches a useful decorating principle: small architectural details create visual order. A wooden valance is not a major renovation, but it can make inexpensive blinds feel more custom, basic curtains feel more finished, and a plain window feel more connected to the room. It is a modest project with an outsized payoffone of those rare DIY jobs where the lumber is small, the impact is noticeable, and nobody has to tear out a wall.
Note: This is a non-structural indoor trim project. Check for wiring, plumbing, and window operation before drilling, use mounting hardware rated for the finished weight, and follow the instructions for your tools, anchors, paint, stain, and adhesives.