

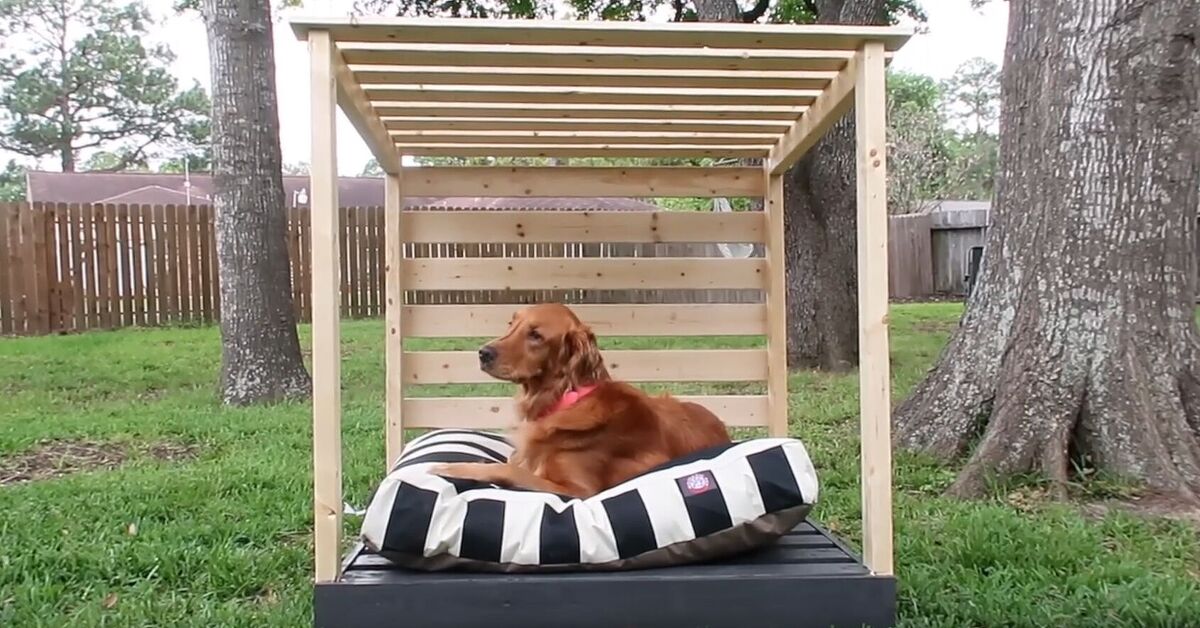
Your dog already believes the backyard belongs to them. The deed may have your name on it, but we all know who supervises the squirrels, inspects the fence, and decides when the patio needs additional barking. A DIY dog cabana simply makes that arrangement official.
This beginner-friendly project transforms a sturdy wood pallet into a raised outdoor dog bed with four posts and a slatted roof. The result is part shaded lounge, part backyard décor, and part tiny resort where payment is accepted exclusively in treats.
After the woodworking is finished, Wondercide Flea & Tick Spray for Pets + Home can be applied to the removable bedding according to the product label. The surrounding yard may be treated separately with an appropriately labeled Wondercide outdoor product. Product labels matter because Wondercide’s indoor and outdoor formulas are intended for different surfaces and uses.
Why Build a DIY Dog Cabana?
A dog cabana creates a defined resting area that keeps your pet off damp soil, rough concrete, and sun-heated decking. Its raised base supports a washable cushion, while the overhead slats provide partial shade without enclosing the structure.
That open design is important. Dogs need airflow, fresh drinking water, shade, and limits on outdoor activity during hot weather. A cabana can make a comfortable spot more inviting, but it is not an air conditioner, a storm shelter, or permission to leave a dog outside during extreme heat.
This project is also customizable. You can paint the base to match your house, stain the roof for a natural cedar look, add a washable outdoor cushion, or hang lightweight curtains on two sides. Just avoid closing every side, because a fashionable dog sauna is still a sauna.
Materials and Tools
Materials
- One clean, structurally sound wood pallet
- Four 1-by-4 boards for the corner posts
- Additional 1-by-4 boards for braces and roof slats
- Cedar fence pickets or exterior lumber for decorative trim
- Exterior-rated 2-inch and 3-inch wood screws
- Scrap lumber for reinforcing the pallet
- Exterior paint or stain
- Outdoor-rated clear protective finish, if desired
- A washable outdoor dog bed or cushion
- Wondercide Flea & Tick Spray for Pets + Home
- Ground anchors, brackets, or heavy pavers if the cabana needs additional stability
Tools
- Tape measure and carpenter’s pencil
- Circular saw or miter saw
- Drill and driver bits
- Carpenter’s square
- Clamps
- Orbital sander or sanding block
- 80-, 120-, and 180-grit sandpaper
- Paintbrush, roller, or clean staining cloth
- Safety glasses, hearing protection, gloves, and a dust mask
How to Build the Dog Cabana
Step 1: Measure Your Dog and the Bed
Begin with the cushion rather than the lumber. Measure the dog bed’s length and width, then confirm that it fits comfortably on the pallet with a little clearance around the edges.
Your dog should be able to enter, turn around, stretch out, and leave without bumping the posts. For a small dog, a compact pallet section may be enough. A large dog may need a full pallet or a newly built platform made from exterior lumber.
Decide on the roof height while your dog is standing. Add enough room for comfortable head clearance and airflow. A roof that barely clears the ears may look cute in a photograph, but your dog will probably file a complaint with management.
Step 2: Prepare and Reinforce the Pallet
Place the pallet on a flat work surface. Remove loose nails, staples, splintered sections, and damaged boards. If the platform is larger than necessary, mark a straight cutting line and trim it with a circular saw.
Cut scrap wood to fit beneath any unsupported edges created by trimming. Secure those pieces with exterior screws so the base remains rigid. Press down firmly on every corner and center section. Nothing should flex, rock, or squeak dramatically.
If the gaps between the pallet boards are wide enough to catch a paw, add smooth deck boards or an exterior plywood panel over the top. Round the corners, countersink every screw, and verify that no sharp hardware remains exposed.
Step 3: Sand Every Dog-Accessible Surface
Sand the base, posts, trim, and roof boards before assembly. Start with 80-grit paper on rough lumber, continue with 120 grit, and finish dog-accessible areas with 180 grit.
Pay special attention to the front edge, entry corners, and any surface your dog may brush against. Run a cloth over the finished wood. If the cloth catches, more sanding is needed. If your own hand is nervous about touching it, your dog’s nose should not be asked to investigate it.
Step 4: Install the Four Corner Posts
Cut four 1-by-4 boards to the same length. Position one post at each corner of the pallet and use a carpenter’s square to hold it upright. Clamp the first post in place, drill pilot holes, and fasten it with two or three 3-inch exterior screws.
Repeat at the remaining corners, measuring frequently to ensure that opposing posts are parallel. Pilot holes reduce splitting, especially near board ends.
For a slightly angled cabana roof, make the rear posts a few inches taller than the front posts. The gentle slope adds visual interest and helps light rain run away from the entrance. However, this open cabana should still be moved under proper cover during severe weather.
Step 5: Add Side Braces
Connect the left posts with a horizontal brace and repeat on the right side. Attach another brace across the rear if it does not obstruct the bed. These rails prevent the tall posts from wobbling and create attachment points for the roof.
Test the frame by applying moderate pressure from several directions. If it racks sideways, install short diagonal braces near the upper corners. Stability matters because dogs do not enter furniture delicately. They arrive like furry delivery trucks with unreliable brakes.
Step 6: Build the Slatted Roof
Cut enough 1-by-4 boards to span the cabana from side to side, allowing a small overhang at each end. Lay the first slat across the front supports and secure it with exterior screws.
Use a scrap board as a spacer before installing the next slat. Continue toward the back, keeping the gaps even. The openings allow warm air to escape while creating broken shade below.
A slatted roof provides partial sun protection, not complete waterproofing. For stronger shade, attach a removable piece of exterior-rated shade cloth above the slats. Keep the sides substantially open so air can circulate. Canopy materials such as outdoor canvas and shade cloth are commonly used for open-air structures.
Step 7: Add Decorative Trim
Cut cedar fence pickets or smooth exterior boards to cover unfinished pallet edges. Attach the trim with countersunk screws or exterior-rated finish nails.
You can add a simple nameplate to the front, but keep decorations flat and firmly attached. Avoid dangling cords, strings, tassels, hooks, artificial vines, or small pieces that could become chewing or entanglement hazards.
Step 8: Paint, Stain, and Cure the Wood
Vacuum away sanding dust and wipe the boards clean. Paint the base with exterior paint, stain the roof and posts, or use one finish throughout. Apply thin coats and follow the manufacturer’s instructions for recoating and curing.
Keep your dog away until the finish is fully cured, not merely dry to the touch. Curing may take considerably longer than surface drying, particularly in humid weather. Do not place food, water, bedding, or toys inside while coatings are still releasing noticeable odors.
Inspect the finish periodically. Sand and reseal peeling areas before your dog can chew or swallow flakes.
Step 9: Choose a Safe Location
Place the cabana on a level, well-drained surface within an already shaded part of the yard. Natural shade from a building, covered patio, or healthy tree canopy is more reliable than expecting a small slatted roof to block intense midday sun.
Check how the sun moves across the yard. A location that is shaded at 9 a.m. may be roasting by 2 p.m. Also inspect the ground for ant activity, standing water, sharp stones, toxic plants, and access to fences that might encourage climbing.
Anchor the structure when wind, uneven terrain, or enthusiastic dogs could move it. Home-improvement guidance for outdoor pet shelters likewise emphasizes stable construction and placement in naturally shaded areas.
How to Use Wondercide Around the Cabana
Use the Correct Product for the Correct Surface
Wondercide Flea & Tick Spray for Pets + Home is the appropriate formula to consider for removable pet bedding and compatible household surfaces. Shake and apply it only as directed by the current label. Spot-test fabrics in an inconspicuous area first, especially when the cushion has a delicate coating or strong color.
Remove the cushion from the cabana, apply the recommended amount in a ventilated location, and let any dampness air out before returning the bed. Do not saturate foam inserts, spray near food or water bowls, or improvise a stronger mixture.
Wondercide’s Yard + Garden products are separately formulated for outdoor use and should not be applied directly to pets, people, indoor furniture, or the cabana cushion unless the specific label permits that use. EPA guidance similarly emphasizes following pesticide labels exactly and keeping products away from pet food and water.
Treat the Cabana as One Part of a Larger Routine
No spray can replace basic yard maintenance. Mow grass, remove leaf litter, trim brush, wash pet bedding, and inspect dogs for ticks after outdoor activity. Ticks are more likely to thrive around brushy borders and accumulated leaves than in sunny, well-maintained lawn areas.
Flea and tick needs vary by region, season, species, age, and health history. Discuss year-round prevention with your veterinarian, particularly if your dog has allergies, takes medication, is pregnant or nursing, or has reacted to pest-control products before. The CDC recommends regular flea checks, grooming, environmental cleaning, and veterinary guidance when selecting prevention products.
Dog Cabana Safety Checklist
- Confirm that the base does not wobble or flex.
- Countersink screws and remove exposed nails.
- Round sharp corners and sand away splinters.
- Use washable bedding that dries quickly.
- Keep multiple sides open for ventilation.
- Place the cabana in dependable shade.
- Provide fresh water nearby without spraying around the bowl.
- Anchor the cabana if wind could lift or tip it.
- Bring the cushion inside during heavy rain.
- Supervise dogs that chew wood or fabric.
- Inspect for ticks after outdoor time.
- Move your dog indoors during extreme heat or severe weather.
Common DIY Dog Cabana Mistakes
Making the Roof Too Solid
A solid low roof may trap heat. Preserve generous openings around the structure and use breathable shade materials rather than wrapping the cabana in plastic.
Using an Unknown Pallet
Free lumber is not a bargain when it smells like chemicals or has absorbed an unidentified spill. Use a clean heat-treated pallet with a trustworthy history, or build the platform from new exterior lumber.
Skipping Pilot Holes
Driving large screws into dry board ends without pilot holes can split the wood. Those cracks collect water, weaken joints, and eventually produce splinters.
Forgetting the Sun’s Afternoon Position
The cabana should remain shaded during the hours your dog uses it. Recheck the location at several times of day rather than assuming the roof alone will be enough.
Confusing Wondercide Formulas
Pets + Home and Yard + Garden products are not interchangeable. Read the front label, directions, approved surfaces, cautions, and application frequency every time.
Real-World Experience: What This Project Is Like After the Building Ends
The first practical lesson with a DIY dog cabana is that the dog may not immediately recognize your masterpiece as a masterpiece. You can measure every board, coordinate the paint with the patio furniture, and present the cushion like a boutique hotel concierge. Your dog may still spend the first ten minutes sniffing one screw hole and then lie beside the cabana.
That reaction is normal. A familiar blanket, favorite toy, or a few treats placed on the bed can help create a positive introduction. Do not push or carry a nervous dog into the structure. Let curiosity handle the marketing campaign.
The second lesson is that location matters more than decoration. A cabana positioned close to the family’s seating area usually receives more attention than one tucked into a distant corner. Many dogs want shade, but they also want to monitor their people. Place the structure where your dog can rest without feeling excluded from backyard activity.
The cushion will probably become the highest-maintenance component. Outdoor beds collect pollen, grass clippings, muddy paw prints, hair, and the occasional mysterious crumb that nobody remembers dropping. A zippered, machine-washable cover is far easier to maintain than a decorative cushion that must be cleaned with three specialty products and an optimistic attitude.
Keeping a second cover nearby is surprisingly useful. One can be washed while the other remains in service. During rainy periods, bring the cushion indoors rather than leaving it on the pallet. Even weather-resistant fabric can develop odors or mildew when moisture remains trapped against wood.
The wood structure also changes with the seasons. Screws can loosen as boards expand and contract, painted edges can chip, and roof slats may shift slightly. A quick monthly inspection catches these problems early. Tighten hardware, sand rough spots, check anchors, and look beneath the bed for insects or moisture.
Another common discovery is that dogs use cabanas differently. A small dog may curl in the back corner, while a larger dog may sleep halfway inside with two legs and a tail extending beyond the entrance. That is not a design failure. Dogs have never shown much respect for furniture boundaries.
When using Wondercide, convenience improves when the cushion is removable. Take it out, follow the product directions, and return it only when ready. Trying to spray around a curious dog, an open water bowl, and a breeze is unnecessarily awkward. Keep all pest-control products in their original labeled containers and store them where pets cannot reach them.
Owners may also notice that treating the cushion alone does not solve a yard-wide flea or tick issue. The most successful routine combines regular laundering, grooming, tick checks, leaf removal, mowing, veterinary prevention, and correctly labeled environmental products. The cabana becomes one manageable zone within that broader plan rather than a magical bug-proof fortress.
Finally, the best sign of success is not how the cabana photographs. It is whether the structure remains stable, shaded, clean, and voluntarily used. When your dog begins choosing it for afternoon naps, carrying toys into it, or watching the yard from the cushion like a tiny security executive, the project has done its job.
Conclusion
An easy DIY dog cabana can turn a basic pallet and a few exterior boards into an attractive outdoor resting place. Careful sanding, strong bracing, breathable shade, washable bedding, and a well-chosen location matter far more than elaborate decoration.
Wondercide can be incorporated into the maintenance routine when the correct formula is used exactly as labeled. Pair it with regular cleaning, yard care, daily tick awareness, veterinary guidance, fresh water, reliable shade, and sensible limits on outdoor time.
The finished cabana will not convince your dog to start paying rent. It may, however, give your backyard supervisor a comfortable office.
Note: This cabana is an optional supervised resting structure, not permanent outdoor housing or protection from dangerous temperatures. The article synthesizes current guidance and project information from Wondercide, Hometalk, the U.S. Environmental Protection Agency, the Centers for Disease Control and Prevention, the American Kennel Club, the ASPCA, the Humane Society of the United States, USDA APHIS, Penn State Extension, University of Minnesota Extension, The Home Depot, and Lowe’s. Always follow current product labels, finish-manufacturer instructions, local weather alerts, and advice from your veterinarian.