

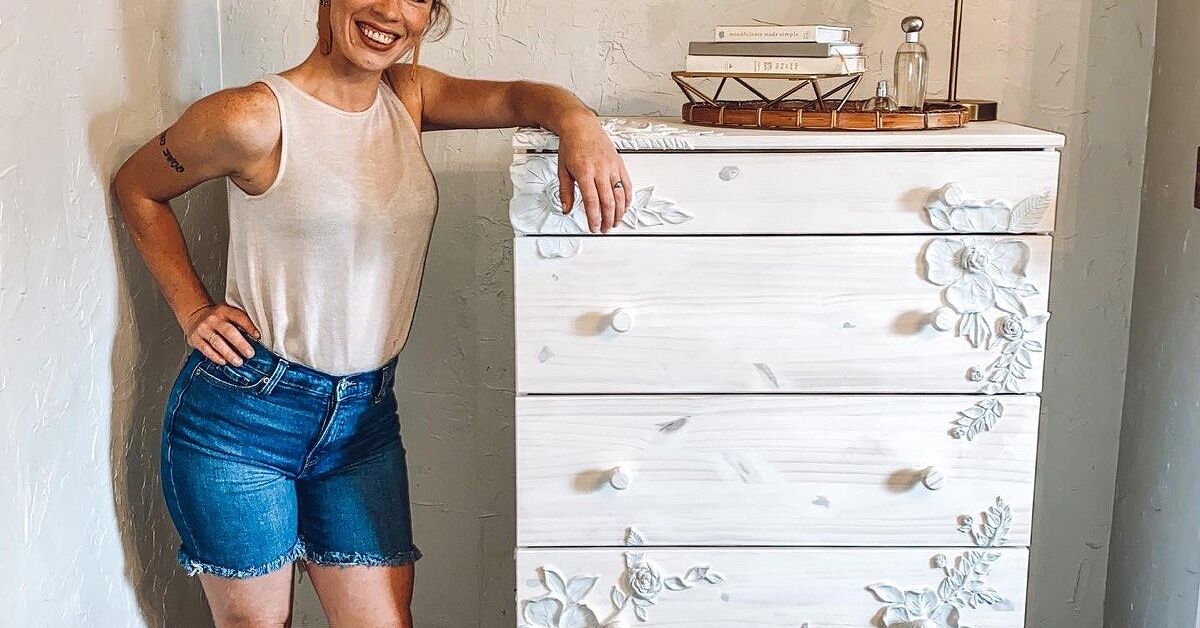
An ordinary dresser can store socks. An enchanted dresser can store socks while looking as though it wandered out of a moonlit garden carrying several excellent decorating opinions. This DIY Enchanted Anthropologie dupe dresser project turns a plain thrift-store find into an ornate statement piece using botanical appliqués, dimensional trim, layered paint, antique glaze, and decorative hardware.
The inspiration comes from Anthropologie’s Enchantment Three-Drawer Dresser, a hand-carved tropical-hardwood piece known for its richly textured surface and generous storage. Rather than attempting to reproduce every carving, this project captures the same romantic, collected-over-time feeling with accessible materials and beginner-friendly techniques.
What Makes an Enchanted Dresser Look Enchanted?
The magic is not simply “paint it green and attach a flower.” A convincing Anthropologie-inspired dresser combines several design layers:
- A substantial furniture silhouette
- Raised botanical or architectural details
- A low-contrast, nature-inspired color palette
- Subtle shadows around the decorative elements
- Aged metallic or antique-style hardware
- A durable finish that still feels soft and handcrafted
The raised pattern is the star. It creates highlights on the petals, leaves, vines, and borders while allowing glaze or dark wax to settle into the recesses. That light-and-shadow effect makes inexpensive appliqués look much more like carved wood.
Choose Inspiration, Not an Exact Copy
Begin by collecting images of carved floral furniture, European garden gates, vintage plasterwork, botanical textiles, and antique cabinets. Look for repeated shapes rather than trying to duplicate one commercial design. A central flower, mirrored vines, leafy corner pieces, and a simple border can create a sophisticated composition without requiring a degree in palace restoration.
Choose the Right Dresser for the Makeover
The ideal dresser has flat or gently framed drawer fronts, a sturdy case, and drawers that operate properly. Solid wood is excellent, but plywood, veneer, MDF, and laminate furniture can also work when prepared with compatible products.
Inspect Structure Before Appearance
Ignore the unfortunate orange stain or outdated knobs for a moment. Instead, check whether the dresser is worth saving:
- Open every drawer and test the runners.
- Check the back panel for separation.
- Press gently on the corners to detect wobbling.
- Look for swollen particleboard, deep water damage, or active pests.
- Confirm that the top is reasonably level.
- Make sure missing hardware can be replaced.
A scratched finish is cosmetic. A collapsing drawer box is a separate woodworking project wearing a dresser costume.
Be Careful With Older Painted Furniture
Do not aggressively sand an unknown vintage painted finish until you have considered the possibility of lead. The EPA warns that disturbing lead-based paint can create hazardous dust and recommends lead-safe practices when working on painted surfaces associated with pre-1978 buildings or furnishings of uncertain age. Test questionable finishes or consult a qualified professional before sanding, scraping, or stripping.
Materials and Tools
Core Supplies
- Sturdy dresser
- Degreasing cleaner or mild dish soap
- Sandpaper or sanding sponges in medium and fine grits
- Wood filler
- Putty knife
- Bonding or stain-blocking primer
- Furniture, cabinet, or trim enamel
- Small angled paintbrush
- Mini foam or microfiber roller
- Lint-free cloths and vacuum
- Drop cloth and painter’s tape
- Protective eyewear, gloves, and an appropriate dust mask or respirator
Decorative Supplies
- Wood appliqués, flexible furniture moldings, or cast resin ornaments
- Decorative half-round trim or narrow molding
- Wood glue or adhesive recommended for the selected appliqué material
- Small clamps, painter’s tape, or temporary brads
- Antique glaze, dark wax, or a deeper paint color for shading
- Optional metallic wax for highlights
- Vintage-style knobs or drawer pulls
- Clear protective topcoat, if compatible with the paint system
- Furniture anti-tip kit
Botanical Motifs That Work Well
Search for roses, peonies, wildflowers, ferns, laurel leaves, climbing vines, small birds, moths, stars, or scalloped borders. Select one dominant motif and two supporting shapes. Using twelve unrelated ornaments can make the dresser look less like an enchanted garden and more like the craft aisle experienced a weather event.
Step 1: Create a Full-Size Design Plan
Remove the drawers and lay them side by side on the floor. Cut paper templates roughly matching the dimensions of your decorative pieces. Arrange the templates until the design looks balanced across the entire dresser.
For a cohesive facade, treat the closed drawers as one large canvas. A vine may appear to travel from the lower-left corner toward the upper-right, while a central flower spans the visual area between two drawers. Keep important details away from the narrow gaps, where they could interfere with movement.
Three Reliable Layouts
- Central bouquet: Place the largest flower in the center with symmetrical leaves extending outward.
- Climbing garden: Start dense at one lower corner and gradually reduce the number of motifs as the design rises.
- Architectural panels: Frame each drawer with narrow trim and place one botanical ornament inside every panel.
Photograph the arrangement before removing the templates. That picture becomes your map when glue enters the conversation and everything suddenly feels more permanent.
Step 2: Remove Hardware and Label Everything
Remove the knobs, pulls, drawer stops, and any easily detachable trim. Place hardware for each drawer in a labeled bag. Mark the hidden back of every drawer with a number so it returns to its original opening.
If the new hardware uses a different hole spacing, fill the old holes now. Press wood filler firmly into each opening, slightly overfill it, and allow it to dry before sanding. Deeper repairs may require several thin applications rather than one heroic blob. DAP’s furniture-repair guidance similarly recommends overfilling shallow defects, allowing full drying, and sanding the repair flush before priming.
Step 3: Clean the Dresser Thoroughly
Old furniture can carry polish, cooking residue, hand oils, dust, fragrance sprays, and mysterious substances best left unnamed. Paint cannot bond properly through that collection.
- Vacuum the dresser, including corners and drawer cavities.
- Wash the exterior using a mild cleaner suitable for the surface.
- Use a degreaser where necessary.
- Rinse away cleaner residue with a fresh damp cloth.
- Allow the piece to dry completely.
Professional furniture-painting guidance consistently emphasizes starting with a clean, dry, contaminant-free surface before sanding or priming.
Step 4: Repair and Scuff-Sand
Tighten loose screws and glue unstable wood joints before decorating. Patch dents, chipped veneer edges, and unwanted hardware holes with a paintable filler. Sand the dried repairs until they disappear beneath your fingertips.
Next, lightly scuff the existing finish. The goal is usually to dull the gloss and create microscopic texture, not to grind the dresser back to its childhood. Work evenly, protect decorative edges, and remove all dust with a vacuum followed by a lint-free cloth.
Adjust the Process for the Material
Solid wood or veneer: Sand gently in the direction of the grain. Avoid sanding through thin veneer.
MDF: Keep moisture limited and treat exposed edges carefully because they absorb primer rapidly. Fine sanding and complete dust removal help create a smoother painted surface.
Laminate: Scuff lightly without cutting through the surface, then use a primer specifically designed to bond to slick materials. Laminate furniture generally needs stronger adhesion preparation than unfinished wood.
Step 5: Attach the Decorative Appliqués
Return to your layout photograph and mark light reference lines with a pencil. Dry-fit every ornament before applying adhesive.
- Arrange the dresser so drawer fronts are level and easy to reach.
- Apply a thin, even layer of compatible adhesive to the back of the first appliqué.
- Press it into position without allowing glue to flood around the edges.
- Hold the piece with painter’s tape, clamps, or temporary pins where appropriate.
- Clean wet squeeze-out immediately.
- Allow the assembly to cure according to the adhesive instructions.
Traditional wood glue is appropriate when both surfaces are porous wood. Titebond describes its original woodworking adhesive as suitable for furniture, trim, molding, hardboard, and particleboard, while synthetic or nonporous ornaments may require a different adhesive. Always match the glue to both materials rather than selecting it because the bottle looks confident.
Blend the Edges
After the adhesive cures, inspect the perimeter of every ornament. Fill distracting gaps with a compatible filler or paintable caulk, depending on the material and joint. Smooth the transition without burying the carved detail. When primed and painted, the appliqués should appear integrated with the drawer rather than attached five minutes before company arrived.
Step 6: Prime for Adhesion and Stain Control
Primer is especially important when combining different materials. The dresser body, filler, trim, resin, and wood appliqués may absorb paint differently. Primer helps unify those surfaces and makes the final color appear more consistent.
Use a bonding primer for laminate or glossy finishes. Choose a stain-blocking primer when dealing with dark wood, knots, water marks, odors, or suspected tannin bleed. Oil-based stain blockers are often effective on stubborn wood discoloration, while quality water-based products may be more convenient for ordinary projects. KILZ specifically identifies tannin, smoke, water, grease, and odor control among the situations requiring stronger stain-blocking performance.
Brush primer into the detailed ornaments first. Then roll the larger flat areas with a thin, even coat. Check for pooled primer around petals and leaves. Once dry, lightly sand rough areas and remove the dust before painting.
Step 7: Build an Enchanted Color Palette
Muted, complex colors make raised details look more expensive. Strong options include:
- Dusty sage with olive shadows
- Deep forest green with black-brown glaze
- Mushroom beige with warm umber shading
- Smoky teal with charcoal recesses
- Plaster white with taupe antiquing
- Muted lavender-gray with bronze highlights
Use Two or Three Related Tones
A single flat color can hide the very texture you worked so hard to attach. Instead, select a main color, a slightly darker shadow color, and an optional lighter highlight.
For example, paint the dresser in dusty sage. Add a diluted olive-brown glaze around the leaf veins and flower centers. Finish with a nearly dry brush carrying a pale moss tone over the highest edges. The result is dimensional but restrained.
Step 8: Paint the Dresser in Thin Coats
Use a small brush to paint the decorative relief, corners, and trim. Immediately follow with a mini roller on broad surfaces. Work methodically so one area does not dry long before the neighboring section.
Two thin coats generally look smoother and cure more reliably than one thick coat. Allow the product’s specified drying time between applications. Lightly sanding between coats can remove dust nibs and small ridges, but do not sand so aggressively that raised details lose definition.
Cabinet and furniture refinishing instructions commonly recommend removing drawers and hardware, priming, sanding the dried primer, applying thin finish coats, and allowing adequate drying time between layers.
Step 9: Add Antique Depth Without Making It Look Dirty
Antiquing should reveal detail, not suggest the dresser spent a decade beside a fireplace in a sandwich shop.
- Make sure the base paint is fully dry.
- Test the glaze or wax on a hidden area.
- Apply a small amount around carvings and inside recesses.
- Wipe the high points clean with a lint-free cloth.
- Repeat gradually until the relief becomes visible.
Dry-Brushed Highlights
Dip the tip of a dry brush into a lighter paint, then remove almost all of it on scrap cardboard. Sweep the brush lightly across raised petals, leaves, borders, and drawer edges. Stop while the effect still feels subtle. Dry brushing has a dangerous habit of looking excellent two strokes before it looks like stage makeup.
Metallic Accents
A tiny amount of aged brass, antique gold, or dark bronze wax can emphasize select edges. Concentrate metallic highlights near the hardware and on a few raised motifs rather than outlining every leaf.
Step 10: Protect the Finish
Some furniture paints are designed to perform without a separate clear coat, while others benefit from additional protection. Follow the paint manufacturer’s instructions before mixing brands or finish systems.
When using a water-based clear coat, apply smooth, thin layers with a quality synthetic brush, roller, or applicator. Avoid repeatedly brushing partially dried material because that can create drag marks and bubbles. Minwax recommends stirring rather than shaking its Polycrylic finish, applying thin coats, and lightly sanding between coats when required. General Finishes similarly advises smooth application with minimal back-brushing.
Test clear finishes over pale paint before coating the entire dresser. Wood tannins, dyes, old contaminants, and incompatible layers can sometimes cause discoloration beneath clear products.
Step 11: Install Hardware and Let the Dresser Cure
Ornate knobs, drop pulls, aged brass handles, ceramic flowers, and dark bronze hardware complement the enchanted aesthetic. Keep the scale proportional to the drawer fronts. Large carvings usually pair better with simple hardware, while restrained molding can support more decorative pulls.
Reinstall the hardware carefully without overtightening the screws. Paint may feel dry before it has fully hardened, so avoid loading the drawers immediately. Give the completed dresser generous curing time and use felt pads beneath decorative objects placed on top.
Important Safety Step: Anchor the Dresser
Once the dresser is in position, secure it to a wall stud or another suitable structural support using an approved anti-tip device. The U.S. Consumer Product Safety Commission recommends anchoring furniture with drawers, doors, and shelves to reduce tip-over hazards. Keep heavy items in lower drawers, and avoid placing objects on top that might encourage children to climb.
Common Mistakes to Avoid
Skipping the Cleaning Stage
Sanding grease does not remove it. It merely introduces the grease to more of the dresser.
Using Oversized Appliqués
Large ornaments can block drawer openings or overwhelm the furniture’s proportions. Measure every gap before gluing.
Applying Thick Paint Over Fine Detail
Heavy coats collect in recesses and soften the pattern. Multiple thin coats preserve definition.
Making Every Detail Symmetrical
Perfect symmetry feels formal. Slightly varied leaves, flowers, and vines often create a more organic, collected appearance.
Applying Too Much Dark Glaze
Build the antique effect slowly. It is easier to add another layer than to explain why the dresser resembles a chimney sweep.
Reassembling Too Soon
Fresh paint can stick where drawer edges touch the case. Allow sufficient curing time before regular use.
Ways to Customize the DIY Anthropologie-Inspired Dresser
Woodland Version
Use ferns, mushrooms, acorns, moths, and tiny stars over deep moss-green paint. Add charcoal glaze and muted bronze hardware.
Romantic Botanical Version
Combine roses, curling vines, and scalloped trim in a warm plaster or faded blush color. Shade the recesses with taupe and add antique brass pulls.
Moody Midnight Version
Paint the dresser smoky navy or near-black. Highlight the botanical relief with graphite, pewter, or dark gold wax for a dramatic bedroom focal point.
Whimsical Child’s-Room Version
Choose softer motifs such as daisies, clouds, birds, and stars. Use low-contrast pastels and smooth, snag-free hardware. Secure all ornaments firmly and anchor the dresser to the wall.
Is a DIY Enchanted Dresser Worth the Work?
This project requires patience, but most of the work is approachable: cleaning, light sanding, arranging appliqués, painting, and glazing. The greatest challenge is knowing when to stop adding decoration.
The reward is a functional piece of furniture that feels custom rather than mass-produced. A discarded dresser gains another life, the finish can be coordinated with an existing room, and the pattern becomes completely personal. You also gain the quiet satisfaction of answering, “I made it,” when someone asks where it came from.
Project Experience: What a Typical Enchanted Dresser Makeover Really Feels Like
A realistic enchanted dresser makeover begins with optimism and a suspiciously cheap secondhand dresser. At first glance, the piece may appear ready for paint. Under better lighting, however, it reveals wax buildup, two chipped corners, a drawer that rubs, and hardware installed by someone who regarded measuring as an optional social convention.
The first useful lesson is that preparation consumes more time than painting. Removing the drawers, cleaning the case, repairing veneer, filling hardware holes, and smoothing previous damage can occupy most of the first work session. That is not wasted time. Each repaired defect prevents a small annoyance from becoming permanently preserved beneath a beautiful new finish.
The design stage is usually the most enjoyable. Paper templates make it possible to experiment freely. A large central flower may initially seem perfect but look crowded once the drawers are stacked together. Moving it slightly upward and replacing two oversized leaves with smaller vines often creates better visual balance. Photographing each promising arrangement is invaluable because every version looks obvious until all the pieces are removed.
Attaching the appliqués introduces the first moment of genuine commitment. Starting with the central motif helps establish alignment. From there, working outward keeps the composition balanced. Painter’s tape can hold lightweight pieces while the adhesive sets, although curved ornaments may require clamps or patient hand pressure. Cleaning glue immediately is far easier than chiseling away a dried ridge beside a delicate petal.
Primer often makes the project look worse before it looks better. The dresser becomes one pale, awkward object covered with visible brush marks and patches. This is normal. Once the primer is lightly sanded and the first color coat is applied, the separate materials begin to read as one carved surface.
The most dramatic change occurs during glazing. Before glaze, the dresser may look attractive but flat. When a darker tone settles around the vines and inside the flower centers, the relief becomes visible from across the room. Wiping the high points clean restores the main color while preserving shadow in the recesses. The transformation can be so satisfying that applying more glaze feels irresistible. Restraint remains the better decorative tool.
Hardware selection also changes the mood more than expected. Bright modern pulls can make an aged botanical design feel confused, while dark bronze or softly aged brass creates continuity. Testing several options against the painted drawer front before drilling new holes prevents regrettable enthusiasm.
The final lesson is to respect curing time. A dresser that feels dry may still be vulnerable to fingerprints, sticking drawers, and marks from decorative objects. Leaving the drawers partially open and delaying heavy use helps the coating harden properly. Once cured, assembled, and anchored, the finished dresser no longer resembles a basic thrift-store find. It feels collected, imaginative, and slightly theatricalin other words, exactly enchanted enough.
Conclusion
A DIY Enchanted Anthropologie dupe dresser succeeds when texture, color, and age appear to belong together. Start with a structurally sound piece, prepare the surface carefully, arrange botanical appliqués as one unified design, and build the finish with thin layers. Use glaze to create depth, highlights to reveal texture, and hardware to complete the story.
The finished dresser does not need to imitate every detail of an expensive carved original. Its value comes from interpretation: the flowers you choose, the palette that suits your home, and the small imperfections that make the piece feel handcrafted. With thoughtful preparation and a little decorative courage, a plain dresser can become storage furniture with main-character energy.