

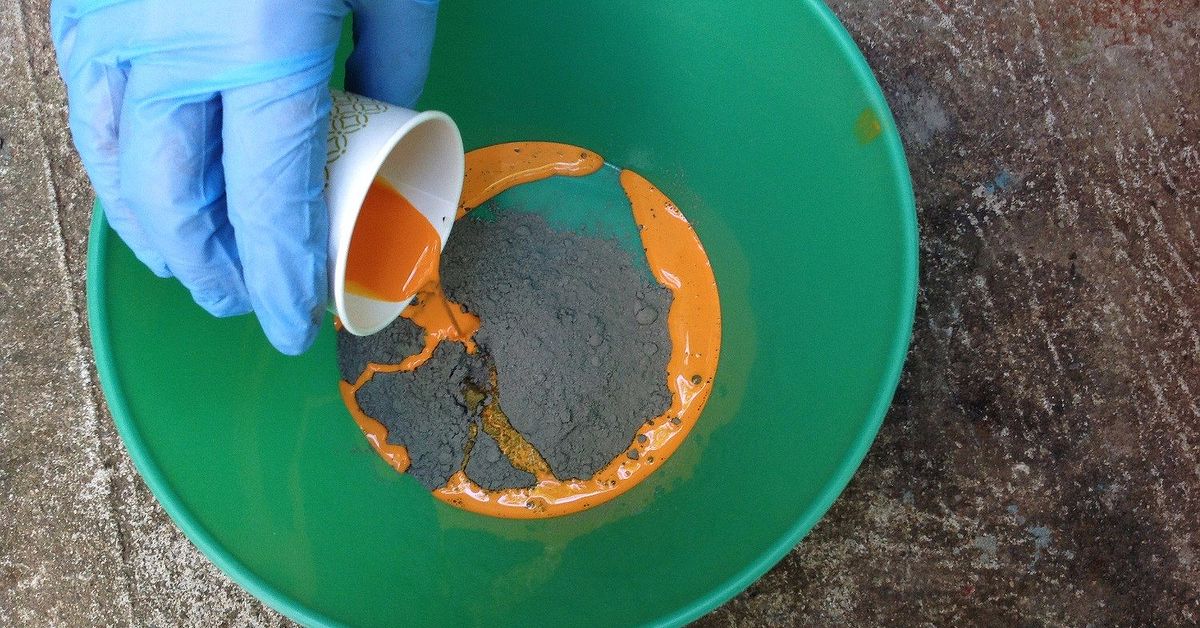
There is something wonderfully optimistic about opening an old can of latex paint and thinking, “Surely thnd some careful measuring, it can.
Using latex paint to tint DIY cement decor is an inexpensive way to create softly colored planters, candleholders, trays, bowls, garden ornaments, and other nonstructural crafts. Instead of painting only the finished surface, you blend a small amount of water-based paint into the liquid used to prepare the cement. The resulting color runs through the material, so a tiny chip is less obvious than it would be on a surface-painted piece.
This method is best treated as a creative craft experiment rather than an engineered concrete formula. Latex paint is not a standardized integral concrete pigment, and different paints contain different pigments, binders, fillers, and additives. Your first batch should therefore be a test batchnot the eight-pound geometric planter you have already emotionally adopted.
Can You Really Mix Latex Paint Into Cement?
Yes, water-based latex or acrylic-latex paint can tint small cement crafts when it replaces part of the measured mixing water. DIY makers have successfully used diluted latex paint in fast-setting cement products to create colored planters and decorative objects. One commonly documented starting approach is to blend approximately one part paint with four parts water before using that colored liquid to mix the cement. important phrase is replaces part of the mixing water. Do not prepare a normal wet cement mix and then pour in an extra cup of paint. Excess liquid can make a mixture easier to stir while quietly reducing its strength, increasing shrinkage, and encouraging cracks. The water-to-cement ratio is one of the major factors affecting concrete strength, with lower water content generally producing stronger material when the rest of the mix is properly designed and cured. decorative trays, little pots, desk accessories, and ornaments, a modest amount of latex paint can provide attractive color without causing an obvious problem. For structural concrete, load-bearing furniture, steps, countertops, fire pits, food-contact surfaces, or permanently submerged pieces, use an approved concrete pigment and follow the mix manufacturer’s instructions.
Cement, Concrete, and Craft Mixes Are Not Identical
Cement is the powdered binder that reacts with water and helps hold other ingredients together. Concrete contains cement plus aggregates such as sand and gravel. Mortar generally contains cement and fine aggregate but no large stones. Many products sold for craft projects are fine-textured cementitious repair or casting mixes, even though people casually call all of them “cement.”
For detailed decor, choose a smooth mix without large gravel. A fine repair cement, sand-topping mix, mortar mix, or specialty casting mix will capture mold details more cleanly than chunky general-purpose concrete. Always follow the package directions because fast-setting products can have very different liquid requirements and working times.
Why Latex Paint Changes the Finished Color
Latex paint is water-based, despite the name sounding as though it should arrive wearing rubber gloves. Modern acrylic-latex paints suspend pigments and polymer binders in water. When a small amount is blended into the mixing liquid, its pigments become distributed through the wet cement paste.
As the cement hydrates and the piece dries, the color becomes lighter and more muted. Gray cement also influences the final shade. Bright aqua may become dusty blue-green, blush paint may dry into muted terracotta, and sunny yellow may end up looking like sophisticated mustardwhich is a polite way of saying “less cheerful than expected.”
White cement or a pale casting mix gives cleaner, brighter colors. Standard gray cement produces earthier, more stone-like shades. This can be an advantage when you want modern neutral decor rather than a plastic-looking finish.
Materials and Tools
- Fine cement, mortar, or concrete craft mix
- Water-based latex or acrylic-latex paint
- Clean water
- Two measuring cups or graduated containers
- Disposable mixing container
- Sturdy stir stick or small mixing paddle
- Silicone, rubber, or smooth plastic mold
- Nitrile or alkali-resistant gloves
- Safety glasses
- Dust mask or suitable respirator for handling dry mix
- Plastic sheet or drop cloth
- Fine sandpaper or sanding sponge
- Concrete-compatible sealer, if needed
Concrete craft molds made from silicone, rubber, or flexible plastic are usually the easiest to release. Smooth nonporous molds also produce cleaner surfaces and require less sanding.
Choosing the Best Latex Paint
Use ordinary water-based latex or acrylic-latex paint in a color you are willing to experiment with. Leftover wall paint, sample jars, and discounted “mistint” paint are excellent budget options.
Flat, matte, or eggshell paint is usually easier to work with than a high-gloss coating because glossy and specialty paints may contain more performance additives. Avoid oil-based paint, solvent-based enamel, textured paint, paint containing glitter or sand, and products marketed as waterproof membranes. Never combine random chemical coatings simply because they occupy the same garage shelf.
Exterior acrylic-latex paint may offer better color retention for outdoor decor, but mixing it into cement does not automatically waterproof the finished object. Most ordinary latex paints are not designed to function as waterproofing systems. ractical Starting Ratio
There is no universal latex-paint-to-cement ratio because paint formulas and cement products differ. A cautious starting point for small decorative projects is:
- One part latex paint
- Four to five parts water
- Enough of that combined liquid to meetbut not exceedthe cement product’s recommended liquid amount
For example, suppose your cement mix requires 10 fluid ounces of liquid. You might combine 2 ounces of latex paint with 8 ounces of water. The total remains 10 ounces. You are not adding 10 ounces of water and then introducing another 2 ounces of paint.
For a paler tint, use less paint. For a stronger color, increase the paint gradually while keeping the total liquid volume unchanged. Heavy paint additions can alter consistency, setting behavior, air content, curing, and strength. If you need saturated or repeatable color, use powdered or liquid pigments manufactured for cement. Concrete pigment manufacturers generally recommend dispersing color thoroughly in premeasured mixing water to improve consistency between batches. e Color Test Tiles First
Before casting the main project, prepare three tablespoon-sized samples with slightly different paint concentrations. Label them while wet and allow them to cure completely. Comparing wet cement colors is unreliable because nearly every shade becomes lighter as moisture leaves.
Record the amount of dry mix, water, and paint used in the winning sample. “A splash of blue and a vibes-based amount of water” is not a recipe you can reproduce next weekend.
How to Tint DIY Cement Decor With Latex Paint
Step 1: Prepare the Work Area
Cover your table and work in a ventilated area. Put on eye protection and gloves before opening the dry mix. Avoid creating dust when scooping or pouring.
Wet cement is highly alkaline and can irritate or burn skin. Cement dust can also irritate the eyes and respiratory system. Wear suitable protective equipment, wash exposed skin promptly, and never kneel or rest bare hands in wet cement. p 2: Prepare the Mold
Clean and dry the mold. If the material tends to grip cement, apply a very light coat of an appropriate mold-release agent. Remove visible puddles because too much release oil can create blotches, pinholes, or soft-looking patches.
For a planter, center the inner mold before mixing. Gather weights, tape, clips, or spacers in advance. Fast-setting cement has little sympathy for people searching the kitchen for a soup can while the mixture becomes a brick.
Step 3: Measure the Required Liquid
Read the cement package directions and determine the total amount of liquid needed for your batch. Measure the water and paint separately, then combine them without exceeding that total.
Use the same measuring system for every batch. Measuring by weight is more repeatable than measuring by volume, but either method can work for casual crafts when used consistently.
Step 4: Blend the Paint and Water Thoroughly
Stir the latex paint into the water until no ribbons, blobs, or darker streaks remain. Pigment that is poorly dispersed can leave marbling in places where you did not intend to create marbling.
If the paint has been stored for a long time, mix it separately before measuring. Do not use paint that smells rotten, contains persistent lumps, or has frozen and separated beyond recovery.
Step 5: Add the Colored Liquid to the Dry Mix
Pour most of the colored liquid into the mixing container. Add the dry cement mix gradually while stirring. Reserve a small amount of liquid so you can adjust the consistency without overshooting.
A good casting consistency is usually similar to thick pancake batter or soft peanut butter, depending on the product and mold. It should flow into details but should not resemble gray soup. If the mixture is too stiff, add the reserved liquid a teaspoon at a time.
Step 6: Fill the Mold and Remove Air
Spoon or pour the tinted mixture into the mold in stages. Press it into corners and narrow details. Tap the sides and base of the mold repeatedly to encourage trapped air bubbles to rise.
For small pieces, gently vibrating the work surface can help. Do not shake so aggressively that the inner planter mold floats away like a tiny plastic boat.
Step 7: Allow Proper Setting and Curing
Follow the product instructions for demolding time. Fast-setting cement may become firm quickly, but early hardness is not the same as full cure. Handle freshly demolded pieces carefully and allow them to continue curing in a protected location.
Avoid placing the project in intense sun, direct airflow, or freezing conditions during early curing. Rapid moisture loss can contribute to surface defects and cracking. Larger or thicker crafts generally need more patience than small ornaments.
Step 8: Sand and Finish
Once the piece is sufficiently hard and dry, smooth sharp edges with fine sandpaper. Wear respiratory protection when sanding and control the dust.
Leave the piece unsealed for a natural matte appearance, or apply a compatible concrete sealer for easier cleaning and better moisture resistance. Test the sealer on the underside first because some products deepen the color or create a glossy “wet look.” Acrylic concrete sealers are available for interior and exterior masonry, but application conditions and surface requirements vary by product. ubleshooting Common Problems
The Dry Color Is Too Pale
Gray cement neutralizes bright paint colors, and all tinted cement tends to lighten as it dries. Increase the paint slightly in the next test, switch to white cement, or use a purpose-made concrete pigment for stronger color.
The Piece Is Soft or Crumbly
The mix may contain too much total liquid, too much paint, insufficient dry material, or poorly blended ingredients. Recheck the package ratio and make a smaller test using less paint. Do not attempt to rescue a weak batch by coating it with sealer; a shiny crumb is still a crumb.
The Color Is Streaky
The paint may not have been dispersed completely, the cement may not have been mixed long enough, or parts of the mold may have contained excess release agent. Blend the paint-water mixture first and scrape the bottom and sides of the mixing container.
Several Pieces Do Not Match
Small changes in water, paint, dry mix, mixing time, curing conditions, and sealer thickness can change the appearance. Measure every ingredient, use material from the same containers, and prepare one large batch when exact matching matters.
The Project Developed Small Cracks
Likely causes include excess liquid, walls that are too thin, uneven thickness, forced drying, difficult demolding, or insufficient curing. Redesign delicate areas with slightly thicker walls and avoid bending the piece while removing it from the mold.
DIY Projects That Work Well With This Method
Latex-tinted cement is best for small, low-risk decorative items such as:
- Succulent and cactus planters
- Decorative cachepots with separate plastic liners
- Ring dishes and catchall trays
- Candleholders designed around contained candles
- Bookends and paperweights
- Garden mushrooms and small ornaments
- Coasters with protective cork backing
- Decorative bowls not intended for food
- Holiday ornaments and place-card holders
You can also create marbled effects by preparing two tinted batches and folding them together only once or twice. For an ombré planter, pour progressively darker batches into the mold. Powdered concrete pigments are usually more predictable for these effects, but latex paint is convenient when the goal is experimentation with supplies already on hand.
Hands-On Experiences and Lessons From Latex-Tinted Cement Projects
The first lesson from working with latex-tinted cement is that the wet color is a dramatic liar. A mixture that looks almost neon in the bowl may dry into a quiet, chalky pastel. On one test, a strong coral-pink liquid produced a muted clay color after curing. The result was attractive, but it was not the cheerful flamingo shade suggested by the wet mix. Making labeled samples would have prevented the surprise.
The second lesson is that careful liquid measurement matters more than aggressive color chasing. It is tempting to keep pouring in paint when the cement still looks gray. That approach can produce a loose mixture that flows beautifully and later develops weak edges. Better results come from holding back some of the measured liquid, mixing slowly, and accepting that cement naturally softens bright colors.
Small batches are easier to control. A single planter-sized batch gives enough time to observe consistency, scrape the container, fill the mold, and tap out bubbles. Mixing enough material for six pieces at once sounds efficient until the last half of the bucket begins setting while the first mold is still being adjusted.
Different paint colors also behave differently. Dark blue, charcoal, brown, and earthy red tend to show more readily in gray cement. Pale yellow and light mint may practically disappear unless used with white cement. Paint opacity matters too. Two colors from the same brand can require different amounts because one may contain substantially more pigment.
Mold choice has an equally noticeable effect. Flexible silicone releases detailed pieces cleanly, while thin disposable plastic containers may crease or deform. A smooth mold creates a more polished exterior; a textured container proudly transfers every scratch, label ridge, and mysterious manufacturing code into the cement.
Air bubbles are another recurring character in the story. Tapping the mold removes many of them, but a few pinholes often remain and can make handmade decor more interesting. For a sleek finish, use a flowing but not watery mixture and work it firmly into the mold. For a weathered stone appearance, a few imperfections are free design assistance.
Sealing changes the personality of the color. An unsealed piece usually looks pale, mineral, and matte. A clear acrylic sealer may deepen the shade and increase contrast, while a glossy sealer can make the project look more manufactured. Testing the underside is essential, especially when the soft, dusty finish is the reason you liked the piece in the first place.
Outdoor projects deserve additional caution. Latex paint in the mix does not eliminate cement’s pores or protect it from constant saturation and freeze-thaw exposure. Drainage holes, raised feet, an appropriate sealer, and seasonal protection can help small planters last longer. For demanding exterior work, purpose-made cement pigments and manufacturer-approved admixtures offer better predictability.
Ultimately, using latex paint to tint DIY cement decor works best as a flexible, low-cost technique for nonstructural crafts. It turns leftover paint into a useful coloring ingredient, creates soft integrated shades, and encourages experimentation without requiring a shelf full of specialty pigments. The winning formula is simple: measure everything, keep the total liquid under control, make test tiles, cure patiently, and let the finished cementnot the wet mixturetell you what color you actually created.
Note: This technique is intended for small, nonstructural decorative projects. Use manufacturer-approved pigments, admixtures, and tested mix designs for load-bearing construction, furniture, countertops, fire-exposed pieces, food-contact items, or concrete exposed to severe weather and continuous moisture.