A Frosty the Snowman homemade ornament is the kind of Christmas craft that makes a tree feel less like a showroom display and more like a family scrapbook with twinkle lights. Store-bought ornaments are lovely, of course, but homemade snowman ornaments come with something better than glitter: personality. Maybe the scarf is a little crooked. Maybe the carrot nose has big main-character energy. Maybe one eye is slightly higher than the other, giving Frosty the expression of someone who just remembered he left cookies in the oven. Perfect? Not always. Memorable? Absolutely.
This guide will walk you through a charming, beginner-friendly DIY snowman ornament inspired by the classic frosty holiday look: round white body, cheerful face, tiny hat, cozy scarf, and enough handmade charm to make your Christmas tree grin. You can make it with common craft supplies such as clear plastic ornaments, pom-poms, felt, buttons, ribbon, craft paint, faux snow, wood beads, salt dough, or recycled materials. Better yet, this project works for kids, adults, classrooms, holiday parties, handmade gift exchanges, and anyone who believes a glue gun is basically a magic wand with a cord.
Why Make a Frosty the Snowman Homemade Ornament?
Homemade Christmas ornaments are more than decorations. They are tiny time capsules. A DIY Frosty ornament can mark a child’s age, a family tradition, a first Christmas in a new home, or simply an afternoon spent laughing over runaway pom-poms. Snowman ornaments are especially popular because they are easy to customize and do not require advanced artistic skills. A snowman is wonderfully forgiving. Three white circles? Snowman. Two white circles? Still snowman. One white circle with a hat? Minimalist snowman. Holiday crafting is generous like that.
The Frosty-inspired style is also timeless. A white snowman body, black coal-like buttons, orange carrot nose, bright scarf, and cheerful hat fit almost any Christmas tree theme. Rustic farmhouse tree? Use twine and burlap. Bright candy-colored tree? Add red, green, and turquoise felt. Elegant winter tree? Choose white glitter, silver ribbon, and pearl beads. Kid-made tree? Bring on the googly eyes and prepare emotionally for chaos.
Best Materials for a DIY Snowman Ornament
You can create a Frosty the Snowman homemade ornament using several craft methods. The best choice depends on your time, supplies, and whether your crafting table is currently controlled by children, cats, or a suspiciously enthusiastic tube of glitter glue.
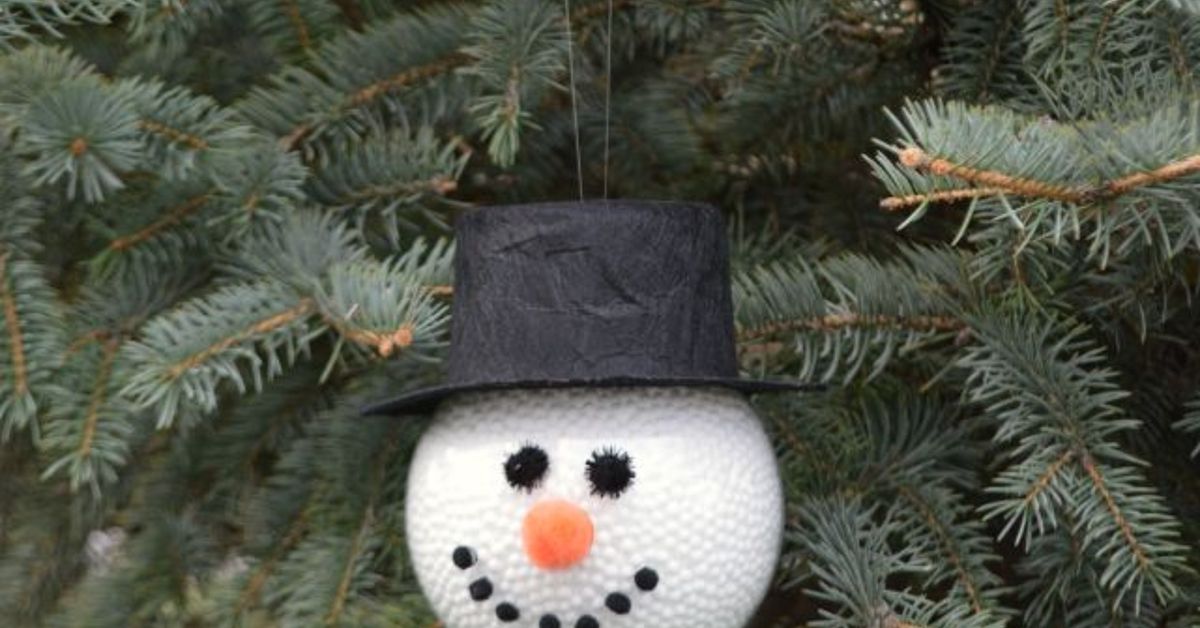
Clear Plastic Ball Ornament
A clear fillable ornament is one of the easiest bases. Fill it with faux snow, white pom-poms, cotton balls, shredded paper, or foam beads. Add a face on the outside with paint pens or vinyl, then finish with a scarf and hat. This option is lightweight, quick, and great for beginners.
Pom-Pom Snowman Ornament
White yarn pom-poms create a soft, fuzzy Frosty look. Stack two or three pom-poms vertically, glue them together, and add felt accessories. This version looks cozy and handmade, like Frosty got dressed during a snowstorm and somehow made it fashion.
Wood Slice Snowman Ornament
Small wood rounds make a rustic snowman ornament with natural charm. Paint the front white, add a face, glue on a mini scarf, and attach twine for hanging. Wood slice ornaments are durable and make excellent keepsake gifts.
Salt Dough Snowman Ornament
Salt dough ornaments are classic, affordable, and family-friendly. They usually use flour, salt, and water, then bake until firm. Once cooled, they can be painted and sealed. Salt dough works beautifully for flat snowman shapes, handprint snowmen, or personalized name ornaments.
Mason Jar Lid Snowman Ornament
Mason jar lids can be turned into round snowman faces or framed mini snow scenes. They are excellent for upcycling and give the ornament a farmhouse-style edge. Add ribbon around the ring, a face inside the circle, and a hanging loop at the top.
Supplies You’ll Need
For the main version in this guide, we will use a clear plastic ornament because it is simple, cute, and does not require baking. It also survives better than glass if dropped, which is useful if your holiday crafting assistant has paws, tiny hands, or dramatic elbows.
Main Supplies
You will need one clear plastic fillable ornament, white pom-poms or faux snow, black acrylic paint or a black paint pen, orange felt or orange craft foam, red or green ribbon, small black buttons, craft glue, scissors, twine or ornament cord, and a small piece of black felt for the hat.
Optional Decorations
You can also add glitter, tiny snowflake stickers, mini bells, sequins, white acrylic paint, pipe cleaners, beads, fabric scraps, name tags, or the year written on the back. Optional supplies are where your ornament goes from “cute” to “this snowman has a full personality and possibly a mortgage.”
Step-by-Step Guide: Frosty the Snowman Homemade Ornament
Step 1: Prepare the Ornament Base
Open your clear plastic ornament carefully. If it has dust or fingerprints inside, wipe it gently with a soft cloth. A clean ornament will make the faux snow or pom-poms look brighter. If you want a frosted look, lightly brush the inside with white acrylic paint or add a pinch of fine white glitter. Do not overdo the glitter unless you are emotionally prepared to find sparkle on your socks in March.
Step 2: Fill the Ornament
Add white pom-poms, cotton balls, foam beads, or faux snow into the ornament. Fill it enough to look fluffy but not so much that the ornament cannot close. If you are using pom-poms, mix small and medium sizes for texture. If you are using faux snow, tap the ornament gently to settle the filling. The goal is a soft snowy body, not a blizzard trapped in a plastic bubble.
Step 3: Close and Secure
Snap the ornament closed. If the ornament feels loose, add a thin line of craft glue around the seam before closing it. Let it dry completely. This small step helps prevent a surprise snow explosion on the living room floor, which is festive only in theory.
Step 4: Make Frosty’s Face
Use a black paint pen to draw two eyes and a dotted smile on the front. Keep the dots simple and evenly spaced. For the carrot nose, cut a tiny triangle from orange felt or craft foam and glue it between the eyes and mouth. You can also use orange paint if you prefer a flatter design. Let the face dry before handling the ornament again.
Step 5: Add Buttons
Glue two or three small black buttons down the front of the ornament. If the ornament is round, place the buttons slightly lower than the face so the design reads as a snowman body. Mini buttons are perfect, but small dots of black paint also work. Handmade ornaments are not picky; they just want to be invited to the tree.
Step 6: Create the Scarf
Cut a narrow strip of ribbon, felt, or fabric about six to eight inches long. Wrap it around the neck area, just below the face, and glue it in place. Trim the ends at an angle for a scarf-like look. For extra detail, cut tiny fringe into the ends. This is the moment your snowman goes from “round winter object” to “Frosty is ready for the holiday parade.”
Step 7: Make a Mini Hat
Cut a small rectangle of black felt and roll it into a cylinder. Glue the seam closed. Then cut two circles: one for the brim and one for the top. Glue the cylinder onto the brim, then glue the top circle over the cylinder. Add a tiny ribbon band if you want. Attach the hat near the top of the ornament, slightly tilted for charm. A tilted hat says, “I am festive, approachable, and probably full of cocoa.”
Step 8: Add the Hanging Loop
Thread twine, ribbon, or ornament cord through the top loop. Tie it securely. Make sure the ornament hangs straight before the glue fully dries. If it leans, adjust the scarf or hat placement. A little tilt is cute; a full sideways snowman may look like Frosty has had a long December.
Step 9: Personalize It
Write a name, date, or short message on the back using a paint pen. You can add “Christmas 2026,” “Our First Tree,” “Made by Emma,” or a family nickname. Personalization turns a simple DIY snowman ornament into a keepsake that gets pulled from the ornament box year after year.
Creative Variations for Your Frosty Ornament
Rustic Farmhouse Frosty
Use a wood slice as the base, paint it white, and add a burlap scarf. Attach twine for hanging and use tiny wooden beads for buttons. This version pairs beautifully with plaid ribbon, dried orange slices, pinecones, and natural Christmas tree decorations.
Glitter Snowman Ornament
Brush the outside of a plastic ornament with craft glue and sprinkle it with fine white glitter. Add a felt hat and scarf after the glitter dries. This gives Frosty a magical snowy finish. Seal it lightly with a clear craft sealer to help reduce glitter shedding.
Kid-Friendly Paper Frosty
Cut three circles from white cardstock and glue them together vertically. Add a construction paper hat, marker face, yarn scarf, and sticker buttons. Punch a hole at the top and tie with ribbon. This version is ideal for classrooms because it is inexpensive and easy to make in batches.
Pom-Pom Frosty
Glue three white pom-poms together, largest on the bottom and smallest on top. Add a felt carrot nose, bead eyes, and a pipe cleaner scarf. This fluffy version looks adorable on smaller trees, garlands, or gift packages.
Memory Ornament Frosty
Place a tiny rolled note inside a clear ornament before filling it with faux snow. The note can include a holiday wish, a favorite family memory, or a child’s handwriting. Years later, opening the ornament box will feel like finding a tiny letter from Christmas past.
Tips for a Better Homemade Snowman Ornament
First, use lightweight materials. Heavy ornaments can drag down tree branches, especially on smaller artificial trees. Plastic ornaments, felt, foam, ribbon, and pom-poms are ideal because they are easy to hang and safer for kids to handle.
Second, allow glue and paint to dry completely between steps. Holiday excitement is real, but wet glue has a way of turning a cheerful snowman into a lint-covered mystery creature. Give each layer time to set.
Third, choose a strong hanging loop. Twine, satin cord, and narrow ribbon all work well. Tie a double knot and test the ornament before placing it on the tree. Nobody wants Frosty making a dramatic midnight dive into the presents.
Fourth, seal painted or salt dough ornaments. A clear acrylic sealer can help protect paint and reduce moisture damage. This is especially important for salt dough ornaments, which should be fully dry before decorating and storing.
Finally, store homemade ornaments carefully. Wrap them in tissue paper, place them in a divided ornament box, or store them in a labeled container. Keep them away from heat and moisture so they look fresh next Christmas.
How to Make This Craft with Kids
A Frosty the Snowman homemade ornament is a great family craft because it can be adjusted for different ages. Younger children can fill plastic ornaments, choose scarf colors, stick on foam shapes, and draw simple faces. Older kids can cut felt, design hats, paint details, and write names or dates.
For safety, adults should handle hot glue, sharp scissors, and any craft knives. Use washable paint, non-toxic glue, and plastic ornaments for younger crafters. Set up supplies in small bowls or trays so pom-poms and beads do not roll everywhere. They still might. Pom-poms are basically tiny festive escape artists.
To make the experience smoother, prepare some pieces ahead of time. Pre-cut scarf strips, hat shapes, and carrot noses. Kids can then focus on assembling and decorating. This keeps the craft fun instead of turning it into a long waiting game with gluey fingers.
Gift Ideas Using Frosty Ornaments
These ornaments make thoughtful handmade gifts for grandparents, teachers, neighbors, coworkers, and friends. Tie one to a wrapped present as a gift topper. Add one to a cookie tin. Place one in a small kraft box with tissue paper and a handwritten tag. You can also make a matching set of snowman ornaments for a family, giving each snowman a different scarf color or name.
For a classroom or party favor, write each guest’s name on the ornament and hang them on a mini tree. At the end of the event, everyone takes home their own Frosty. It is simple, affordable, and much more memorable than another candy cane that ends up forgotten in a backpack until spring.
Common Mistakes to Avoid
Using Too Much Glue
Too much glue can leave visible clumps or make felt slide around. Use small dots and press pieces gently into place. If glue squeezes out, wipe it away before it dries.
Overfilling the Ornament
A clear ornament should close easily. If it bulges, remove some filling. A snowman ornament should look fluffy, not like it is wearing three sweaters under a coat.
Skipping Dry Time
Paint pens and glue need time to set. Let the face dry before adding scarves or hats. This prevents smudges and keeps the design crisp.
Forgetting to Add the Date
A date turns a craft into a keepsake. Even a small year written on the back helps preserve the memory.
Experience Notes: What Making a Frosty Ornament Really Feels Like
Making a Frosty the Snowman homemade ornament sounds simple, and it is, but the real magic happens in the small moments around the craft. The table fills up with ribbon scraps. Someone chooses the “perfect” button and then changes their mind seven times. A child decides Frosty needs purple earmuffs, gold shoes, and possibly a pet penguin. The ornament becomes less about copying a sample and more about letting everyone’s holiday imagination stretch its legs.
One of the best experiences with this craft is how quickly it brings people together. Unlike complicated DIY projects that require exact measurements and a heroic amount of patience, this ornament welcomes beginners. A grandparent can cut ribbon while a child fills the ornament with faux snow. A parent can help glue the hat while someone else draws the face. The project naturally becomes a little assembly line of laughter, storytelling, and mild debates about whether Frosty’s smile should have five dots or seven.
Another wonderful part is how each ornament ends up different. Even when everyone starts with the same supplies, no two snowmen look alike. One Frosty may look classic with a black hat and red scarf. Another may look like he just returned from a ski vacation in neon green felt. A third may have googly eyes that point in different directions, which somehow makes him the favorite. Homemade ornaments have a way of turning imperfections into personality.
This craft also teaches patience in a gentle way. Waiting for glue to dry is not glamorous, but it gives families a chance to slow down during a season that often feels rushed. While the ornaments dry, you can play Christmas music, make cocoa, wrap presents, or clean glitter off the dog if necessary. The finished ornament becomes a reminder that holiday joy does not have to be expensive or complicated. Sometimes it is just a plastic ball, a scrap of ribbon, and a carrot nose made from orange felt.
For adults, making this ornament can feel surprisingly nostalgic. Many people remember school crafts, handmade decorations, or ornaments from childhood that still appear on the family tree. Creating a new Frosty ornament continues that tradition. It says, “This year mattered. We made something with our hands. We paused long enough to enjoy it.” That feeling is worth more than a perfect store display.
If you make several Frosty ornaments over the years, they can become a family collection. Add the year to each one. Change the scarf color annually. Let each child design their own snowman every December. After a few seasons, the tree will hold a cheerful little snowman parade, each ornament carrying its own story. Some will be neat. Some will be wonderfully weird. All of them will belong.
And that is the heart of this project. A Frosty the Snowman homemade ornament is not just a craft; it is a small celebration of creativity, memory, and holiday cheer. It is proof that a meaningful Christmas decoration does not need to come from a fancy boutique. Sometimes the best ornament is made at the kitchen table, surrounded by glue sticks, ribbon curls, and people who are enjoying each other’s company. Frosty would approve. He might even ask for extra glitter.
Conclusion
A Frosty the Snowman homemade ornament is easy to make, fun to personalize, and charming enough to earn a front-row spot on the Christmas tree. Whether you use a clear plastic ornament, pom-poms, wood slices, salt dough, felt, or recycled mason jar lids, the result is a keepsake filled with handmade warmth. This DIY snowman ornament is perfect for families, classrooms, holiday parties, and thoughtful homemade gifts. Best of all, it gives you permission to slow down, laugh at crooked scarves, and enjoy the cozy creativity that makes Christmas decorating feel personal.