There are two kinds of backyard projects: the ones that require a trip to the hardware store, three new tools, and a suspicious amount of confidenceand the ones you can make with a clean soda bottle, a few household supplies, and the joyful hope that a glittering little flying jewel will visit your yard. This guide is the second kind.
Learning how to make a hummingbird feeder using a soda bottle is a simple, budget-friendly way to reuse plastic while creating a nectar station for one of America’s most beloved backyard visitors. Hummingbirds are tiny, fast, energetic, and dramatic enough to make your patio feel like a nature documentary with better snacks. A DIY soda bottle hummingbird feeder can help attract them, but only if it is built safely, cleaned often, and filled with the right homemade nectar.
The good news? You do not need red dye, fancy nectar packets, or a feeder shaped like a Victorian chandelier. You need clean materials, the correct sugar-water ratio, and a design that does not leak like a toddler with a juice box. Let’s build one properly.
Why Use a Soda Bottle for a DIY Hummingbird Feeder?
A soda bottle makes a surprisingly useful base for a homemade hummingbird feeder because it is lightweight, easy to hang, and already designed to hold liquid. Instead of tossing the bottle into the recycling bin immediately, you can give it a second life in the garden.
This project also has a few practical advantages. A clear bottle lets you see the nectar level at a glance. The screw cap gives you a natural place to add feeding ports. The bottle shape is easy to wrap with wire or string for hanging. Best of all, you can make several feeders for very little money, which is helpful because hummingbirds can be territorial. One tiny bird may decide that your entire yard is its private restaurant and everyone else can kindly hover elsewhere.
However, there is one important warning: a homemade feeder must be easy to clean. Hummingbird nectar spoils quickly, especially in warm weather. If your design has tiny corners, glued seams, or hidden cavities that trap old sugar water, it can grow mold or bacteria. Cute is nice. Clean is non-negotiable.
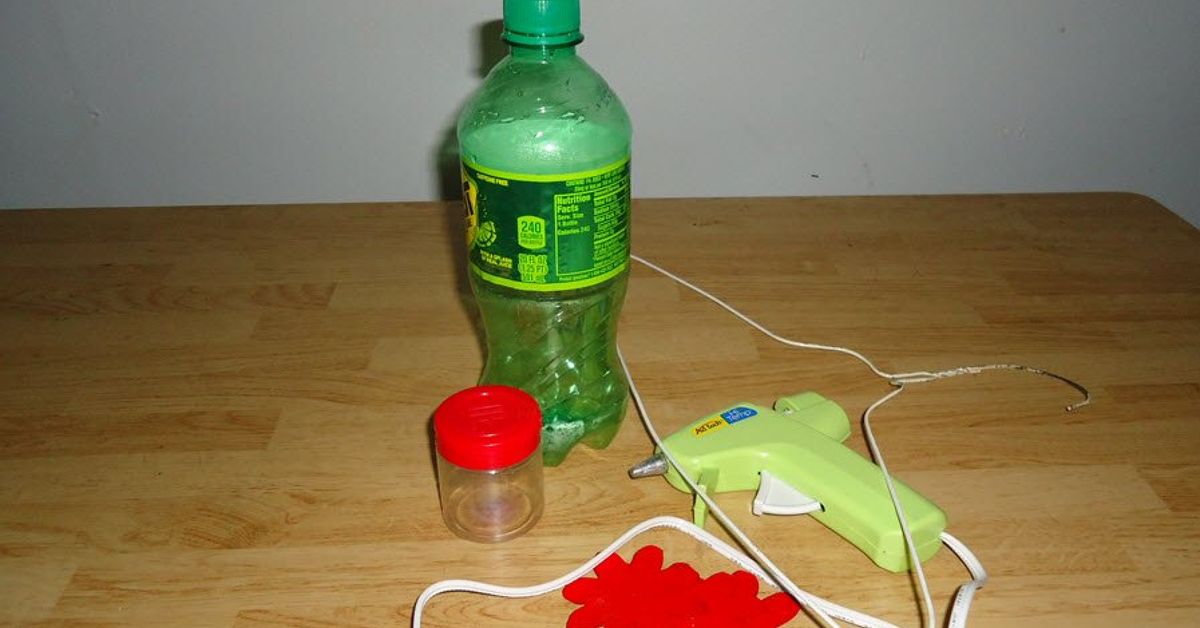
Materials You Will Need
Before you start, gather everything in one place. This prevents the classic DIY situation where you are holding a half-cut bottle and suddenly realize the scissors have joined the witness protection program.
Basic Supplies
- One clean 16-ounce or 20-ounce plastic soda bottle with cap
- Red or orange plastic flowers, bottle caps, or craft foam for flower-shaped feeding accents
- Two to four short pieces of plastic straw or small feeding tubes
- Craft wire, strong string, or a small hanging chain
- A pushpin, small nail, awl, or drill with a small bit
- Scissors or a craft knife
- Hot glue or waterproof, non-toxic outdoor sealant
- A small tray, shallow plastic lid, or red plastic cup bottom for a feeding base
- Fine sandpaper or a nail file
For the Nectar
- 1 part plain white granulated sugar
- 4 parts water
- A clean spoon or measuring cup
- A small saucepan or heat-safe container
Use only plain white granulated sugar. Do not use honey, brown sugar, raw sugar, powdered sugar, artificial sweeteners, or red food coloring. Hummingbirds are tiny athletes, not dessert critics. They need simple sucrose water that resembles natural flower nectar.
Step-by-Step: How to Make a Hummingbird Feeder Using a Soda Bottle
Step 1: Wash the Bottle Thoroughly
Start by removing the label and washing the soda bottle, cap, and any parts that will touch nectar. Use hot water and mild dish soap, then rinse extremely well. You do not want leftover soda, soap residue, or mystery stickiness inside the feeder.
Let everything dry completely. If the bottle still smells like cola, lemon-lime soda, or artificial grape thunderstorm, wash it again. Hummingbirds should be attracted by fresh nectar, not yesterday’s soft drink.
Step 2: Decide on the Feeder Style
There are two common ways to make a soda bottle hummingbird feeder. The first is the inverted bottle style, where the bottle hangs upside down and nectar flows into a small base. The second is the side-port style, where the bottle hangs upright and birds drink from small ports near the lower side of the bottle.
For beginners, the inverted bottle with a shallow base is usually easier to monitor, but it must be sealed carefully to prevent leaks. If you are using a thin plastic soda bottle, keep the feeder small and fill it only halfway at first. A lighter feeder is easier to hang and less likely to swing wildly in the breeze like it just heard bad news.
Step 3: Make the Feeding Base
Use a shallow plastic lid, the bottom of a small red plastic cup, or a clean reusable container lid as the base. The base should be wide enough to catch nectar from the bottle opening but shallow enough that the feeding ports are easy to clean.
Trace the bottle cap or neck in the center of the base. Carefully cut a hole just large enough for the bottle neck to fit snugly. A tight fit matters because a loose connection can leak. If the plastic edges are sharp, smooth them with sandpaper or a nail file.
Step 4: Add Feeding Ports
Make two to four small feeding holes around the base. Hummingbirds have long bills and tongues, so the holes do not need to be large. In fact, smaller holes help reduce leaking and discourage bees from crawling inside.
If you are using short straw pieces as feeding tubes, insert them through the holes at a slight upward angle. Seal around each straw with waterproof, non-toxic sealant or hot glue. Let the seal cure completely before adding nectar. The goal is simple: nectar accessible to hummingbirds, not dripping onto your patio like a sugary crime scene.
Place red or orange flower shapes around the feeding holes. Hummingbirds are strongly attracted to bright warm colors, especially red, but the color belongs on the feedernot in the nectar. A red flower accent around each port is enough to help birds spot the feeder.
Step 5: Attach the Bottle to the Base
Insert the bottle neck through the center hole in the base. The cap may be modified with a small hole, or the bottle may screw into a base depending on your design. If you are using the cap, drill or punch one tiny hole in it to allow slow nectar flow into the base.
Test the fit with plain water before using nectar. Fill the bottle with water, attach the base, invert it over the sink, and watch for leaks. If water pours out quickly, the hole is too large or the seal is weak. If nothing flows at all, the hole may be too small. Adjust slowly. DIY is mostly problem-solving with better lighting.
Step 6: Create a Hanger
Wrap craft wire around the upper and lower parts of the bottle to form a secure cradle. Twist the wire firmly, leaving a loop at the top for hanging. You can also use strong string, but wire usually holds the bottle more steadily.
Make sure the feeder hangs level. A tilted feeder can leak, attract ants, and generally behave like it was assembled during an earthquake. If needed, add a second support loop around the bottle shoulder to keep it balanced.
Step 7: Make Safe Hummingbird Nectar
The best homemade hummingbird nectar recipe is simple:
Mix 1 part white granulated sugar with 4 parts water.
For example, combine 1 cup of sugar with 4 cups of water, or 1/4 cup of sugar with 1 cup of water for a smaller batch. Stir until the sugar dissolves completely. You may heat the water to help dissolve the sugar, but always let the nectar cool to room temperature before filling the feeder.
Do not add red dye. Do not add vitamins. Do not add fruit juice. Do not add honey. Do not add anything that sounds like it belongs in a smoothie. Plain sugar water is the safest standard for feeder nectar.
Step 8: Fill and Hang the Feeder
Fill the bottle only partway for the first test. Attach the base securely, invert the feeder, and check again for leaks. Once it passes the sink test, hang it outdoors in a partially shaded location.
Good feeder placement is part science, part hospitality. Hang the feeder where hummingbirds can see it, but avoid full afternoon sun because heat makes nectar spoil faster. A spot near nectar-rich flowers is excellent. A location near a window can be enjoyable for viewing, but place it either very close to the glass or far enough away to reduce collision risk.
Where to Hang Your Soda Bottle Hummingbird Feeder
Choose a place that is visible, shaded, and easy for you to reach. If you need a ladder, hiking boots, and emotional preparation to clean the feeder, you will not clean it often enough.
Hang it about 4 to 6 feet above the ground when possible. Keep it away from dense shrubs where cats or other predators may hide. If ants become a problem, use an ant moat above the feeder. You can buy one or make a simple version with a small cup of water placed between the hook and the feeder.
If one hummingbird guards the feeder like a tiny feathered bouncer, hang a second feeder out of sight from the first. Multiple feeding stations can reduce bullying and give more birds a chance to visit.
How Often Should You Clean a Homemade Hummingbird Feeder?
Cleaning is the most important part of owning any hummingbird feeder, homemade or store-bought. Sugar water can ferment, cloud, and grow mold. In mild weather, change the nectar every two to three days. In hot weather, change it daily or whenever it looks cloudy.
Wash the feeder with hot water and a bottle brush. For deeper cleaning, use a diluted white vinegar solution, then rinse thoroughly. Avoid leaving soap residue. If you see black mold, sticky buildup, or cloudy nectar, take the feeder down immediately and clean it before refilling.
A soda bottle feeder should also be inspected for scratches, cracks, or warped plastic. Scratched plastic can hold residue and become harder to sanitize. If the bottle starts looking cloudy or rough inside, retire it and make a fresh feeder. The project is cheap; hummingbird health is not.
Common Mistakes to Avoid
Using Red Dye
Red dye is unnecessary. Use red parts on the feeder instead. Bright red flowers, a red base, or red ribbon near the feeder can attract hummingbirds safely.
Making Nectar Too Sweet
More sugar is not better. A 1:4 sugar-to-water ratio is the standard recipe for everyday feeder use. Overly sweet nectar may spoil faster and is not needed for healthy birds.
Forgetting to Clean the Feeder
A dirty feeder can harm birds. If you are too busy to clean it regularly, take it down until you can maintain it. No feeder is better than a spoiled feeder.
Making Feeding Holes Too Large
Large holes invite leaks, bees, wasps, and ants. Keep ports small and neat. If insects dominate the feeder, clean it, reduce leaks, and move it to a slightly different location.
Using Weak Hanging Materials
A full bottle of nectar has weight. Use sturdy wire or cord, and test the hanger before placing the feeder outside. Nobody wants to host the world’s smallest syrup explosion.
How to Attract More Hummingbirds Naturally
A feeder is helpful, but flowers make your yard far more appealing. Hummingbirds love nectar-rich blooms, especially tubular flowers in red, orange, pink, and purple shades. Consider planting bee balm, salvia, trumpet honeysuckle, cardinal flower, columbine, penstemon, or native trumpet creeper where appropriate for your region.
A hummingbird-friendly yard should also avoid heavy pesticide use. Hummingbirds eat tiny insects and spiders for protein, and they use spider silk for nest-building. A perfectly sterile yard may look tidy, but to a hummingbird, it is basically an airport with no restaurants.
Provide perches, shrubs, and small trees nearby so birds can rest between feeding trips. Hummingbirds spend plenty of time sitting, watching, and defending their favorite food sources. They may be small, but they have the confidence of a neighborhood committee president.
Is a Soda Bottle Feeder Better Than a Store-Bought Feeder?
A homemade soda bottle feeder is not automatically better than a store-bought model. Commercial feeders are often easier to disassemble and scrub, which is a major advantage. But a DIY feeder can be useful as a temporary, educational, or creative project if you design it with cleaning in mind.
The best feeder is not the fanciest one. It is the one you can keep clean, refill with safe nectar, and hang in a smart location. If your soda bottle feeder leaks constantly or is difficult to wash, redesign it or switch to a simple saucer-style feeder. Practicality wins.
of Real-Life Experience: What Making a Soda Bottle Hummingbird Feeder Teaches You
The first thing you learn when making a hummingbird feeder from a soda bottle is that hummingbirds are not impressed by your crafting ego. You can spend an hour cutting perfect flower shapes, adjusting wire loops, and admiring your recycled masterpiece, only for the first visitor to zip by, inspect it for half a second, and vanish like a tiny unpaid critic. Do not take it personally. Hummingbirds are cautious with new food sources. Give them time.
From experience, the testing stage matters more than the decorating stage. A feeder that looks charming on the table may drip outdoors once the sun warms the plastic. Always test with water first. Hang it over a sink, porch rail, or bucket and watch it for several minutes. A slow drip might seem harmless, but outside it becomes an ant invitation written in sugar. If you see leaks, seal them before adding nectar.
Another useful lesson is to make the feeder smaller than you think you need. New hummingbird fans often want a giant bottle full of nectar, imagining a crowd of birds lining up like it is opening day at a dessert buffet. In reality, fresh nectar is better than abundant nectar. Unless you have heavy hummingbird traffic, fill the feeder with only enough sugar water for a day or two. Less waste, easier cleaning, happier birds.
Placement can make or break the project. A feeder in blazing sun may look beautiful at breakfast and become a warm fermentation experiment by afternoon. A feeder hidden too deep in a tree may never be noticed. The sweet spot is bright but partially shaded, visible from above, and close to natural cover without being buried in predator-friendly shrubbery. Near flowers is ideal because blooms act like a neon sign that says, “Good stuff here.”
You also learn that cleaning becomes part of the hobby. It is not glamorous. Nobody posts dramatic photos of themselves scrubbing feeder ports with a tiny brush, although frankly, maybe we should. But cleaning is the difference between helping hummingbirds and accidentally creating a risky feeding station. Keep a dedicated bottle brush or small straw brush nearby. Once the routine is easy, maintenance feels less like a chore and more like caring for a very small outdoor café.
Finally, the real reward is patience. The first hummingbird visit may happen in a flash: a glimmer of green, a buzz of wings, a quick sip, and gone. Then it returns. Then another bird appears. Soon you may find yourself standing very still by the window, whispering, “There it is!” like you have discovered buried treasure. And in a way, you have. You turned a soda bottle into a reason to look closer at your yard, waste less, plant better, and pay attention to one of nature’s most energetic little miracles.
Conclusion
Making a hummingbird feeder using a soda bottle is a fun, affordable, and eco-friendly backyard project, but the real success comes from safe design and consistent care. Use a clean bottle, small feeding ports, bright red accents, and a secure hanger. Fill it with simple homemade nectar made from 1 part white sugar and 4 parts water. Skip red dye, honey, brown sugar, and artificial sweeteners. Most importantly, clean the feeder often and replace nectar before it spoils.
A DIY soda bottle hummingbird feeder can bring quick flashes of color, movement, and joy to your garden. It can also remind you that great backyard wildlife projects do not need to be complicated. Sometimes they begin with a bottle, a little sugar water, and the humble belief that even the tiniest guests deserve a clean table.