If your walls are begging for a vacation, a beachy beaded placemat clock might be the easiest way to give them one without booking airfare. This project turns a decorative beaded placemat into a coastal-inspired wall clock that feels part craft, part home décor, and part “Wait, you made that?” conversation starter. It has texture, sparkle, personality, and just enough practical purpose to justify your next craft-store trip.
The charm of a beachy beaded placemat clock is that it blends several design trends people already love: woven texture, natural color palettes, a handmade look, and functional décor. Coastal style works best when it feels relaxed rather than theme-park nautical, so this project leans into sandy neutrals, sea-glass blues, driftwood tones, pearly accents, and subtle shimmer. In other words, think “breezy beach cottage” instead of “captain’s cabin with a foghorn.”
Whether you want a statement piece for a breakfast nook, a playful accent for a guest room, or a handmade gift that looks far more expensive than it is, this DIY clock has real potential. Better yet, it is customizable. You can go soft and elegant, colorful and tropical, or vintage and weathered. The basic idea stays simple: start with a round beaded placemat, add a clock movement, and style it so the finished piece looks intentional, balanced, and easy to read.
What Is a Beachy Beaded Placemat Clock?
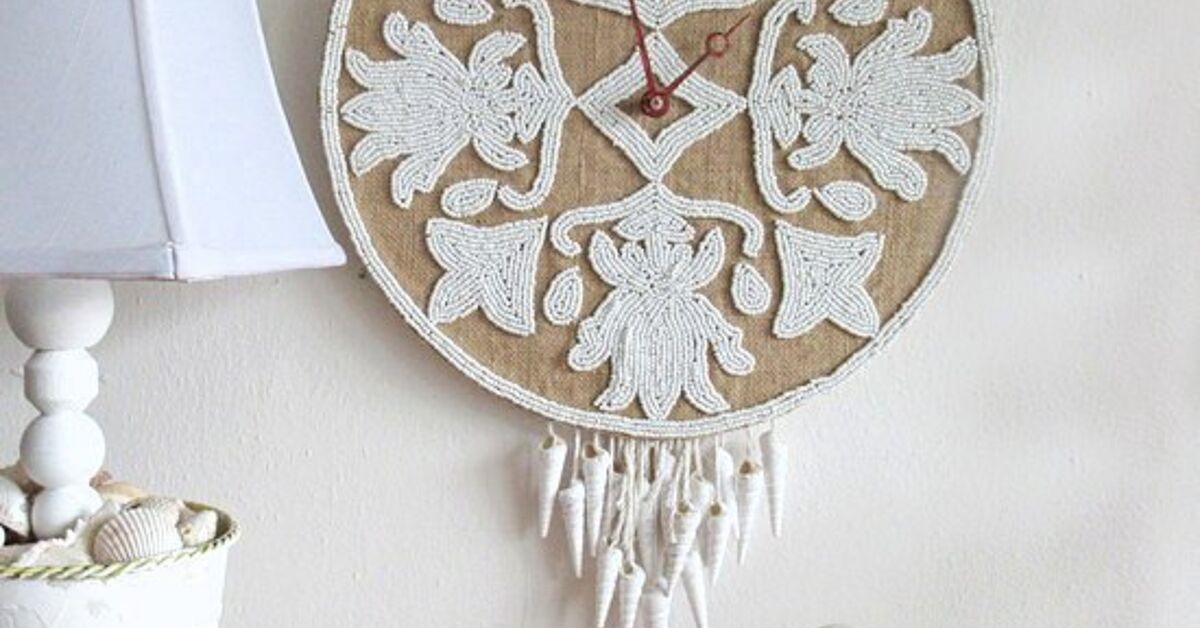
A beachy beaded placemat clock is a DIY wall clock made by repurposing or upcycling a decorative placemat as the clock face. The “beachy” part usually comes from the color story and materials: beads that resemble shells or sea glass, woven details that echo rattan or jute, and tones inspired by sand, surf, salt air, and sun-bleached wood. The result is a wall piece that feels casual, summery, and handcrafted in the best possible way.
The placemat acts as the visible clock face, while a quartz clock movement sits behind it. Most DIY clock mechanisms are battery-powered and fairly compact, which makes them ideal for lightweight projects like placemats, thin wood panels, and craft boards. That makes this project approachable even for beginners who are more “glue gun optimist” than “tool-belt professional.”
Why This DIY Project Works So Well
Some crafts are beautiful but completely impractical. Others are useful but look like they were assembled during a power outage. This project lands in a sweet spot. A beachy beaded placemat clock is decorative and functional, which means it earns wall space instead of merely asking for it.
It also works because beaded placemats already have built-in visual interest. They often feature circular patterns, radiating details, embroidered motifs, or dimensional borders that naturally draw the eye toward the center. Conveniently, the center is exactly where the clock mechanism belongs. It is one of those rare DIY ideas where the base item feels like it was secretly hoping to become a clock all along.
Another reason it works is scale. A placemat is large enough to read from across a room, yet small enough to hang almost anywhere. It can fill an awkward blank wall, soften a gallery arrangement, or add character above a sideboard, bar cart, or entry table.
Materials You Will Need
- 1 round beaded placemat
- 1 quartz clock movement kit with hands
- 1 AA battery
- Pencil or fabric marker
- Ruler or measuring tape
- Craft knife, awl, or small drill, depending on the placemat material
- Cardboard or thin wood backing if the placemat is very flexible
- Strong craft adhesive or hot glue, if reinforcement is needed
- Wall hanger or hook rated for the finished weight
- Optional embellishments such as shells, tassels, rope trim, faux pearls, or paint
How to Choose the Right Clock Movement
This is the part that separates a cute idea from a clock that actually tells time instead of just expressing itself artistically. Before buying a movement kit, measure the thickness of your placemat and any backing you plan to use. The threaded shaft on the movement needs to be long enough to pass through the full thickness of the material and still leave enough room for the washer, nut, and hands.
If the placemat is lightweight and your hands are relatively small, a standard quartz movement will usually do the job. If you plan to use oversized decorative hands, check whether you need a high-torque movement. Bigger hands are dramatic, but drama is only fun when the minute hand is not collapsing under its own ambition.
How to Make a Beachy Beaded Placemat Clock
1. Pick the Right Placemat
Start with a round placemat that feels sturdy enough to hold its shape. Beaded placemats with dense stitching, embroidery, or a firm backing are usually easier to work with than extremely floppy ones. Look for a design with a clear center point or a symmetrical pattern. Coastal colors such as ivory, soft aqua, seafoam, coral, tan, pale blue, sandy beige, and sun-faded white work especially well.
If your placemat is gorgeous but flexible, do not panic. Add a backing layer made from thin wood, foam board, or sturdy cardboard cut to size. This gives the clock movement more support and helps the finished piece sit flatter against the wall.
2. Find and Mark the Center
Lay the placemat flat and measure across it horizontally and vertically to find the center. Mark that point lightly. Accuracy matters here because even a slightly off-center mechanism can make the finished clock look crooked, and nobody wants a clock that appears to be relaxing harder than the rest of the room.
If the beading pattern already has a center medallion, use that as your guide. Symmetry is your friend.
3. Create the Hole Carefully
Make a small opening at the center for the clock shaft. The best method depends on the material. If the placemat is fabric-backed, an awl or sharp craft tool may be enough. If you are working through a wood or rigid backing, a small drill bit might be the better option. Go slowly to avoid fraying thread, cracking beads, or damaging the decorative pattern.
The hole should be just large enough for the shaft to pass through. Too small and the movement will not fit. Too large and the mechanism may wobble. That is charming in beach grass, not in timekeeping equipment.
4. Install the Movement
Insert the movement from the back so the shaft comes through the front. Add the rubber washer if included, then the brass washer and mounting nut according to your kit instructions. Tighten it enough to hold the movement securely, but do not overdo it. Cranking it down like you are closing a pickle jar from 1998 can damage delicate materials.
If the placemat is uneven because of beadwork, use a small stabilizing disk or backing plate behind the movement. This helps the mechanism sit straighter and reduces stress on the placemat.
5. Attach the Clock Hands
Attach the hour hand first, pressing it on gently and aligning it carefully. Then attach the minute hand, and finally the second hand if your kit includes one. The hands should sit parallel without touching each other or scraping the placemat surface. Before adding the battery, move the hands manually through a full rotation to make sure they clear one another.
This is not the moment to embrace “close enough.” If the hands rub, the clock may stop, lag, or behave like it is negotiating with time instead of measuring it.
6. Add Numbers or Keep It Minimal
At this point, decide how readable you want the clock to be. Some beaded placemats already have pattern points that can visually suggest the hours. If not, add small markers at 12, 3, 6, and 9 using pearls, painted dots, mini shells, driftwood-style beads, or metallic stickers. For a cleaner modern-coastal look, keep the face mostly open and let the texture do the talking.
If the placemat is richly detailed, fewer additions usually look better. You want “designed,” not “souvenir shop lost-and-found bin.”
7. Hang It Securely
Many clock movements include a built-in hanger on the back. Use it if the finished clock is light and balanced. For heavier versions, especially those with wood backing or extra embellishments, make sure your wall hardware is rated for the weight. A level is helpful here unless you enjoy clocks that make guests tilt their heads like confused puppies.
Best Color Ideas for a Coastal Look
If you want your beachy beaded placemat clock to feel stylish rather than overly themed, start with a restrained palette. White, cream, beige, weathered tan, and pale gray create a sandy base. Then layer in watery tones such as soft aqua, muted turquoise, seafoam green, pale teal, or dusty blue. A touch of coral or blush can add warmth without overpowering the design.
Metal finishes matter, too. Brushed gold can add a sunlit glow. White hands feel airy and clean. Black hands offer stronger contrast and easier readability. For a soft driftwood-inspired look, choose light wood or matte neutral accents around the clock face.
You can also tailor the project to different coastal moods:
- Classic coastal: white, navy, beige, and rope details
- Soft beach cottage: ivory, pale blue, shell pink, and pearly beads
- Tropical shoreline: turquoise, coral, sandy tan, and bold texture
- Modern organic coastal: oatmeal, flax, driftwood, matte brass, and minimal markers
Mistakes to Avoid
Choosing a placemat that is too flimsy: If it droops, the hands may catch or the clock may not hang properly.
Ignoring shaft length: This is one of the most common DIY clock mistakes. If the shaft is too short for the material thickness, the movement will not assemble correctly.
Using hands that are too large: Oversized hands can overpower the placemat visually and mechanically.
Overdecorating the face: A beachy beaded placemat clock already has texture. Let it breathe.
Skipping a test run: Always install the battery and let the clock run on a table before hanging it on the wall.
Where to Use a Beachy Beaded Placemat Clock
This kind of clock is surprisingly versatile. It works beautifully in a breakfast nook, entryway, sunroom, guest bedroom, covered porch, beach house rental, or craft room. It can also make a fun addition to a bathroom with coastal styling, as long as the room is not so humid that it damages the placemat or metal hardware over time.
It also makes a thoughtful handmade gift. Housewarmings, birthdays, Mother’s Day, hostess gifts, or summer wedding décor all come to mind. It feels personal without being overly serious, which is ideal. Not every gift needs to say, “I know your soul.” Sometimes it just needs to say, “I made you a pretty clock, and now your wall has better taste.”
Conclusion
A beachy beaded placemat clock is one of those rare DIY projects that manages to be affordable, practical, customizable, and genuinely stylish. It turns a humble tabletop item into wall décor with texture and charm, while giving you endless room to personalize the final look. The best versions are not fussy. They feel breezy, balanced, and just imperfect enough to remind you that something handmade often has more character than something factory-perfect.
If you love coastal décor but want it to feel fresh, this project is worth a try. Start with a placemat that already makes you smile, choose clock hardware that fits the material, and keep your palette light and relaxed. The end result can be elegant, playful, rustic, or polished, but it should always feel easy. After all, beach style is not supposed to look stressed. Neither should your clock.
Experience: Living With and Making a Beachy Beaded Placemat Clock
The real fun of a beachy beaded placemat clock begins after the glue dries and the battery goes in. On paper, it is a simple craft. In real life, it changes the mood of a room more than you expect. A plain wall suddenly has texture. A forgotten corner looks finished. A small breakfast nook feels like it belongs to someone who drinks coffee slowly and somehow never loses their sunglasses. That may or may not be true, but the clock definitely helps sell the fantasy.
One of the best things about this project is how personal it feels. Two people can start with the same idea and end up with completely different results. One clock might lean elegant, with pearl-like beads, soft gold hands, and a barely-there palette of cream and sea glass. Another might go full cheerful shoreline with aqua accents, tiny shell markers, and a playful pop of coral. Both can work, which is part of the appeal. The project is flexible enough to match your home instead of bossing it around.
The making process itself is also more satisfying than expected. There is something oddly delightful about turning an object meant for a dining table into something that hangs proudly on a wall. It feels resourceful without being preachy. It feels creative without requiring a full workshop. And it offers that magical DIY moment when the parts finally come together and stop looking like “supplies” and start looking like “I absolutely meant to do that.”
People also tend to notice this clock in a different way than they notice ordinary décor. A framed print might blend in. A generic store-bought clock might get a quick glance. But a beaded placemat clock usually earns a second look. Guests ask where it came from. Then you get to enjoy the deeply satisfying moment of saying, “I made it,” as casually as possible, even though your inner voice is already accepting an imaginary craft award.
It is also a fun seasonal piece. In summer, it feels bright and breezy. In winter, especially in a landlocked home far from any actual shoreline, it becomes a cheerful reminder that warm weather still exists and flip-flops will rise again. If your décor changes through the year, the clock can shift with it. Pair it with shells and driftwood in July, then style it with softer neutrals and woven textures in the colder months. Good coastal décor is not just about beaches; it is about ease, light, and natural texture.
Another nice surprise is that this type of clock works well in homes that are not overtly coastal. You do not need anchor pillows, model sailboats, or a bathroom painted the exact color of a toothpaste commercial. In a modern room, the clock adds warmth. In a cottage-style room, it adds personality. In an eclectic space, it reads as handmade art with a function attached. It is beachy, yes, but in a grown-up, relaxed way.
Most of all, the experience of making and living with a beachy beaded placemat clock is a reminder that décor can be fun. Not intimidating. Not precious. Fun. You take an inexpensive object, add a little imagination, solve a few practical details, and end up with something that tells time while also telling a story. And that is a pretty nice trick for a placemat.