

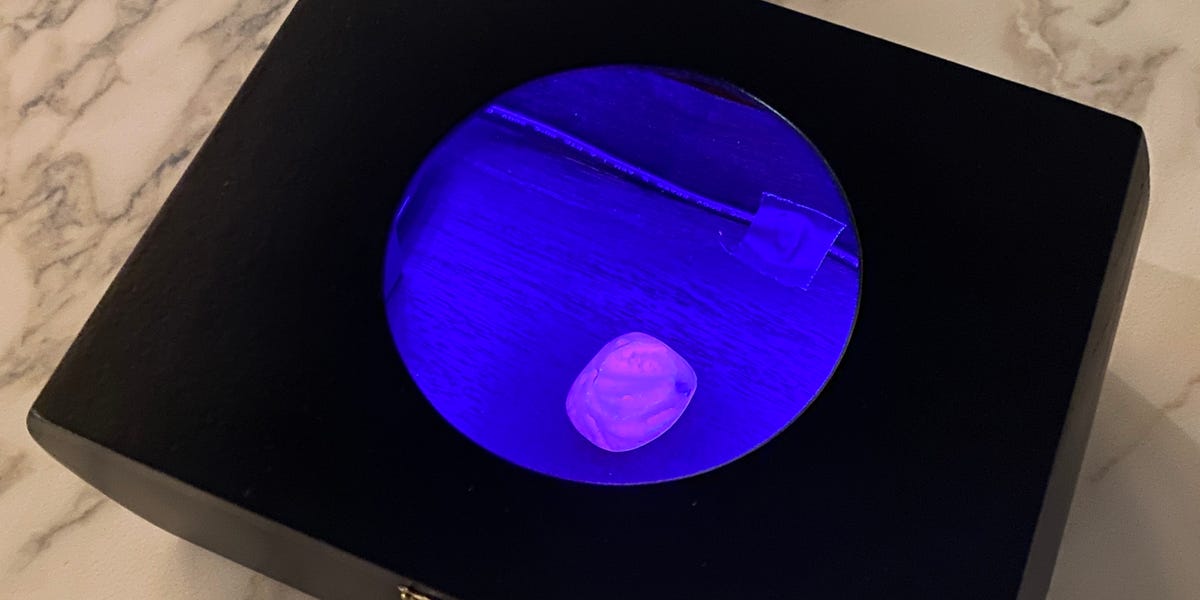
A cigar box has a talent for reinvention. One day it holds cigars, the next day it becomes a tiny museum, a jewelry case, a guitar, orin this very satisfying projecta glowing display for fluorescent rocks. Yes, the proper science word is “fluorescent,” but we will keep the title’s charming “florescent” spelling as a nod to the handmade spirit of the project. After all, a DIY cigar box project should have a little personality.
This guide shows you how to turn a wooden cigar box into a compact UV rock display that makes ordinary-looking stones glow like they have been keeping cosmic secrets. With a few basic tools, a small ultraviolet light, dark interior paint, and a thoughtful layout, you can build a portable display for fluorescent minerals, glow rocks, Yooperlites, calcite, fluorite, sodalite, willemite, or any other UV-reactive specimens in your collection.
The goal is simple: build something attractive, safe, affordable, and sturdy enough to sit on a shelf without looking like a middle school science fair project had a dramatic breakup with a flashlight. The result is part shadow box, part mineral cabinet, and part “wait, why is that rock glowing orange?” conversation starter.
What Is a Fluorescent Rock Display?
A fluorescent rock display is a small cabinet, box, or case designed to show minerals under ultraviolet light. Some minerals absorb UV radiation and immediately re-emit that energy as visible color. Under normal room light, a specimen may look gray, tan, white, or mildly interesting. Under the right UV wavelength, it can glow neon green, hot orange, electric blue, pink, yellow, or red.
This glow is not paint, magic, or a tiny rave hosted by geology. It is fluorescence, a natural optical effect caused by the mineral’s chemistry, trace elements, crystal structure, or impurities. Calcite, fluorite, sodalite, aragonite, scheelite, willemite, and some forms of sphalerite are well-known examples. Some rocks glow strongly under longwave UV light, while others respond better to shortwave UV. That matters when choosing your light source.
Why Use a Cigar Box?
A cigar box is nearly perfect for a DIY fluorescent rock display because it already has the bones of a miniature cabinet. Most wooden cigar boxes are compact, lightweight, easy to drill, and attractive enough to display without major woodworking skills. They also come with a lid, which is useful for creating a controlled viewing space.
Instead of building a cabinet from scratch, you can focus on lighting, layout, safety, and style. A cigar box also gives the project a vintage look. The contrast between an old wooden box and futuristic glowing minerals is oddly delightfullike a Victorian scientist discovered LEDs and immediately got carried away.
Materials You Will Need
You can keep this project simple or make it fancy. The basic version is inexpensive and beginner-friendly, while the upgraded version adds a front viewing window, cleaner wiring, and better light control.
Basic Supplies
- One wooden cigar box with a hinged lid
- Fluorescent rocks or UV-reactive mineral specimens
- 365 nm longwave UV LED strip, UV flashlight, or small blacklight bar
- Battery pack or USB power supply with an on/off switch
- Matte black paint, black felt, velvet, or black foam board
- Museum putty, removable adhesive dots, or small display stands
- Small screws, cable clips, or hot glue for securing lights
- Craft knife, small drill, ruler, pencil, and sandpaper
Optional Upgrades
- UV-blocking acrylic or clear protective front panel
- Magnetic latch or small clasp
- Mini hinges if your cigar box needs repair
- Black weather stripping to reduce light leaks
- Reflective foil tape for controlled light bounce
- Small labels for mineral names and locations
- Low-profile shelf risers or foam platforms
If you are using only a small longwave UV LED and viewing briefly, the project can be very simple. If you plan to use stronger UV lamps, especially shortwave UV, build in protective shielding and avoid direct exposure to the light source. UV safety is not the place to improvise with “I’ll just squint.” Your eyes are not replaceable accessories.
Choosing the Right UV Light
The light is the heart of your DIY fluorescent rock display. The most accessible choice is a 365 nm longwave UV LED light. It is widely available, works well with many common fluorescent rocks, and is easier to handle than shortwave UV equipment. Longwave UV is often called blacklight, although high-quality 365 nm lights usually produce less visible purple glare than cheaper 395 nm lights.
A 395 nm UV light can still make some specimens glow, but it often throws more visible violet light into the display. That can make the rocks look less dramatic because the purple glare competes with the fluorescence. A 365 nm light usually gives a cleaner result. If your goal is a display that makes guests say “Whoa,” 365 nm is usually worth the small upgrade.
Shortwave UV lights, commonly around 254 nm, can produce spectacular fluorescence in certain minerals, including many classic collector specimens. However, shortwave UV is more hazardous to skin and eyes and requires stronger safety planning. For a cigar box project, longwave UV is the better starting point. Save shortwave builds for a properly enclosed cabinet with UV-blocking materials and protective eyewear.
Best Rocks and Minerals for a Cigar Box Display
The best specimens are small, colorful under UV, and visually interesting in normal light too. You do not need museum-grade minerals. A cigar box display is intimate, so even modest rocks can look spectacular when arranged well.
Beginner-Friendly Fluorescent Specimens
- Yooperlite: Often glows orange under 365 nm UV because of fluorescent sodalite.
- Calcite: Can fluoresce red, orange, pink, or yellow depending on the specimen.
- Fluorite: Frequently glows blue, violet, cream, or greenish under UV.
- Sodalite: Known for vivid orange fluorescence in some rocks.
- Aragonite: May glow cream, white, yellow, or green.
- Willemite: Famous for bright green fluorescence, especially in classic Franklin, New Jersey specimens.
- Scheelite: Often produces a blue-white glow, especially under shortwave UV.
When shopping, look for sellers who clearly state the UV wavelength used in their photos. A rock that glows under shortwave UV may not perform the same under your 365 nm LED. That does not make the rock bad; it simply means the rock and the light are not speaking the same fluorescent language.
Step-by-Step: How to Make a DIY Fluorescent Rock Display
Step 1: Inspect and Clean the Cigar Box
Start by checking the box for loose hinges, splinters, warped corners, or strong odors. Wipe it down with a dry cloth. If the box smells heavily of cigars, leave it open for a few days in a ventilated area. A little cedar aroma is charming. A full cigar lounge experience next to your minerals is less charming.
Lightly sand rough edges and tighten any hardware. If the lid does not stay open at a good viewing angle, consider adding a small chain, ribbon support, or hinge stop. You want the lid to behave, not flop backward like it just heard shocking gossip.
Step 2: Plan the Interior Layout
Before painting or installing lights, place your rocks inside the box and experiment with arrangement. Put larger specimens toward the back and smaller ones toward the front. Leave space between rocks so each glow can be seen clearly. If everything is crowded together, the display becomes a glowing mineral traffic jam.
Try arranging specimens by color, mineral type, location, or brightness. A strong orange Yooperlite beside a green willemite and blue fluorite can create a dramatic color contrast. A collection of mostly calcite can look elegant if each piece glows a slightly different shade.
Step 3: Darken the Background
A dark interior makes fluorescent colors pop. Matte black paint is the easiest option, but black felt, velvet, or foam board can create a softer, gallery-like finish. Avoid glossy paint because it reflects UV and visible light in distracting ways. The rocks should be the stars; the box interior should be the quiet stage manager wearing black.
If you use paint, apply thin coats and let each coat dry completely. If you use felt or velvet, cut pieces carefully and attach them with craft glue or double-sided adhesive. Keep the corners clean. Sloppy fabric bunches can make the display look unfinished.
Step 4: Install the UV Light
Mount the UV LED strip or light bar along the inside top edge of the box, under the lid, or along the upper back wall. The best position depends on how your box opens. The light should shine onto the rocks without pointing directly into the viewer’s eyes.
For LED strips, use the adhesive backing plus small cable clips or a few dots of hot glue for extra hold. Adhesive strips sometimes fail over time, especially inside wooden boxes. Nobody wants to open a display and find the lighting has collapsed onto a piece of calcite like a tiny stage rigging disaster.
If the light uses USB power, drill a small hole near the back or side of the box for the cable. Sand the hole smooth so it does not damage the cord. If you use a battery pack, attach it to the back of the box or hide it behind a removable false panel.
Step 5: Reduce Light Leaks
Fluorescent minerals look best in darkness. If your cigar box has gaps around the lid, add thin black foam tape or weather stripping. This helps block stray light and gives the box a more finished feel. You can also add a small magnetic catch so the lid closes securely.
If you want the display to remain open while operating, create a front viewing panel. A clear acrylic sheet can help protect specimens and keep fingers away from the light. For stronger UV sources, choose materials specifically rated for UV blocking and design the display so viewers cannot look directly at the lamp.
Step 6: Secure the Rocks
Use museum putty, removable adhesive dots, small acrylic stands, or custom foam risers to secure the specimens. Avoid permanent glue unless you are absolutely sure you never want to rearrange the display. Collections evolve, and today’s favorite rock may eventually get promoted, retired, or replaced by something that glows like alien candy.
For heavier rocks, make sure the bottom of the cigar box can support the weight. Reinforce thin boxes with a piece of plywood, basswood, or foam board cut to fit the floor. A small display should feel solid when picked up.
Step 7: Add Labels
Labels make the project more educational and polished. Use small black cards with white ink, printed labels, or tiny folded placards. Include the mineral name, location if known, and UV response. For example: “Sodalite-rich syenite, Michigan, orange under 365 nm UV.”
Keep labels short. The display should not look like it is trying to win a footnote competition. If you want more detail, place a small QR code inside the lid linking to a personal collection page or inventory note.
Safety Tips for a UV Rock Display
UV light can be useful and beautiful, but it deserves respect. Do not stare into UV LEDs or lamps. Do not aim UV lights at faces, pets, or children. Keep viewing sessions short, use the lowest effective light strength, and consider UV-blocking glasses when working closely with the display.
Be especially careful with shortwave UV. It can irritate skin and eyes, and exposure should be controlled with shielding, distance, and protective eyewear. If you are building a display for family use, classrooms, craft fairs, or public demonstrations, design it so the lamp is enclosed and the viewer sees only the glowing rocks, not the bare UV source.
Also remember heat and wiring safety. Use low-heat LEDs, avoid overloaded power supplies, and do not bury electronics under fabric where heat can build up. If your setup feels hot, smells odd, flickers, or behaves like it is auditioning for a fire safety video, unplug it and troubleshoot before using it again.
Design Ideas to Make It Look Professional
Create Levels
Small risers make a huge difference. Use black foam blocks, cork, or painted wood scraps to lift some rocks higher than others. Levels create depth and prevent smaller specimens from hiding behind larger ones.
Use a Two-Light Setup
One small warm-white LED can show the rocks in normal light, while the UV LED reveals their hidden colors. Put both on separate switches. This creates a before-and-after effect that feels dramatic and educational. Visitors can see the “ordinary” rock first, then flip the UV light and watch the geology party begin.
Line the Lid With Information
The inside of the cigar box lid is useful real estate. Add a short explanation of fluorescence, a mineral list, or a small map showing where the specimens came from. Keep the design clean and readable.
Make It Portable
Add a small handle, latch, and battery-powered UV light to create a travel-friendly display. This is great for classrooms, rock club meetings, homeschool lessons, or show-and-tell moments where you want to arrive looking prepared instead of carrying loose rocks in a sandwich bag.
Common Mistakes to Avoid
The first mistake is using the wrong UV wavelength. Many beginners buy a cheap purple 395 nm flashlight and wonder why their rocks barely glow. Some specimens do respond to 395 nm, but a 365 nm light usually gives better results for common longwave-reactive rocks.
The second mistake is placing the light too close or at the wrong angle. Direct glare can wash out the glow and make viewing uncomfortable. Try side lighting or top-front lighting angled downward. Move the light around before permanently attaching it.
The third mistake is overcrowding the display. A cigar box is small. Let it be small. A carefully chosen group of six rocks often looks better than twenty specimens fighting for attention like contestants on a geology reality show.
The fourth mistake is skipping safety. Even a casual hobby display should keep UV exposure controlled. Use common sense, shielding, and protective habits from the beginning.
Maintenance and Care
Dust dulls the drama. Clean the inside of the display gently with a soft brush or microfiber cloth. Avoid spraying cleaners near mineral specimens, especially delicate or porous ones. Some minerals are sensitive to moisture, chemicals, or abrasion.
Check the lighting every few months. Adhesive can loosen, wires can shift, and batteries can corrode if forgotten. If you use battery power, remove batteries when storing the display for a long time. Label your power source and keep cords tidy.
Store the box away from direct sunlight and high humidity. A wooden cigar box can warp if exposed to damp conditions, and some mineral specimens may fade or degrade over time when exposed to strong light or moisture.
Experience Notes: What This Project Teaches You
A cigar box fluorescent rock display is more than a craft project. It teaches patience, observation, and the strange joy of discovering that rocks are far less boring than they have been accused of being. The best part is the transformation. You place a plain gray stone inside the box, switch on the UV light, and suddenly it glows orange like a coal from a dragon’s fireplace. That moment never gets old.
One useful experience from building this type of display is learning that lighting placement matters as much as the light itself. At first, it is tempting to blast the rocks from the front with the brightest UV source available. That often creates glare and uneven color. A better approach is to test the light from several positions. Move it along the top edge, then the side, then behind a small lip. Watch how the minerals respond. Some specimens glow best with direct light; others look better when the light is angled across their surface. The project quietly trains you to see like a photographer and think like a stage designer.
Another lesson is that contrast is everything. A fluorescent rock display needs darkness the way popcorn needs a movie. Matte black interiors, black risers, and controlled light leaks make even modest specimens look stronger. A bright wooden interior may look pretty in daylight, but under UV it can compete with the rocks. Once you switch to a dark background, the colors become cleaner and more dramatic.
The project also teaches restraint. Cigar boxes are small, and that is part of their charm. You may want to include every glowing rock you own, but a crowded display loses impact. Choose specimens like you are curating a tiny gallery. Pick one bright orange rock, one green, one blue, one pale white, and one oddball that surprises people. Leave breathing room. A good display says, “Look at these treasures.” A crowded one says, “I emptied a drawer.”
There is also a practical satisfaction in making something useful from a found object. Old cigar boxes often have interesting labels, warm wood tones, and built-in character. By adding UV lighting and minerals, you give the box a second life. It becomes a conversation piece, a teaching tool, and a personal collection cabinet. It is the kind of project that invites people closer. They ask what the rocks are, why they glow, where they came from, and whether all rocks can do that. Suddenly, your small box has started a geology lesson without sounding like a lecture.
Finally, this project encourages safe curiosity. Fluorescent minerals are fascinating, but UV light should be handled thoughtfully. Building the display with shielding, careful lamp placement, and good habits makes the experience better for everyone. The final result should feel magical, not reckless. When done well, a DIY cigar box fluorescent rock display is compact, beautiful, educational, and just weird enough to be memorable. In other words, it is exactly the kind of project that makes a weekend feel well spent.
Conclusion
A cigar box project is a clever way to build a DIY fluorescent rock display without needing a full workshop, a giant budget, or a degree in museum exhibit design. With a sturdy box, a dark interior, the right 365 nm UV light, and a small collection of UV-reactive minerals, you can create a glowing miniature gallery that looks far more impressive than the parts list suggests.
Focus on three things: choose rocks that respond well to your light, control glare and light leaks, and treat UV safety seriously. Add labels, risers, and a clean layout, and your cigar box will become a tiny mineral theater where every rock gets its dramatic entrance.