

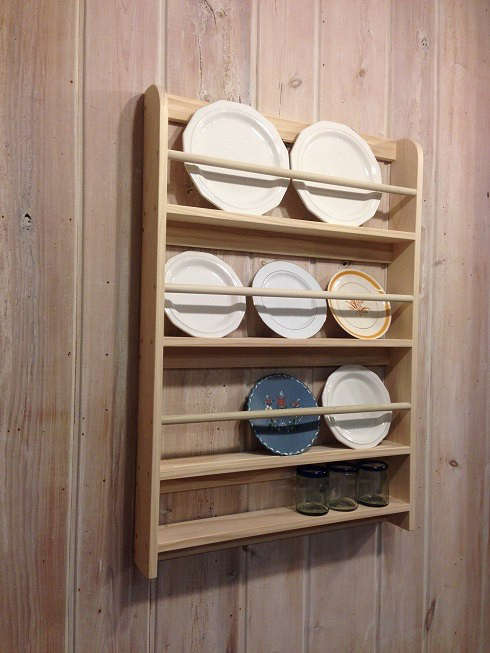
A decorative plate display rack solves a surprisingly dramatic household problem: beautiful dishes that spend their lives stacked in a dark cabinet like unpaid interns. Whether you own hand-painted ceramics, inherited china, souvenir plates, seasonal dishes, or a thrift-store collection that somehow became “a collection,” the right rack turns those pieces into visible decor while keeping them organized and protected.
Plate racks range from tiny tabletop stands to wall-mounted wooden shelves, vertical iron holders, tiered countertop organizers, and built-in cabinet inserts. The best option is not simply the prettiest one. It must fit the plate diameter, support the total weight, suit the wall or surface, and hold every piece securely enough that a passing elbow, slammed door, or enthusiastic cat cannot launch a porcelain disaster.
What Is a Decorative Plate Display Rack?
A decorative plate display rack is a holder designed to present plates upright or at a slight angle rather than stacking them flat. Unlike ordinary dish storage, it treats the front of each plate as artwork. A rack may display one special plate, a coordinated set, or an intentionally mismatched group of ceramics.
Design publications regularly show plates used beyond the kitchenin dining rooms, living rooms, bedrooms, bathrooms, and mixed gallery wallsbecause their curved profiles add dimension that framed art cannot provide. Collections can be symmetrical and formal or eclectic and layered, depending on the room and the personality of the owner.
Popular Types of Decorative Plate Display Racks
Tabletop Plate Stands
A tabletop stand holds one plate on a mantel, console table, bookshelf, buffet, or kitchen counter. Common versions are made from metal, acrylic, wood, or plastic. They are inexpensive, easy to move, and ideal for rotating seasonal pieces.
Choose a stand based on the plate’s height and weight, not only its diameter. A shallow dessert plate may sit comfortably on a small easel, while a thick stoneware platter needs a wider base and a deeper support lip. The stand should cradle the lower edge without covering too much of the design.
Wall-Mounted Wooden Plate Racks
This classic style usually includes one or more narrow shelves with a groove, front rail, spindle, or raised lip that keeps plates from sliding forward. It works especially well in farmhouse, cottage, traditional, coastal, and English-inspired interiors. A painted rack can blend into the wall, while a stained rack adds warmth and contrast.
Wall racks are excellent when floor and counter space are limited. They also make it easy to combine decorative plates with bowls, small pitchers, cutting boards, cookbooks, or framed art. Open shelving and plate racks are widely used to turn practical dishware into part of a room’s visual composition.
Vertical Metal Plate Holders
A vertical holder arranges several plates from top to bottom. It is useful on narrow walls, beside a cabinet, between windows, or in a small dining nook. Black iron creates a traditional or rustic look, while brass, chrome, or geometric metal can feel more contemporary.
Check the spacing between brackets carefully. Decorative plates are not standardized, and a holder designed for flat dinner plates may not accommodate deep bowls, scalloped rims, or heavy pottery. Measure the thickest part of the plate rather than trusting a generic “fits up to 10 inches” label.
Tiered Countertop Racks
Tiered racks display several plates or small platters on a counter, hutch, or buffet. They offer quick access and can double as serving organizers during holidays. However, they consume more surface area than a wall rack, so they work best when the display earns its keep instead of becoming a decorative parking lot for random dishes.
Built-In Plate Racks and Cabinet Inserts
Built-in racks use vertical dividers to store plates on edge inside an open cabinet or upper cupboard. This creates a custom look and makes individual plates easier to remove. It is particularly practical for frequently used dishes because there is no heavy stack to lift.
For valuable antique or fragile plates, make sure the dividers are smooth, stable, and spaced generously enough to prevent rims from rubbing. A decorative display should not slowly sandpaper the gold trim off Grandma’s wedding china.
How to Choose the Right Plate Rack
Measure the Plates First
Measure the diameter, depth, rim thickness, and approximate weight of each plate. For a multi-plate rack, measure the largest and deepest pieces, then check whether the slots, rails, or grooves can accept them. Leave enough clearance to lift each plate without scraping the shelf above.
If the rack will hold a mixed collection, create paper templates of the plates and arrange them on the wall or shelf. Designers often recommend planning a plate display on the floor or within a measured outline before committing to holes. This helps test spacing, balance, and the overall silhouette.
Match the Rack to the Plate Weight
Light porcelain and small decorative saucers place far less stress on a rack than thick stoneware or oversized serving platters. Add the approximate weight of every plate, then include the rack itself. The mounting system must support the combined load with a sensible safety margin.
Do not assume that a decorative screw or tiny plastic anchor is strong enough simply because it came in the box. Wall type matters. Drywall, plaster, masonry, tile, and wood paneling require different fasteners.
Look for a Reliable Retaining Lip
A good rack has a groove, wire arm, rail, or raised lip that prevents forward movement. The deeper or heavier the plate, the more important this becomes. In earthquake-prone areas, homes with active children, or rooms where doors frequently slam, discreet clear bumpers or another removable stabilizer may provide extra security.
Choose a Material That Fits the Room
Wood feels warm and architectural. Metal appears lighter and can suit vintage, industrial, or modern spaces. Acrylic nearly disappears, making the plate the star. In kitchens and bathrooms, select finishes that tolerate humidity and can be wiped clean. Unsealed wood may stain or swell, while inexpensive metal can rust when repeatedly exposed to moisture.
Think About Everyday Access
If the plates are purely decorative, a higher placement may be fine. If they are used for meals, place the rack within comfortable reach and avoid positioning it above a hot stove, sink splash zone, or busy doorway. Everyday access should not require a step stool, a prayer, and advanced balance training.
How to Install a Wall-Mounted Plate Rack Safely
1. Choose the Location
Select a wall that gives the rack visual breathing room. Above a sideboard, breakfast nook, console, or low cabinet is usually safer and more balanced than hanging it over a bed or seating area. Avoid locations where people may bump the rack with shoulders, bags, chair backs, or doors.
2. Locate Studs and Identify the Wall Type
For a substantial wooden rack or a collection of heavy plates, fastening into wall studs is the preferred approach. When studs do not align with the mounting holes, use anchors specifically rated for the wall material and full load. Home-improvement guidance consistently recommends studs for heavier shelving and correctly rated anchors when direct stud attachment is unavailable.
3. Mark, Level, and Double-Check
Hold the rack in position, mark the mounting points, and use a level. Painter’s tape can show the rack’s width and centerline before drilling. Confirm that no electrical wiring or plumbing is likely to run behind the chosen location, especially near outlets, switches, sinks, and bathrooms.
4. Install the Correct Fasteners
Follow the manufacturer’s instructions and choose screws or anchors compatible with drywall, plaster, masonry, tile, or studs. Do not mix hardware casually. A fastener rated for one wall type may perform poorly in another. Larger racks benefit from multiple attachment points that distribute weight instead of concentrating it on one screw.
5. Test the Empty Rack
Before adding plates, press gently downward and outward to check for movement. The rack should feel solid, level, and flush to the wall. Load the lightest plates first, then observe whether the shelf sags, twists, or pulls away.
6. Add Plates With Stable Spacing
Place heavier pieces near the strongest mounting points and distribute weight evenly. Make sure every plate sits fully in its groove or behind the retaining rail. Avoid overcrowding. A little space between rims makes the arrangement easier to appreciate and reduces accidental contact.
Styling Ideas for a Decorative Plate Display Rack
Create a Coordinated Color Story
Blue-and-white transferware is a classic choice, but almost any limited palette can feel intentional. Try cream and terracotta for warmth, black and white for graphic contrast, or botanical patterns against a green rack. Repeating one color across different designs helps mismatched plates look collected rather than chaotic.
Mix Sizes Without Losing Balance
Use one large platter as an anchor, then arrange smaller plates around it. On a long horizontal rack, place visual weight near the center or balance two larger pieces at opposite ends. Odd-numbered groupings often feel relaxed, while even rows appear more formal.
Combine Plates With Other Objects
A plate rack can hold more than plates. Layer a small framed print behind a shallow bowl, add a miniature pitcher, or lean a cutting board beside a ceramic platter. Mixed displays create depth, but every object should have enough room to read clearly. Plate collections can also be incorporated into gallery arrangements with framed art, mirrors, baskets, and other dimensional pieces.
Use Seasonal Rotation
A rack makes seasonal decorating easy. Display floral plates in spring, coastal designs in summer, warm earthenware in fall, and holiday china in winter. Store off-season pieces carefully and rotate them without rebuilding the entire room.
Let Heirlooms Tell a Story
Inherited china often has more emotional value than resale value, which makes displaying it especially meaningful. Pair a few family pieces with newer plates in similar colors so the arrangement feels personal rather than museum-like. Design experts also encourage treating decorative heirloom dishes as artwork and integrating them into rooms beyond the kitchen.
Protecting Decorative and Antique Plates
Dust plates regularly with a soft, dry microfiber cloth. Remove them one at a time and support each piece with both hands. Avoid abrasive cleaners, harsh chemicals, and soaking antique ceramics unless you know the material and decoration are stable.
Sunlight, dust, unstable mounting, and environmental changes can affect displayed objects over time. Museum conservation guidance emphasizes secure display, careful handling, condition checks, and protection from damaging environmental exposure. For rare, cracked, repaired, hand-painted, or highly valuable ceramics, consult a professional conservator before adding adhesives or attempting aggressive cleaning.
Inspect the rack periodically. Tighten loose screws, check for rust or wood movement, and look for chipped grooves or worn padding. If a plate rattles whenever someone walks past, the display is giving you a polite warning before it gives you a loud one.
Common Mistakes to Avoid
- Buying by diameter alone: Deep rims and thick pottery may not fit even when the stated diameter does.
- Ignoring total weight: Five heavy plates can turn a delicate rack into a physics lesson.
- Using the wrong wall anchors: Match the fastener to the wall material and rated load.
- Hanging the rack too high: A display should be visible without forcing everyone to admire the ceiling.
- Overcrowding: Packed rims are harder to remove and more likely to chip.
- Placing valuable plates near heat or moisture: Avoid stove steam, sink splashes, and direct sunlight.
- Trusting adhesive products blindly: Confirm compatibility with the plate finish and wall surface.
DIY Decorative Plate Rack Ideas
A simple DIY rack can be made from a narrow shelf board, a backboard, and a front retaining rail. Another option is a picture ledge with a routed groove for plate rims. Paint the rack the same color as the wall for a built-in appearance, or stain it to coordinate with a dining table or cabinet.
Before building, test the groove angle and rail height with the actual plates. Plates should lean slightly backward, not stand vertically with their weight pressing forward. Sand every contact surface smoothly and add thin felt or clear bumpers where appropriate. Secure the finished rack to studs or use correctly rated wall hardware based on its size and load.
A Composite Real-World Experience: What Usually Works
Consider a typical project: a homeowner has eight decorative plates collected from flea markets, family cabinets, and vacations. The group includes two 12-inch platters, four dinner plates, and two smaller dessert plates. The first instinct is to buy a narrow vertical metal holder because it looks elegant online. Once the plates arrive at the wall, however, the deeper stoneware rims do not fit the fixed brackets. Lesson one arrives immediately: decorative plates are three-dimensional objects, not circles printed on a product page.
The second attempt uses a 36-inch wooden wall rack with a grooved shelf and front rail. Before installation, paper templates are taped above a dining-room sideboard. Moving the templates reveals that the rack looks better centered on the furniture rather than centered on the entire wall. This small distinction makes the display feel connected to the room instead of floating in decorative space like a confused satellite.
During installation, one mounting hole aligns with a stud and the other does not. Instead of using the lightweight anchor supplied with the rack, the homeowner chooses hardware rated for the wall type and combined load. The empty rack is leveled, secured, and tested before the plates are added. That extra ten minutes is not glamorous, but neither is explaining a plate-shaped crater in the floor.
Styling takes several rounds. The first arrangement places all large plates on one side and small plates on the other, creating the visual impression that the rack is listing. The improved version puts a large platter near each end, repeats blue details across the middle, and leaves a little empty space between rims. Two plates are removed entirely. This is often the breakthrough: a display does not have to include everything you own. Editing is part of decorating.
After a few weeks, practical details become clear. The plates closest to the kitchen doorway collect more dust. One shallow plate slides slightly when a nearby cabinet closes. A tiny clear bumper behind that plate stops the movement. The display is dusted with a soft cloth, and every piece is lifted with two hands rather than pulled by the rim.
Seasonal rotation improves the arrangement further. In December, two everyday plates are replaced with holiday china. In spring, floral dessert plates take their place. Because the rack is accessible and not overcrowded, these changes take minutes rather than becoming a weekend renovation.
The strongest lesson from projects like this is that a decorative plate display rack succeeds when four things work together: correct sizing, secure installation, visual balance, and easy maintenance. Style gets the attention, but fit and safety keep the arrangement beautiful. The perfect rack is not necessarily the most ornate or expensive one. It is the rack that lets the plates look important without constantly reminding everyone that gravity is undefeated.
Conclusion
A decorative plate display rack can turn unused dishes into meaningful wall art, create practical storage, and give a room a collected, personal character. Start by measuring every plate, then choose a rack with suitable depth, spacing, material, and load capacity. Mount wall racks with hardware appropriate for the wall and total weight, leave enough room between pieces, and protect valuable ceramics from unstable surfaces, moisture, harsh cleaners, and prolonged direct sunlight.
The most attractive displays are rarely the most crowded. A thoughtful mix of sizes, colors, and stories will usually look better than a rack filled simply because one more plate technically fits. Give each piece room to be seen, and your collection can become a focal point rather than cabinet clutter with ambitions.
Note: This article provides general decorating and installation guidance. Follow the rack manufacturer’s instructions and use fasteners rated for your wall type and total display weight. Consult a qualified installer or conservator for unusually heavy racks, fragile walls, or valuable antique ceramics.