

Some DIY projects announce themselves with glitter, power tools, and a suspicious amount of cleanup. This DIY faux succulent embroidery hoop wreath is not one of those projects. It is calm, pretty, budget-friendly, and forgiving enough that even your hot glue “oops” moments can be hidden under moss. That, friends, is the kind of craft diplomacy we support.
Inspired by the charming Our Crafty Mom style of approachable home decorating, this wreath combines a simple embroidery hoop, faux succulents, moss, foam, twine, and a little hot glue magic. The result is a modern farmhouse wreath that looks fresh year-round without asking you for sunlight, water, or emotional commitment. It works on a front door, mantel, gallery wall, covered porch, craft room, or anywhere that needs a soft pop of greenery.
The beauty of a faux succulent embroidery hoop wreath is its balance of structure and softness. The hoop gives it clean lines. The succulents add sculptural texture. The moss hides the mechanics. The twine says, “Yes, I shop rustic,” even if the rest of your house currently says, “Laundry lives here now.”
Why an Embroidery Hoop Makes the Perfect Wreath Base
Traditional wreath forms are lovely, but embroidery hoops have become a favorite in DIY home decor because they create a lighter, cleaner, more modern silhouette. Instead of a full, bulky circle, the hoop gives the wreath breathing room. That open negative space makes the finished piece feel stylish rather than overstuffed.
An embroidery hoop also solves a practical problem: it is inexpensive and easy to hang. Most hoops already have a small tightening screw at the top, which can work as part of the design or help support ribbon, twine, or fishing line. Wooden hoops can be left natural, stained, painted, whitewashed, wrapped in yarn, or rubbed with a little craft wax for an aged look.
For a faux succulent wreath, the natural wood tone pairs especially well with green, blue-green, gray, and purple-tinted succulents. It gives the project that popular “organic but tidy” style: a little earthy, a little farmhouse, and not so wild that it looks like your craft closet sneezed.
Supplies for a DIY Faux Succulent Embroidery Hoop Wreath
You do not need a museum-sized craft room to make this project. A dining table, a glue gun, and the willingness to vacuum moss later will do nicely.
Basic Materials
- One wooden embroidery hoop, usually 10 to 14 inches wide
- Assorted faux succulents in different sizes and textures
- Small piece of floral foam or Styrofoam
- Preserved moss, Spanish moss, or sheet moss
- Hot glue gun and glue sticks
- Wire cutters or strong craft scissors
- Ribbon, jute twine, leather cord, or fishing line for hanging
- Optional faux greenery, small silk flowers, beads, or seasonal accents
The most important design tip is to choose faux succulents that vary in shape. Look for one or two larger rosettes, several medium pieces, and a few trailing or spiky stems. That mix creates movement. If every succulent is the same size, the wreath can look flat, like a tiny green marching band.
How to Make the Faux Succulent Hoop Wreath
This project is beginner-friendly, but it still benefits from a little planning. Before gluing anything, lay the hoop flat and arrange the succulents around the foam. Move them around until the composition feels balanced. The goal is not perfect symmetry. In fact, a slightly off-center cluster often looks more expensive and designer-inspired.
Step 1: Prepare the Embroidery Hoop
Remove any labels and check the hoop for rough spots. If needed, lightly sand the wood. You can leave the hoop natural for a warm farmhouse look, stain it for a richer tone, paint it black for modern contrast, or dry-brush it white for cottage style.
If you are going for an Our Crafty Mom-inspired rustic look, natural wood or twine is a safe choice. It keeps the focus on the succulents and makes the wreath easy to style with other decor.
Step 2: Attach the Foam
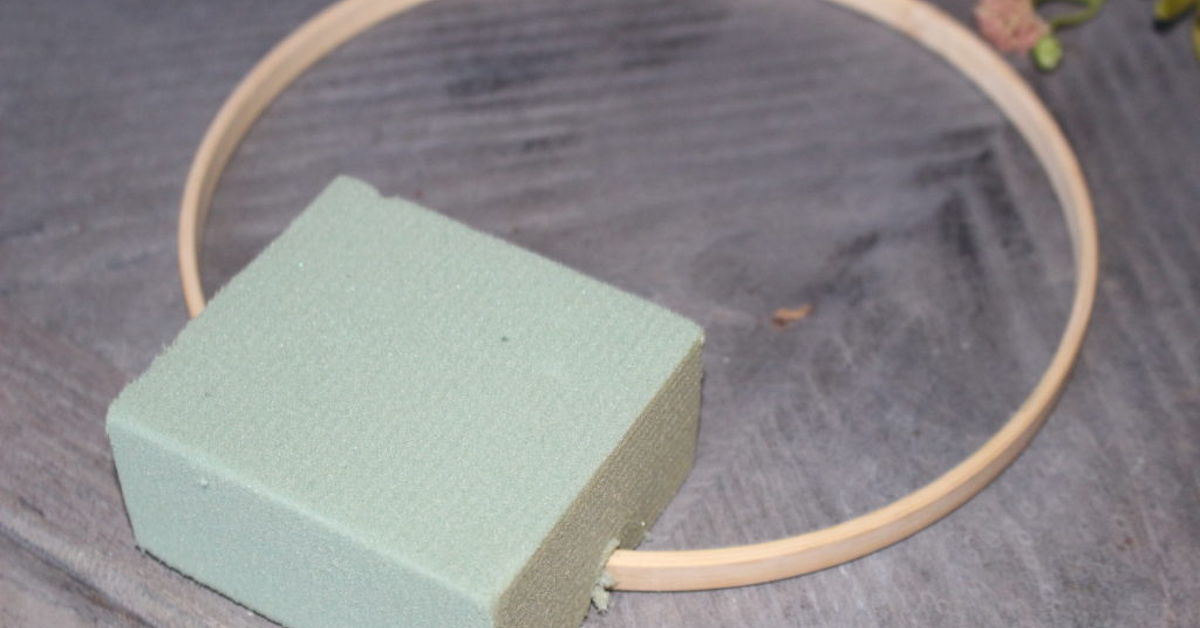
Cut a small square or rectangle of floral foam. Place it on the lower inside edge of the embroidery hoop or slightly off to one side. Press the hoop gently into the foam so it makes a shallow groove, then secure it with hot glue.
This little foam base is the secret support system. It gives the succulent stems somewhere to sit and makes the wreath easier to build. Think of it as the stage crew of the project: not glamorous, but nothing works without it.
Step 3: Trim the Faux Succulents
Most faux succulents come on plastic or wire stems. Use wire cutters to trim the stems so they are long enough to push into the foam but not so long that they poke through awkwardly. If a succulent head pops off its stem, do not panic. That is what hot glue is for. Hot glue is basically craft therapy in stick form.
Separate the succulents by size before arranging them. Put large rosettes in one pile, medium fillers in another, and tiny accents in a third. This makes it easier to build a layered design instead of grabbing randomly and hoping for the best.
Step 4: Create the Main Arrangement
Start with the largest succulent. Place it where you want the eye to land first, usually near the center of the foam cluster. Then add medium succulents around it, angling them slightly in different directions. This prevents the arrangement from looking stiff.
Work in odd numbers when possible. Three main succulents often look more natural than two. Five smaller pieces can create a lush look without overwhelming the hoop. Mix colors and shapes as you go: a round rosette beside a spiky succulent, a soft green next to a dusty purple, a trailing piece tucked under a fuller one.
Step 5: Glue Everything Securely
Once you like the arrangement, remove one piece at a time, add hot glue to the stem or base, and press it into the foam. Hold it briefly until the glue grips. Continue until every succulent feels secure.
If the wreath will hang on a front door or covered porch, use extra glue and consider adding floral wire around larger stems. Outdoor movement, humidity, and the occasional dramatic door slam can test your craftsmanship. Give the wreath a fighting chance.
Step 6: Cover the Foam With Moss
Now comes the satisfying part. Pull apart small pieces of moss and glue them over the foam. Tuck moss between succulents and along the bottom edge so the base disappears. Do not use one giant moss clump unless your goal is “decorative swamp.” Smaller pieces look more natural and give better control.
Moss also softens the transition between the hoop and the succulent cluster. It makes the arrangement look intentional, finished, and more expensive than it actually is.
Step 7: Add a Hanger
Use ribbon, twine, leather cord, or fishing line to hang the wreath. Jute twine gives a rustic farmhouse look. Satin ribbon feels softer and more feminine. Fishing line creates a floating effect, especially on a wall or window.
Before calling the project finished, hold it upright and give it a gentle shake. If anything wiggles, add more glue. This is better discovered over the table than after a succulent lands in your entryway like a tiny green meteor.
Design Variations for Every Style
The basic faux succulent embroidery hoop wreath is easy to customize. Once you understand the structure, you can adjust the colors, scale, and finishing details to match almost any room or season.
Modern Minimalist
Use a black or walnut-stained hoop with only three to five succulents. Keep the arrangement off-center and skip extra flowers. This style works beautifully in apartments, offices, and neutral spaces.
Farmhouse Rustic
Leave the hoop natural, add jute twine, and use plenty of moss. Choose muted green succulents and maybe one small white flower. This version looks right at home on a mantel, reclaimed wood backdrop, or kitchen wall.
Boho Greenery Wreath
Wrap part of the hoop with macrame cord or yarn. Add trailing faux greenery, wood beads, and soft sage-toned succulents. The finished wreath feels relaxed and artsy without requiring you to learn actual macrame knots, which is a mercy.
Spring or Summer Door Decor
Add small silk flowers in blush, coral, lavender, or yellow. Keep them secondary so the succulents remain the star. This creates a cheerful seasonal wreath that can still stay up after the holiday decorations come down.
Holiday Succulent Hoop Wreath
For winter, add mini pine sprigs, tiny ornaments, velvet ribbon, or metallic berries. Faux succulents pair surprisingly well with holiday decor because their cool green tones balance sparkle and red accents.
Common Mistakes and How to Avoid Them
The easiest mistake is using too many large succulents. Big pieces are beautiful, but they can overpower the hoop. Start with one statement succulent and build around it with smaller accents.
Another common issue is gluing too soon. Dry-fit the entire design first. Take a quick photo with your phone before removing pieces to glue them. That way, you have a reference if your carefully planned arrangement suddenly becomes a botanical puzzle.
Also, avoid placing all the succulents in a perfectly straight row. Nature rarely lines up like a grocery store checkout lane. Vary height, direction, and spacing. Let a few pieces overlap slightly. Add moss in small amounts until the base is hidden but not buried.
Finally, think about where the wreath will hang. If it will be outdoors, choose weather-resistant faux greenery and keep it on a covered door or porch. Faux plants last longer when protected from harsh sun, heavy rain, and wind.
Where to Display Your Finished Wreath
A DIY faux succulent embroidery hoop wreath is more versatile than many traditional wreaths because it is lightweight and not tied to one holiday. Hang it on a front door for curb appeal, place it over a mantel, layer it on a gallery wall, or hang it from a cabinet door for a small surprise of greenery.
It also makes a thoughtful handmade gift. Housewarming party? Bring the wreath. Mother’s Day? Bring the wreath. Friend says they cannot keep plants alive? Bring the wreath and whisper, “This one believes in you.”
For events, these hoop wreaths can be used as wedding chair decor, baby shower backdrops, garden party accents, or craft night projects. Because the materials are affordable, you can make several in different sizes and group them together for a larger wall display.
Budget Tips for a High-End Look
Faux succulents can range from very cheap to surprisingly fancy. You do not need the most expensive ones, but realism matters. Look for varied coloring, flexible leaves, and matte finishes. Extremely shiny plastic succulents tend to look less natural, though they can still work if mixed with moss and better-quality greenery.
Check craft stores, dollar stores, thrift shops, seasonal clearance bins, and old faux arrangements you already own. Sometimes one outdated centerpiece can be taken apart and transformed into a wreath that looks completely new.
To make the wreath look more polished, limit the color palette. Three greens, one dusty accent color, and natural moss are usually enough. Too many bright colors can make the wreath feel busy. A restrained palette gives it that boutique decor look without the boutique decor price tag.
Care and Storage Tips
The best part of faux succulent decor is the low maintenance. There is no watering schedule, no sunlight requirement, and no guilt when you go on vacation. To clean the wreath, gently dust it with a soft cloth, feather duster, or cool air from a hair dryer on a low setting.
If you store it seasonally, place it in a shallow box and avoid stacking heavy items on top. Faux succulents can bend or crease if crushed. A little careful storage means the wreath can come back year after year looking like it has its life together, even if the holiday bins do not.
My Experience With This Kind of DIY Wreath Project
There is something especially satisfying about making a faux succulent embroidery hoop wreath because it gives quick results without feeling rushed. Some crafts require measuring, leveling, sanding, sealing, waiting overnight, and then discovering you bought the wrong size hardware. This project is much kinder. You can lay everything out, adjust the design, glue it together, and see the finished wreath in one sitting.
The first thing I always notice with this type of project is how much the layout matters. At the beginning, the supplies may not look impressive. A plain hoop, a chunk of foam, a bag of moss, and a handful of faux succulents can look like the contents of a very confused drawer. But once the larger succulent is placed as an anchor, the design starts making sense. Suddenly the medium pieces have a job. The little sprigs become fillers. The moss stops looking messy and starts looking intentional.
One useful habit is to step back often. When you are close to the table, every tiny gap looks enormous. From a few feet away, the wreath usually looks fuller and more balanced. This is also why taking a phone photo helps. A photo makes uneven spacing easier to spot. It is like having a tiny design consultant, except it lives in your pocket and also contains 800 pictures of your lunch.
I have also learned not to underestimate the power of texture. The prettiest faux succulent wreaths usually include contrast: soft moss, smooth rosettes, spiky stems, trailing greenery, and the hard round line of the hoop. Even if everything is green, the different shapes keep the eye moving. That is what makes the wreath feel layered instead of flat.
Hot glue technique matters too. A small dab is fine for lightweight pieces, but larger succulents need more support. Press them firmly into the foam and let the glue set before moving on. If the wreath is going outside, floral wire is worth using for extra security. Nobody wants to open the front door and find a succulent casualty on the welcome mat.
The most enjoyable part is styling the finished piece. On a front door, it feels cheerful and welcoming. On a mantel, it adds greenery without clutter. On a craft room wall, it looks like proof that you are the sort of person who finishes projects. That alone is worth celebrating. And because the wreath is faux, it keeps looking fresh even during busy weeks when real plants would be filing a formal complaint.
The DIY faux succulent embroidery hoop wreath is a perfect example of why simple crafts remain popular. It is affordable, customizable, beginner-friendly, and stylish enough to display proudly. Whether you are inspired by Our Crafty Mom, modern farmhouse decor, or your own need to make something pretty on a quiet afternoon, this project delivers a big visual reward with very little drama.
Conclusion
A DIY faux succulent embroidery hoop wreath is the kind of craft that checks all the boxes: easy, affordable, attractive, reusable, and wonderfully low maintenance. With a wooden hoop, faux succulents, moss, foam, and hot glue, you can create a piece of home decor that feels fresh in every season.
The key is thoughtful placement. Start with a strong focal succulent, layer smaller pieces around it, hide the foam with moss, and choose a hanger that matches your style. Keep the hoop natural for farmhouse warmth, stain it for a richer look, or paint it for modern contrast. However you finish it, the wreath brings texture, greenery, and handmade charm into your home.
Note: This article is a fresh, original web-ready guide inspired by real DIY wreath-making methods, faux succulent decor ideas, and practical embroidery hoop craft techniques.