Note: This article is an original, fully rewritten woodworking guide based on real DIY wine rack construction practices, live-edge slab preparation methods, tool-safety guidance, finishing techniques, wall-mounting principles, and practical wine-storage recommendations.
A live edge wine rack is the rare DIY project that lets you act practical and dramatic at the same time. Practical, because you are building a compact place to store bottles. Dramatic, because a slab of cherry, walnut, maple, oak, or cedar with its natural edge still intact looks as if a tree wandered into your dining room and decided to become furniture.
The beauty of this Popular Mechanics-style project is that it does not require a giant cabinet shop, a degree in furniture making, or a secret handshake from a guild of bearded woodworkers. With one good board, careful layout, clean drilling, patient sanding, and a strong joint, you can create a tabletop or wall-friendly wine rack that looks custom, rustic, and surprisingly refined.
This guide walks through how to build a live edge wine rack using simple woodworking logic: choose stable wood, cut two main parts, drill bottle-neck holes, join the pieces at a slight leaning angle, reinforce the joint, sand the rack smooth, and finish it so the grain glows. Along the way, you will also learn why bottle spacing matters, why corked wine prefers to rest sideways, and why the top of the refrigerator is a terrible “wine cellar,” even if it looks convenient and smug.
What Is a Live Edge Wine Rack?
A live edge wine rack is a bottle holder made from wood that preserves at least one natural edge of the original tree. Instead of trimming every side into perfect straight lines, the maker keeps the organic curve, knots, sapwood, bark line, or natural contour. The result is part storage piece, part sculpture, and part humble brag.
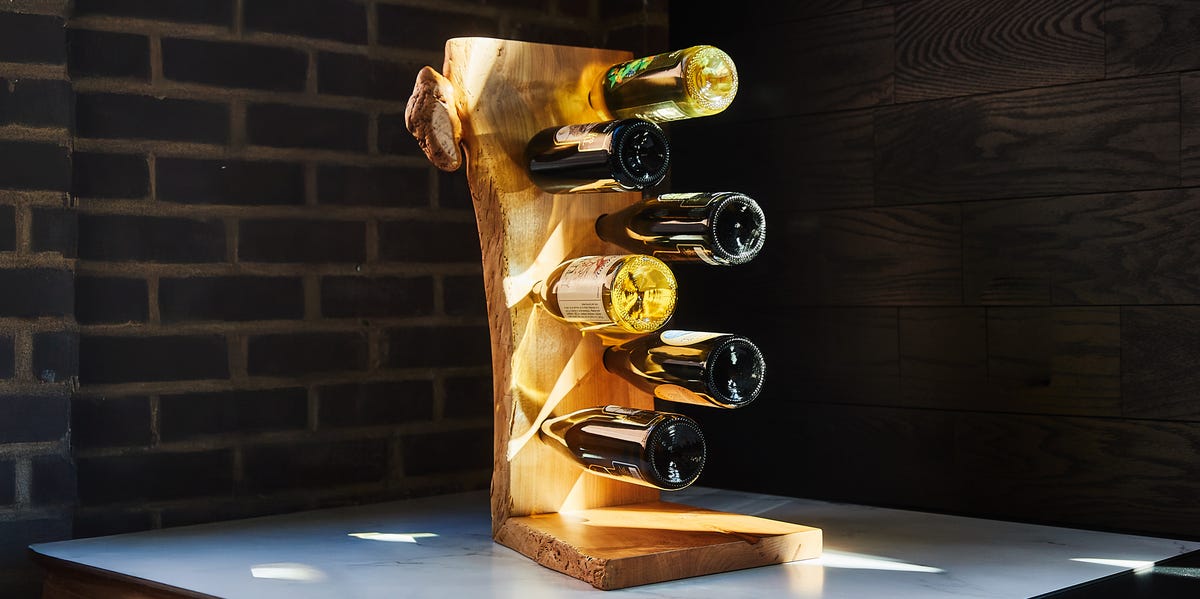
For this project, the basic shape is simple: one longer board holds the bottles, while a shorter angled board acts as the base or support. The rack leans back slightly so the bottles sit securely with their necks inserted through drilled holes. A good design keeps the bottles balanced, visible, and easy to remove without turning your Cabernet into a bowling ball.
Why This Project Works for Beginners
This DIY live edge wine rack is beginner-friendly because it focuses on a few core skills instead of a thousand fancy ones. You will measure, cut, drill, glue, reinforce, sand, and finish. That is woodworking’s greatest hits album. The project is small enough to complete in a weekend but attractive enough to give as a gift, display on a bar cart, or place on a dining room sideboard.
It is also easy to customize. Want a sleek modern version? Use straight-grain walnut and a satin finish. Want a farmhouse look? Use a lighter live edge slab and leave some texture. Want a conversation piece? Pick a board with dramatic grain, knots, spalting, or natural color variation. Just make sure the wood is dry, stable, and not crumbling like an ancient cookie.
Materials You Will Need
Wood and Supplies
For a six-bottle rack, start with a board or slab approximately 8 inches wide, 36 inches long, and about 1 inch thick. Cherry is a great choice because it machines well and darkens beautifully over time. Walnut gives a richer, moodier look. Maple creates a clean, bright rack. Oak is strong and traditional, though its open grain may need extra finish attention.
- One live edge board, about 8 inches by 36 inches by 1 inch
- Small scrap hardwood for splines or reinforcement strips
- Wood glue
- Satin polyurethane, hardwax oil, Danish oil, or another clear finish
- Sandpaper from 100 grit through 220, 320, or 400 grit
- Painter’s tape or fiberglass strapping tape
- Optional: epoxy for small cracks, knots, or voids
Tools
You do not need an aircraft hangar full of machinery. A compact shop setup can handle this project. A table saw makes spline slots easier, but you can adapt the process with hand tools if needed.
- Miter saw, circular saw, or table saw
- Drill or drill press
- 1 1/4-inch Forstner bit or hole saw
- Clamps
- Sharp chisel
- Handsaw or flush-cut saw
- Orbital sander or sanding block
- Measuring tape, square, pencil, and straightedge
- Safety glasses, hearing protection, and dust mask or respirator
Step 1: Choose the Right Live Edge Board
The best live edge wine rack begins at the lumber pile. Look for a board that is flat, dry, and structurally sound. Kiln-dried wood is ideal because it has already been stabilized. Air-dried wood can work, but it should be properly seasoned. If the board is still moving, twisting, or damp, it may warp after you build the rack, which is nature’s way of saying, “I was not finished.”
Check the slab for cracks that run through the bottle-hole area. Small checks and knots can add character, but avoid weak sections where the wood may split under load. If the bark is loose, remove it. Bark may look rustic, but if it is not firmly attached, it will eventually fall off and make your wine rack look like it is shedding.
For a clean live-edge look, gently scrape loose bark with a chisel, nylon brush, or brass brush. Do not attack the edge like you are angry at it. The goal is to preserve the natural contour while removing unstable material.
Step 2: Flatten and Prepare the Slab
If your live edge board is already flat, celebrate quietly and move on. If not, flatten it before cutting parts. A jointer, planer, router sled, or local woodworking shop with a wide belt sander can help. For a small board, careful sanding may be enough, but avoid relying on finish to hide a twisted surface. Finish is not magic. It is more like makeup: helpful, but not a structural engineer.
Once flat, inspect the board for voids. Small cracks can be filled with clear or tinted epoxy. If using epoxy, tape the underside of cracks before pouring and allow full curing time before sanding. Epoxy can highlight natural defects beautifully, but it should be used with restraint unless you want the rack to look like a river table’s enthusiastic cousin.
Step 3: Cut the Main Pieces
From the 36-inch board, cut two main pieces: one piece about 22 inches long for the bottle holder and one piece about 13 inches long for the base. If you want the grain to flow continuously through the angled joint, cut the two pieces from adjacent sections of the same board and keep track of their orientation.
The rack leans slightly backward, which improves bottle balance and gives the finished piece a relaxed stance. A common approach is to create a mitered joint that forms an angle a little greater than 90 degrees, around 97 degrees. To do that, cut matching miters at approximately 48.5 degrees on the joining ends. Sand the miter faces lightly so they meet cleanly without gaps.
Before gluing anything, dry-fit the two pieces on a flat surface. The longer bottle board should lean back, not forward. If it leans forward, do not call it “modern.” Turn it around and fix the geometry.
Step 4: Lay Out the Bottle Holes
The hole layout determines whether the rack looks intentional or like it lost a fight with a drill press. For a six-bottle rack, arrange the holes in two staggered vertical rows of three. The staggered pattern gives the bottles breathing room and makes the rack visually balanced.
A practical layout is to space the two rows about 3 1/2 inches apart across the width of the board, keeping them centered between the edges. On the first row, place the lowest hole about 4 1/2 inches from the mitered end, then space the remaining holes 6 inches apart center to center. On the second row, start about 7 1/2 inches from the mitered end and again use 6-inch center spacing.
These measurements are a strong starting point, but always test with the bottles you actually plan to store. Some wine bottles have wider shoulders, thicker glass, or unusual neck shapes. Champagne bottles, for example, are built like they expect a bar fight. Test first.
Step 5: Drill Clean Bottle-Neck Holes
Use a 1 1/4-inch Forstner bit or hole saw for most standard wine bottle necks. A Forstner bit usually creates cleaner edges, especially in hardwood. Clamp the board securely, place scrap wood underneath to prevent tear-out, and drill slowly. Let the bit cut; do not force it like you are trying to win a carnival game.
If using a handheld drill, keep it as square to the board as possible. A drill press gives better control, but a careful hand drill works. After drilling, ease the sharp edges of each hole with sandpaper. A slight roundover makes the bottle necks slide in smoothly and reduces the chance of scratching labels or glass.
Test every hole with a bottle. The neck should pass through easily up to the base of the neck, while the shoulder of the bottle rests against the face of the board. If the hole is too tight, sand it gradually. If the hole is wildly too large, congratulations: you have invented a very elegant wooden donut.
Step 6: Glue the Angled Miter Joint
Lay the two mitered pieces face down with their angled ends touching. Apply fiberglass strapping tape across the joint on the outside face, then flip the pieces over. Spread wood glue evenly on both miter faces. Now fold the joint closed using the tape as a hinge. This “book fold” method helps the joint close neatly and keeps the faces aligned.
Wipe away glue squeeze-out with a damp rag. Clamp carefully or use strong tape to hold the joint while the glue cures. Follow the glue manufacturer’s recommended drying time. For many wood glues, overnight curing is sensible, while a full 24 hours gives the joint more confidence before reinforcement.
A plain miter joint looks clean, but it is not the strongest joint because end grain does not glue as reliably as long grain. Since this rack will hold full bottles of wine, reinforcement is not optional. Wine is heavy, and gravity is annoyingly consistent.
Step 7: Reinforce the Joint With Splines
Splines are thin strips of wood inserted across a joint to add strength and visual detail. They increase glue surface and help lock the two pieces together. On a live edge wine rack, splines can be both functional and decorative, especially if you use contrasting wood such as maple splines in walnut or walnut splines in cherry.
Once the miter glue has cured, mark several evenly spaced spline locations across the outside of the joint. Five splines work well on a rack of this size. Cut shallow slots across the miter joint using a table saw jig, handsaw, or another controlled method. The slots should be consistent and snug.
Cut spline strips from scrap hardwood to match the slot width. They should slide in firmly without hammering so hard that the joint panics. Apply glue inside each slot, insert the splines, and let everything cure. Afterward, trim the spline ends flush with a handsaw and pare them smooth with a sharp chisel.
Step 8: Sand Without Erasing the Character
Sanding is where a rough project becomes furniture. Start around 100 grit if the board is already fairly smooth. If it has saw marks or rough patches, begin lower, such as 80 grit, but move carefully. Progress through 120, 150, 180, and 220 grit. For a smoother, more polished finish, continue to 320 or 400 grit.
Do not over-sand the live edge. The natural edge should look organic, not machine-polished into boredom. Use folded sandpaper, a soft sanding pad, or a small detail sander to smooth sharp spots while preserving the curves.
Vacuum dust from the holes and wipe the rack with a clean cloth. Wood dust can irritate eyes, skin, and lungs, so use dust collection when possible and wear a properly fitted mask or respirator while sanding. Your future self will appreciate breathing more than your current self enjoys skipping PPE.
Step 9: Apply the Finish
A clear finish lets the live edge and grain take the spotlight. Satin polyurethane is durable, easy to clean, and forgiving for a wine rack that may see fingerprints, drips, and occasional “just one more glass” enthusiasm. Wipe-on polyurethane is especially friendly for beginners because it builds thin coats with fewer brush marks.
Hardwax oil is another excellent choice if you want a natural, low-sheen finish. Danish oil can warm the color of the wood and is simple to apply, though it may not offer the same surface protection as polyurethane. Whatever finish you choose, apply it according to the manufacturer’s instructions, work in a ventilated area, and allow proper curing time before loading bottles.
For a live edge rack, finish the holes, the underside, and the base as carefully as the visible face. Uneven finishing can allow moisture exchange at different rates, which may encourage wood movement. Besides, the underside deserves dignity too.
Step 10: Test the Rack Before Displaying It
After the finish cures, load one bottle at a time and check the balance. The rack should sit flat without rocking. The bottles should angle securely with their necks passing through the holes and their shoulders supported by the board. If the rack feels unstable, do not ignore it. Add small rubber feet, adjust the base, or modify the support before filling it completely.
If you plan to place the rack on a counter, sideboard, or bar, choose a cool, shaded location away from ovens, dishwashers, heaters, bright windows, and vibrating appliances. Wine likes calm. It does not want to live next to a blender that makes breakfast smoothies like a helicopter landing.
Optional: Turn It Into a Wall-Mounted Wine Rack
This project is commonly built as a tabletop rack, but a wall-mounted variation is possible if you redesign the support system properly. Do not simply screw the base into drywall and hope for the best. Full wine bottles are heavy, and drywall alone is not a trustworthy life coach.
For wall mounting, locate studs with a stud finder and fasten into solid framing whenever possible. Use a level, drill pilot holes, and choose hardware rated for the load. If studs do not align with your desired placement, install a wooden cleat or backer board secured to studs, then mount the rack to that. Heavy-duty wall anchors may work in some situations, but studs or blocking are the better choice for a loaded wine rack.
Also consider bottle depth. A wall rack projects outward, so avoid narrow hallways, busy walkways, and doors that swing open with theatrical violence. A wine rack should be admired, not body-checked.
Design Ideas and Custom Upgrades
Use Contrasting Splines
Contrasting splines add a handcrafted detail that looks intentional and professional. Walnut splines in maple, maple splines in cherry, or cherry splines in walnut create a subtle decorative rhythm across the joint.
Add a Small Glass Holder
You can attach a narrow rail beneath the base to hold stemware, but only if the rack is stable enough. For a tabletop rack, keep accessories light. For a wall-mounted rack, reinforce the mounting system before adding glass storage.
Burn or Ebonize the Edge
A lightly darkened live edge can create contrast, especially on pale wood. Use controlled techniques and test on scrap. The goal is “warm rustic detail,” not “campfire incident.”
Personalize the Finish
A satin finish feels modern and practical. Gloss looks more formal but shows imperfections. Matte finishes look natural but may need more maintenance. For gifts, consider engraving initials, a date, or a short phrase on the underside or base.
Common Mistakes to Avoid
Using Wet or Unstable Wood
Green wood may crack, twist, or shrink after construction. Use dry lumber and let it acclimate to your home or shop before building.
Skipping Test Holes
Wine bottles vary. Drill test holes in scrap before committing to your beautiful slab. This tiny step can save the project.
Weak Joint Reinforcement
A glued miter alone is not ideal for a loaded rack. Add splines, dowels, loose tenons, or another reinforcement method.
Over-Sanding the Live Edge
Too much sanding can remove the organic texture that makes the piece special. Smooth the edge, but do not erase its personality.
Bad Wine Placement
Even a gorgeous rack should not sit in direct sun, above the fridge, beside a heater, or anywhere with constant vibration. Store wine in a cool, dark, steady spot whenever possible.
Wine Storage Tips for Your New Rack
A live edge wine rack is best for bottles you plan to drink soon or display briefly. For long-term storage, wine prefers stable conditions: cool temperatures, darkness, minimal vibration, and sideways positioning for cork-sealed bottles. Horizontal storage helps keep natural cork moist, reducing the risk of drying and oxygen exposure.
If your home is warm or you collect bottles for months or years, consider a wine fridge or a low, interior closet. For everyday bottles, a sturdy rack in a shaded dining area or pantry can work well. The main idea is simple: wine does not need a mansion, but it does appreciate not being cooked, shaken, or sunbathed.
Experience Notes: What Building a Live Edge Wine Rack Teaches You
The first lesson from building a live edge wine rack is that wood has opinions. You may begin with a clean plan, sharp pencil marks, and heroic confidence, but the board will quickly remind you that it used to be a tree. Grain changes direction. Knots appear exactly where you wanted a hole. The live edge curves with charming disregard for your ruler. This is not a flaw; it is the point of the project.
One useful experience is to spend extra time choosing the board. In a lumber store or sawmill, beginners often grab the most dramatic slab first. Big bark! Wild grain! A knot shaped like a tiny owl! But the best project board is not always the loudest one. For a wine rack, stability matters more than drama. A slightly calmer board with straight enough grain, solid edges, and minimal checking will usually build better than a spectacular slab that wants to split in three directions.
Another practical lesson is that drilling clean holes takes patience. A Forstner bit can make beautiful openings, but it rewards control. Clamp the work. Use backing scrap. Clear chips often. If the bit heats up, pause. Rushing this step can burn the wood or tear out the back side. The bottle holes are among the first things people notice, so this is where neatness pays rent.
The miter joint is where many builders learn humility. Two angled cuts may look simple, but small gaps become very visible after glue-up. Dry-fitting helps. Sanding the miter faces lightly on a flat surface helps. Using tape as a hinge helps even more. The joint does not need to be museum-perfect, but it should close tightly enough that the rack looks designed rather than negotiated.
Splines are the moment the project starts to feel real. Before splines, the rack is two boards having a polite disagreement. After splines, it becomes one object. Contrasting splines also give beginners a taste of decorative joinery without requiring advanced furniture-making skills. It is a small detail that says, “Yes, I meant to do that,” which is one of woodworking’s most satisfying sentences.
Finishing teaches restraint. It is tempting to keep adding coats until the rack shines like a bowling lane, but live edge pieces often look better when the finish supports the wood instead of smothering it. A satin finish usually hits the sweet spot: warm, protective, and not too flashy. Between coats, light sanding or scuffing keeps the surface smooth. Always let the finish cure before loading bottles, because wine bottles can leave marks on finishes that are dry to the touch but not fully hardened.
Finally, this project teaches that handmade items do not need to be flawless to be valuable. A tiny asymmetry in the edge, a knot near the base, or a slight color shift in the grain can make the rack feel personal. Store-bought racks often look identical. A live edge wine rack looks like it came from a specific board, built by specific hands, for a specific room. That is the charm. Also, it holds wine, which is a strong argument in its favor.
Conclusion
Building a live edge wine rack is a satisfying weekend woodworking project because it combines simple construction with high visual impact. You begin with a natural slab, shape it into two angled parts, drill clean bottle holes, reinforce the joint, sand the surfaces, and apply a finish that lets the grain shine. The finished rack is compact, useful, gift-worthy, and far more interesting than a plain store-bought holder.
The key is to respect both the wood and the wine. Choose dry, stable lumber. Test your bottle fit before drilling the final holes. Reinforce the miter joint so it can carry real weight. Sand enough for comfort, but not so much that the live edge loses its wild character. Then place the rack somewhere cool, dark, and steady so your bottles stay as happy as your woodworking ego.
Whether you build it from cherry, walnut, maple, oak, or a mystery slab from the back of a sawmill, this project offers the best kind of DIY reward: a beautiful object you can actually use. And when guests ask where you bought it, you get to lean casually against the counter and say, “Oh, I made that.” Try not to say it too smugly. Or do. You earned a little.