You open the remote, flashlight, toy, or camera andbamthere it is: a crusty, chalky, alien-looking mess where shiny battery contacts used to be. Battery corrosion is one of those tiny household problems that can wreck a perfectly good device and ruin your mood before coffee.
The good news: most battery corrosion is fixable if you clean it the right way and match the method to the battery type. The better news: with a few simple habits, you can prevent most corrosion from happening again. This guide walks you through both worldssmall household batteries and car battery terminalsusing safe, practical, real-life steps that actually work.
What Battery Corrosion Is (and Why It Looks So Dramatic)
Battery corrosion is residue created when battery chemicals escape and react with air, moisture, and metal contacts. In household batteries (like AA/AAA alkaline cells), that crust is usually linked to alkaline electrolyte leakage. In car batteries, corrosion often appears around terminals as white, blue, or green buildup tied to acidic vapors and chemical reactions near the posts.
Translation: your battery isn’t “dirty.” It’s having a chemistry meltdown in your gadget.
Two corrosion types, two cleaning strategies
- Household alkaline battery leakage in electronics: Usually neutralized with a mild acid (white vinegar or lemon juice), then cleaned and dried.
- Car battery terminal corrosion: Usually neutralized with a baking soda + water solution, scrubbed, rinsed, dried, and protected.
If you remember only one thing from this article, remember this: match the cleaner to the chemistry. Using the wrong cleaner can make cleanup harder and sometimes more damaging.
Safety First (Because Eyes and Skin Are Not Replaceable Parts)
Before you clean anything, protect yourself. Corrosion residue can irritate skin and eyes, and car battery systems can spark if handled carelessly.
Basic safety checklist
- Wear nitrile/rubber gloves.
- Wear eye protection.
- Work in a ventilated area.
- Keep kids and pets away from the cleanup zone.
- Never touch your face while cleaning.
- Wash hands thoroughly afterward.
If you’re cleaning car battery corrosion and you’re not comfortable with basic under-hood work, ask an experienced adult or a mechanic to help. Confidence is great. Blind confidence plus metal tools near battery terminals? Not as great.
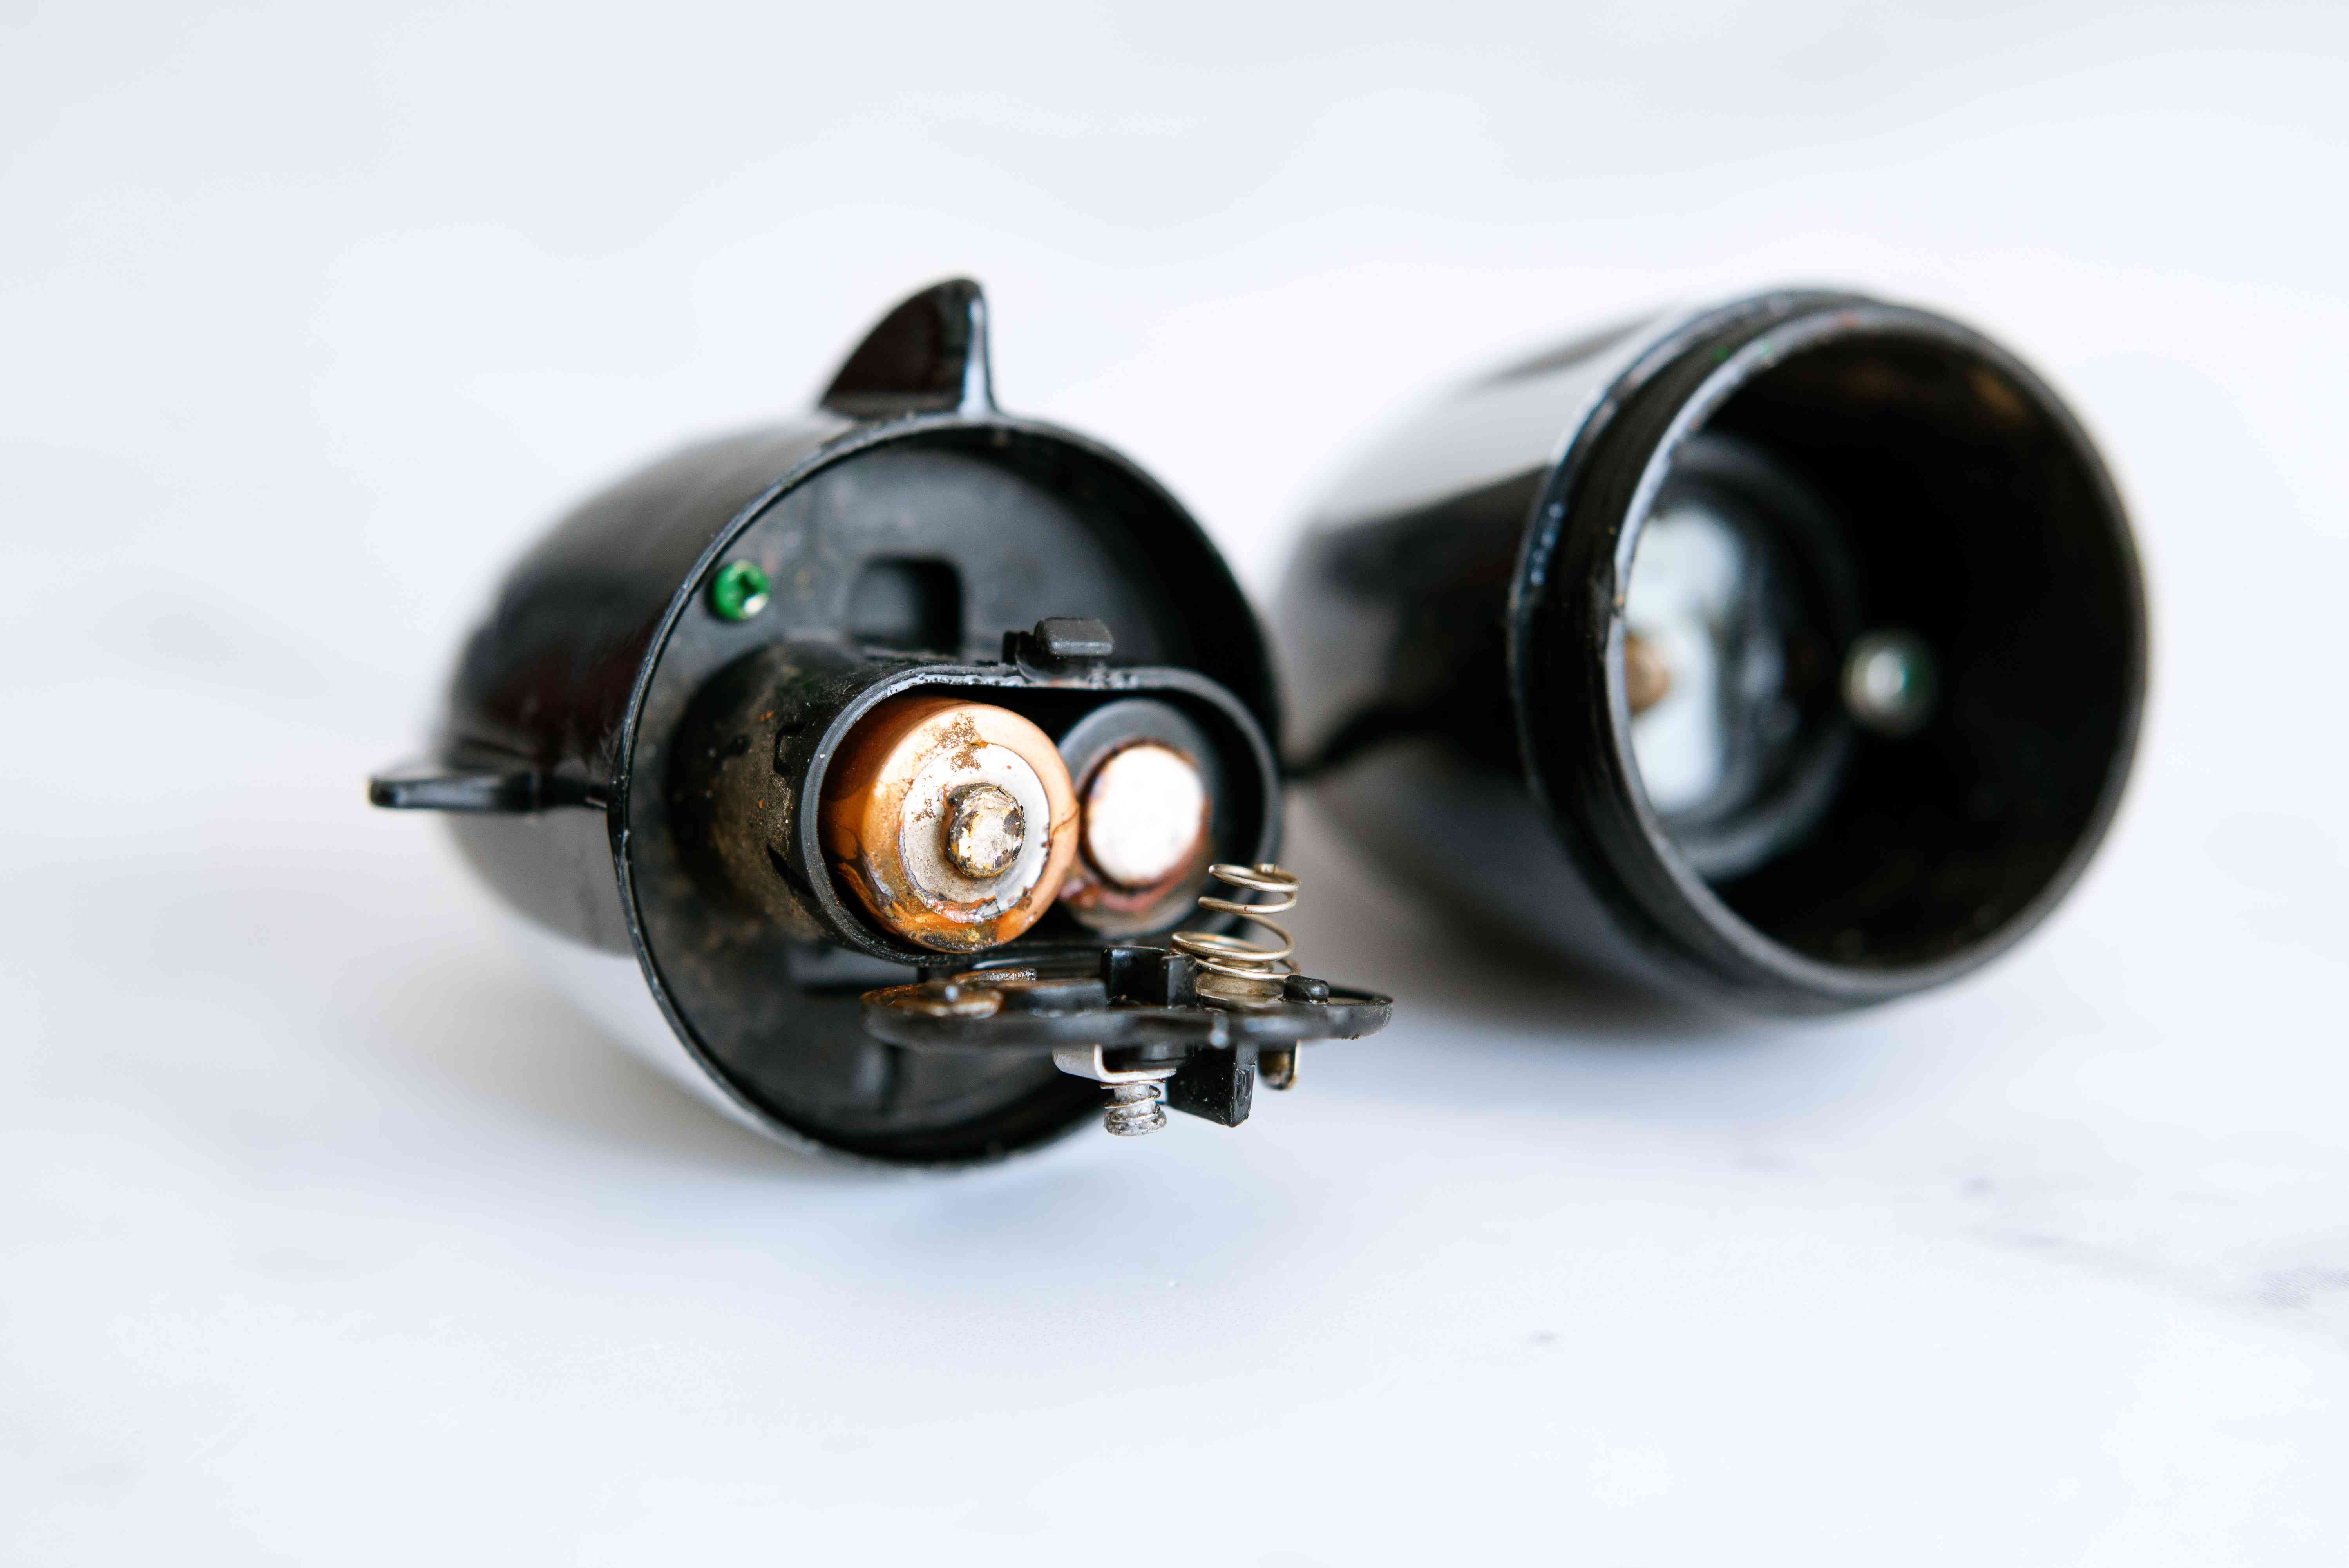
How to Clean Alkaline Battery Corrosion in Electronics
This method is for remotes, toys, clocks, flashlights, and similar devices with replaceable household batteries.
What you’ll need
- Gloves and eye protection
- Cotton swabs
- White vinegar or lemon juice
- Soft toothbrush (or small detailing brush)
- Paper towels or clean cloth
- Pencil eraser (optional, for polishing contacts)
Step-by-step cleanup
-
Power off the device and remove batteries.
Do not try to “clean around” installed batteries. Remove all cells, even the ones that look fine. -
Bag and isolate damaged batteries.
Place leaking/corroded batteries in a plastic bag or non-metal container for proper recycling/disposal later. -
Apply a mild acid to corrosion only.
Dip a cotton swab in white vinegar (or lemon juice), then dab crusty areas. You may hear a slight fizzing reaction. -
Gently scrub contacts and corners.
Use a swab or soft brush to lift residue. Work slowly so you don’t bend metal battery contacts. -
Wipe and repeat.
Corrosion often lifts in layers. Wipe between passes and repeat until metal is visible. -
Dry thoroughly.
Moisture left behind can cause future corrosion. Let the compartment air dry fully. -
Polish contact points (optional).
A clean pencil eraser can help brighten contact surfaces for better conductivity. -
Install fresh matching batteries.
Use all new cells of the same type/brand in that device.
When to stop and replace the device
- Contacts are broken, snapped, or heavily eaten away.
- Corrosion reached wiring or circuit board areas.
- Device still fails after cleaning and known-good batteries.
- Any sign of swollen, damaged, or hot lithium cells (do not DIY clean).
How to Clean Car Battery Terminal Corrosion
Car battery corrosion looks intimidating, but the process is straightforward when done in order. Here’s the playbook.
What you’ll need
- Gloves and eye protection
- Wrench/socket for terminal clamps
- Baking soda
- Clean water (distilled if possible)
- Battery terminal brush or stiff nylon brush
- Rags/paper towels
- Terminal protectant spray or anti-corrosion washers (optional)
Step-by-step cleanup
-
Turn engine off and locate battery.
Confirm where your battery sits (under hood, trunk, or less common locations). -
Inspect before touching.
If the battery case is cracked, bulging, leaking liquid, or hot, stop and seek professional service. -
Disconnect terminals safely.
Remove the negative (-) cable first, then the positive (+). -
Mix cleaner.
Make a paste/solution from baking soda and water. -
Apply and neutralize.
Put the mixture on corroded posts, clamps, and nearby buildup. You’ll often see bubbling. -
Scrub terminals and clamps.
Use a brush to remove residue until metal contact surfaces are mostly clean. -
Rinse lightly and dry completely.
Wipe away residue; avoid flooding surrounding electrical components. -
Reconnect in reverse order.
Connect positive (+) first, then negative (-). Tighten snugly. -
Add protection.
Apply terminal protectant to slow future corrosion.
If your car still struggles to start after terminal cleanup, the battery may be weak/aged, or charging-system issues may be involved.
Common Mistakes That Make Corrosion Worse
- Using metal tools aggressively inside tiny electronics and scraping off contact plating.
- Skipping PPE because “it’s just a little crust.”
- Mixing battery chemistries (old/new, brand/type mismatch), which increases leakage risk.
- Putting fresh batteries into a damp compartment.
- Ignoring heat exposure. High temps accelerate leakage and battery decline.
- Treating damaged lithium-ion batteries like regular AA cells. Different risk profile, different disposal urgency.
How to Prevent Battery Corrosion
For household devices
- Remove batteries from devices you won’t use for weeks or months.
- Store batteries in a cool, dry place at normal room temperature.
- Don’t mix old/new batteries in one device.
- Use the correct battery type and polarity.
- Check “forgotten devices” seasonally (holiday lights, emergency flashlights, old game controllers).
For vehicles
- Inspect battery posts and clamps periodically for buildup.
- Keep the battery top clean and dry.
- Ensure terminals are tight, not loose.
- Use anti-corrosion protection after cleaning.
- Test battery health proactively, especially before weather extremes.
Troubleshooting After You Clean
“I cleaned the remote, but it still doesn’t work.”
- Recheck spring/contact tension (contacts may be flattened).
- Try known-fresh batteries from the same pack.
- Confirm polarity and battery orientation.
- Inspect deeper for board damage; sometimes corrosion reached internal traces.
“I cleaned the car battery terminals, but starting is still weak.”
- Battery may be near end-of-life.
- Alternator/charging system may be underperforming.
- Parasitic drain or accessory load may be pulling power overnight.
- Cable damage beyond the terminal ends may be present.
Cleaning corrosion restores connection quality. It doesn’t magically reverse battery aging. (If only.)
Quick FAQ: Battery Corrosion Cleanup
Can I use baking soda on AA battery leakage in electronics?
For alkaline household battery residue, mild acids like vinegar/lemon are typically used to neutralize residue. Baking soda is commonly used for acidic car battery terminal corrosion.
Is battery corrosion always dangerous?
Not every case is an emergency, but residue can be caustic and irritating. Treat every cleanup with gloves, eye protection, and careful handling.
Can I save a badly corroded device?
Sometimes yesif damage is mostly on battery contacts. If corrosion spread onto boards/wires, repair may exceed replacement value.
Can I throw leaking batteries in regular trash?
Many battery types should be recycled or taken to proper collection points. Lithium-ion batteries, in particular, require special handling.
Conclusion
Cleaning battery corrosion is less about brute force and more about chemistry, sequence, and patience. Use vinegar/lemon for alkaline residue in household electronics. Use baking soda and water for car battery terminal corrosion. Wear protective gear, disconnect/reconnect car terminals in the right order, dry everything thoroughly, and recycle damaged batteries responsibly.
Do that, and you’ll rescue more devices, prevent repeat messes, and spend less money replacing things that were actually salvageable. Plus, you get the deeply satisfying feeling of winning a tiny battle against chaos. And crust.
Real-World Experiences: What People Learn the Hard Way (and Then Never Forget)
One of the most common stories starts like this: someone grabs a flashlight during a power outage, clicks the button, and gets… nothing. They open the battery compartment and find white crust welded around the spring. They assume it’s dead forever. After a careful cleanup with cotton swabs and vinegar, it comes back to life. That single save changes how people treat every other battery-powered item in their house.
Another frequent scenario is the “holiday decoration time capsule.” String lights, singing ornaments, and battery candles sit in storage for 10 months, then come out with corroded AA cells. The pattern is almost always the same: old batteries were left inside, temperature swings did the rest, and the contacts paid the price. People who go through this once usually adopt a new ritual: remove all batteries before storage and tape a small bag of fresh replacements to the device box. That tiny habit prevents a lot of January frustration.
Car owners have their own version. A vehicle starts fine all summer, then struggles on a cold morning. The owner assumes the battery is dead, but a quick look reveals fuzzy green-blue buildup on the terminals. After disconnecting safely, cleaning with baking soda solution, scrubbing, drying, and reconnecting properly, the crank strength improves immediately. Not every no-start problem is solved by terminal cleaning, but many weak-start cases get dramatically better once the connection is restored.
There’s also the “overconfident scrub” lesson. Some people attack corrosion with metal screwdrivers or heavy sandpaper, scraping away not just residue but the contact surface itself. The result: a cleaner-looking compartment that still fails electrically. Gentle tools and patience matter more than force. A toothbrush, swabs, and targeted cleaning beat aggressive scraping almost every time.
One household had a TV remote that kept “randomly failing.” The culprit wasn’t the remote brand or the TVit was mixed batteries: one older cell and one new one, different brands, different ages. After switching to matched fresh batteries and cleaning contacts, the remote stayed stable. That experience teaches an underrated rule: battery sets should be team players, not strangers forced into the same compartment.
Families with kids often learn to check toys quarterly. High-drain toys can sit half-used, then leak during long idle periods. A five-minute inspection routine every season catches early crust before it hardens into a full rebuild project. Think of it as preventive maintenance with a very high “future headache avoided” score.
People also discover that “dry” is not optional. Devices reassembled while still damp may fail immediately or corrode again quickly. The most successful cleanups include a deliberate dry windowsometimes just 10–20 minutes in a ventilated room, sometimes longer for tight compartments. Dry is where good repairs become durable repairs.
The biggest shared takeaway from real-life battery corrosion stories is simple: small consistent habits beat emergency heroics. Remove batteries from long-idle devices, store replacements correctly, inspect contacts periodically, and clean early when you spot residue. If you do that, battery corrosion becomes an occasional nuisancenot a recurring disaster.