Google Photos is fantastic at keeping your memories floating safely in the cloud, but sometimes you need a photo on your actual computerright now, not e, attach an image to a school or work project, edit a photo in desktop software, back up your favorite shots to an external drive, or rescue that one perfect vacation picture before it disappears into the endless scroll of “I swear I took it last summer.”
The good news: downloading an image from Google Photos to your computer is simple once you know where to click. The slightly sneaky news: the best method depends on whether you want one photo, several photos, a full album, or your entire Google Photos library. This guide walks through each option in plain English, with practical tips for Windows, Mac, Chrome, Edge, Safari, ZIP files, file names, storage, and common problems.
The main keyword here is how to download an image from Google Photos to your computer, but we will also naturally cover related searches such as download Google Photos to PC, save Google Photos to computer, download pictures from Google Photos, Google Photos download all, and Google Takeout photos export.
Why Download Photos from Google Photos?
Google Photos is built for convenience. It backs up pictures from your phone, organizes them by date, helps you search by people, places, pets, screenshots, food, and occasionally things you forgot existed. But cloud storage is not the same as having a local copy. A local file on your computer gives you more control.
Common reasons to download an image
You may want to download a Google Photos image when you need to upload it somewhere that does not connect directly to Google Photos. For example, many school portals, job applications, design tools, printing websites, and document editors expect a normal image file from your computer. You may also want to edit the image in Photoshop, Lightroom, Canva desktop workflows, GIMP, Preview, Microsoft Photos, or another local program.
Another major reason is backup. Google Photos is reliable, but a smart backup strategy does not put every egg, chicken, and breakfast plan into one digital basket. Keeping important pictures on your computer or an external drive can protect you from accidental deletion, account access issues, or storage changes.
Before You Start: A Quick Checklist
Before downloading anything, make sure you are using the correct Google account. This sounds obvious until you realize you have three Gmail accounts, one old school account, and a mystery account created in 2016 during a moment of password chaos.
Check these items first
Open your browser and go to Google Photos. Look at the profile icon in the top-right corner. Confirm that you are signed in to the account where your photos are stored. If you use Google Photos on your phone, confirm that backup is turned on there if you expect recent phone pictures to appear on your computer.
Also check your computer’s download folder. Most browsers save files to the Downloads folder unless you changed the setting. In Chrome, you can adjust the default download location or turn on the option that asks where to save each file. This is useful if you are downloading many photos and want them to land directly inside a folder like “Family Photos,” “Blog Images,” or “Vacation 2026,” instead of falling into Downloads like loose socks in a laundry room.
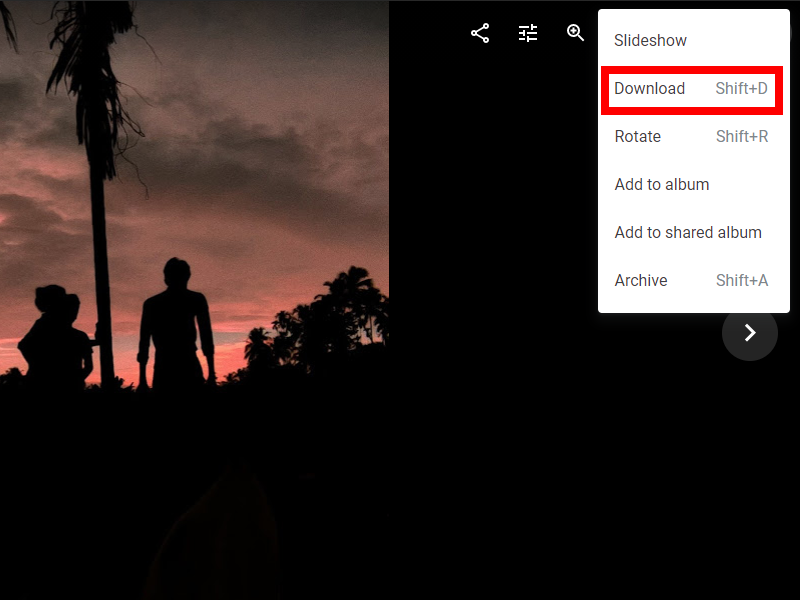
Method 1: Download One Image from Google Photos to Your Computer
This is the easiest method and the one most people need. It works when you want a single photo saved to your Windows PC, Mac, Chromebook, or laptop.
Step-by-step instructions
- Open your web browser.
- Go to photos.google.com.
- Sign in to your Google account if needed.
- Find the image you want to download.
- Click the image to open it.
- Click the three-dot menu in the top-right corner.
- Choose Download.
- Wait for the file to save to your computer.
On many computers, the image will appear in your Downloads folder. If your browser asks where to save the file, choose the folder you prefer and click Save.
Keyboard shortcut tip
On Google Photos web, you may be able to use a keyboard shortcut to download a selected photo. However, menus are more reliable for beginners because shortcuts can vary by browser, keyboard layout, or current page focus. When in doubt, the three-dot menu is your calm little lighthouse.
Method 2: Download Multiple Images from Google Photos
If you want to download several images at once, Google Photos lets you select multiple items and download them together. This is perfect for grabbing photos from one event, a batch of screenshots, or a handful of product images for a website.
How to select multiple photos
- Go to photos.google.com.
- Hover over the first image you want.
- Click the small checkmark circle in the top-left corner of the image.
- Select more images by clicking their checkmarks.
- Click the three-dot menu.
- Select Download.
When you download multiple images, Google Photos usually packages them into a ZIP file. A ZIP file is simply a compressed folder. Think of it as a suitcase: your photos are inside, and the computer politely zips the suitcase closed so everything travels together.
How to open the ZIP file
On Windows, right-click the ZIP file and choose Extract All. Follow the prompts, and Windows will create a normal folder containing your photos. On Mac, double-click the ZIP file. macOS will automatically expand it into a folder in the same location.
After extracting, you can move the photos anywhere you like: Pictures, Desktop, an external hard drive, a USB drive, or a carefully named folder that your future self will actually understand.
Method 3: Download an Entire Album from Google Photos
Downloading an album is useful when your photos are already organized. For example, maybe you have an album called “Chicago Trip,” “Wedding Favorites,” “Recipe Photos,” or “Dog Being Ridiculous, Volume 4.” Instead of selecting each image one by one, you can download the album.
Steps to download an album
- Open Google Photos on your computer.
- Go to Albums or Collections, depending on your current Google Photos layout.
- Open the album you want to download.
- Click the three-dot menu.
- Choose Download all.
Google Photos will prepare the album as a ZIP file. Large albums can take longer to download, especially if they include high-resolution images or videos. If the download feels slow, do not panic-click the button seventeen times. That is how your Downloads folder becomes a ZIP file jungle.
Method 4: Download All Google Photos Using Google Takeout
If you want to download your entire Google Photos library, Google Takeout is the better tool. Google Takeout lets you export a copy of data from Google products, including Google Photos. This is the method to use when you are creating a full backup, moving to another photo service, saving years of phone pictures to an external drive, or preparing to close an account.
How to export Google Photos with Google Takeout
- Go to takeout.google.com.
- Sign in to the correct Google account.
- Click Deselect all if all Google products are selected.
- Scroll down and select Google Photos.
- Choose whether to export all photos or only selected albums.
- Click Next step.
- Choose the delivery method, such as a download link by email.
- Select the file type, usually .zip.
- Choose the archive size.
- Click Create export.
- Wait for Google to prepare your archive.
- Download the archive when it is ready.
Google Takeout exports can take time. A small photo library may be ready fairly quickly. A huge library with years of images and videos may take much longer. Once the archive is ready, Google will provide a way to download it. Save the files somewhere with enough storage space.
Important note about Takeout files
Google Takeout may include extra JSON files next to your photos. These files store metadata such as descriptions, album information, timestamps, or other details. They are not broken photos. Do not delete them immediately if you care about preserving information for a serious archive or migration. For casual use, you can focus on the image files, but for long-term backup, keep the full export together.
Where Do Downloaded Google Photos Go?
Most downloaded Google Photos files go to your browser’s default download location. On Windows, this is usually the Downloads folder. On Mac, it is also commonly the Downloads folder. Some browsers show a downloads button near the address bar after saving a file.
How to find your downloaded image
If you cannot find the file, open your browser’s download history. In Chrome, you can press Ctrl + J on Windows or Command + Option + L on Mac to view downloads. You can also click the browser menu and choose Downloads. From there, you can open the file location.
Another simple trick is to search your computer for the file name. If the image was downloaded as something like IMG_2048.jpg, type that into your file search. If you downloaded a ZIP file, search for .zip or sort your Downloads folder by date.
What File Type Will You Get?
Most Google Photos images download as standard formats such as JPG, PNG, HEIC, or WEBP, depending on the original file and how it was stored. Photos from iPhones may appear as HEIC files if they were uploaded in that format. Screenshots may be PNG files. Web images saved to your phone may be WEBP. Videos will download in video formats such as MP4 or MOV.
What if your computer will not open the image?
If a downloaded image does not open, the file type may not be supported by your default photo viewer. Try opening it in another app, updating your operating system, or converting a copy to JPG or PNG using trusted software. For most everyday uses, JPG is the easiest format to upload, share, print, and edit.
Does Downloading Delete Photos from Google Photos?
No. Downloading an image from Google Photos creates a local copy on your computer. It does not remove the image from Google Photos. Your cloud copy stays where it is unless you manually delete it from Google Photos.
This is an important distinction. Download means “make me a copy.” Delete means “remove it.” The two buttons are not twins. They are more like distant cousins who should not sit next to each other at family dinner.
Does Downloading Reduce Image Quality?
The downloaded file reflects what Google Photos has stored in your account. If the photo was backed up in original quality, you should get the original-quality version stored by Google Photos. If it was backed up using a storage-saving setting, the file may reflect that compressed version.
For professional printing, design work, or serious archiving, check the image dimensions and file size after downloading. Open the file properties on Windows or Get Info on Mac. If the file is much smaller than expected, compare it with the original device copy if you still have it.
Troubleshooting: Why Can’t I Download from Google Photos?
Most download problems have simple causes. The photo may not be fully loaded, your browser may block the download, your internet connection may drop, or your computer may not have enough storage space.
Try these fixes
- Refresh Google Photos and try again.
- Make sure you are signed in to the correct Google account.
- Check your internet connection.
- Try a different browser, such as Chrome, Edge, Firefox, or Safari.
- Disable strict browser extensions temporarily if they block downloads.
- Check whether your computer has enough free storage.
- Try downloading fewer photos at once.
- Clear browser cache if Google Photos behaves strangely.
If a large ZIP file fails, download smaller batches. Instead of selecting 1,000 photos, try 100 or 200 at a time. Your computer, browser, and internet connection will thank you with fewer dramatic sighs.
Best Practices for Organizing Downloaded Google Photos
Downloading is only step one. Organization is where future happiness lives. Without a system, your photos may end up scattered across Downloads, Desktop, Pictures, and a folder named “New Folder (7),” which is basically a cry for help.
Create folders by date or event
A simple folder structure works best. Try organizing by year and event:
- Pictures > 2026 > Family Reunion
- Pictures > 2026 > Blog Images
- Pictures > 2025 > Graduation
- Pictures > Google Photos Backup > Travel
For business or content work, name folders by project. For example, use “Website Product Photos,” “Client Social Media Images,” or “Recipe Blog June.” Clear names save time later.
Rename important files
Camera file names like IMG_4839.jpg are not very helpful. For important images, rename them with descriptive words, such as blueberry-muffins-final.jpg or family-photo-beach-2026.jpg. Descriptive names are easier to search and better for SEO when images are uploaded to a website.
SEO Tip: Preparing Google Photos Images for the Web
If you are downloading images from Google Photos to publish on a website, do a little cleanup first. Large images can slow down your site, and slow pages can hurt user experience. Compress images before uploading them, especially if they come directly from a modern phone camera.
Use descriptive file names and alt text
For SEO, rename the image file before uploading it. Instead of IMG_9991.jpg, use a file name like homemade-strawberry-iced-tea.jpg. Add helpful alt text that describes the image naturally. Do not stuff keywords into alt text. Search engines are smart, and users with screen readers deserve useful descriptions, not a keyword salad wearing a tiny hat.
Security and Privacy Tips
Photos can contain private information. Before downloading and sharing images, check for sensitive details such as addresses, license plates, school names, personal documents, faces of people who did not agree to be posted, or location clues. This is especially important when publishing images online.
If you are using a shared or public computer, sign out of your Google account when finished. Also avoid saving private photos to public machines. If the browser asks whether to save your password, choose no unless it is your own trusted device.
Real-World Experience: What I’ve Learned Downloading Google Photos to a Computer
Downloading one image from Google Photos is usually painless. The trouble begins when people try to download “just a few photos” and accidentally select half their digital life. The first real lesson is to start small. Download one photo first, confirm where it lands, open it, and make sure the quality looks right. After that, download a batch. This tiny test run can save a surprising amount of confusion.
Another practical experience: your Downloads folder can become messy fast. If you are collecting images for a project, create the destination folder before you start. For example, if you are writing a blog post, make a folder called “Google Photos Blog Images.” If you are saving family photos, create a folder by event or date. Then move each download immediately. It sounds boring, but boring organization is better than spending twenty minutes hunting for one picture while muttering, “I literally just downloaded it.”
ZIP files are another common stumbling block. Many users download multiple images and think the photos are missing because they only see one ZIP file. The photos are inside that ZIP file. On Windows, right-click and extract it. On Mac, double-click it. After extraction, check the new folder. This is especially important before uploading images to a website, attaching them to email, or moving them to an external drive.
Large exports through Google Takeout require patience and planning. If your Google Photos library has thousands of images and videos, do not begin the export five minutes before you need the files. Make sure your computer has enough storage. If possible, use a stable Wi-Fi connection or plug into a reliable network. For very large archives, download one archive file at a time and keep the folder structure intact until you know what is inside.
One more lesson: check image orientation and format before using downloaded photos publicly. A picture may look perfect in Google Photos but rotate oddly in another app. HEIC files from iPhones may not work everywhere. If you are uploading to a website or sending images to someone who is not tech-comfortable, JPG is often the safest choice. Keep the original file, but create a converted copy when needed.
For people using Google Photos as a backup, the best habit is to create a regular local backup schedule. You do not need to download everything every week, but important albums deserve an extra copy. Family events, legal documents, portfolio images, business photos, and once-in-a-lifetime travel shots should not live in only one place. A computer copy plus an external drive copy is a much stronger safety net.
Finally, do not overlook privacy. Before sharing downloaded photos, zoom in and scan the background. Whiteboards, mail, name tags, street signs, school logos, and computer screens can reveal more than expected. The photo may be cute; the private information in the corner may be less cute. A quick crop can prevent an awkward surprise later.
Conclusion
Learning how to download an image from Google Photos to your computer is simple once you understand the right method. For one image, open it, click the three-dot menu, and choose Download. For several images, select them and download the ZIP file. For albums, use Download all. For your entire library, use Google Takeout and prepare for a larger export.
The key is choosing the method that matches your goal. A single image does not need Google Takeout. A full account backup should not be done one photo at a time unless you enjoy digital finger exercise. Keep your files organized, extract ZIP folders properly, watch your image formats, and store important pictures in more than one place.
Note: This article is based on current Google Photos web download behavior, Google account export practices, common browser download settings, and standard Windows/Mac ZIP file handling. Interface labels may change slightly over time, but the core workflow remains the same: select, download, save, extract if needed, and organize.