If you have ever looked at a plain piece of furniture and thought, “Nice… but it has all the personality of unsalted mashed potatoes,” dry brushing may be your new favorite trick. The dry brush technique is one of the easiest ways to give furniture, wood décor, frames, shelves, and even accent pieces that perfectly imperfect weathered look. It creates soft streaks, uneven highlights, and that “I found this in a charming antique shop and definitely did not wrestle with it in my garage for three hours” vibe.
The beauty of dry brushing is that it is forgiving. In fact, being a little messy is part of the charm. You are not trying to get a flawless factory finish. You are aiming for texture, contrast, age, and visual depth. Think old farmhouse table, breezy coastal frame, vintage dresser, or a rustic sign that looks like it has stories to tell.
In this guide, you will learn exactly how to dry brush a weathered look, what tools work best, which paint colors create the most convincing aged effect, what mistakes to avoid, and how to make the finish look natural instead of accidentally “craft night gone rogue.”
What Is Dry Brushing?
Dry brushing is a paint technique that uses very little paint on the brush. Instead of applying a full, wet coat, you lightly drag a nearly dry brush over the surface so the paint catches only on raised areas, edges, grain patterns, and texture. That selective coverage is what creates the weathered, distressed, and layered look.
Unlike standard painting, where the goal is smooth and even, dry brushing celebrates inconsistency. Streaks are welcome. Wood grain showing through is welcome. Tiny imperfections are basically invited to the party.
Why the Weathered Look Works So Well
A weathered finish adds character fast. It can make a brand-new piece feel storied, soften harsh modern lines, and give inexpensive furniture a more custom feel. It is especially popular in farmhouse, cottage, coastal, vintage, rustic, and shabby-chic interiors, but it also works beautifully in transitional spaces that need a little texture so they do not feel too polished.
The trick is balance. A good weathered look should feel believable, not over-rehearsed. Real wear happens on edges, corners, around knobs, across raised trim, and anywhere hands, sunlight, and time naturally leave their mark. When your dry brushing follows that logic, the finish looks authentic instead of theatrical.
Best Surfaces for Dry Brushing
Dry brushing works best on surfaces with some texture or detail. Wood is the classic choice because the grain helps the paint catch in interesting ways, but it can also work on previously painted furniture, picture frames, decorative boxes, signs, and some primed laminate pieces.
Great candidates include:
Dressers, side tables, stools, shelves, cabinets, trays, mirrors, wood signs, headboards, and accent pieces with grooves, raised panels, or carved trim. If the piece has absolutely no texture and is slicker than a dolphin in a rainstorm, you will need better prep and more patience.
Surfaces that need extra prep:
Laminate, very glossy paint, metal, or sealed furniture. These can still be dry brushed, but only after proper cleaning, light sanding or scuffing, and in many cases, primer. Skipping prep is the DIY version of wearing flip-flops to hike a mountain. Technically possible. Emotionally regrettable.
Supplies You Need
You do not need a giant workshop or a suspiciously expensive collection of boutique brushes. A simple setup will do:
Basic materials:
A chip brush or stiff-bristle brush, lint-free cloth or paper towels, drop cloth, sandpaper, tack cloth or damp rag, base coat paint, dry brush color, optional primer, and a protective topcoat for finished pieces that will get regular use.
Best paint types:
Latex paint, chalk-style paint, and some milk-paint looks work especially well for weathered finishes. Chalk-style paints are popular because they tend to create a velvety, vintage look and are easy to distress. For a softer washed effect, a diluted white or light paint can mimic a whitewashed finish. For a more layered antique effect, combine a dark base with a light dry brush color.
How to Choose Colors for a Weathered Finish
Color pairing matters more than people think. If your colors do not create enough contrast, the piece can look dusty rather than intentionally aged. If the contrast is too strong, it can look like the furniture lost a bet.
Reliable color combinations:
Charcoal over white, white over dark brown, cream over faded blue, light gray over black, soft greige over warm wood, and white over weathered oak tones. These combinations highlight texture without looking cartoonish.
For a coastal or driftwood feel:
Use pale gray, warm white, muted taupe, or a thinned whitewash-style layer. These colors brighten the grain and create that sun-worn look often seen in beach homes and relaxed cottage interiors.
For a more rustic antique look:
Start with a darker or warmer base coat, then dry brush with white, cream, or a lighter neutral. You can also layer more than one dry brush color if you want extra depth, but use restraint. You want weathered charm, not a paint traffic jam.
Step-by-Step: How to Dry Brush a Weathered Look
1. Clean the piece thoroughly
Dust, grease, wax, and mystery grime will sabotage your finish. Wipe the surface well and let it dry fully. Remove hardware if possible. Label drawers and parts if the piece comes apart. Future-you will be thrilled.
2. Sand lightly
If the surface is shiny, sealed, or rough, a light sanding helps the paint grip and smooths obvious flaws. On wood, sand with the grain. Wipe off all dust before painting. Even a small layer of sanding dust can turn your lovely weathered finish into a crunchy disappointment.
3. Apply a base coat if needed
If the piece already has a color you love underneath, you may be able to dry brush directly over it. Otherwise, apply a base coat and let it dry fully. A darker base color usually works beautifully under a light dry brush layer because it creates instant contrast and depth.
4. Load the brush the right way
This is the heart of the technique. Dip only the tip of the brush into paint. Then wipe most of it off on a rag, paper towel, paper plate, or the edge of your setup until the brush feels nearly dry. The bristles should still look separated, not soggy or clumped. If the brush seems suspiciously under-loaded, good. You are doing it right.
5. Use light, fast strokes
Drag the brush lightly across the surface using feathery strokes. For wood, brushing with the grain creates the most believable effect. Focus on edges, corners, raised details, and high points first, because those are the spots that naturally catch wear over time.
Do not mash the brush into the piece. You are dusting the surface with color, not trying to repaint it. Build the effect slowly with multiple passes rather than one heavy-handed sweep.
6. Step back often
What looks subtle from six inches away can look dramatic from six feet away. Pause often and view the piece from different angles. A weathered finish should feel layered and irregular, but still intentional. If one area is too heavy, soften it with a cloth, a lightly damp brush, or a bit of gentle sanding after it dries.
7. Add a second weathered layer if desired
If you want more depth, add another color after the first one dries. For example, use a warm white first, then a very soft gray over selected areas. Multi-layer finishes can look gorgeous when done sparingly because they mimic the way old painted furniture changes over time.
8. Distress strategically
Once dry, you can lightly sand edges, corners, and hardware areas to reveal a bit of the base coat or wood underneath. This is especially effective on furniture meant to look genuinely aged. The key word here is lightly. Stop before the piece starts looking like it survived a minor tornado.
9. Seal the finish
If the item will be touched often, like a side table, stool, tray, or cabinet, seal it with a clear protective coat. Matte or flat topcoats preserve the weathered look best, while satin can add a little polish. On purely decorative items, sealing is optional but still helpful for longevity.
Common Mistakes to Avoid
Using too much paint
This is the number one mistake. If the brush is too wet, you will get blobs, heavy streaks, and a finish that looks painted rather than weathered. Wipe off more paint than you think you need. Then wipe off a little more for luck.
Skipping prep
Dry brushing is low drama, but not no drama. Glossy or dirty surfaces need proper prep or the paint may smear, fail to grip, or wear off too easily.
Distressing random areas
Wear should make sense. Focus on edges, corners, trim, drawer fronts, around pulls, and places that naturally collect use. Random scratches in the middle of a perfectly flat panel can look forced.
Not testing first
Always test your color and technique on the back, underside, or a scrap board. Dry brushing looks different depending on wood species, paint type, and how thirsty the surface is.
Specific Examples of a Great Weathered Finish
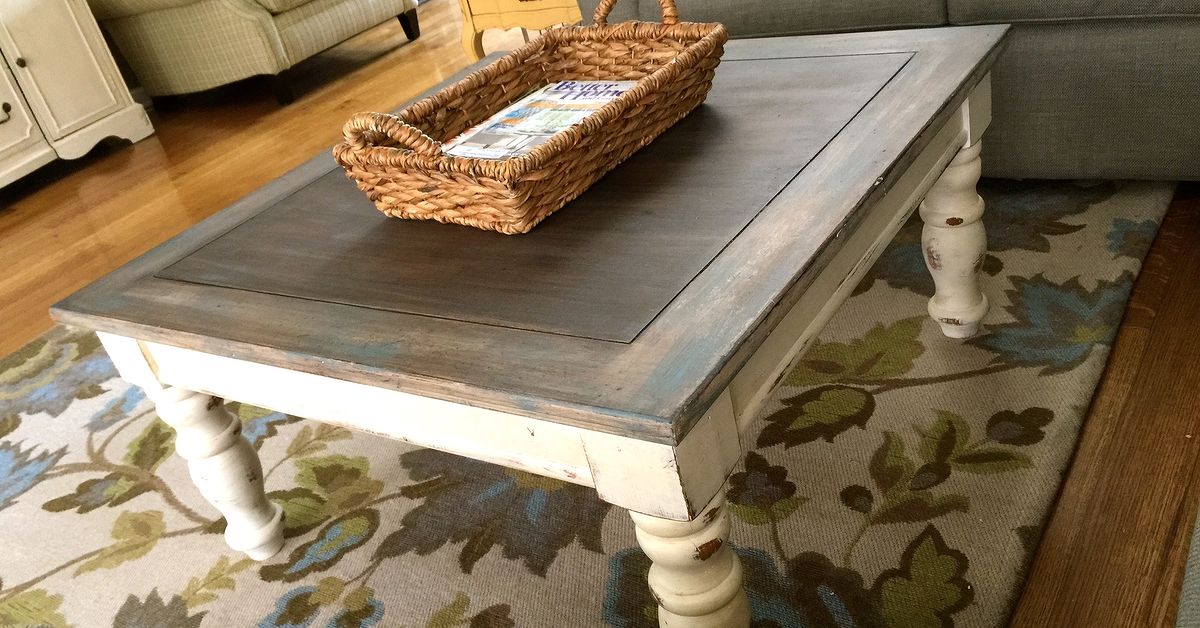
Example 1: Rustic side table
Paint the table in a matte charcoal base coat. After it dries, dry brush soft white over the legs, corners, and tabletop grain. Finish by lightly sanding the edges. The result looks collected, cozy, and perfectly at home beside a linen sofa.
Example 2: Coastal picture frame
Start with raw or medium-tone wood. Apply a thin whitewashed layer, then dry brush pale gray over the corners and raised trim. This creates a driftwood-inspired finish that feels breezy and relaxed.
Example 3: Vintage dresser makeover
Use a warm cream base and a muted sage dry brush layer on details and drawer edges. Add slight distressing around the knobs and feet. Suddenly the dresser looks like it came with a backstory and maybe excellent taste in jazz.
Dry Brushing vs. Whitewashing vs. Distressing
These terms overlap, but they are not identical. Dry brushing uses minimal paint to highlight texture. Whitewashing usually involves thinning paint so wood grain shows through more evenly across the surface. Distressing typically means sanding, scraping, or wearing back areas to mimic age. The most convincing weathered finishes often combine all three techniques in moderation.
For example, you might start with a whitewash-like base for softness, add dry brushing for texture, and finish with light sanding on edges for believable wear. That layered approach gives the finish much more nuance than a single trick alone.
How to Make It Look Natural
Natural-looking weathered finishes share three traits: restraint, contrast, and logic. Restraint means not covering every inch in dry-brushed streaks. Contrast means choosing colors that actually show up. Logic means placing wear where real life would place it.
If you remember only one thing from this article, make it this: less paint, more passes. That one mindset will save you from most dry-brushing mistakes.
Final Thoughts
Learning how to dry brush a weathered look is one of the most useful painting skills for DIY décor. It is affordable, beginner-friendly, and incredibly flexible. You can go farmhouse, coastal, antique, cottage, rustic, or somewhere in that delightful middle zone where your furniture looks lovingly aged rather than freshly assembled.
The technique rewards patience more than perfection. Prep the surface, choose colors with enough contrast, keep the brush nearly dry, and build the look gradually. Once you get the feel for it, you will start eyeing every bland piece of furniture in your home like a producer scouting a makeover show.
And honestly? That is when the fun starts.
Extended Experience: What Real Dry-Brushing Projects Teach You
The most helpful thing about dry brushing is that the first project usually teaches you more than ten tutorials ever could. On paper, the technique sounds almost too simple: use less paint, drag the brush, admire your genius. In reality, the experience is a little more hands-on, a little more trial-and-error, and a lot more satisfying.
One common experience is realizing just how little paint the brush actually needs. Most beginners dip too deeply at first, then make one stroke and watch a big stripe land on the surface like an uninvited guest. The fix is easy: wipe off the brush aggressively and try again. By the third or fourth pass, most people suddenly feel the difference. The paint starts catching the grain instead of coating it, and that is the moment the technique clicks.
Another lesson comes from color. A weathered finish often looks underwhelming while it is wet. Many DIYers panic too early and add more paint. Then it dries darker or heavier than expected. Experienced painters learn to let the first pass dry before judging the result. Dry brushing is not a dramatic reveal in the first ten seconds. It is more like building flavor in a soup. Annoying analogy? Maybe. Accurate? Absolutely.
Projects also teach you that every surface behaves differently. A rough pine board grabs paint instantly and can look beautifully aged with very little effort. A slick, previously painted cabinet is pickier and demands better prep. Laminate, glossy finishes, and sealed wood all make you earn that vintage charm. That is why experienced DIYers become almost religious about cleaning, scuff sanding, and testing first on hidden areas.
There is also a strong emotional arc to dry brushing. The middle of the project often looks weird. Not bad, just awkward. A table with half-finished streaks and one sanded corner can resemble a furniture identity crisis. Then the final touches happen: the edges get balanced, the hardware goes back on, the topcoat settles, and suddenly the piece makes sense. This is why patience matters. Many good finishes are nearly ruined by people who quit at the awkward stage and overwork them.
Over time, experienced DIYers also get better at making wear look believable. They stop distressing random flat areas and focus on corners, trim, feet, drawer fronts, and around knobs. They learn that restraint is what separates “beautifully aged” from “craft fair disaster.” They also become more comfortable mixing techniques, such as combining a light whitewash with dry brushing or adding a second subtle color for depth.
Perhaps the best experience tied to dry brushing is how approachable it feels. You do not need elite talent or a workshop worthy of television. You need a brush, a rag, a little courage, and the willingness to build the finish slowly. Once you complete one good piece, you start seeing potential everywhere: old stools, bland frames, plain shelves, hand-me-down dressers, and all the forgotten wooden objects quietly waiting for a glow-up.
That is the real charm of the technique. Dry brushing does not just change furniture. It changes how you look at furniture. And after that, your house may never be safe from “just one quick project” again.