

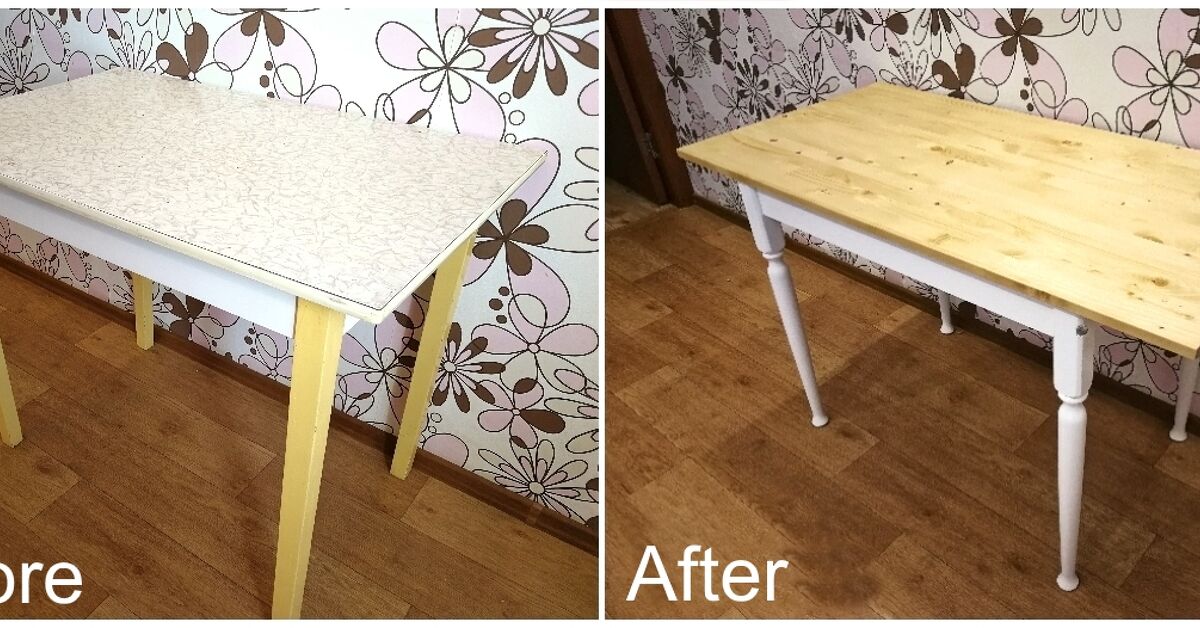
An old dining table can look hopelessly dated while still being struct rings, mystery scratches, and one suspicious patch of glitter glue may be solid wood, sturdy joinery, and years of future family dinners.
Giving an old dining table a second life is not simply a matter of attacking it with sandpaper and hoping for farmhouse magic. The best DIY dining table makeover begins with identifying the material, checking the structure, choosing the right finish, and allowing enough drying and curing time. Patience is not the most exciting tool in the workshop, but it is usually the one that prevents fingerprints from becoming permanent decorative features.
This guide explains how to refinish, repaint, repair, and update an old dining table using practical techniques suitable for solid wood, veneer, laminate, and previously painted furniture.
Should You Restore or Replace Your Old Dining Table?
Before buying another table, consider what the existing one already offers. Older dining tables may have solid frames, replaceable hardware, removable leaves, traditional joinery, or thick tops that can survive multiple refinishing projects. A cosmetic problem does not automatically mean the table has reached the end of its useful life.
A DIY makeover is usually worthwhile when the table is stable or repairable, fits the room, and has a shape you still enjoy. Scratches, worn stain, peeling paint, loose joints, and dated colors can often be corrected. Severe rot, widespread insect damage, major warping, or a badly separated engineered-wood core may make replacement more practical.
Start With a Structural Inspection
Place the table on a level floor and gently push each corner. Check for wobbling legs, loose apron joints, damaged brackets, cracked supports, and missing fasteners. Open and close extension mechanisms, inspect the table leaves, and confirm that the top is securely attached to the base.
Tighten loose screws, but do not keep turning after they stop gripping. A stripped screw hole may need repair with a wood plug, dowel, or properly sized replacement fastener. Loose glued joints should usually be separated carefully, cleaned, reglued on exposed wood, and clamped according to the adhesive manufacturer’s directions. Glue applied over varnish or paint cannot bond properly because it cannot penetrate the wood.
Structural repair and bonding guidance synthesized from manufacturer instructions. ction>
Identify What Your Dining Table Is Made Of
Material identification is one of the most important steps in an old dining table DIY project. Sanding a thick solid-wood top is forgiving. Sanding through a thin veneer is an excellent way to turn a weekend makeover into an emergency lesson about replacement tops.
Solid Wood
Solid wood normally shows continuous grain around the edges and underneath the tabletop. Minor scratches and stains can often be sanded out, while deeper damage may be filled or incorporated into a rustic finish. Solid wood offers the greatest flexibility for stripping, staining, painting, or applying a natural clear coat.
Wood Veneer
Veneer is a thin layer of real wood bonded over plywood, fiberboard, or another core. It can be stained beautifully, but aggressive sanding may cut through the decorative surface. If the grain on the top does not continue naturally around the edge, or if a thin layer is visible where the surface is chipped, the table may be veneered.
Use light hand sanding or a very gentle scuff-sanding approach on veneer. Repair loose sections with an appropriate adhesive and flat clamping pressure before applying a finish.
Laminate or Melamine
Laminate has a printed or colored surface rather than exposed wood grain. Traditional penetrating wood stain will not soak into it. A laminate dining table makeover generally requires thorough cleaning, light abrasion, a bonding primer, and a compatible durable paint.
Do not attempt to reveal “natural wood” by sanding laminate. There may be particleboard beneath it, and particleboard is not hiding a charming walnut personality.
Material-specific painting and refinishing guidance. ction>
Choose the Right Makeover Style
Decide what the finished table should look like before stripping anything. Your goal determines how much preparation is necessary and which imperfections must be repaired.
Option 1: Refresh the Existing Finish
If the original color is attractive and the finish is mostly intact, a complete strip-down may be unnecessary. Clean the table, repair small scratches, lightly scuff the surface, and apply a compatible maintenance product or protective topcoat after testing adhesion in a hidden area.
This approach preserves much of the table’s character and is ideal for minor fading, shallow scratches, and light wear.
Option 2: Repaint the Entire Table
Paint is excellent for tables with mismatched wood, widespread stains, repaired veneer, or an unattractive existing color. Black, deep navy, warm white, muted green, and earthy beige can make traditional furniture look current without changing its shape.
A painted dining table still needs careful cleaning, repairs, sanding, primer, and cure time. “No-prep” paint can be useful in certain situations, but grease, wax, loose coatings, and glossy surfaces remain enthusiastic enemies of adhesion.
Option 3: Refinish and Stain the Wood
Choose stain when the table has attractive real-wood grain worth highlighting. This route requires the most uniform surface preparation because leftover finish, glue, filler, and uneven sanding can cause blotchy color.
Option 4: Create a Two-Tone Table
A natural or stained tabletop paired with a painted base is one of the most forgiving dining table makeover ideas. The top celebrates the wood, while the painted legs and apron hide mismatched repairs and visually lighten a bulky design.
Tools and Materials
Your exact supply list will depend on the chosen finish, but a typical dining table refinishing project may require:
- Drop cloths or plastic sheeting
- Screwdrivers, wrenches, and labeled storage bags
- Wood glue, clamps, and wood filler
- Degreasing cleaner and clean lint-free cloths
- Sandpaper in several graduated grits
- Random-orbit sander for suitable solid, flat surfaces
- Sanding sponge for curves, corners, and details
- Dust mask or an appropriate respirator
- Safety glasses and chemical-resistant gloves
- Primer, furniture paint, stain, or clear finish
- Quality brushes, foam rollers, or application pads
- Vacuum with a suitable filter
- Stir sticks and disposable containers
Read every product label before beginning. Confirm that cleaners, primers, paints, stains, and clear coats are compatible with one another. Mixing products based solely on optimism is not a recognized finishing system.
Safety Before Sanding or Stripping
Work in a well-ventilated area away from flames, pets, children, and food preparation. Wear eye protection and use the respiratory protection specified for the dust, solvent, stripper, paint, or finish involved.
Take extra care with unknown old painted coatings. Disturbing lead-containing paint through dry sanding, scraping, or cutting can create hazardous dust. If lead may be present, test before disturbing the surface and follow current lead-safe practices. Wet methods, containment, careful cleanup, and professional assistance may be appropriate depending on the result and condition of the table.
Chemical stripping products also vary widely. Follow the label for ventilation, gloves, respirator selection, application thickness, waiting time, cleanup, and disposal. Never combine chemical products unless the manufacturer explicitly permits it.
Safety guidance based on current EPA lead-safe recommendations and refinishing instructions. ction>
How to Give Your Old Dining Table a Second Life
Step 1: Photograph and Disassemble the Table
Take pictures before removing anything. Photograph brackets, leaf hardware, leg orientation, extension mechanisms, and fastener locations. These images become extremely valuable when several nearly identical screws begin pretending they have never met you.
Remove the legs, leaves, hardware, and detachable sections when practical. Label everything and place the fasteners in separate bags. Disassembly makes cleaning, sanding, painting, and repairing easier while reducing drips around joints.
Step 2: Clean Before You Sand
Dining tables collect cooking residue, hand oils, polish, wax, and cleaning-product buildup. Sanding a dirty table can grind contaminants into the surface and spread them across areas that were previously clean.
Wash the table with a cleaner appropriate for the existing finish. Work with damp rather than soaking-wet cloths, especially around veneer edges and joints. Rinse away cleaner residue when required and allow the table to dry completely.
Step 3: Complete Structural Repairs
Repair loose joints before cosmetic work. Remove failing adhesive where possible, expose clean bonding surfaces, apply the correct wood glue, and clamp the joint squarely. Use pads between clamps and finished wood to prevent dents.
Fill dents, gouges, and unused hardware holes after structural repairs. Select paintable filler for painted surfaces and stainable filler for stained projects. Even stainable filler may absorb color differently from surrounding wood, so test it first.
Step 4: Remove Loose or Failing Finish
A finish that is peeling, cracked, gummy, or badly water-damaged should be removed until the remaining surface is sound. Flat solid-wood tops can often be sanded, while carved details may be easier to strip chemically.
Do not automatically strip a stable finish if the table will be painted. Cleaning, repairing, scuff sanding, and priming may be enough. Complete removal is more important when applying penetrating stain or correcting widespread finish failure.
Step 5: Sand With Control
Use the least aggressive grit that accomplishes the task. Coarse paper removes heavy finish and damage quickly, but it also creates scratches that must be removed later. Progress through a logical grit sequence instead of jumping directly from aggressive paper to extra-fine paper.
On suitable solid wood, a makeover might begin around 80 or 100 grit for heavy removal, move through 120 or 150 grit, and finish around 180 grit before many stains or paints. The correct sequence depends on the wood and finishing product. Always follow the finish manufacturer’s recommendation.
Move a random-orbit sander steadily and allow the tool’s weight to provide pressure. Pushing down can slow the pad, create uneven sanding, and leave visible swirls. Sand edges and veneer cautiously by hand. Remove dust between grits so loose abrasive particles do not continue scratching the surface.
Sanding sequence and tool-use guidance. cuum and Inspect Under Good Light
Vacuum the tabletop, apron, legs, corners, and surrounding workspace. Wipe the surface using the method recommended for the intended finish. Inspect it under side lighting, which makes scratches, glue residue, dents, and swirl marks easier to see.
Correct defects now. A flaw that seems tiny on bare wood may become surprisingly ambitious after dark stain or glossy paint is applied.
Step 7A: Apply Stain for a Natural-Wood Finish
Test the stain underneath the table or on another hidden section. Wood species, sanding technique, previous coatings, and repairs can all affect the final color.
Soft or porous wood may benefit from a compatible pre-stain conditioner to reduce uneven absorption. Apply stain in manageable sections, work with the grain, and remove excess according to the label. Leaving a heavy layer of stain on the surface can lead to tackiness and an uneven appearance.
Allow the stain to dry fully before applying a compatible clear finish. If you want a lighter natural appearance, you may skip colored stain and protect the properly prepared wood with a clear product designed for furniture.
Step 7B: Prime and Paint for a Color Makeover
Use a suitable bonding primer over glossy finishes, laminate, or difficult surfaces. Use a stain-blocking primer when tannins, water marks, or old discoloration could bleed through light-colored paint.
Apply thin, even coats with a quality brush, fine-finish roller, or sprayer. Lightly sand between coats when directed, then remove every trace of dust. Several thin coats generally level and cure more reliably than one heroic coat thick enough to preserve fingerprints.
Avoid heavy buildup on the mating edges of removable leaves and extension sections. Excess paint can make the pieces stick or prevent the table from closing correctly.
Painting, priming, and table-leaf guidance. otect the Tabletop
A dining tabletop faces spills, heat, cleaning, writing pressure, serving dishes, and the occasional child who considers furniture an experimental art surface. Choose a durable finish intended for furniture or similarly demanding interior surfaces.
Depending on the product, protection may involve multiple thin coats of water-based polyurethane, oil-based polyurethane, varnish, hard-wax oil, or a compatible furniture topcoat. Follow the label for application tools, sanding between coats, recoat times, ventilation, and the recommended number of coats.
Water-based products generally preserve lighter wood color, while many oil-based products add warmth or amber tones. Test the full finishing system before coating the visible top.
Step 9: Let the Finish Cure
Dry and cured are not the same condition. A surface may feel dry enough to touch while remaining vulnerable to scratches, water, heat, and objects left in one place. Observe the full cure instructions before returning the table to daily service.
Environmental conditions matter. Cold temperatures, excessive heat, and high humidity may slow drying or cause application problems. Keep the project within the product’s recommended temperature and humidity range.
Topcoat, drying, and curing guidance. eassemble and Level the Table
Reattach the legs and hardware using your photographs as a guide. Tighten fasteners evenly without crushing the wood. Reinstall the leaves, test the extension mechanism, and confirm that painted edges do not bind.
Set the table on a level surface and check for rocking. Adjustable glides can correct small floor irregularities, but continuing wobble may indicate a loose joint, twisted frame, or uneven leg length that needs further repair.
Dining Table Makeover Ideas That Do Not Look Homemade
Natural Top With a Dark Base
Refinish the tabletop in a medium natural tone and paint the legs charcoal, black, or deep navy. This combination works well with traditional tables that feel visually heavy.
Warm White With a Wood Accent
Paint the apron and legs warm white while preserving a wood top or leaf. Warm whites tend to feel more forgiving than bright white in busy dining rooms.
Single-Color Modern Finish
Paint the entire table in one satin or low-luster color for a cleaner silhouette. This approach can unify tables made from several wood species or repaired materials.
Subtle Color Blocking
Add a contrasting edge, painted apron, or color beneath the tabletop. The detail is visible without turning dinner into a debate about whether the table has become an abstract sculpture.
Updated Hardware and Feet
Replace worn glides, decorative caps, or visible hardware when appropriate. Small metal details can help an older table coordinate with modern lighting and cabinet hardware.
Common Dining Table Refinishing Mistakes
Sanding Before Cleaning
This spreads grease, wax, and polish into the surface, potentially causing adhesion problems later.
Using an Orbital Sander Aggressively on Veneer
Thin veneer can disappear quickly, especially near edges and corners. Hand sanding is slower but far safer.
Skipping the Test Patch
Stain color, primer adhesion, and topcoat clarity may look different on the actual table than they do on a sample card.
Applying Heavy Coats
Thick paint and clear finish may sag, wrinkle, trap softness underneath, or require much longer to cure.
Using the Table Too Soon
Plates, placemats, and decorations can leave impressions in a finish that feels dry but has not fully cured.
Ignoring the Underside
The underside does not always need a decorative finish, but it should be cleaned and inspected. Hidden damage, loose blocks, old pest activity, and missing hardware often live there peacefully until someone looks.
How to Care for Your Refinished Dining Table
Use placemats, trivets, and coasters to reduce wear. Wipe spills promptly with a soft cloth and use cleaning products approved for the finish. Avoid soaking the tabletop or allowing liquid to remain around seams, leaf edges, and veneer.
Do not use silicone-rich polish, oil soap, abrasive powder, or aggressive household degreasers unless the finish manufacturer recommends them. Some furniture-care products can leave contamination that makes future recoating difficult.
Lift decorative objects rather than dragging them. Add felt pads beneath centerpieces, lamps, and serving accessories. Periodically inspect fasteners and extension hardware, especially after the table has been moved.
Furniture-care guidance. ction>
Experience Notes: Lessons From Successful Old Dining Table DIY Projects
The most useful lesson from dining table makeovers is that preparation usually takes longer than painting or staining. A table can be coated in an afternoon, but achieving a finish that survives everyday meals requires cleaning, repairs, controlled sanding, dust removal, testing, and patience between coats. Rushing those steps saves a few hours and may create several weekends of correction work.
Another repeated experience is that the original makeover plan often changes after the table is cleaned. What first appears to be dark, damaged wood may actually be a cloudy old finish covering attractive grain. Conversely, a tabletop that looks like solid wood from across the room may reveal thin veneer, patched sections, or laminate once the edges are inspected. Committing to stain before identifying the surface is risky. A flexible plansuch as a stained top with a painted baseoften produces a better result.
Test patches are also more valuable than paint chips and online photographs. Lighting, wood species, existing stain, and room color all influence the final appearance. A fashionable cool gray can look blue beside warm flooring. A rich walnut stain can become nearly black on an already dark tabletop. Testing beneath the table or on the back of a leaf provides far more useful information than judging color through a screen.
Dust control makes a dramatic difference. Sanding dust settles on floors, walls, clothing, wet paint, and apparently every object in the surrounding ZIP code. Connecting a vacuum to the sander, cleaning between grits, and performing final finishing in a separate clean area can prevent rough particles from becoming permanent parts of the topcoat.
Large tabletops also expose application mistakes more clearly than small furniture. A brush technique that looks fine on a chair leg may leave lap marks across a six-foot surface. Working in manageable sections, maintaining a wet edge, using thin coats, and choosing an applicator recommended for the finish helps create a more consistent result. For some water-based topcoats, a quality paint pad or fine roller may be easier to control than a narrow brush.
One of the most common disappointments occurs after the table looks finished. The owner reassembles it, places a centerpiece on top, and serves dinner the next day. When the centerpiece is moved, it leaves a soft ring or rectangular impression. The lesson is simple: respect cure time. A finish may feel dry within hours while still hardening underneath for days or longer. Light use and full use are not always the same milestone.
It is equally important to accept that an old table does not need to look factory-new. Small dents, repaired scratches, and slight color variation can give the piece character. Trying to erase every mark may require removing more wood than necessary. The goal should be a stable, attractive, usable tablenot evidence that the table recently entered a furniture witness-protection program.
Finally, the most satisfying dining table transformations usually balance appearance with practicality. A dramatic high-gloss finish may be beautiful but reveal fingerprints and scratches. A heavily distressed surface may suit a rustic room but prove difficult to clean. Selecting a finish based on the household’s actual habits leads to longer-lasting satisfaction. Families with children, frequent guests, or daily dining use should prioritize durability, cleanability, and easy touch-ups.
An old dining table already has the difficult parts: size, structure, history, and a place in the home. With thoughtful repairs, suitable products, and enough curing time, it can return to service looking intentional rather than merely old. The finished table may not be perfect, but it will be personal, useful, and ready to collect an entirely new generation of dinner stories.