If summer has turned your room into a baked potato with Wi-Fi, an in-wall air conditioner can be a smart fix. It keeps your window free, looks cleaner than a bulky window unit, and can cool a room like it means business. But installation is not a “close enough counts” kind of project. A through-the-wall air conditioner needs the right unit, the right sleeve, the right wall opening, and the right slope. Skip those details and you may end up with leaks, rattles, poor airflow, or a machine that cools like it is on an extended coffee break.
This guide walks you through how to install an in-wall air conditioner the right way. You will learn how to choose the correct unit, prep the wall, install the sleeve, slide in the chassis, seal everything up, and test the system without turning your living room into a DIY regret museum.
What Is an In-Wall Air Conditioner, Exactly?
First, a quick but important distinction: when most homeowners say in-wall air conditioner, they usually mean a through-the-wall air conditioner or built-in wall AC. That is not the same thing as a standard window unit. A real wall unit is designed to sit inside a sleeve installed in the wall. A window unit, on the other hand, is designed to breathe through the sides or top in ways that do not always work when the unit is boxed into a wall cavity.
Translation: do not grab a random window AC and stuff it into drywall like you are hiding leftovers in the back of the fridge. Buy a unit specifically rated for through-the-wall installation.
Before You Buy: Choose the Right Unit
1. Size the AC correctly
Start with room size. Measure the room’s length and width, then multiply those numbers to get square footage. A small bedroom may need around 5,000 to 8,000 BTUs, while a larger living room may need 10,000 to 14,000 BTUs or more. Oversizing is not a flex. A unit that is too large can short-cycle, cool unevenly, and leave the room clammy. Undersizing is equally annoying because the system will run forever and still leave you sweating.
If the room gets strong afternoon sun, has high ceilings, opens into another room, or houses heat-generating electronics, bump the capacity up modestly. If it is a shady room used mostly for sleeping, you may not need as much cooling power.
2. Confirm wall sleeve compatibility
Many through-the-wall units require a specific sleeve or are designed to fit certain universal sleeves. Before you buy, check the unit’s required sleeve width, height, and depth. This is not the time to rely on vibes, eyeballing, or “it looks about right.” A mismatch can lead to poor support, air leaks, and lousy performance.
3. Check the electrical requirements
Some smaller units run on a standard 115-volt outlet. Larger models often need 208/230-volt service and a matching receptacle. Check the product specifications before installation. If the outlet is wrong, or if there is no proper circuit nearby, stop and call a licensed electrician. An air conditioner should cool your room, not audition for a fire safety lecture.
Tools and Materials You May Need
- Through-the-wall air conditioner
- Compatible wall sleeve
- Tape measure
- Level
- Pencil or marker
- Drill and bits
- Screws or anchors recommended by the manufacturer
- Framing lumber if needed
- Caulk and caulk gun
- Foam insulation or weather sealing materials
- Utility knife
- Safety glasses and gloves
- Stud finder
- Reciprocating saw or masonry tools, depending on wall type
You may also need help from another person. Through-the-wall units can be awkward, heavy, and surprisingly good at testing your lower back.
Pick the Best Location
The ideal wall is an exterior wall with enough open space inside and outside the home. Avoid spots blocked by shrubs, fences, furniture, or curtains that can interfere with airflow. Inside, choose a location that allows the cool air to spread across the room. Outside, make sure the rear of the unit has the clearances required by the manufacturer.
Also think about what is inside the wall. Check for plumbing, wiring, gas lines, and structural framing members before cutting. If the wall is load-bearing or made of brick, concrete block, or stone, installation can get more complicated fast. That does not mean it cannot be done. It just means a “weekend project” can suddenly become a “call somebody with a truck and a laser level” project.
How to Install an In-Wall Air Conditioner: Step by Step
Step 1: Read the manufacturer instructions first
Yes, really. Every model has slightly different sleeve, trim, fastening, and electrical requirements. Read the manual before cutting the wall. Reading it after cutting is a bit like reading a recipe after the cake is already on fire.
Step 2: Mark the wall opening
Use the sleeve dimensions, not the faceplate dimensions, to mark your opening. Double-check height, width, and depth. Use a level so the opening is straight side to side. Then verify that the location works both indoors and outdoors. A well-placed unit looks intentional. A crooked hole looks like a home improvement jump scare.
Step 3: Cut the opening
For framed walls with siding, remove the interior wall finish first, then cut the opening through the sheathing and siding. For masonry walls, this step is more labor-intensive and usually requires specialized tools. In either case, take your time and protect nearby surfaces from dust and debris.
If the opening crosses wall studs or other framing, you may need to add a header, jack studs, or blocking to support the structure around the sleeve. This is one of the most important parts of the job. The sleeve must sit in a properly supported opening, not float in a drywall wish.
Step 4: Frame and reinforce the opening
Create a square, sturdy rough opening that matches the manufacturer’s dimensions. Dry-fit the sleeve to make sure it slides in without forcing. If the opening is too tight, fix it now. If it is too loose, add framing or spacers so the sleeve can be secured properly without distortion.
Step 5: Install the wall sleeve
Slide the sleeve into the opening. Most manufacturer guidance calls for the sleeve to be level from side to side and slightly pitched downward toward the outside so condensation drains correctly. This outward tilt is small, but it matters. Too little slope and water may pool. Too much and the unit may sit poorly or vibrate.
Secure the sleeve to the framing or wall structure using the recommended screws or anchors. Fasten the sides as instructed. Do not improvise by drilling random holes where you think they look nice. The bottom of the sleeve is especially important because some systems rely on specific drainage paths.
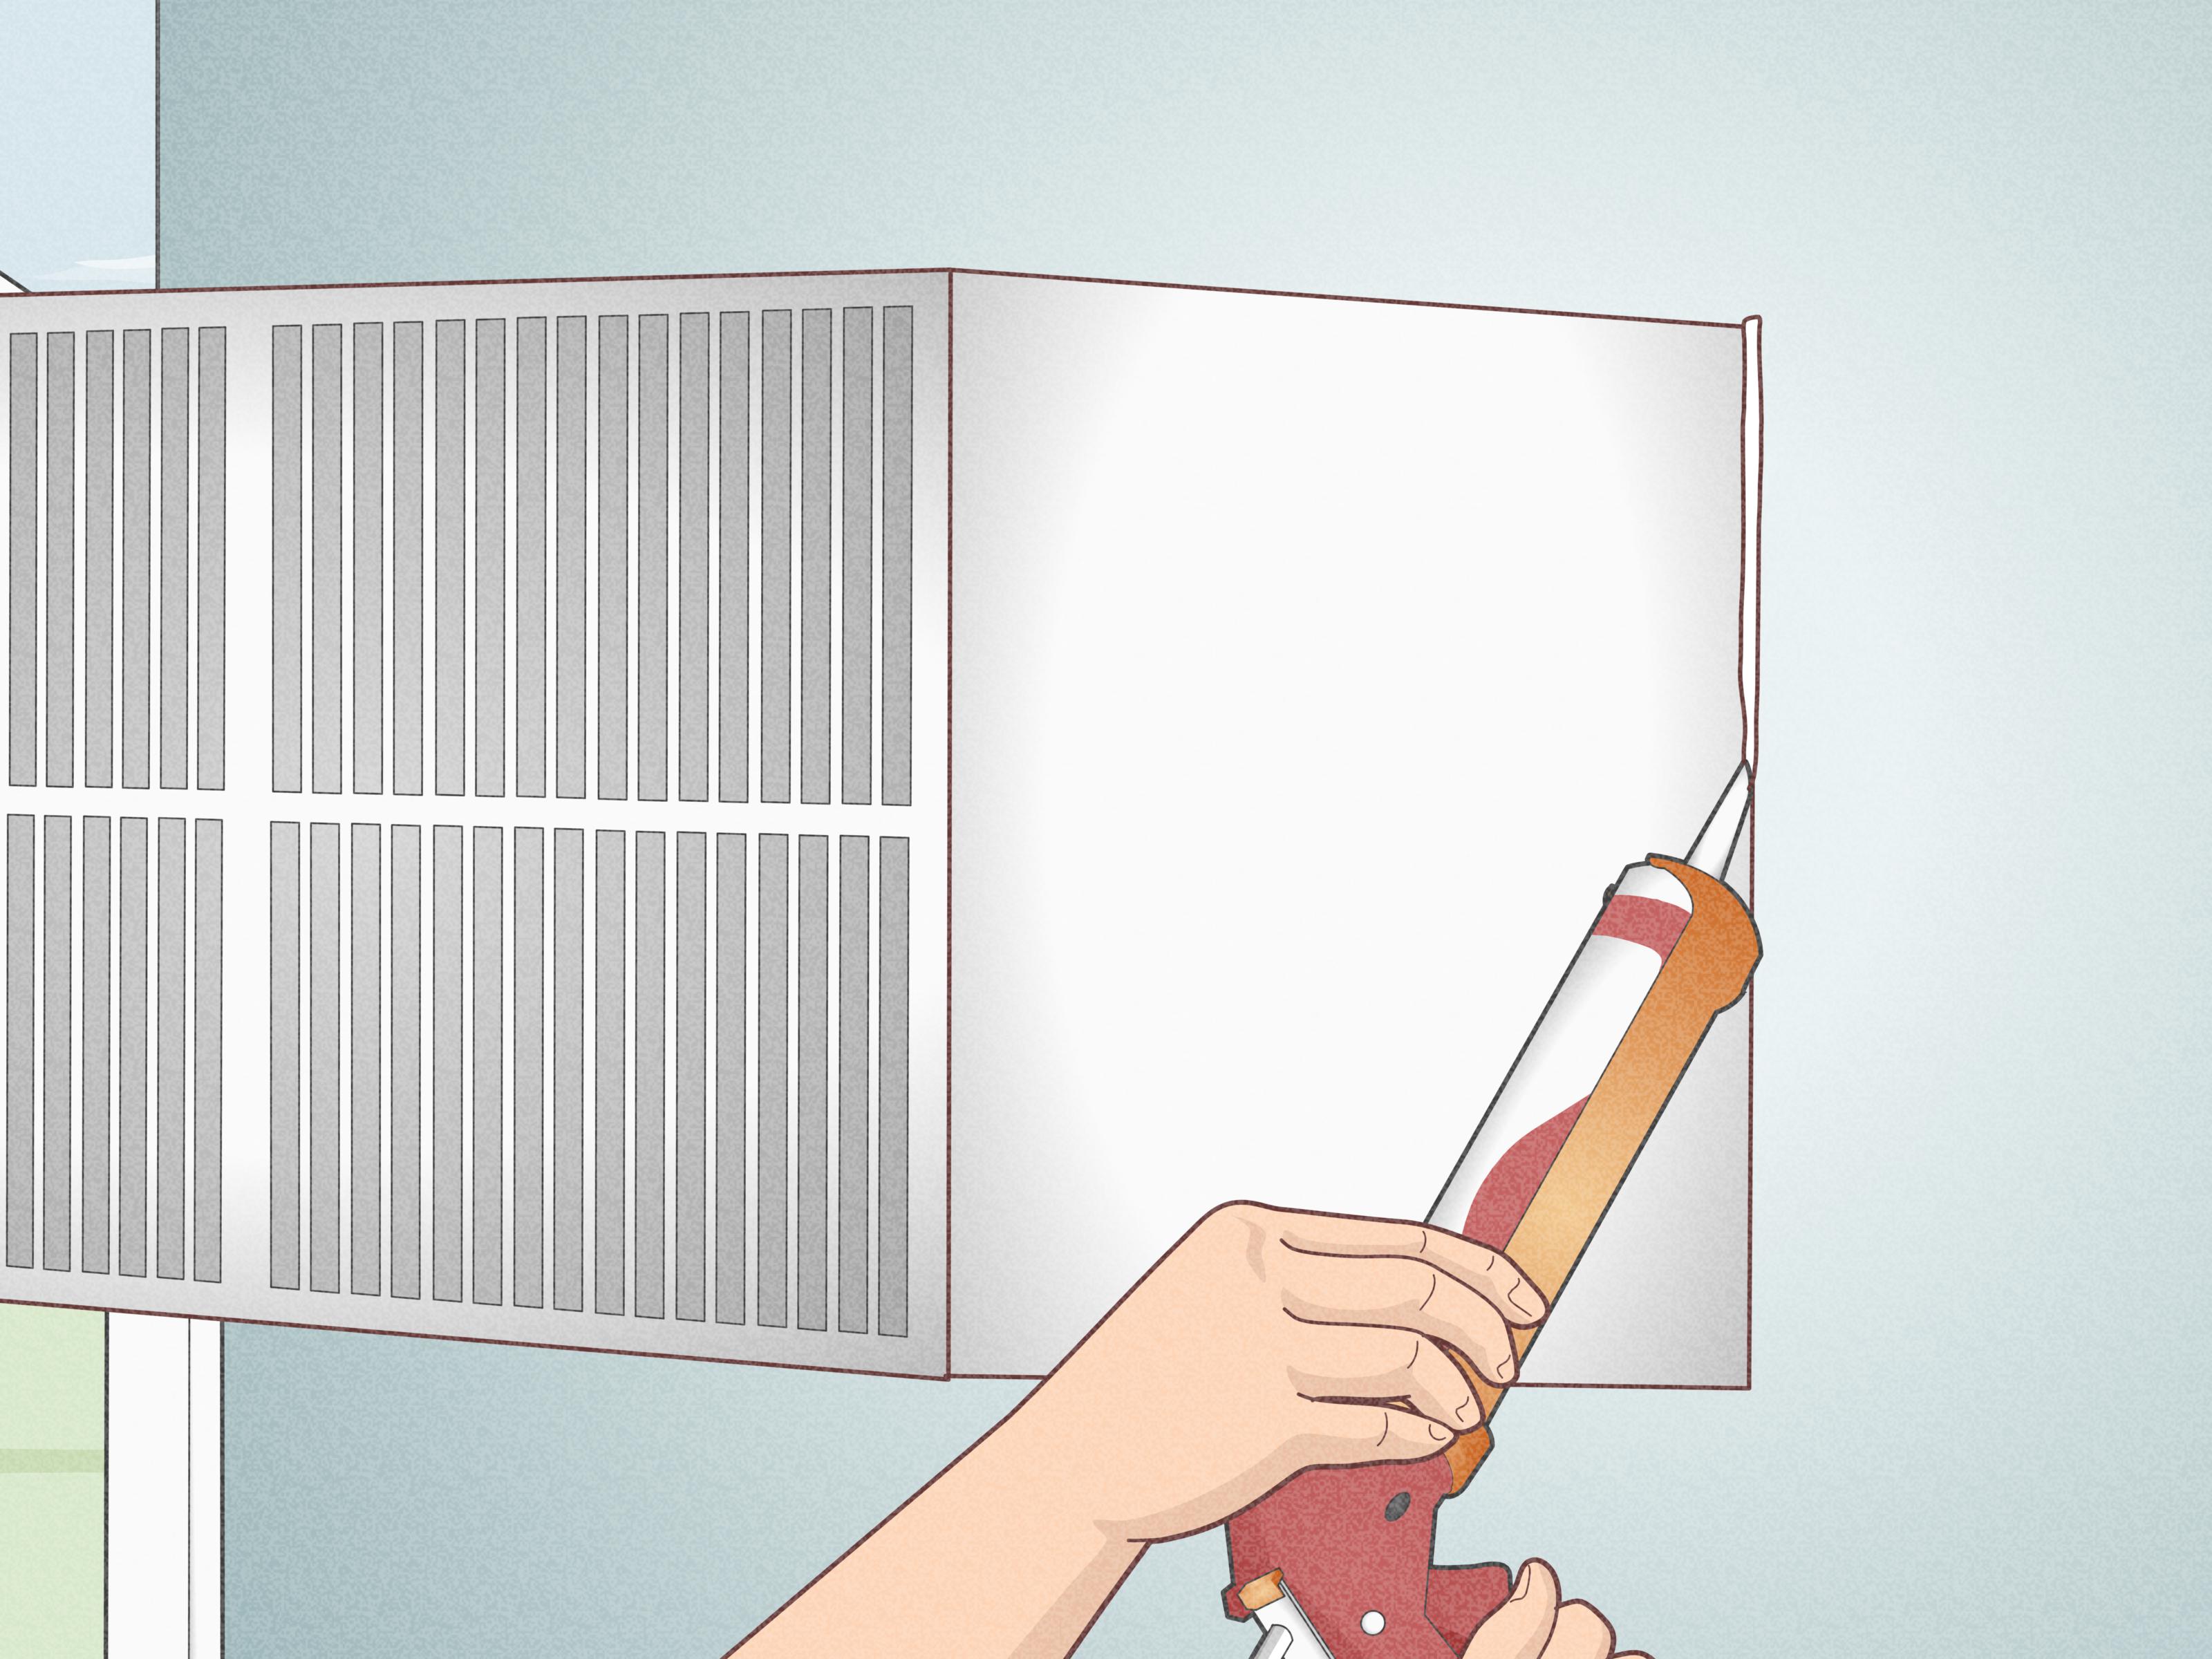
Step 6: Seal the sleeve thoroughly
Once the sleeve is fastened, caulk the perimeter on both the interior and exterior sides. Add insulation or foam where appropriate. This step is where energy efficiency either gets invited in or rudely turned away at the door.
A sloppy seal can let in hot air, water, insects, dust, and that mysterious outdoor smell nobody wants in the bedroom. A clean seal improves comfort, reduces energy loss, and helps the finished installation look polished.
Step 7: Slide the air conditioner chassis into the sleeve
Many wall units have a slide-in chassis design. With the sleeve already in place, carefully lift the chassis and slide it into the sleeve from indoors. Use two people if the manufacturer recommends it. Align the unit, secure it according to the instructions, and make sure it sits firmly without wobble.
If the unit feels like it is binding, do not force it. Pull it back out and re-check the sleeve alignment, slope, and any interior obstructions.
Step 8: Install the trim and front panel
Attach the trim kit, front grille, and decorative panels that came with the unit. These parts do more than improve looks. They also help manage airflow and hide small gaps between the unit and wall opening. A good trim job makes the installation look built-in. A rushed trim job makes it look like the wall lost an argument.
Step 9: Plug in and test the unit
Connect the unit to the correct outlet, restore power if needed, and run a test cycle. Listen for unusual vibration, rattling, or scraping sounds. Check that cool air is blowing strongly indoors and that the unit appears stable. Inspect the exterior to confirm the back of the unit is unobstructed and that the sleeve is sealed properly.
Common Mistakes to Avoid
Using the wrong type of AC
A through-the-wall model is designed for wall installation. A standard window unit is not always safe or effective in that application. The wrong choice can block vents, reduce performance, or damage the system.
Ignoring sleeve dimensions
Even a small mismatch can cause headaches. Always match the sleeve and unit carefully.
Skipping the slope
If the sleeve or unit does not tilt slightly toward the exterior, water may not drain properly. That can lead to leaks, mold, corrosion, or indoor dripping. None of these are charming.
Poor sealing
Air leaks around the sleeve can undo a lot of your hard work. Seal the inside and outside edges well, and inspect the finished opening before calling the job done.
Forgetting electrical requirements
Never assume the outlet is correct just because one exists nearby. Verify voltage, receptacle type, and circuit compatibility before installation day.
When to Hire a Pro
Some homeowners can handle this project successfully, especially when replacing an old wall unit with a new one that fits the existing sleeve. But professional help is usually worth it when:
- You are cutting through brick, block, stucco, or concrete
- The wall is load-bearing
- You need a new electrical circuit or outlet
- You are unsure how to frame the rough opening
- The exterior finish must be preserved carefully
Hiring a pro for part of the work is also a smart middle ground. For example, you might have a carpenter create the opening and install the sleeve, then handle the interior finishing and final setup yourself.
Final Thoughts
Learning how to install an in-wall air conditioner is part measuring, part carpentry, part patience, and part humility. The key is respecting the details: buy a real through-the-wall unit, use the correct sleeve, support the opening properly, pitch the sleeve slightly outward, seal it carefully, and follow the manual instead of your guesswork. Do that, and your reward is clean-looking, efficient cooling without sacrificing a window.
In other words, this is one of those home projects where accuracy feels a little boring in the moment but looks brilliant once the heat wave rolls in. Future you, sitting comfortably in a cool room while everyone else is fanning themselves with junk mail, will be very grateful.
Real-World Experience and Practical Lessons From Installing an In-Wall Air Conditioner
Here is the part many step-by-step guides skip: the real experience of installing an in-wall air conditioner is usually less about one dramatic moment and more about a bunch of tiny decisions that either make the project smooth or make you question your life choices by 3 p.m.
The first surprise for many homeowners is how much easier the job feels when you are replacing an old through-the-wall unit instead of creating a brand-new opening. If you already have a sound sleeve in place and the new unit is compatible, the project may be closer to a careful swap than a full construction project. You still need to inspect the sleeve, reseal gaps, and verify the electrical setup, but the biggest mess may be a little dust and some muttering.
Creating a new opening, on the other hand, tends to teach humility. Walls are never as empty as people hope. There is often a stud exactly where you wanted the unit, an outlet nearby that is somehow not useful, or exterior siding that makes a perfectly square cut feel like advanced geometry. One of the best practical lessons is to spend more time planning than your impatient side wants. Measure inside. Measure outside. Check height against furniture placement. Check outdoor clearance. Then measure again because tape measures are cheaper than wall repairs.
Another common experience is realizing that support and sealing matter more than speed. Homeowners often focus on getting the air conditioner into the wall, but the real quality of the installation comes from the boring details around it. A properly supported sleeve feels rock solid. A badly supported one can vibrate, flex, and make every cooling cycle sound like a shopping cart rolling over gravel. The same goes for sealing. Even a strong AC will feel underwhelming if hot outdoor air is sneaking in around the frame.
People also underestimate how heavy and awkward the chassis can be. The weight is not always impossible, but it is often inconvenient in the most annoying way. It is bulky, the grip points are not always friendly, and the wall opening is usually at an awkward height. Having a second person nearby is not just a safety tip. It is a sanity tip.
Then there is the emotional roller coaster of the first test run. You switch the unit on, hear the fan start, and immediately become an amateur sound engineer. Is that hum normal? Is that rattle the trim, the sleeve, or the universe telling you to tighten one more screw? The good news is that most post-install issues are small: loose trim, unsealed gaps, slight misalignment, or foam insulation that needs adjusting. The bad news is that these tiny issues are much easier to fix right away than after you have declared the project “done” and put all the tools away.
The best real-world advice is simple: do not rush the finish. A clean bead of exterior caulk, properly installed trim, and a careful final check for airflow and stability can turn a decent installation into a great one. That last hour of cleanup and adjustment is often what separates a project that looks homemade from one that looks professionally installed.
So yes, installing an in-wall air conditioner can absolutely be a satisfying DIY project. Just treat it like precision work, not brute-force work. The goal is not merely to get the AC into the wall. The goal is to make it look intentional, run efficiently, drain properly, and stay quiet enough that you can enjoy the cool air without listening to a metal symphony every time the compressor kicks on.