Insulating exterior walls is basically teaching your house to keep its thoughts (aka conditioned air) to itself. Done right, it can make rooms feel less drafty, cut heating and cooling costs, reduce noise, and stop that one wall from feeling like a giant ice pack in January. Done wrong… well, you can accidentally create a moisture trap that turns your wall cavity into a science fair project.
This guide walks you through the “right way” to install insulation on exterior wallsespecially for the most common real-world scenario: upgrading insulation during re-siding or an exterior remodel. You’ll also get options for open-stud remodels and retrofit methods, plus practical checks so you don’t end up with “technically insulated” walls that still feel like a wind tunnel.
What “the Right Way” Actually Means
Insulating exterior walls isn’t just stuffing fluffy material into a cavity and hoping for the best. A high-performing wall manages three things in order:
- Bulk water (rain) keep it out with good flashing and a water-resistive barrier (WRB).
- Air movement stop leaks, because air carries a lot of moisture and heat.
- Heat flow add insulation to slow down conduction (that’s your R-value).
If you skip the air and water details and jump straight to insulation, you can still end up with cold walls, wet sheathing, and moldy surprises. Insulation works best when it’s paired with air sealing and moisture controlthink “winter coat + zipper,” not “winter coat + open front.”
Step 1: Choose the Best Wall-Insulation Strategy for Your Situation
“Exterior walls” can mean a lot of different job sites. Pick the approach that matches your reality:
A) Open-stud walls (new build or gut remodel)
If drywall is off and studs are exposed, you can air-seal the framing and install cavity insulation neatly. This is the easiest time to hit a high-quality installation because you can actually see what you’re doing (a rare gift in construction).
B) Existing finished walls (most homes)
If the walls are closed up, you typically have three retrofit paths:
- Dense-pack/blown-in insulation (cellulose or fiberglass) through holes drilled from inside or outside.
- Exterior continuous insulation (rigid foam or mineral wool boards) added when you remove siding.
- Leave the wall alone and focus on the attic, rim joist, and air sealingsometimes the best “wall insulation” is fixing the biggest leaks first.
If you’re already replacing siding, adding continuous exterior insulation is often the highest-impact upgrade because it reduces thermal bridging through studs and can improve comfort dramatically.
Step 2: Pick Insulation Materials That Match Your Wall, Climate, and Goals
Here’s the cheat sheet: the best insulation is the one that fits your assembly, won’t create moisture problems, and can be installed correctly. A “perfect” product installed poorly performs like a sad sweater with holes.
| Insulation Type | Best For | Pros | Watch Outs |
|---|---|---|---|
| Fiberglass batts | Open studs | Affordable, widely available | Needs perfect fitgaps/voids crush performance |
| Mineral wool batts | Open studs | Great fit, sound control, moisture tolerant | Costs more than fiberglass in many areas |
| Dense-pack cellulose | Retrofit cavities | Fills irregular bays well, reduces air movement | Requires correct density and blocking details |
| Spray foam (open/closed-cell) | Hard-to-seal cavities | Excellent air sealing (especially closed-cell) | Costly; fire/thermal barrier rules; best left to pros |
| Rigid foam boards (EPS/XPS/polyiso) | Continuous exterior insulation | Reduces thermal bridging; can help condensation control | Seam taping/flashing must be right; code details matter |
| Exterior mineral wool boards | Continuous exterior insulation + drying | Vapor-open, fire resistant, performs well behind rainscreens | Attachment and detailing need planning |
Quick R-value reality check: Wall cavities alone have limits. A 2×4 wall typically lands around the R-13 to R-15 range in the cavity, and 2×6 walls commonly use R-19 to R-23 cavity insulation. Continuous exterior insulation can push performance higher while reducing stud “striping” (those cold lines you feel where studs conduct heat).
Step 3: Moisture, Vapor, and CondensationDon’t Build a Wall That Sweats
Most insulation horror stories aren’t about temperaturethey’re about moisture. Water gets into walls three main ways: rain leaks (bulk water), air leakage (warm, moist indoor air escaping into cold cavities), and vapor diffusion. Of the three, air leakage is usually the heavyweight champ.
Understand vapor retarders (without falling asleep)
Vapor retarders are classified by how much water vapor can pass through them: Class I (very low permeance), Class II (semi-impermeable), Class III (more vapor-open). The “right” choice depends on climate zone, wall design, and whether the assembly can dry to at least one side.
The condensation-control big idea
In colder climates, the key is keeping the exterior sheathing warm enough that indoor moisture won’t condense inside the wall. That’s one reason exterior continuous insulation can be so valuable: it moves the dew-point risk outward and reduces condensation potential. The wrong move is layering vapor-tight materials on both sides of the wall, leaving moisture with nowhere to go.
Practical rule of thumb: build walls that can dry. If you add a relatively vapor-closed layer outside (some foam products), be cautious about adding a very vapor-closed layer on the interior (like polyethylene) unless you’re following a proven assembly for your climate. When in doubt, follow local code and climate-zone guidance, or consult a building-science-savvy pro.
Step 4: The Best-Practice Process for Exterior Wall Insulation (Continuous Insulation Retrofit)
This is the “gold standard” upgrade when you’re removing siding anyway. The goal is to create a continuous control layer (water/air) and then add a continuous insulation layer, followed by a drainage/ventilation space (often called a rainscreen) and the new cladding.
4.1 Prep and safety (the unglamorous part that saves your weekend)
- Inspect for damage: rot, insects, mold, and structural issues must be fixed before insulation goes on.
- Lead-safe practices: if your home is pre-1978, assume lead-based paint may exist on trim/siding and control dust accordingly.
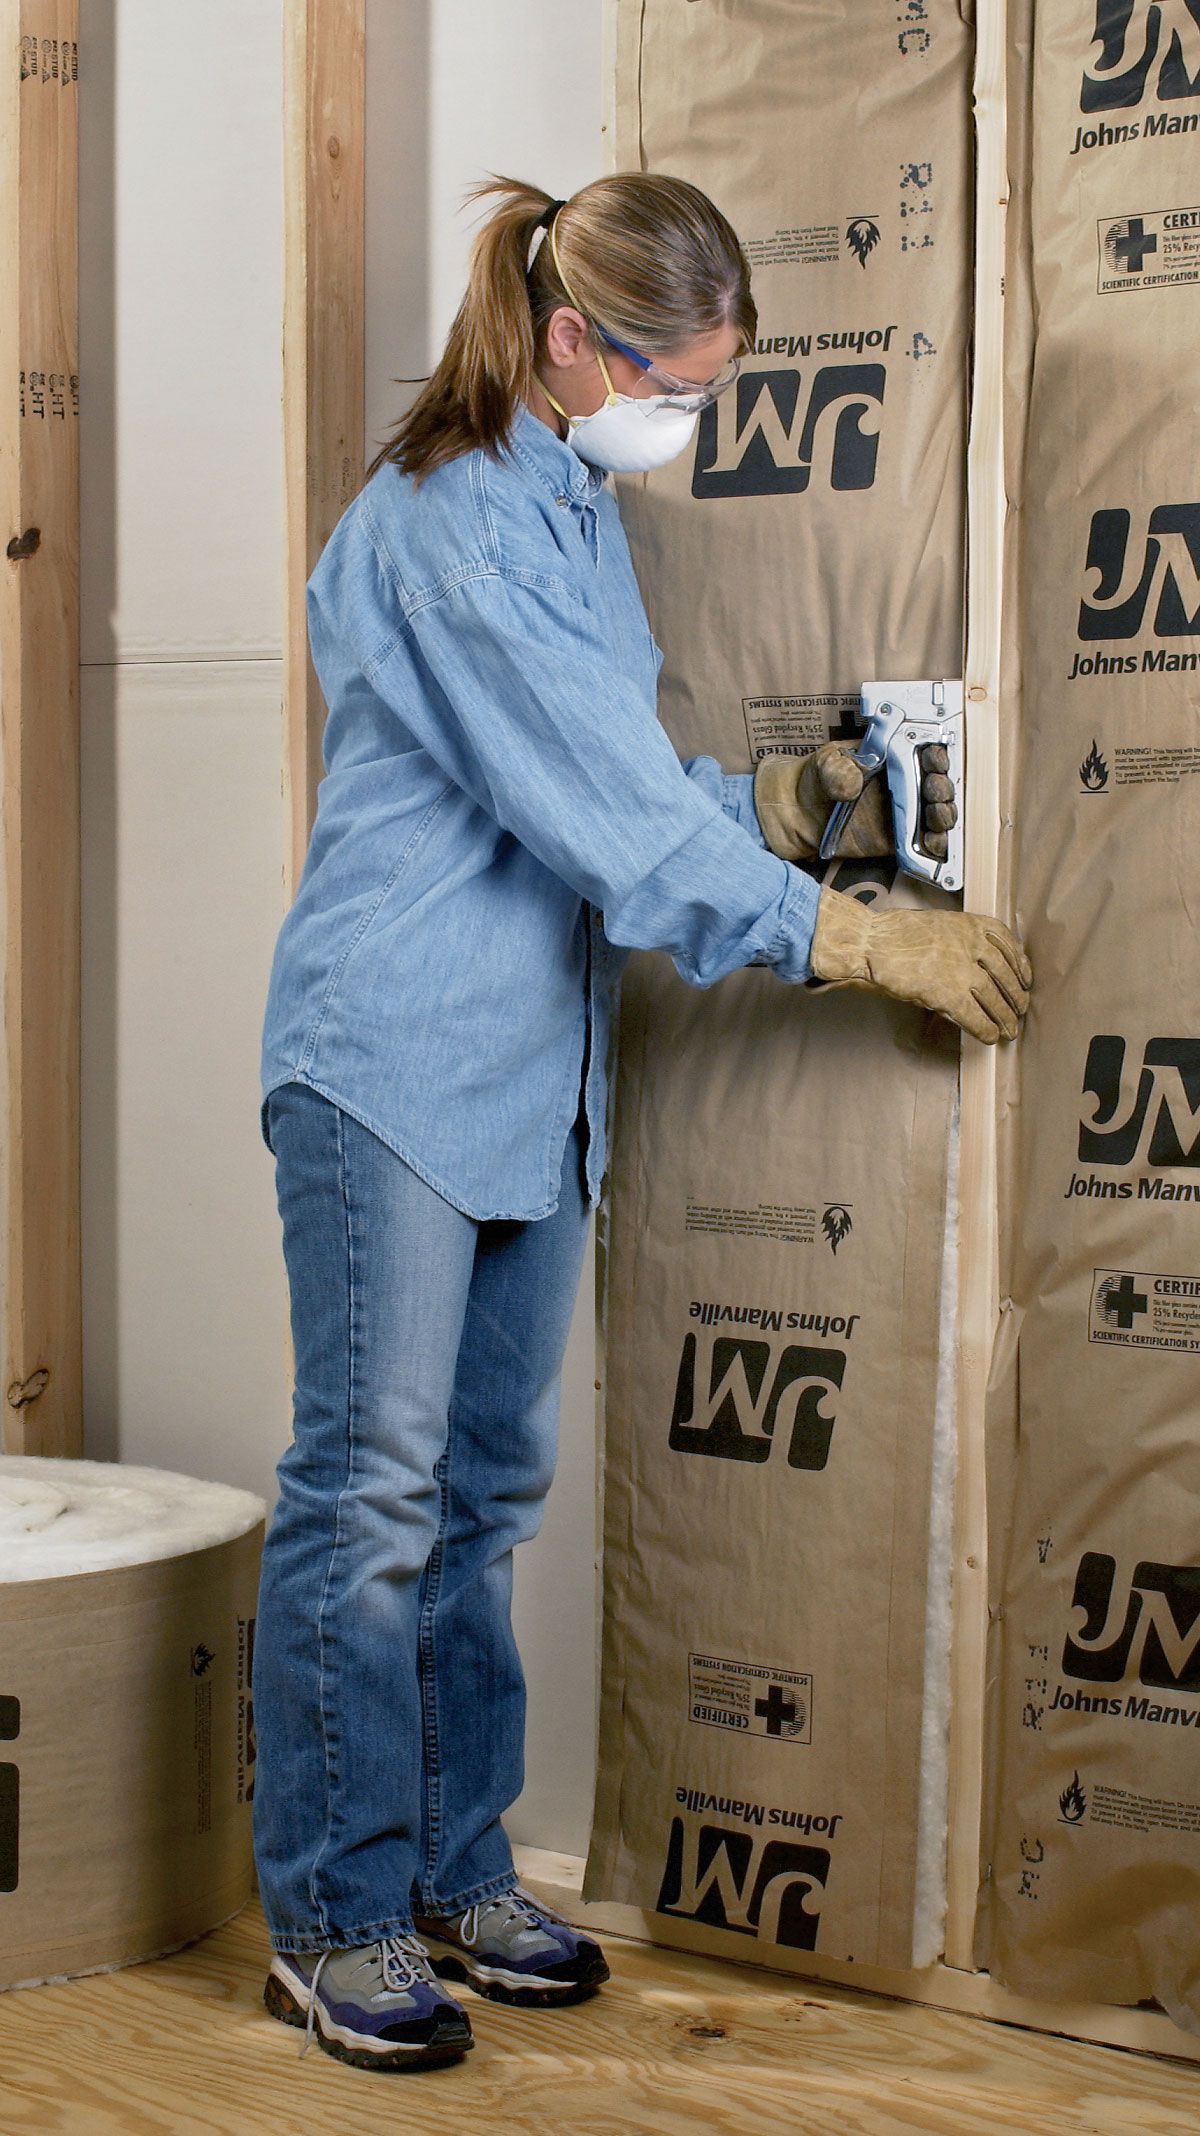
- PPE: gloves, eye protection, and a respirator/particulate mask are smart when cutting fiberglass or dealing with old materials.
4.2 Establish the water and air control layer
Your wall needs a reliable WRB and a continuous air barrier. Depending on your design, that air/water control layer could be: housewrap, a fully adhered membrane, or (in some assemblies) the taped exterior sheathing or taped rigid insulationif approved by the product and allowed by local code.
- Remove protruding fasteners and repair damaged sheathing.
- Flash openings properly (windows/doors) so water sheds outwardalways “shingle style.”
- Tape seams and integrate transitions (corners, penetrations, roof-to-wall intersections).
4.3 Install the continuous insulation layer (foam or mineral wool boards)
Install boards in a way that keeps them flat, continuous, and well-sealed:
- Stagger seams between layers if using two layers (a common best practice for better air control and fewer thermal shortcuts).
- Seal joints: tape compatible seams, and use low-expansion foam for small gaps where appropriate.
- Keep it tight: avoid big voids behind boards; uneven substrates should be addressed during prep.
- Plan thickness: thicker exterior insulation can improve comfort and condensation control, but it affects window/door trim details and fastener schedules.
4.4 Add furring strips and a rainscreen gap (your wall’s “breathing room”)
A rainscreen is a small gap between insulation/WRB and sidingoften created with vertical furring stripsso water can drain and materials can dry. It also gives siding a solid attachment plane. At the bottom and top of the wall, use vented detailing (with insect screening) so the cavity can drain and dry.
4.5 Reinstall cladding and fix the “details that actually matter”
- Extend window/door trim (often with “window bucks” or extension jambs) so flashing and trim work with the new wall thickness.
- Use kick-out flashing where roofs meet walls (this is a notorious leak spot).
- Seal penetrations (vents, hose bibs, lighting) with proper gaskets/flashingnot just wishful caulk.
Step 5: Installing Cavity Insulation the Right Way (Open Stud Bays)
If your wall cavities are accessible from the inside, you can do excellent workif you slow down enough to do it neatly. The goal is full, continuous contact without gaps, compression, or missing corners.
5.1 Air seal first (yes, before insulation)
Seal top and bottom plates, around window/door framing, and any penetrations (wires, pipes). The wall can be “insulated” and still leak like a screen door if you skip this.
5.2 Install batts like you’re trying to win a cleanliness award
- Cut batts to fit snuglyno slumping, no gaps at the sides.
- Split batts around wiring so insulation stays full-depth behind the wire (don’t just mash it).
- Don’t compress insulation to “make it fit.” Compression lowers performance.
- Faced batts go with the facing toward the conditioned space where appropriateavoid creating double vapor barriers.
5.3 Dense-pack cellulose for tricky bays
Dense-pack cellulose is a strong option when bays are irregular, full of blocking, or you want better cavity fill than batts typically achieve. It’s especially common in retrofits through drilled holes or in open walls using netting. The key is correct density and thorough fill.
5.4 Spray foam: powerful, but follow code and hire skill
Spray foam can deliver excellent air sealing and high R-value per inch, but it also has important fire-safety and covering requirements. In many residential applications, foam plastics require approved thermal/ignition barriers (often gypsum board) unless a specific code exception applies. If you’re considering spray foam, treat it as a “specialty system,” not a casual weekend experiment.
Step 6: Quality Checks (Because Insulation Is Only as Good as Its Worst Gap)
Before closing walls or reinstalling siding, do a simple quality-control walkthrough:
- Continuity check: is insulation continuous across the whole wall, including rim areas, corners, and around openings?
- Alignment check: is insulation in contact with the air barrier (no big air space that enables convection loops)?
- Moisture path check: does water have a path to drain out, and can the assembly dry to at least one side?
- Thermal bridge check: if comfort is the goal, consider continuous exterior insulation to reduce stud bridging.
If you want to get fancy (the good kind of fancy), a blower door test or infrared scan can reveal leaks and missing insulation areas while you can still fix them.
Common Mistakes to Avoid (A Short List of Long-Term Regrets)
- Skipping air sealing and expecting insulation to stop drafts by itself.
- Leaving gaps and voids in batts or boards (gaps are basically insulation’s kryptonite).
- Forgetting flashing integration around windows/doors when wall thickness changes.
- Creating a vapor trap by layering vapor-closed materials on both sides of the wall.
- No rainscreen in wet climates (or behind claddings that store water), reducing drying potential.
- Ignoring code/fire requirements for foam plastics and required protective coverings.
Real-World Examples: Two Homes, Two “Right Ways”
Example 1: Cold climate comfort fix (think Minneapolis-style winters)
A homeowner complains: “The living room wall is freezing, even though the thermostat says 72.” The house has 2×4 walls and older siding. During re-siding, the crew:
- Repairs sheathing and installs a continuous WRB/air barrier.
- Adds continuous exterior insulation to reduce thermal bridging and keep sheathing warmer.
- Installs vertical furring strips for a rainscreen and solid siding attachment.
- Ensures window flashing/trim extensions are properly integrated.
Result: the wall surface temperature rises noticeably, drafts drop, and the room feels more evenoften the “comfort win” people actually feel day-to-day.
Example 2: Hot-humid upgrade (think Gulf Coast summers)
In hot-humid climates, moisture drives can reverse depending on season and HVAC use. The “right way” emphasizes: airtightness, good WRB detailing, and avoiding interior polyethylene that could trap moisture. Exterior insulation can still help comfort and efficiency, but the assembly should be designed so it can dry appropriately for the local climate and cladding type.
Wrap-Up: The Wall Should Be Warm, Dry, and Boring
The best insulated exterior wall is the one you never have to think about again. If you control water, stop air leaks, and install insulation continuously (especially with exterior continuous insulation during re-siding), you’ll get a wall that performs well, stays dry, and doesn’t surprise you later. In home improvement, “no surprises” is the real luxury finish.
Field Notes: of Hard-Earned Exterior Wall Insulation Wisdom
What follows is the kind of jobsite wisdom that shows up again and again in contractor notes, energy-audit reports, and homeowner “wish I knew that” storiescompiled into practical lessons you can use before you buy a single board or batt.
First: most “bad insulation” complaints are really air leakage complaints wearing an insulation costume. People add more R-value, and the room still feels drafty because the real culprit is air moving through top plates, rim areas, electrical penetrations, and leaky sheathing seams. The fix is unglamorousseal the pathwaysthen let insulation do its job. A surprisingly effective habit is doing a “pen test”: before closing anything up, walk the wall and point out every place air could move from inside to outside. If you can point at it, you should probably seal it.
Second: exterior continuous insulation is a game-changer, but it’s also a detail magnet. As soon as you add thickness outside, windows and doors become the center of the universe. The most common regret is not planning the trim and flashing strategy early. If the wall gets thicker, you need a clear plan for extending jambs, aligning WRB layers, and maintaining shingle-style drainage. The “right way” is to sketch the window detail before demo daybecause nothing says “budget surprise” like inventing a flashing system in the driveway.
Third: rainscreens feel optional until you open a wall years later. In wetter regions or behind claddings that hold water, a drainage and drying space can be the difference between a wall that ages gracefully and one that silently stews. Many pros treat a rainscreen like seatbelts: you don’t plan to crash, but you still buckle up. Even a modest gap with proper venting and insect protection can improve drying and durability.
Fourth: batt insulation is either excellent or disappointingrarely “fine.” The difference is installation quality. Batts should fully fill cavities with no big voids, no rounded edges, and no lazy stuffing behind wires and pipes. The best installers cut and fit around obstructions like they’re tailoring a suit. The worst installers treat batts like laundry. If you’re DIYing, slow down and aim for continuous, snug contact. If you’re hiring it out, ask what “Grade 1” installation means and how they verify it before drywall goes up.
Fifth: moisture rules are regional, and “my cousin in Arizona did it this way” is not a building-science citation. Cold climates often benefit from keeping sheathing warmer with exterior insulation; hot-humid climates often prioritize drying potential and airtightness. When people get into trouble, it’s usually because they mixed vapor-closed layers without understanding where drying can happen. The safest mindset is: water will get in somehow; make sure it can get out safely.
Finally: don’t forget the human factor. Insulation work is itchy, dusty, and full of sharp edges and awkward ladders. Good PPE and lead-safe dust control aren’t overkillthey’re what lets you finish the job without turning your lungs into a complaint department. The best projects end with a comfortable home, a clean site, and zero “why is this wall damp?” mysteries.