If you have ever looked at a pile of wooden clothespins and thought, “These could either organize my laundry or become suspiciously fancy lighting,” congratulations: you are exactly the kind of person this project was made for. A clothespin chandelier is one of those rare DIYs that feels equal parts clever, affordable, sculptural, and just weird enough to make guests ask, “Wait… is that made of actual clothespins?”
The answer, of course, is yes. Gloriously yes.
What makes this project so appealing is that it turns a humble household item into a statement light fixture with texture, warmth, and a handmade look that works in farmhouse, modern rustic, Scandinavian, boho, and even minimalist spaces. It is also surprisingly customizable. You can keep the wood natural for a soft, organic glow, stain it for a richer tone, paint it black for a moodier look, or use a tighter or looser pattern depending on how much light you want to filter through.
In this guide, you will learn how to make a clothespin chandelier step by step, what materials work best, how to keep it safe, and how to avoid the common mistakes that can turn a charming DIY into an overhead regret. We will also cover design ideas, placement tips, and a real-world look at what the building experience is actually like. Spoiler: it is fun, a little repetitive, and strangely satisfying in the same way bubble wrap is satisfying, except prettier and less noisy.
Why a Clothespin Chandelier Works So Well
A clothespin chandelier is basically a decorative shade built around a light source. The clothespins create texture and pattern, while the gaps between them allow light to escape. That is the magic. Instead of getting one big boring glow, you get filtered light, shadow play, and a fixture that looks more expensive than its parts would suggest.
It also solves a common decorating problem: how to add character overhead without spending a small fortune on a designer pendant. A ready-made chandelier can be gorgeous, but your wallet may need a moment alone afterward. Clothespins, on the other hand, are inexpensive, easy to find, and surprisingly stylish when repeated in a thoughtful pattern.
The repeating wood shapes give the fixture rhythm. The natural material adds warmth. And because the structure is lightweight compared to many traditional chandeliers, it can be a smart option for smaller rooms like laundry rooms, breakfast nooks, entryways, craft rooms, and reading corners.
What You Need
Main Materials
- Wooden spring clothespins
- Hardware cloth or wire mesh
- 22-gauge craft wire or thin floral wire
- A pendant light kit or chandelier light kit
- A ceiling canopy if needed
- LED bulb
Tools
- Metal snips or wire cutters
- Work gloves
- Pliers
- Measuring tape
- Painter’s tape or clips for test fitting
- Spray paint or wood stain, optional
Optional Extras
- Heavy-duty anchors or mounting hardware
- Dimmer-compatible LED bulb
- Embroidery hoops or metal rings for shaping
- Clear matte sealer
If you want a classic drum-shaped clothespin chandelier, a wire mesh cylinder is one of the easiest foundations to build. It gives the clothespins something to grip, holds its shape well, and lets you experiment with patterns before committing.
Before You Start: The Safety Stuff That Actually Matters
Let us be responsible for one minute so the rest of the project can stay fun.
Your clothespin chandelier is decorative, but it still surrounds a light source. That means heat, clearance, and mounting matter. Always use an LED bulb. LEDs run far cooler than incandescent bulbs, which waste a large amount of their energy as heat. That makes LEDs the smarter choice for a fixture built from wood and wire. Also make sure the bulb wattage matches the fixture rating, and when in doubt, go lower rather than higher.
Give the bulb space. Do not cram clothespins tightly against the bulb, and do not block the top and bottom so completely that heat gets trapped. A clothespin chandelier looks best when it has some breathing room anyway. Airy design is not just pretty; it is practical.
Use a listed light kit when possible, and if you are hardwiring anything into a ceiling box, turn off power at the breaker and follow proper wiring practices. If you are not comfortable with that part, build the shade yourself and have an electrician install the light kit. There is no shame in outsourcing the “do not electrocute me” phase.
Finally, mount it securely. If the fixture is hanging from hooks, anchors, chain, or a ceiling box, every part should be rated to support the finished weight. Decorative lighting is delightful. Decorative lighting falling into your breakfast pastry is less delightful.
How To Make A Clothespin Chandelier, Step by Step
1. Decide on the Size and Shape
Start by choosing your chandelier shape. The most beginner-friendly version is a drum pendant. It is clean, modern, and easy to build. For a small room, a diameter around 10 to 14 inches works well. For a bigger room or a more dramatic look, go larger. Just remember that the bigger the frame, the more clothespins you will need, and those little wooden overachievers add up quickly.
If the chandelier will hang above a table, make sure the fixture feels proportional to the surface below it. If it will hang in an open walkway, keep enough clearance so nobody meets it with their forehead.
2. Build the Wire Frame
Put on gloves and cut a strip of hardware cloth to your desired height. For a medium chandelier, a strip around 9 to 12 inches tall is a practical starting point. Roll the wire into a cylinder and bind the ends together with thin craft wire, twisting tightly with pliers.
Check the shape from all angles. You want a neat, even drum, not a wire tortilla that gave up halfway through the job. If needed, use metal rings or embroidery hoops at the top and bottom to help the structure stay perfectly round.
3. Prep the Frame
If you dislike the industrial look of silver mesh, spray paint the wire frame before adding clothespins. White, black, bronze, or matte gold can all work beautifully depending on your room. Let it dry fully. This is not the moment for impatience unless you enjoy fingerprints, smudges, and emotional character building.
4. Test Clothespin Placement
Before clipping every pin in place, test a few layout ideas. Horizontal rows create a more solid, structured look. A staggered or zigzag pattern feels lighter and often lets more light pass through. Diagonal designs can look striking, but they are harder to finish neatly at the top and bottom edges.
A great trick is to make sure your wire frame has an even number of repeating sections around the perimeter. That makes it easier for the pattern to wrap all the way around without a weird seam that screams, “I lost confidence near the end.”
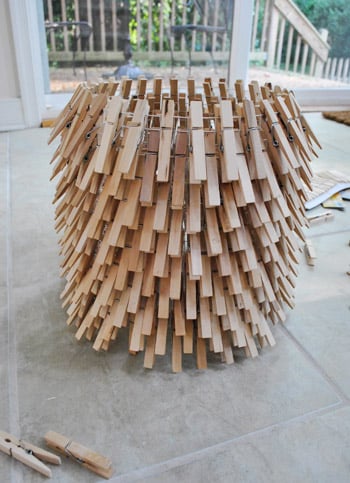
5. Clip On the Clothespins
Now for the oddly relaxing part. Clip the clothespins onto the wire frame one by one, following your chosen pattern. If you are using standard spring clothespins, keep the springs in place. The spring tension helps hold them securely to the wire. Work slowly and step back often to check symmetry.
If your goal is a fuller chandelier, layer the clothespins closer together. If you want a brighter, airier look, leave more negative space. Natural wood creates a soft glow, while painted clothespins make the pattern itself more graphic.
6. Add the Light Kit
Thread the pendant kit through the center of the frame. Make sure the bulb hangs centered and does not touch the wood. That part is very important. “Close enough” is not a lighting safety strategy.
If you are using a plug-in swag kit, this is much easier. If you are hardwiring the fixture, install the light kit according to manufacturer directions or have it professionally wired. Secure the shade to the hanging structure so it sits level.
7. Hang and Adjust
Install the chandelier and test the height before calling it finished. Over a dining table, many designers recommend a bottom height roughly 30 to 36 inches above the tabletop. In open areas, keep it high enough for safe clearance. Stand back, turn it on, and see how the pattern looks both lit and unlit. Sometimes a tiny tweak in height makes the whole thing feel intentional instead of accidental.
Best Bulbs for a Clothespin Chandelier
The best bulb for this project is a warm LED. It gives you the cozy look people want from wood tones without producing the kind of heat that makes everyone nervous. A warm white bulb usually creates the prettiest effect with natural clothespins because it turns the wood honey-gold instead of sterile or bluish.
If your room needs flexible lighting, choose a dimmable LED and pair it with a compatible dimmer. That gives you bright function when folding laundry or working at a table, and softer ambience when you just want your DIY masterpiece to glow like the overachiever it is.
Design Ideas to Make It Look Custom
Keep It Natural
Natural unfinished clothespins are classic for a reason. They give the chandelier texture, warmth, and that high-low design mix people love.
Go Monochrome
Paint the clothespins black, white, or soft greige for a more modern look. Black looks dramatic and sculptural. White feels light and coastal. Greige says, “I have throw pillows with opinions.”
Create an Ombre Effect
Dip-dye or paint the bottom half of the pins for a soft gradient. This works especially well in boho or eclectic rooms.
Try a Tiered Version
Want more chandelier, less pendant? Build two or three stacked rings in graduating sizes. Just keep the structure balanced and the wiring simple.
Use It in Unexpected Rooms
A clothespin chandelier feels right at home in a laundry room, but it also works in a breakfast nook, home office, mudroom, guest room, or craft area. In small spaces, it becomes instant personality without taking up an inch of floor space.
Common Mistakes to Avoid
- Using a hot bulb: Always choose LED over incandescent.
- Blocking airflow: Do not pack the top and bottom so tightly that heat cannot escape.
- Skipping the mockup: Test your pattern before clipping on hundreds of pins.
- Ignoring scale: A fixture that is too tiny looks timid; one that is too huge looks like it is plotting something.
- Underestimating clothespin count: Buy more than you think you need.
- Poor mounting: The prettiest chandelier in the world is still a bad idea if it is not securely supported.
Conclusion
Learning how to make a clothespin chandelier is not just about assembling a light fixture. It is about proving that inexpensive materials can become genuinely stylish decor when you use repetition, texture, and a little patience. This is a project that looks playful up close and polished from across the room, which is honestly a pretty charming combination.
The beauty of a clothespin chandelier is that you can make it fit your own space. Keep it simple and natural. Paint it bold. Go small and subtle or big and dramatic. Just remember the three golden rules: use LED bulbs, leave room for airflow, and mount it securely. Do those things, and your chandelier can be both safe and stunning.
In other words, do not underestimate the humble clothespin. Today it is holding socks. Tomorrow it is the star of the ceiling.
Real-World DIY Experience: What It Is Actually Like to Make One
If you are wondering what the experience of making a clothespin chandelier feels like in real life, here is the honest version: it starts with confidence, moves briefly into chaos, and ends with you staring upward like you invented electricity yourself.
The first surprise for most people is how simple the materials seem. Clothespins? Easy. Wire frame? Easy. Light kit? Manageable. The trap is that the project looks so straightforward that you assume it will come together in one smooth burst of DIY genius. In reality, the first half hour is usually spent deciding on the pattern, changing your mind, then changing it again because what looked great in your hand suddenly looks like a tiny wooden porcupine when attached to the frame.
The second surprise is how repetitive and calming the process becomes once you commit to a layout. Clipping on clothespins one by one is almost meditative. You get into a rhythm. Clip, step back, squint, adjust, repeat. It is the kind of project that makes time disappear. You may start while listening to one podcast episode and look up three episodes later with sawdust on your shirt and a suspicious amount of pride in your heart.
There is also a very specific emotional journey that happens when the frame first goes up. Before the bulb is on, the fixture can look a little odd. You might think, “Have I made a designer light, or have I suspended a wooden salad spinner from the ceiling?” This is normal. Do not panic. The magic usually happens the moment you switch on the light. The gaps between the clothespins start to glow, the pattern becomes intentional, and the whole thing suddenly makes sense.
Another real-world lesson is that scale matters more than you think. A chandelier that feels perfect on a worktable can look tiny once it is hanging in a room. That is why mockups help. Tape a cardboard ring to the ceiling, or hang the frame temporarily before finishing every detail. This small step saves a lot of “why does this look like a toy?” energy later.
Many first-time makers also discover that natural wood is more beautiful than expected. Plenty of people begin the project planning to paint every clothespin, only to realize the unfinished wood gives off a warmer, softer glow. It feels less crafty and more sculptural. The light passing through raw wood has a cozy quality that painted finishes sometimes lose.
And then there is the bragging-rights phase. This comes after installation, when someone notices the fixture and asks where you bought it. That is your moment. You take a casual sip of coffee and say, “Oh, that? I made it.” Do not overdo it. You want confident artisan energy, not villain origin story energy.
So yes, the experience can be fiddly. Your fingers may get tired. You may rework the pattern more than once. But it is also one of those projects that feels deeply satisfying because the transformation is so dramatic. You begin with a bag of laundry-room hardware and end with a chandelier that looks clever, custom, and unexpectedly stylish. That is a pretty good trade for an afternoon of DIY effort and a table full of runaway clothespins.