A home theater is basically permission to watch movies “for the sound design” while wearing sweatpants and eating popcorn straight from the bowl like a cinematic raccoon. But getting that big-screen, wraparound-sound feeling isn’t magicit’s planning, placement, and a few settings most people ignore (until dialogue sounds like it’s being whispered from inside a sock).
This guide walks you through an in-depth, real-world home theater setupfrom picking the right layout to running calibrationso your system looks clean, sounds huge, and doesn’t require a PhD in HDMI. Along the way, you’ll see specific examples, practical rules of thumb, and the “don’t do what I did” lessons people learn the hard way.
1) Start With a Plan (Because Your Room Has Opinions)
Choose your “home theater type”
Before you buy anything or start drilling holes, decide what kind of experience you want. Most home theaters fall into one of these buckets:
- Simple & sleek: TV + soundbar (optionally with a subwoofer and surrounds)
- Balanced “real theater”: TV/projector + AV receiver + 5.1 speakers
- Immersive: AV receiver + 5.1.2 or higher (Dolby Atmos height channels)
Pick your main seating position first
Home theater setup works best when you pick one primary seat (or one primary row). That spot becomes your reference point for screen height, speaker angles, and calibration. If you try to perfectly optimize for every seat in the house, you’ll end up optimizing for none of themlike trying to season soup for five different taste buds at the same time.
Measure the room like you mean it
- Wall width (for screen size and speaker spacing)
- Seating distance (for screen comfort and viewing angle)
- Where power outlets are (because extension cords should not become furniture)
- Where you can run cables cleanly (baseboards, rugs, raceways, in-wall routes)
2) Choose the Core Components
Display: TV vs projector
A TV is brighter and simpler: great for living rooms, sports, and daytime viewing. A projector can feel “movie-theater big,” especially in a darker, light-controlled space.
- TV advantages: high brightness, strong HDR performance, easy placement, fewer install variables
- Projector advantages: giant screen sizes, cinematic feel, flexible screen options
If you go projector, placement matters: throw distance (how far the projector sits from the screen) depends on the projector’s lens and zoom range, so use a manufacturer tool or calculator before you mount anything permanently. You’ll also want to prefer lens shift over heavy keystone correction when possible, because lens shift allows image positioning without the same tradeoffs in image geometry and clarity.
Audio: soundbar vs AV receiver (AVR)
If you want the simplest path to “better than TV speakers,” a soundbar can be a big upgrade fast. If you want the “sound comes from everywhere” feelingespecially clear dialogue, true surround, and upgrade flexibilityan AV receiver with separate speakers is the classic home theater backbone.
- Soundbar: fastest setup, fewer cables, great for small spaces
- AV receiver + speakers: best immersion, better channel separation, easiest to upgrade over time
Speakers: start with the channels that matter most
A common “sweet spot” system is 5.1: front left, center, front right, two surrounds, and one subwoofer.
If you want height effects (rain above you, helicopters overhead), consider 5.1.2 (two height channels) once your base surround system is strong.
Don’t underestimate the center channel. It carries most movie and TV dialogue. If your center speaker is weak or poorly placed, you’ll spend your evenings riding the volume button like it owes you money.
3) Screen Size and Seating Distance (Comfort Beats Bragging Rights)
Use viewing angle as your guide
Screen size isn’t just “bigger is better.” It’s “bigger is better until your neck files a complaint.” A practical way to choose screen size is by viewing anglehow much of your field of view the screen fills. Many home theater guidelines reference angles in the general range of roughly 30°–40° depending on preference and standards, with 36° commonly cited as a strong cinematic target and lower angles considered minimum comfort baselines.
Quick rule-of-thumb examples
- If you sit 8–10 feet away, many people find 65–85 inches comfortable for a TV.
- For projection, a 100–120 inch screen is a common “theater feel” sizeif your room and throw distance allow it.
The “right” answer is the one that feels immersive without fatigue. If your eyes or neck feel tired after a movie, your setup is basically doing cardiojust not the kind you asked for.
4) Speaker Placement That Actually Works
Great gear can sound mediocre if it’s placed poorly. Decent gear can sound impressive if it’s placed thoughtfully. Here’s how to get placement right without turning your living room into a science fair.
Front left / center / right: your main soundstage
- Center speaker: centered above/below the screen, aimed toward ear level
- Left & right: spaced evenly from the center, angled (“toed in”) toward the main seat
- Height: ideally close to ear level when seated, especially tweeters
If the center speaker is below the TV, tilt it up. If it’s above the TV, tilt it down. Dialogue should feel like it’s coming from the screennot from your coffee table or ceiling like a haunted ventriloquist act.
Surround speakers: wraparound, not “surprise behind your ear”
For 5.1, surrounds typically go to the sides of your seating area (or slightly behind), aimed toward the listening position. They can be at ear level or slightly elevated. In 7.1, you add rear surrounds behind the seats (in addition to side surrounds), which helps fill in the back sound field.
Subwoofer placement: do the “sub crawl” (yes, really)
Bass is heavily influenced by the room. The same subwoofer can sound tight and powerful in one spot and muddy or weak in another spot just a few feet away. That’s why enthusiasts use a simple technique often called the subwoofer crawl:
- Place the subwoofer at or near your main listening position.
- Play a repeating bass-heavy track or scene.
- Crawl (or crouch) around the room edges where a sub could reasonably live.
- Where the bass sounds smooth and strong, that’s a good placement candidate.
It looks silly. It works. Your knees may not forgive you, but your explosions will.
Dolby Atmos height channels: overhead or Atmos-enabled modules
If you’re building a 5.1.2 system, the goal is to add convincing height effects while keeping the main 5.1 bed layer clean and balanced. Height speakers can be:
- Overhead speakers: installed in/on the ceiling (best “true height” effect when done well)
- Atmos-enabled (upfiring) speakers: sit on top of front speakers and bounce sound off the ceiling (more room-dependent, but easier to install)
The big idea: keep the layout symmetrical relative to the main seat, and run calibration after placement so timing and levels align properly.
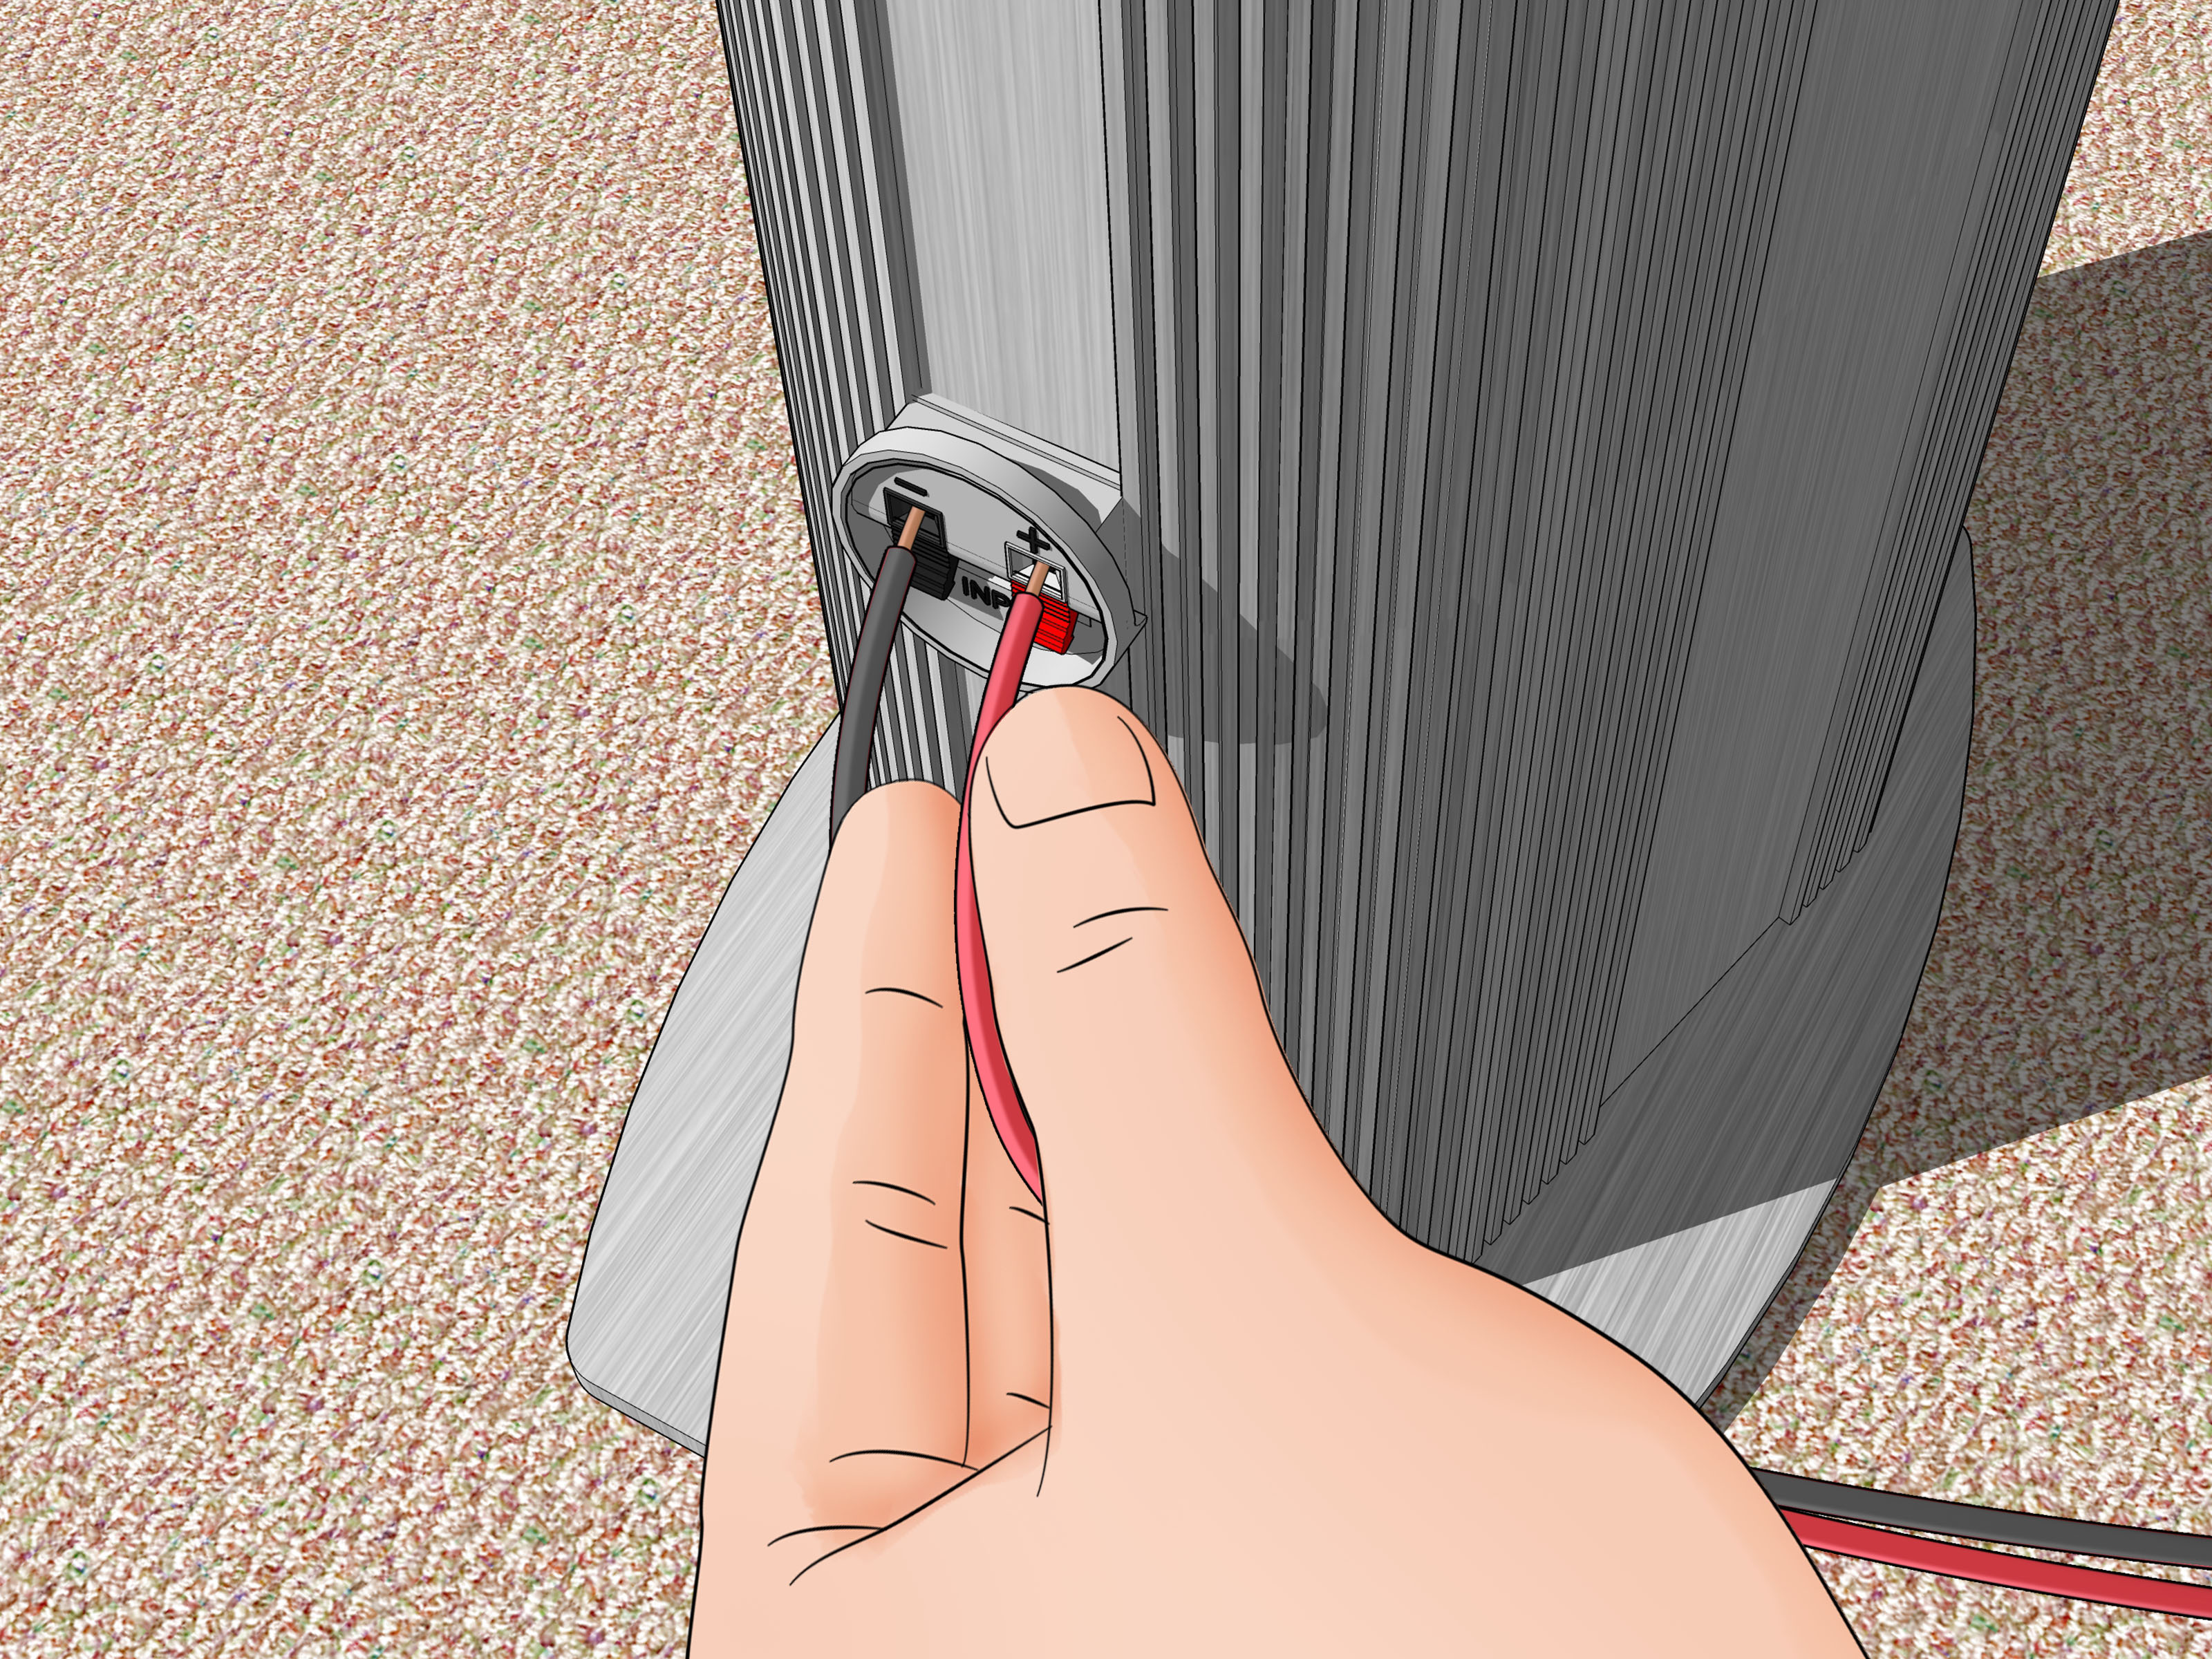
5) Wiring and Connections (Where Most People Accidentally Create a Snake Pit)
HDMI connection strategy: choose one of these
There are two common, clean ways to connect your system:
-
AV receiver as the hub: Plug sources (streaming box, game console, Blu-ray) into the AVR, then run one HDMI to the TV/projector.
Best when you have multiple sources and want the AVR to handle switching. -
TV as the hub + ARC/eARC back to audio: Plug sources into the TV, then send audio from the TV back to the AVR or soundbar using HDMI ARC/eARC.
Great if the TV is your switching center and you want one-cable audio return.
If your TV and audio device support eARC, it can simplify the setup by sending TV-originated audio (from built-in streaming apps or connected devices) back to a compatible AVR/soundbar through a single HDMI cable. (Translation: fewer cables, fewer headaches, better audio capability when everything supports it.)
Speaker wire gauge: don’t overthink it, but don’t undersize it
For many home theater setups, 16-gauge speaker wire is sufficient. For longer runs (for example, speakers far from the receiver), stepping up to 14-gauge is a common recommendation to reduce resistance over distance. Label both ends of every cable. Future-you will treat present-you like a genius.
Ventilation and power: let your gear breathe
- AV receivers can run warm; give them airflow and avoid sealing them in a tiny cabinet.
- Use a quality surge protector and avoid daisy-chaining power strips like it’s a holiday light contest.
- Keep power cables separated from signal cables when possible to reduce noise risk.
6) AV Receiver Setup and Calibration (The “Make It Sound Right” Step)
Run the receiver’s auto-setup
Most receivers include an auto-calibration system and a measurement microphone. The on-screen wizard typically walks you through speaker detection, distance (delay), level matching, and basic EQ/room correction. Follow it carefully:
- Place the microphone at ear height at the main seat (use a tripod if possible).
- Keep the room quiet during measurements (yes, that includes the dishwasher).
- Take multiple measurement positions if the system requests it.
Set speaker sizes and crossovers (aka “bass management”)
Bass management routes low frequencies to the subwoofer (where they usually belong) and keeps your other speakers from struggling with deep bass they weren’t built to handle. Many systems will choose crossover points automatically. A common starting point is around 80 Hz, but the “right” setting depends on your speakers and room. If your speakers are small, a higher crossover may work better; if they’re large and capable, you may go lower.
Confirm levels and dialogue clarity
After calibration, play a familiar scene with lots of dialogue. If voices sound thin, muffled, or too quiet relative to music and effects:
- Check that the center speaker is aimed correctly and not blocked inside a cabinet.
- Re-run calibration with better mic placement.
- Consider a small center-level adjustment (a little goes a long way).
Basic video settings: avoid “soap opera face”
Many TVs ship with motion smoothing enabled. It can make films look like they were shot on a phone in a brightly lit hallway. Look for motion interpolation settings and reduce/disable them for movies. For gaming, use Game Mode to reduce input lag.
7) Room Tweaks That Make a Shockingly Big Difference
Control reflections with “soft stuff” and smart placement
Hard surfaces reflect sound. Reflections can blur clarity and smear imaging. The good news: you don’t need to turn your room into a recording studio to improve things.
- Add a rug if you have hard floors.
- Use curtains for big windows.
- Consider acoustic panels at key reflection points if the room is echoey.
A common method for finding early reflection points is the “mirror trick”: from the listening position, have someone slide a mirror along the wall; where you can see a speaker’s reflection, that spot is a first reflection point. Treating these areas can tighten imaging and improve clarity.
Projector image placement: lens shift over keystone when you can
If you’re installing a projector, you’ll often face small alignment issues. Lens shift is a preferred tool because it physically moves the lens/image without the same geometry compromises as heavy keystone correction. Plan throw distance and image size using a calculator, then fine-tune with lens shift and careful mount placement.
8) Troubleshooting Common Home Theater Problems
No sound from surrounds (but you swear they’re connected)
- Confirm the content is actually in surround (some shows are stereo).
- Check AVR sound mode (Auto/Direct vs a surround upmixer).
- Verify speaker wires are firmly connected and not shorting.
ARC/eARC not working
- Make sure you’re using the TV’s ARC/eARC HDMI port (usually labeled).
- Enable ARC/eARC in the TV audio settings and HDMI-CEC control settings.
- Power-cycle the TV and AVR/soundbar after changing settings.
Audio sync feels “off”
- Use the AVR’s lip-sync delay setting (or TV audio delay setting).
- Try a direct connection (source → AVR → TV) rather than source → TV → ARC.
9) Three Example Setups (So You Can Copy-Paste a Strategy)
Example A: Apartment-friendly upgrade (fast and clean)
- Display: TV
- Audio: soundbar + subwoofer (optional surrounds if possible)
- Setup highlights: mount or place soundbar centered, use HDMI ARC/eARC, run built-in calibration, keep sub near a wall but not jammed into a corner
Example B: Family room “real theater” (best value per wow)
- Display: 65–85″ TV or a modest projector/screen
- Audio: AV receiver + 5.1 speakers
- Setup highlights: prioritize center channel placement, do the sub crawl, run receiver calibration, tidy cables with labels and raceways
Example C: Dedicated immersive room (the hobby becomes a lifestyle)
- Display: projector + screen
- Audio: AV receiver/processor + 5.1.2 (or beyond)
- Setup highlights: plan throw distance early, use lens shift, treat first reflection points, calibrate carefully, consider dual subwoofers if bass is uneven across seats
10) Real-World Experiences and Lessons People Learn the Hard Way (About )
Here are common “experience-based” lessons home theater owners report after living with their setup for a whileaka the stuff you usually learn after you’ve already unplugged everything twice and said, “No, seriously, why is this happening?”
1) Dialogue is the #1 complaintuntil you fix the center channel.
Many people start by chasing bigger bass or fancier surround effects. Then they watch a movie and realize they can’t understand a word without subtitles. In real rooms, the center speaker’s placement and aim matter more than people expect. If it’s shoved into a cabinet, blocked by decor, or firing at your shins, dialogue clarity suffers. A small tweakpulling it forward to the cabinet edge, tilting it toward ear level, and re-running calibrationoften feels like a “free upgrade.”
2) Subwoofers don’t behave. Rooms do.
People are often shocked that moving a subwoofer a couple feet can change bass from “earthquake” to “where’d it go?” That’s why the sub crawl is so widely recommended. Once you hear the difference, you stop thinking of sub placement as “where it fits” and start thinking of it as “where physics stops bullying me.” Some owners later add a second subnot because they need more volume, but because two subs can smooth bass across more seats.
3) Cable management is either a five-minute win or a lifelong regret.
The difference between a setup you love and a setup you avoid touching can be as simple as labeling cables and using a tidy path (raceways, under-rug routes, or organized bundles). Owners who label everything tend to experiment more, upgrade more easily, and troubleshoot faster. Owners who don’t label everything eventually stare at the back of the receiver like it’s a plate of spaghetti that’s judging them.
4) Calibration is not optional if you want “effortless” sound.
Without calibration, many systems sound loud but not coherentvoices wander, effects feel disconnected, and bass booms in weird places. Once people run the receiver’s auto-setup correctly (mic at ear height, quiet room), they often describe the sound as more “locked in.” The system becomes less fatiguing, and you stop constantly adjusting the volume between scenes.
5) The best upgrade is often the room, not the gear.
A rug, thicker curtains, and some attention to reflections can make a bigger difference than swapping electronics. People are surprised when simple changes improve clarity and reduce harshness. If the room is bright and echoey, the audio will sound bright and echoeyno matter how premium the receiver is.
In short: the “best” home theater systems aren’t always the most expensive. They’re the ones that respect the room, prioritize the center channel, tame the bass, and treat calibration like a steprather than a suggestion.
Conclusion
Setting up a home theater system is equal parts art and “move that speaker two inches and suddenly everything clicks.” Start with your seating position and screen comfort, place speakers with intention, connect devices with a clean HDMI plan, and run calibration like you actually want it to work (because you do). Once your system is dialed in, the reward is huge: clearer dialogue, deeper immersion, and a movie-night experience that makes your couch feel suspiciously like the best seat in the house.