

Building a deck is a little like assembling a giant outdoor puzzle, except the puzzle weighs several hundred pounds, lives in the weather, and will eventually hold your grill, your patio chairs, and Uncle Mike doing his “one more burger” victory dance. In other words, the frame matters. And one of the most important parts of that frame is learning how to square joists for a deck before you install decking boards.
When deck joists are square, the deck frame forms clean 90-degree corners. The decking boards install more evenly, the rim joists line up better, stairs and railings become less of a wrestling match, and the whole structure feels more professional. When the joists are out of square, every later step becomes a negotiation with geometry. Spoiler: geometry usually wins.
This step-by-step guide explains how to square deck joists using practical job-site methods such as the 3-4-5 rule, diagonal measurements, temporary bracing, joist layout, and final alignment checks. Whether you are building a small backyard platform or a larger attached deck, the goal is the same: create a strong, straight, square frame before the first deck board goes down.
What Does It Mean To Square Joists for a Deck?
To square joists for a deck means arranging the joists, rim joists, ledger, and beam so the corners of the deck frame form true right angles. A rectangular deck should not be shaped like a parallelogram, a trapezoid, or a “close enough” mystery polygon. It should measure the same diagonally from corner to corner in both directions.
The joists are the horizontal framing members that support the deck boards. They usually run from the ledger board or beam toward the outside rim joist. If the outer frame is square, the joists can be installed at consistent spacing, usually 16 inches on center for many standard wood and composite deck applications. Some deck designs may require 12 inches on center, especially with diagonal decking, picture-frame borders, heavy loads, or specific manufacturer requirements.
Squaring is not only about appearance. A square deck frame helps distribute loads correctly, keeps fasteners aligned, reduces board gaps that look like a toddler drew them, and makes rail posts, stairs, fascia, and trim easier to install.
Tools and Materials You Will Need
Before you begin, gather the tools that make accurate layout possible. This is not the moment to rely on a bent tape measure you found under the lawn mower in 2016.
- Tape measure, preferably 25 feet or longer
- Framing square or speed square
- Chalk line
- Pencil or marker
- String line and stakes or batter boards
- Level or laser level
- Clamps
- Temporary bracing boards
- Drill or impact driver
- Approved joist hangers and structural fasteners
- Pressure-treated joists, rim joists, ledger, and beams as required by your plan
- Safety glasses and work gloves
Use corrosion-resistant fasteners that are compatible with pressure-treated lumber and exterior conditions. Deck framing lives outdoors, so ordinary indoor screws are about as useful as flip-flops in a snowstorm.
Before You Start: Check Codes, Plans, and Lumber
Deck framing should follow your local building code, approved permit drawings, and the installation instructions for your decking material. Local rules may control joist span, beam size, ledger attachment, footing depth, guard requirements, lateral load connections, and inspections. When in doubt, ask your local building department before building, not after your inspector raises one eyebrow and starts taking notes.
Confirm Joist Size and Span
Joist size depends on the span, wood species, grade, spacing, load, and whether the joists cantilever beyond a beam. A common residential deck may use 2×8, 2×10, or 2×12 joists, but the correct size must come from code span tables, engineered plans, or manufacturer guidance. Do not guess. A deck is not the place for “vibes-based engineering.”
Choose Straight Lumber
Look down the edge of each joist before installing it. Avoid boards with severe twists, bows, crowns, large cracks, or major defects. A slight crown is normal; install joists with the crown facing up so the board can settle under load. Extremely warped lumber can pull your frame out of square and create waves under the decking boards.
Mark Joist Spacing Clearly
Most deck joist layouts are marked “on center,” meaning the measurement runs from the center of one joist to the center of the next. For many deck boards, 16 inches on center is common. For diagonal decking or some composite installations, 12 inches on center may be required. Always check the decking manufacturer’s instructions before committing to a spacing pattern.
Step 1: Establish a Straight, Level Reference Line
Every square deck begins with a reliable reference. For an attached deck, that reference is usually the ledger board fastened to the house. For a freestanding deck, it may be a beam line, string line, or carefully laid-out rectangular footprint.
If you are using a ledger, make sure it is level, properly flashed, and attached according to code. The ledger should be straight because the rest of the frame will follow its lead. A crooked ledger is like a bad opening sentence; everything after it has to work harder.
Snap a chalk line along the ledger or rim location. Mark the overall deck width, joist positions, and rim joist locations. Use a framing square to transfer marks cleanly across the lumber.
Step 2: Install the First Side Rim Joist Temporarily
Install the first side rim joist at one end of the ledger or frame. If you are building an attached deck, this side rim joist may sit in a joist hanger or attach to the ledger and beam, depending on the design. Do not fully fasten everything yet. At this stage, the magic word is “temporary.”
Fasten the side rim joist lightly enough that you can still adjust its angle. Use clamps or temporary screws. Check that the joist is level and sitting correctly on its support. The side rim joist will help define one side of the deck frame, so take your time here.
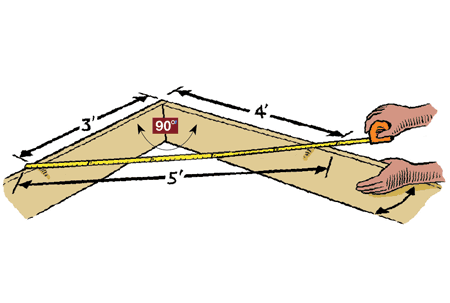
Step 3: Use the 3-4-5 Method To Create a Right Angle
The 3-4-5 method is the classic way to create a right angle using the Pythagorean theorem, although you do not need to say “Pythagorean theorem” out loud unless you want your neighbors to slowly back away.
Here is how it works:
- From the corner where the ledger and side rim joist meet, measure 3 feet along the ledger and mark it.
- From the same corner, measure 4 feet along the side rim joist and mark it.
- Measure diagonally between those two marks.
- If the diagonal measurement is exactly 5 feet, the corner is square.
- If it is not 5 feet, adjust the side rim joist until the diagonal is correct.
For larger deck frames, use the same ratio but scale it up. A 6-8-10 triangle is easier to read accurately on a deck because small measurement errors matter less. For even bigger layouts, you can use 9-12-15. The larger the triangle, the more precise your squaring will be.
Step 4: Install the Opposite Side Rim Joist
Once the first side is square, move to the opposite side rim joist. Measure the planned deck width along the ledger and mark the second side. Install the opposite rim joist loosely, then use the same 3-4-5 or 6-8-10 method to square it to the ledger.
Check that both side rim joists are parallel. Measure between them near the house and again at the outside end. The measurements should match. If they do not, adjust before fastening. A small error here grows into a bigger headache later, usually around the time you are holding a deck board and muttering things that are not in the building code.
Step 5: Attach the Outside Rim Joist
The outside rim joist connects the ends of the side rim joists and completes the outer rectangle of the deck frame. Cut it to the correct length, place it against the joist ends, and fasten it temporarily.
Before driving all final fasteners, check the frame for square using diagonal measurements. Measure from the inside corner at one end of the ledger to the opposite outside corner. Then measure the other diagonal. If both diagonal measurements are equal, your frame is square.
If the diagonal measurements are not equal, gently shift the frame. Push or pull the longer diagonal inward, or move the shorter diagonal outward, until both measurements match. Use clamps, temporary braces, or a helper with patience and snacks.
Step 6: Brace the Frame So It Stays Square
Once the deck frame is square, brace it immediately. Temporary diagonal bracing keeps the frame from racking while you install joists. Without bracing, the frame can move while you work, especially if the lumber is long, the site is uneven, or your helper decides to lean on the rim joist like it is a porch railing already.
Run a temporary 2×4 diagonally across the frame and fasten it with screws. Do not install it where it blocks joist placement, or plan to move it as needed. Recheck the diagonals after bracing. If the frame stayed square, continue. If not, adjust and brace again.
Step 7: Mark Joist Locations on the Ledger and Rim
With the outer frame square and braced, mark the joist layout. Start at one end and mark the joist spacing on the ledger and the outside rim joist. Use the same starting point on both sides so the joists run straight and parallel.
For 16-inch on-center spacing, mark every 16 inches, then mark an “X” on the side of the line where the joist will sit. This prevents layout confusion. Without the X, you may accidentally install one joist on the wrong side of the line, and suddenly every later joist begins drifting like a shopping cart with one bad wheel.
If your deck boards will run diagonally, check whether your decking requires 12-inch on-center joist spacing. If your deck has a border, breaker board, stair opening, hot tub area, or heavy feature, add blocking and extra joists according to the plan.
Step 8: Install Joist Hangers Correctly
Install joist hangers at the marked locations if your joists frame into the ledger, rim, or beam face. Use the hanger size that matches the joist size, and use the fasteners specified by the hanger manufacturer. Do not substitute drywall screws, random deck screws, or whatever was left in the coffee can from 2009.
Joist hangers are engineered hardware. Their strength depends on correct fasteners, correct nail holes, and full bearing where required. If a hanger calls for specific nails or structural screws, use them. This is one of those moments where “close enough” is not charming.
Step 9: Set the Joists Crown-Up and Keep Them Aligned
Install each joist with the crown facing up. Seat the joist fully in its hanger or on its beam. Check that the top edge is flush with the ledger and rim joist. A high joist can create a hump in the decking; a low joist can create a dip. Neither one improves the look of your outdoor living space.
As you install joists, keep checking for square and alignment. Measure diagonals again after several joists are in place. Long joists can nudge the frame, especially if the lumber is slightly twisted. Correct small movement early. It is much easier to adjust a frame now than after the decking boards are installed and your deck has developed “personality.”
Step 10: Add Blocking To Lock the Joists in Place
Blocking is short framing installed between joists. It helps keep joists upright, reduces twisting, and adds support where needed. Blocking is often installed at midspan, along deck board seams, around picture-frame borders, near rail posts, and wherever the plan calls for extra support.
Cut blocking pieces snugly, but not so tight that they shove the joists out of layout. Stagger the blocks slightly so you can fasten through the joists into the ends of the blocking. After blocking is installed, check the frame again for square, level, and consistent joist spacing.
Step 11: Final Squareness Check Before Decking
Before installing deck boards, do one final inspection. This is your last easy chance to fix the frame. Once decking goes down, every framing problem becomes more dramatic and less fun.
Check These Details
- Both diagonal measurements of the deck frame are equal.
- Side rim joists are parallel.
- Joists are spaced consistently on center.
- Joists are flush and level across the top.
- Joist hangers have the correct fasteners in the required holes.
- Blocking is secure and does not push joists out of line.
- The frame is braced and does not rack.
- Ledger flashing and water management details are complete.
If everything checks out, congratulations. You have built a square deck frame, which means the decking installation will be smoother, cleaner, and far less likely to inspire dramatic sighing.
Common Mistakes When Squaring Deck Joists
Mistake 1: Measuring Only One Side
A deck can have two sides that look straight and still be out of square. Always measure both diagonals. Equal diagonals are the fastest way to confirm that a rectangular frame is truly square.
Mistake 2: Forgetting To Brace the Frame
A frame can be square at 10:00 a.m. and out of square by lunch if it is not braced. Temporary diagonal bracing is cheap insurance.
Mistake 3: Using Warped Rim Joists
The rim joists define the outside shape of the deck. If they are badly bowed or twisted, the joists and decking will fight you all the way to the finish line.
Mistake 4: Ignoring Manufacturer Spacing Requirements
Composite decking, PVC decking, wood decking, and diagonal layouts may have different joist spacing requirements. Always check the product instructions. A beautiful deck board still needs the right support underneath.
Mistake 5: Fully Fastening Too Soon
During layout, keep components adjustable until the frame is square. Once the measurements are correct, then lock everything down.
Example: Squaring a 12-Foot by 16-Foot Deck Frame
Imagine you are building a 12-foot by 16-foot rectangular deck attached to a house. The ledger is 16 feet long, and the joists run 12 feet out from the house. After installing the side rim joists and outside rim joist temporarily, measure diagonally from the left ledger corner to the opposite outside corner. Then measure from the right ledger corner to the opposite outside corner.
For a perfect 12-by-16 rectangle, the diagonal should be 20 feet. That comes from the 3-4-5 relationship scaled up: 12, 16, and 20. If one diagonal is 20 feet 1 inch and the other is 19 feet 11 inches, the frame is out of square. Shift the outer frame until both diagonal measurements match. Then brace it.
This simple example shows why diagonal measurements are so useful. They tell you what your eyes cannot always see, especially when the job site is busy, the lumber is long, and the sun is doing that thing where every pencil mark disappears.
Pro Tips for Better Deck Joist Layout
Use a Story Pole
A story pole is a scrap board marked with repeated measurements. Instead of pulling a tape measure again and again, you can transfer joist spacing quickly and consistently. This reduces mistakes and speeds up layout.
Mark Both Edges of Important Joists
For double joists, picture-frame borders, stair openings, or breaker boards, mark both edges clearly. Write notes directly on the framing if needed. Future you will appreciate it.
Keep Checking as You Build
Do not wait until all joists are installed to discover the frame moved. Check diagonals after setting the rim, after installing several joists, after blocking, and before decking.
Use Temporary Screws for Adjustments
Temporary screws are easier to remove than nails if you need to adjust the frame. Once everything is square, use the required structural fasteners for the final connections.
Extra Field Experience: What Real Deck Projects Teach You
After you have worked on a few decks, you learn that squaring joists is not a single step. It is a habit. The best deck builders do not square the frame once and walk away like they have solved world peace. They check, brace, install, check again, and keep correcting small movement before it becomes a big problem.
One of the most common field lessons is that lumber is rarely perfect. A fresh stack of pressure-treated boards may look fine at the store, but once you start sorting, you will find crowns, bows, twists, and ends that look like they were chewed by an ambitious beaver. The trick is to use the straightest boards for rim joists and layout-critical areas. Save slightly imperfect boards for shorter blocking where possible. If a board is badly twisted, do not force it into the frame and hope fasteners will “teach it manners.” Warped lumber often wins.
Another experience-based tip is to avoid relying on only one measuring method. The 3-4-5 rule is excellent for creating a right angle, but diagonal measurements confirm the whole frame. String lines help reveal bowed sides. A framing square helps with individual marks. A level checks plane and elevation. Each tool catches a different kind of mistake. Think of them as a tiny inspection committee, except they do not drink your coffee.
Working with a helper also makes squaring easier, but only if both people use the same language. Before measuring diagonals, agree on whether you are measuring inside corner to inside corner, outside corner to outside corner, or from fixed reference marks. A surprising number of deck-layout arguments begin with two people measuring from different points and both insisting they are right. Mark the exact measurement points with pencil or tape. Then measure the same points every time.
Temporary bracing is another lesson that separates smooth projects from frustrating ones. A deck frame can rack while you climb over it, pull joists into place, or tighten hardware. Once the frame is square, install diagonal bracing before continuing. Leave the bracing in place until enough joists, blocking, and decking are installed to stabilize the structure. Removing bracing too early is like taking the training wheels off while the bike is still in the box.
It also helps to think ahead to the decking pattern. If the deck will have a picture-frame border, the joist layout must support the border boards. If the decking runs diagonally, tighter joist spacing is often needed. If boards meet over a seam, you may need double joists or blocking so both board ends have proper support. Squaring joists is not only about making a rectangle; it is about preparing a frame that supports the finished deck cleanly.
Finally, do not rush the layout stage. Many DIY builders want to get to the visible partthe deck boardsbecause that is when the project starts looking like a deck instead of a wooden skeleton. But the frame is where quality is won or lost. Spending an extra hour squaring joists can save several hours of trimming, adjusting, and inventing new vocabulary later. A square frame makes the rest of the build feel almost civilized.
Conclusion
Learning how to square joists for a deck is one of the most valuable skills in deck construction. A square frame supports straight decking, cleaner trim, stronger connections, and a better-looking finished project. Start with a straight reference line, use the 3-4-5 or 6-8-10 method to establish right angles, confirm the frame with equal diagonal measurements, brace it securely, and keep checking as joists and blocking go in.
Deck building rewards patience. Measure carefully, mark clearly, use the right hardware, follow local code, and do not let a slightly crooked frame convince you it has “character.” Character belongs in old novels and quirky neighbors. Your deck joists should be square.
Note: This article is for general educational guidance. Always follow your local building code, approved plans, manufacturer instructions, and inspection requirements when building a deck.