Your front steps are the handshake of your home. When they are smooth, safe, and styled with a little personality, they say, “Welcome in, we have snacks.” When they are cracked, chipped, stained, and growing one suspicious weed through the middle, they say, “Watch your ankle and maybe update your tetanus shot.” The good news is that cracked concrete steps do not automatically mean a costly demolition project. In many cases, you can repair, resurface, stain, seal, and decorate them into a warm, welcoming entryway that looks intentional instead of tired.
This guide walks through the practical side of concrete step repair and the design side of entryway transformation. We will cover how to inspect the damage, choose the right repair method, patch broken corners, resurface worn treads, add safer texture, finish the surface beautifully, and style the space with lighting, planters, railings, and seasonal charm. Think of it as a front-step glow-up: part home maintenance, part curb appeal therapy, and part “why did I wait so long to do this?”
Why Cracked Concrete Steps Deserve Attention
Cracked concrete steps are more than an eyesore. Small cracks allow water to seep into the concrete. In colder climates, that water can freeze, expand, and make the cracks worse. In warmer areas, moisture still contributes to erosion, staining, mildew, and surface breakdown. Over time, a thin line can become a chip, a chip can become a missing edge, and a missing edge can become the spot every guest trips over while trying to compliment your wreath.
Damaged steps can also reduce curb appeal. The entryway sets expectations before anyone rings the bell. A clean, repaired, thoughtfully decorated set of steps can make even a modest home look cared for. A cracked and crumbling stoop, on the other hand, can make a freshly painted front door look like it is trying to carry the entire exterior by itself.
Step One: Inspect Before You Repair
Before buying patching compound or rolling out a porch rug, take a close look at the concrete. Not all cracks are equal. Hairline cracks, shallow chips, small pits, and worn surfaces are usually good candidates for DIY repair. Wider cracks, deep separation, sinking steps, major movement, exposed rusting rebar, or stairs pulling away from the house may point to structural issues that need a concrete contractor or mason.
Look for these warning signs
Walk around the steps and check for loose chunks, hollow-sounding areas, uneven risers, pooling water, and movement when weight is applied. If the stairs feel unstable, do not cover the problem with paint or resurfacer. That is like putting a bow tie on a raccoon and calling it a butler. Charming, maybe, but not safe.
Also inspect drainage. If downspouts dump water onto the steps, if soil slopes toward the stoop, or if snow and rain sit on the treads for hours, the repair will not last as long. Fix water problems first by redirecting downspouts, cleaning gutters, adjusting grading, or adding a small splash block or drainage channel where appropriate.
Step Two: Gather Tools and Materials
A strong concrete step repair begins with preparation. For most small-to-moderate projects, you may need a stiff-bristle brush, wire brush, broom, bucket, margin trowel, pointing trowel, putty knife, cold chisel, hammer, shop vacuum, gloves, safety glasses, concrete bonding adhesive, concrete patching compound, crack filler, resurfacer, painter’s tape, wood boards for forms, screws or clamps, a sponge, and a sealer.
Choose materials based on the damage. Flexible concrete crack sealant works well for narrow cracks that may continue to move slightly. Fast-setting cement patchers are useful for broken corners and edges. Polymer-modified resurfacing products can refresh worn but structurally sound concrete. Concrete stain, porch paint, or a decorative coating can add warmth once repairs have cured. Always read product labels for temperature ranges, cure times, surface preparation, and slip-resistance recommendations.
Step Three: Clean Like the Repair Depends on It
Because it does. Concrete repair products need a clean, solid surface to bond properly. Remove loose concrete with a chisel and hammer. Sweep away dirt, leaves, weeds, and old flaking paint. Scrub the surface with a stiff brush and water. For heavily stained or grimy steps, use a concrete cleaner. If the steps have old peeling coating, scrape or sand it down to sound concrete before applying new material.
A pressure washer can help, but use common sense. You want to clean the concrete, not blast it into a dramatic before-and-after video no one asked for. After washing, allow the surface to become damp but not puddled before applying many patching materials. Some products bond best to a slightly damp surface, while others require dry concrete, so follow the instructions for the specific material you are using.
Step Four: Repair Cracks the Smart Way
For thin cracks, use a masonry crack filler or flexible concrete repair caulk. Cut the nozzle small, force the filler into the crack, and smooth it with a putty knife. If the crack is deeper than it looks, insert backer rod first so the filler sits at the proper depth and does not disappear into the concrete like loose change in a couch.
For larger cracks, widen the crack slightly with a chisel to create a better bonding shape, remove dust, apply bonding adhesive if required, and fill with a concrete repair mix. Press the material firmly into the void so it reaches the full depth. Feather the edges with a trowel and avoid overworking the surface, which can weaken the finish or create a patch that looks too shiny compared with the surrounding concrete.
Step Five: Rebuild Broken Corners and Edges
Chipped step noses and broken corners are common because those edges take abuse from shoes, shovels, moving boxes, strollers, furniture, and the occasional mystery thud no one in the house will admit to. To rebuild an edge, remove all loose concrete until only sound material remains. Brush or vacuum away dust. Then create a simple form with straight wood boards to hold the patching material in shape.
Apply bonding agent to the old concrete if the repair product calls for it. Mix the patching compound to a firm consistency, usually thicker than pancake batter and closer to peanut butter. Pack it into the damaged area, pushing it against the form. Shape the edge with a trowel and match the existing contour. Once the material begins to set, use a brush or broom to blend the texture with the rest of the step.
Step Six: Resurface for a Fresh, Unified Look
After cracks and chips are repaired, resurfacing can make old concrete steps look dramatically better. A concrete resurfacer is typically applied as a thin layer over sound concrete. It hides small imperfections, restores a more even appearance, and gives the steps a fresh surface that can later be stained, sealed, or textured.
Resurfacing is not a magic cloak for unstable stairs. The concrete underneath must be solid. Repair deeper damage first, allow patches to cure as directed, and tape off areas where you do not want resurfacer. Mix the resurfacer to the recommended consistency and apply it with a trowel, squeegee, or brush depending on the product. Work in manageable sections, keep edges wet, and add a light broom finish for traction. Outdoor steps should never be polished slick unless your design goal is “front-yard ice rink.”
Step Seven: Add Warmth With Color and Texture
Plain gray concrete can look clean and classic, but color often makes the entryway feel warmer. Concrete stain can add earthy tones such as sandstone, warm gray, charcoal, soft brown, or terracotta. Solid concrete stain or porch paint can provide more uniform coverage, especially if the steps have old discoloration. Decorative overlays can mimic stone, tile, or stamped patterns when installed correctly.
When choosing a finish, think about the home’s exterior. A white farmhouse may look beautiful with soft gray steps, black railings, and wood-toned planters. A brick home might benefit from warm taupe or charcoal concrete that complements the masonry. A modern exterior can handle clean lines, dark stain, and minimalist planters. The goal is not to make the steps scream for attention; it is to make them look like they belong.
Do not forget traction
Outdoor steps need grip. Choose finishes rated for exterior walking surfaces, and consider adding a slip-resistant additive to the sealer or paint. A broom texture, grit additive, or textured coating can help reduce slipping in rain. Avoid glossy coatings on steps unless they are specifically designed for traction.
Step Eight: Seal the Surface for Durability
Sealing repaired concrete helps protect it from moisture, stains, deicing chemicals, and everyday wear. Use an exterior concrete sealer compatible with your patch, stain, or coating. Apply only after the repair materials have cured properly. Rushing the sealer is one of those DIY mistakes that seems efficient until the finish clouds, peels, or traps moisture underneath.
Most sealers are applied with a roller, sprayer, or brush in thin, even coats. More is not always better. Thick sealer can create a slippery or blotchy surface. Follow the manufacturer’s coverage rate, drying time, and recoat instructions. If your entryway gets heavy traffic or harsh weather, plan to reseal periodically.
Step Nine: Upgrade Safety With Railings and Lighting
A warm entryway should also feel secure. If your steps have several risers, a sturdy handrail may be required by local code and is often a smart upgrade even when not required. Railings can be simple black metal, classic white, wood, cable-style, or decorative wrought iron. The best railing looks good, feels solid, and does not wobble like it has a secret.
Lighting is another major transformation tool. Add wall sconces, stair lights, solar path lights, or low-voltage landscape lighting along the walkway. Warm white bulbs usually feel more inviting than harsh blue-white light. Good lighting helps guests see the steps, highlights your repair work, and makes the entry feel safer after dark.
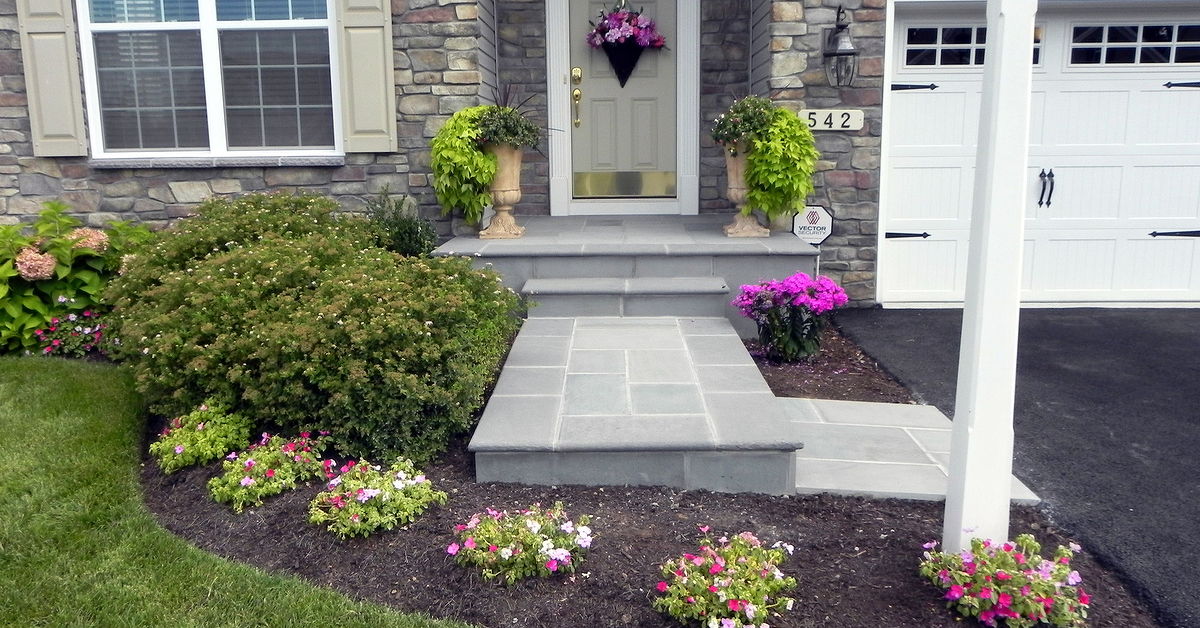
Step Ten: Style the Entryway So It Feels Welcoming
Once the concrete is repaired and protected, it is time for the fun part. Add a durable outdoor doormat that fits the width of the door. Place planters on either side of the steps or at the landing. Use plants that match the light conditions: boxwood, dwarf evergreens, ornamental grasses, ferns, petunias, coleus, mums, or seasonal arrangements can all work depending on climate and exposure.
Layering makes the entryway feel finished. Try a larger outdoor rug under a smaller coir mat if the landing is big enough. Add a wreath, update house numbers, paint the front door, or install a new mailbox and door hardware. These small touches make the repaired steps part of a complete entry design rather than an isolated patch job.
Concrete Step Makeover Ideas for Different Home Styles
Classic American entry
Repair the steps, resurface in a soft gray finish, add black metal railings, white trim, symmetrical planters, and a navy or red front door. This look is timeless, tidy, and friendly without trying too hard.
Modern warm minimalism
Use a smooth but slip-resistant charcoal or warm gray finish. Add slim railings, simple address numbers, matte black lighting, and two oversized planters with architectural grasses. Keep the color palette restrained and let the lines do the talking.
Cottage charm
Choose a light stone-colored stain or textured overlay, then add mixed flower pots, a cheerful door color, a natural fiber doormat, and soft lantern-style lighting. A few imperfect blooms are welcome. Cottage style should not look like it is afraid of bees.
Rustic farmhouse
Pair repaired concrete steps with wood planters, black hardware, warm porch lights, and a layered doormat. If the concrete surface is too plain, consider a stain in a warm taupe or weathered stone tone.
Common Mistakes to Avoid
The first mistake is patching over loose concrete. If the base crumbles, the patch will fail. The second is skipping bonding agent when the product requires it. The third is using too much water in the mix, which can weaken the repair. The fourth is ignoring drainage. Water is the tiny villain in many concrete stories, and it always returns for the sequel.
Another mistake is choosing indoor finishes for outdoor steps. Interior paint, glossy coatings, and decorative products not rated for freeze-thaw exposure can peel, become slippery, or wear quickly. Finally, avoid decorating before the repair cures. Planters, rugs, and mats can trap moisture on fresh coatings. Give the concrete time to harden and breathe.
When To Call a Professional
DIY repairs are practical for small cracks, shallow chips, cosmetic resurfacing, and minor edge rebuilding. Call a professional if the steps are sinking, separating from the house, leaning, crumbling deeply, or showing signs of structural failure. Also consider hiring help for large decorative overlays, stamped finishes, railing installation, or repairs that must meet specific building-code requirements.
Professional repair costs more upfront, but it can save money if the problem is beyond surface damage. A contractor can evaluate whether the steps need patching, mudjacking, replacement, drainage correction, or reinforcement. When safety is involved, the cheapest option is not always the least expensive in the long run.
Maintenance Tips for Long-Lasting Results
After your cracked concrete steps have been transformed, keep them looking good with simple maintenance. Sweep regularly so grit does not grind into the surface. Clean stains quickly. Avoid harsh deicing salts when possible, especially on newer concrete or recently repaired surfaces. Use sand for traction in icy conditions, and shovel snow with a plastic shovel instead of a sharp metal one that can scrape the finish.
Check the steps every season. Look for new cracks, peeling sealer, clogged gutters, or water pooling near the entry. Touch up small issues before they become dramatic. Concrete rewards boring maintenance. It may not be glamorous, but neither is explaining to guests why the front step has evolved into a small canyon.
Real-World Experience: What a Concrete Step Makeover Actually Feels Like
One of the most satisfying things about transforming cracked concrete steps is how quickly the mood of the entire house changes. The first time you sweep away the dust, patch a broken corner, and see the shape of the step return, it feels like the home exhales. Before the repair, the entry may have looked neglected even if the rest of the house was clean and loved. After the repair, the front door suddenly looks more polished, the walkway feels more intentional, and visitors do not have to perform a tiny obstacle-course routine just to say hello.
From hands-on experience with projects like this, preparation is the part people underestimate most. Everyone wants to jump to the pretty finish. That is understandable. Stain is exciting. Planters are exciting. Scraping loose concrete with a wire brush while wearing safety glasses is not exactly a magazine-cover moment. But the cleaning and prep stage determines whether the repair lasts. When the surface is truly clean, the patch bonds better, the resurfacer spreads more evenly, and the final color looks more consistent.
Another lesson is that small repairs require patience even when the products are labeled fast-setting. Fast-setting does not mean “throw a welcome mat on it in ten minutes and invite the neighborhood over.” Concrete repair materials need time to cure, and coatings need proper drying conditions. Weather matters. A hot, windy afternoon can dry resurfacer too quickly. A damp, chilly morning can slow curing. The best results usually happen when you pick a mild day, work in sections, and resist the urge to rush.
Color choice also has a bigger impact than expected. A slightly warmer gray or stone tone can make concrete steps look less industrial and more connected to the home. If the house has brick, wood, cream siding, or warm landscaping, a cool bluish-gray may feel out of place. Testing a small hidden area or sample board can prevent regret. The same goes for sealer sheen. Satin often looks more forgiving than high gloss on outdoor steps, and it usually feels more natural.
Decorating after the repair is where the entryway becomes personal. Two planters can frame the stairs beautifully, but scale matters. Tiny pots on wide concrete steps can look lonely, like they missed the plant bus. Oversized planters, on the other hand, create structure and warmth. A layered doormat adds texture. Updated lighting makes the steps safer and gives the whole front entrance a welcoming glow at night. Even a simple wreath or fresh house numbers can make the repair feel like a complete makeover.
The biggest takeaway is that a cracked concrete step project does not have to be perfect to be transformative. A DIY repair may not look like brand-new poured concrete, and that is okay. The goal is safe, solid, clean, and welcoming. A few subtle texture variations are normal. In fact, they can give the entry character. What matters most is that the steps no longer look forgotten. They look maintained, useful, and ready to welcome people home.
For homeowners on a budget, this project is also encouraging because it can be done in phases. Start by fixing drainage and safety issues. Then patch cracks and corners. Later, resurface or stain. After that, add lighting, railings, planters, and decor as time and budget allow. You do not need a full exterior renovation to create a better first impression. Sometimes the path from “cracked and cold” to “warm and welcoming” begins with a brush, a bucket, a trowel, and the decision that your front steps deserve better than being ignored until delivery drivers start leaving packages at a safe distance.
Conclusion
Transforming cracked concrete steps into a warm welcoming entryway is a smart blend of repair, safety, and style. Start by inspecting the damage, fixing drainage problems, cleaning thoroughly, and choosing the right repair product for cracks, chips, corners, or surface wear. Resurfacing can create a fresh, unified look, while stain, sealer, lighting, railings, planters, and door accents turn the repaired steps into an inviting entrance.
The best entryways feel cared for before they feel expensive. You do not need marble stairs, imported tile, or a front porch that looks like it has its own public relations team. You need solid steps, safe footing, warm details, and a design that fits your home. Fix the cracks, protect the surface, add personality, and your entryway can go from “please step carefully” to “come on in.”
Note: This article was written for web publishing in standard American English and is based on practical concrete-repair, resurfacing, safety, and curb-appeal guidance from reputable U.S. home improvement and building resources.