There are two kinds of people in this world: the ones who walk past grocery store flowers without a second glance, and the ones who stare at the flower bucket like they are auditioning for a home makeover show. This article is for the second group. The good news is that grocery store flowers can look surprisingly polished, expensive, and gift-worthy with the right wrap. You do not need a florist studio, a mysterious European accent, or ribbon that costs more than the flowers.
If you know how to choose fresh stems, shape a hand-tied bouquet, and wrap it with a little intention, supermarket flowers can go from “I grabbed these near the avocados” to “Wow, this looks boutique.” The trick is not just the paper. It is the whole presentation: color choice, stem prep, bouquet shape, and a wrap that feels clean instead of chaotic. Once you learn the process, you can turn an affordable bunch into a beautiful bouquet for birthdays, dinner parties, thank-you gifts, or the classic “I saw these and thought of you” moment.
Below, you will learn exactly how to wrap grocery store flowers for a beautiful bouquet, plus the mistakes to avoid, the materials worth using, and a few design tricks that make cheap flowers look far more glamorous than their barcode suggests.
Why Grocery Store Flowers Work So Well
Grocery store flowers are popular for one very simple reason: they are convenient. But convenience does not have to look lazy. Most supermarkets sell blooms that already have the bones of a good arrangement. Roses, carnations, chrysanthemums, tulips, alstroemeria, eucalyptus, baby’s breath, and seasonal filler flowers are easy to find, easy to mix, and easy to wrap. A lot of them are hardy enough to handle transport and a bit of styling without throwing a dramatic wilt-fest in the checkout lane.
What makes them look beautiful is editing. Instead of handing over the bouquet exactly as it came in a cellophane sleeve, you are going to refine it. You will remove tired leaves, trim the stems, rebalance the color story, and wrap the bouquet in a way that looks intentional. Think of it like changing a model out of sweatpants and into a tailored coat. Same person. Much stronger entrance.
What You Need to Wrap Grocery Store Flowers
- Kraft paper, florist wrap, tissue paper, or sturdy decorative paper
- Twine, satin ribbon, raffia, or a clean rubber band
- Sharp scissors or garden snips
- A damp paper towel
- Plastic wrap or a small plastic bag for the stems
- Optional: greenery, filler flowers, gift tag, or tissue lining
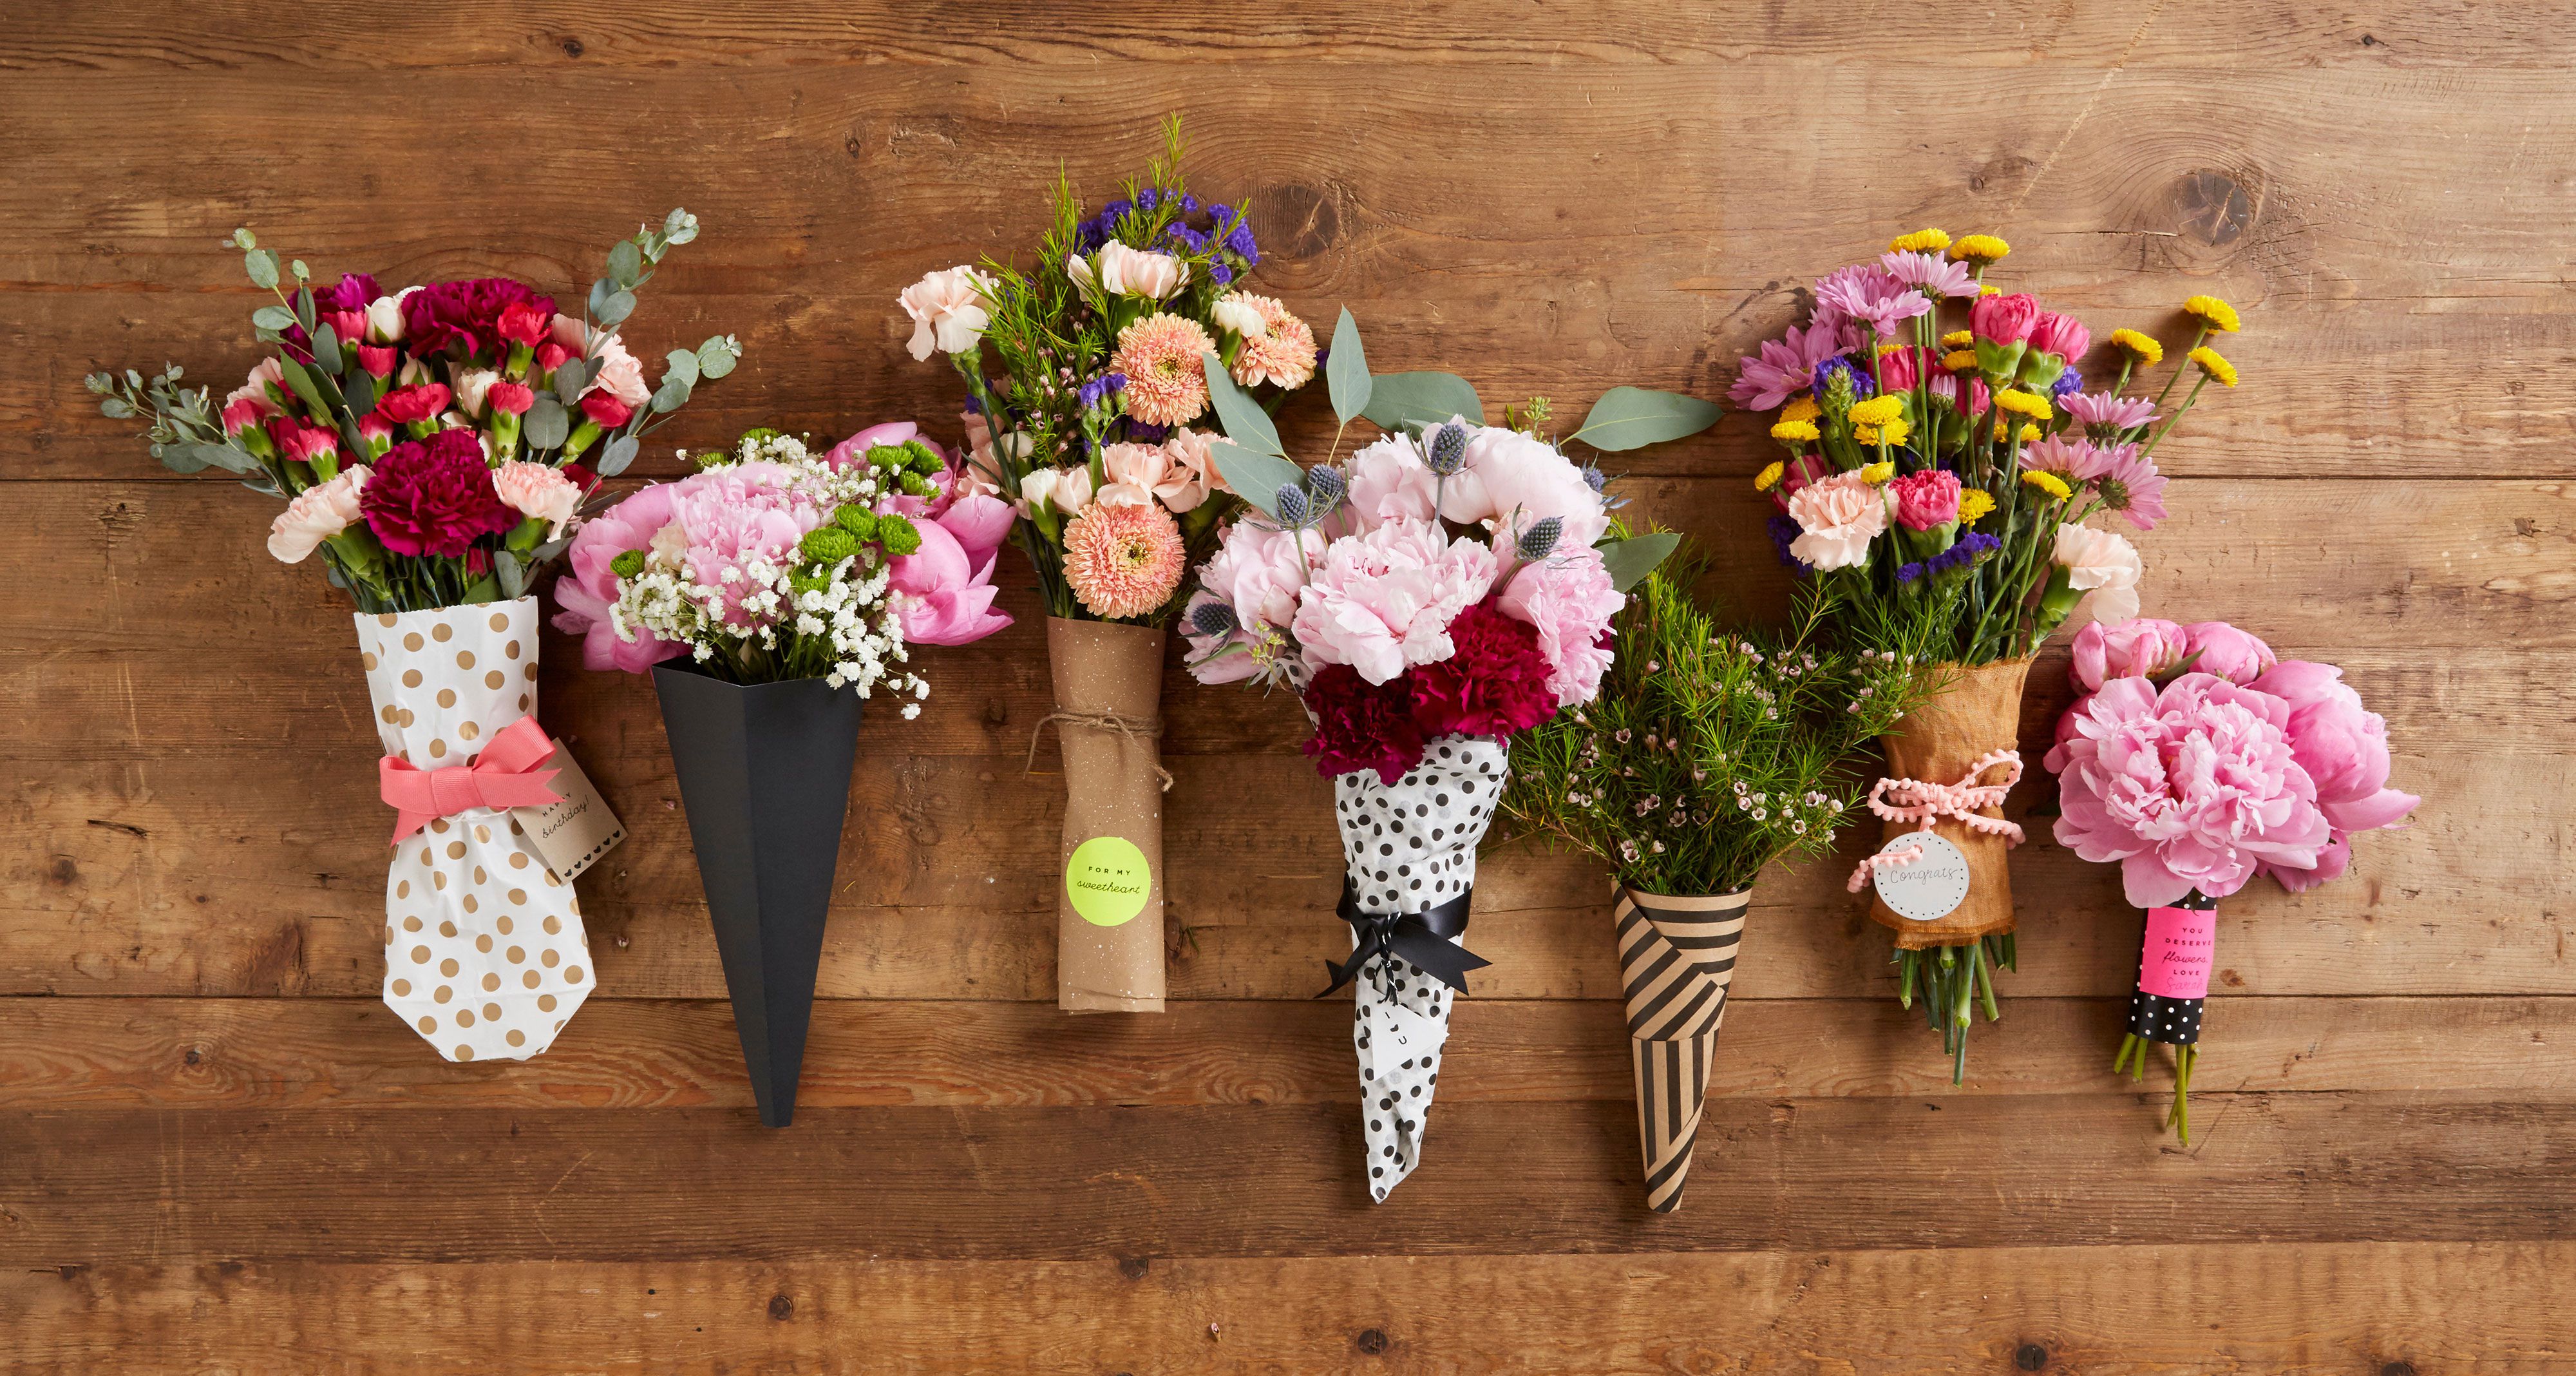
Kraft paper is the safest choice because it looks classic, photographs well, and makes almost any bouquet feel more elevated. Tissue paper is softer and more romantic. A double layer of tissue over kraft paper gives you the best of both worlds: structure and softness. If you want the bouquet to feel more modern, choose solid paper in white, tan, dusty blue, sage, or blush. If you want it to feel playful, use patterned paper sparingly. The flowers are the stars here. The wrap is the backup singer, not the lead vocalist.
Step 1: Pick Better Flowers at the Store
The prettiest wrap in the world cannot save flowers that already look exhausted. When shopping, check the petals first. You want blooms that feel fresh and intact, not bruised, browned, or falling apart like they have already lived several emotional lives. Look at the stems and leaves too. They should be firm, hydrated, and reasonably green. If the water in the store bucket looks cloudy, give those flowers a polite nod and keep moving.
For the best-looking bouquet, choose a simple mix:
- One focal flower: roses, tulips, lilies, or sunflowers
- One supporting flower: carnations, mums, spray roses, or alstroemeria
- One greenery or filler: eucalyptus, ruscus, baby’s breath, or fern
This formula keeps the bouquet balanced. You are not trying to build a botanical traffic jam. You are building contrast: one shape for drama, one for volume, and one for movement.
Step 2: Remove the Store Packaging and Edit the Bunch
Once you get home, strip off the plastic sleeve immediately. Grocery bouquets often look cramped because the store packaging squeezes the stems into one stiff little column. Let the flowers breathe. Lay everything out on a table and sort by type. This is also when you should pull any damaged petals, weak stems, or tired filler that is only bringing down the group project.
Remove leaves from the lower half of the stems, especially anything that will sit below the wrap or below a water line later. Extra foliage near the base makes the bouquet look bulky and messy. Cleaner stems make a bouquet feel more intentional and easier to tie.
Step 3: Trim the Stems the Right Way
Use sharp scissors or garden snips to cut the stems at an angle. A fresh angled cut helps the flowers take up water more easily and gives you cleaner, more even ends. If you are gifting the bouquet soon, do a light trim now and a final trim later if the recipient will place them in a vase. If the flowers are looking floppy, let them drink in water for a while before wrapping them. Hydrated flowers are far easier to shape and far less likely to punish you midway through the process.
Try to keep the stem lengths fairly consistent, but do not make them identical too early. You still need room to adjust the bouquet shape. Final perfection comes after the bouquet is tied, not before.
Step 4: Build a Hand-Tied Bouquet Shape
This is where the magic happens. Hold one stem in your hand as the center. Add greenery first if you want a looser, more natural bouquet. Then add your focal flowers one by one, rotating the bouquet as you go. Slip in your supporting flowers between the larger blooms. The goal is a rounded shape that feels balanced from every angle.
If you want a florist-style look, slightly angle the stems as you add them so the bouquet starts to spiral. Do not worry about creating a perfect professional spiral on your first try. Just avoid stacking every flower straight up and down like pencils in a cup. A little angle creates movement, and movement makes a bouquet look alive.
As you build, step back and check:
- Are the biggest flowers spaced out instead of clumped together?
- Does one side look heavier than the other?
- Do the colors feel balanced?
- Is there enough greenery to soften the edges?
A good bouquet usually looks full at the top, tapered at the stems, and easy on the eyes. If one flower is sticking up like it is trying to win a solo award, tuck it lower or move it outward.
Step 5: Secure the Bouquet Before Wrapping
Once the shape looks right, bind the stems at the natural holding point with twine, ribbon, raffia, floral tape, or a rubber band. The binding point is usually a few inches below the blooms, where your hand naturally grips the bouquet. Too high, and the bouquet feels stiff. Too low, and the stems wobble like shopping cart wheels.
This step matters more than people think. If the stems are not secured first, the bouquet can shift while you wrap it, and suddenly your lovely arrangement turns into a floral identity crisis.
Step 6: Add Moisture Protection for Gifting
If the bouquet will be gifted outside of a vase, wrap the stem ends in a damp paper towel. Then cover that with plastic wrap or a small plastic bag and secure it discreetly. This little trick helps keep the flowers hydrated during transport and protects the wrapping paper from getting soggy. It is especially useful if the bouquet will spend an hour or two out of water on the way to dinner, a party, or someone’s front door.
If you are delivering flowers in hot weather, keep them cool for as long as possible and avoid leaving them in a sunny car seat like they are tiny botanical commuters.
Step 7: Wrap the Bouquet So It Looks Expensive
Now for the fun part. Lay one or two sheets of wrapping paper flat on your table, with one corner pointing toward you like a diamond. If you are using tissue plus kraft paper, place the tissue on top. Put the bouquet diagonally across the paper so the flower heads extend beyond the top edge and the stems rest near the lower corner.
Fold one side of the paper over the bouquet, then fold the other side across it. Roll or lift the bottom corner up around the stems. Adjust until the wrap feels snug but not strangled. You want the bouquet to feel secure, not vacuum-sealed. Tie the middle or lower half with ribbon, twine, or raffia.
Here are three easy wrapping styles:
1. The Classic Cone Wrap
This is the easiest and most foolproof. It gives the bouquet a clean, market-style look and works beautifully with kraft paper and twine.
2. The Layered Soft Wrap
Use tissue paper under kraft paper for a softer, fuller effect. This works especially well for romantic bouquets with roses, tulips, or peonies.
3. The Straight-Edge Modern Wrap
Use crisp paper with clean folds and a simple satin ribbon. This style looks polished, minimal, and very gift-shop chic.
How to Make Cheap Flowers Look More Luxurious
If your budget is modest but your standards are wildly unreasonable, welcome. There are still ways to make grocery store flowers look elevated.
- Limit the palette: Stick to two or three colors for a more curated look.
- Use greenery generously: Eucalyptus can make basic flowers feel far more stylish.
- Edit aggressively: Fewer stems arranged well often look better than too many stuffed together.
- Reflex roses lightly: Gently opening outer petals can make roses appear fuller.
- Choose paper wisely: Neutral wrap instantly looks more expensive than loud plastic.
- Add a small tag: A handwritten note makes even a simple bouquet feel personal.
For example, one bunch of white roses, one bunch of alstroemeria, and a few eucalyptus stems wrapped in tan kraft paper with cream ribbon can look like something from a boutique florist. It is less about spending more and more about styling better.
Common Mistakes to Avoid
Using Too Many Flower Types
Too much variety can make a bouquet look confused. Pick a clear direction and stick to it.
Skipping Stem Cleanup
Messy stems make the bouquet look amateur. Clean lines matter.
Wrapping Before Tying
Always secure the bouquet first. Otherwise, the flowers shift and your neat wrap loses the battle.
Overstuffing the Paper
The wrap should frame the flowers, not swallow them. Let the blooms be visible and airy.
Trying Weird Vase Hacks
Flowers mostly want fresh water, clean cuts, and basic care. Resist the internet urge to turn your bouquet into a science experiment involving soda, bleach, or mystery pantry ingredients.
Best Occasions for a Wrapped Grocery Store Bouquet
A wrapped bouquet works for more than gifting. It is perfect for:
- Host gifts
- Birthday surprises
- Teacher thank-yous
- Mother’s Day or Easter brunch
- Casual romantic gestures
- Fresh home decor on a budget
You can even make a few smaller bouquets from one big grocery store haul. Split a large bunch into mini hand-tied bundles, wrap each one in paper, and suddenly you look like the kind of person who casually makes charming things. Dangerous power.
How to Keep the Bouquet Fresh After Wrapping
If the bouquet is staying wrapped for a while, keep the stems moist and the flowers cool. Once gifted, the recipient should unwrap the stems, trim them again, and place them in a clean vase with fresh water and flower food if available. Change the water every few days and remove fading blooms as needed. A bouquet that starts beautifully should have a fighting chance to stay that way.
If certain stems bend or droop, rehydration can help. Sometimes a little time in water solves more flower problems than any fancy hack ever will.
Final Thoughts
Learning how to wrap grocery store flowers for a beautiful bouquet is really about presentation, not perfection. You are taking something ordinary and giving it shape, mood, and a bit of ceremony. With fresh stems, a thoughtful color mix, clean binding, and paper that flatters instead of fights the bouquet, supermarket flowers can look personal, stylish, and surprisingly high-end.
So next time you spot a flower bucket between the bananas and the sparkling water, do not underestimate it. That little grocery store bouquet is only a few trims, a little paper, and some confidence away from becoming something genuinely lovely.
Experiences and Real-Life Lessons From Wrapping Grocery Store Flowers
One of the best things about wrapping grocery store flowers is that the experience gets better every time you do it. The first time, most people are a little clumsy. The stems slide. The paper crinkles in a weird place. The ribbon looks as though it has survived an argument. But then something clicks. You realize that flowers are forgiving. They do not demand perfection. They just need a bit of care and a little styling.
A common experience is discovering that the bouquet looked far more expensive after you removed half the filler the store included. Grocery bouquets are often padded with bulk greenery or decorative fluff that makes them look large in the cooler but not necessarily beautiful in your hands. Once people start editing the bunch, the flowers usually look cleaner and more elegant right away. That moment surprises a lot of beginners. Bigger is not always prettier. Better spacing is often the secret.
Another relatable lesson is how much the paper changes the mood. Wrap a bouquet in plain kraft paper and it feels warm, casual, and artisanal. Use white paper and satin ribbon, and suddenly it looks sleek and modern. Add blush tissue, and the exact same flowers feel softer and more romantic. This is why many people who get into bouquet wrapping end up keeping a small stash of wrapping paper at home. It becomes a tiny superpower. A last-minute grocery run can turn into a thoughtful hostess gift in under twenty minutes.
People also learn quickly that flower prep matters more than they expected. A bouquet can look average in the parking lot and gorgeous on the kitchen table after the stems are cleaned, trimmed, and rearranged. Removing bruised petals, pulling off low leaves, and giving the flowers a drink of water before wrapping can make a major difference. It is one of those satisfying before-and-after experiences that makes you feel oddly competent, like fixing a crooked picture frame or folding a fitted sheet on the first try.
There is also a personal side to the experience. Wrapped flowers feel more intimate than flowers handed over in store plastic. They show effort. Even when the cost is low, the gesture feels elevated because someone clearly took the time to make the bouquet look special. Many people remember not the exact flowers they received, but the fact that they were wrapped beautifully, tied with ribbon, and presented like a gift instead of an errand.
Over time, wrapping grocery store flowers can become a small ritual. Some people do it before visiting friends. Some do it on Sundays to make the house feel fresher for the week. Some do it when they want a simple creative project that ends with something pretty on the table. And that may be the nicest part of all: it is affordable, useful, and joyful. A bunch of flowers from the grocery store may start as an impulse purchase, but with a little practice, it turns into a bouquet that feels thoughtful, stylish, and unmistakably made by hand.