There is something wildly satisfying about a good DIY before-and-after. Maybe it is the drama. Maybe it is the budget brag. Maybe it is the comforting reminder that a room does not need a celebrity designer, a six-figure renovation, or a suspiciously perfect TV crew to look better. Sometimes it just needs sandpaper, paint, nerve, and one determined human being whispering, “Well, I already bought the roller, so now I have to commit.”
That is exactly why these UK home makeover stories hit so hard. The spirit behind the phrase “Just £30” is not really about a magical number. It is about resourcefulness. It is about turning tired cabinets, gloomy hallways, bargain-bin furniture, or neglected corners into something fresh, useful, and deeply personal. These DIY home transformations prove that creativity often beats cash, and that a little elbow grease can do more for a room than another online cart full of “must-have” decor ever could.
Why These DIY Before-And-After Ideas Feel So Inspiring
The best budget DIY ideas are not impressive because they are expensive. They are impressive because they are smart. A fresh coat of paint can rescue a dark room. New hardware can make old cabinetry feel custom. Peel-and-stick updates can fake a bigger renovation. Better storage can turn chaos into calm. And when a talented DIYer in the UK transforms a cramped flat, a dated terrace, or a weary rental corner, the result feels relatable in a way luxury remodels often do not.
These before-and-after photos also tap into something emotional. They show progress. They show patience. They show that homes are allowed to evolve. Not every makeover is perfect, and honestly, that is part of the charm. Sometimes the slightly wonky shelf is proof that a real person made the space better with their own two hands. That is not a flaw. That is character wearing overalls.
50 Inspiring DIY Before-And-After Transformations
Living Rooms and Shared Spaces
- The beige box became a cozy retreat. White walls turned warm greige, a thrifted rug grounded the seating area, and layered lamps replaced one harsh ceiling light. Suddenly the room looked intentional instead of tired.
- A sad fireplace got its comeback tour. Dark brick was painted, the mantel was sanded and stained, and the hearth styling was simplified. Before: heavy and gloomy. After: airy, clean, and proudly showing off.
- The “everything room” finally chose a direction. A UK family room that had been part office, part toy dump, part snack zone was zoned with shelves, baskets, and a better furniture layout.
- Old laminate shelves became built-ins. A few trim pieces, paint, and persistence made flat-pack shelving look custom. The before looked temporary. The after looked like it had always belonged there.
- A tiny apartment living room learned a new trick. Curtains were hung higher, furniture legs got exposed, and clutter was edited down. Nothing structural changed, but the room suddenly felt taller and calmer.
- The coffee table glow-up stole the show. A scratched table was sanded, painted, sealed, and restyled with books and a tray. It went from “curb alert” to “Where did you buy that?”
- An awkward alcove became the star of the room. Instead of ignoring a strange nook, the DIYer added a bench, paneling, and wall hooks. Before it was wasted space. After it became useful and charming.
- The dark media wall softened up. Bulky storage was replaced with slimmer cabinets, cords disappeared, and artwork balanced the TV zone. The room no longer felt like it was designed by remote control.
- A bland rental got personality without drama. Peel-and-stick wallpaper, removable art ledges, and clever textiles added character without upsetting a landlord or a security deposit.
- The hand-me-down sofa got a second life. New cushion covers, a throw, and better styling changed the whole mood. Sometimes the makeover is not about replacing furniture. It is about finally helping it.
Kitchens and Dining Areas
- Painted cabinets did the heavy lifting. The kitchen still had the same bones, but once the cabinet fronts changed color and the hardware was updated, the whole space looked more modern.
- The backsplash fake-out worked beautifully. Peel-and-stick tile transformed a blank wall into a focal point. It was budget-friendly, renter-aware, and dramatically more stylish than the original “builder basic” look.
- An old table became the heart of the room. Sanded wood, painted legs, and mismatched chairs tied together with color made a once-forgotten dining set look playful and collected.
- Open shelving rescued a cluttered corner. Removing one or two upper doors lightened the kitchen visually and created room for everyday dishes, glassware, and a few carefully chosen decorative pieces.
- The pantry makeover was weirdly thrilling. Matching jars, labeled bins, and painted shelves turned a stressful cupboard into a space that practically begged to be opened for guests.
- The breakfast nook found its purpose. A bench seat, washable cushions, and a small table turned an underused corner into a cheerful everyday hangout with very strong tea-and-toast energy.
- Countertops looked fresher without a replacement bill. The DIYer focused on clearing visual clutter, changing accessories, and updating wall color, proving that surfaces can feel new without being new.
- The fridge zone stopped looking random. A surrounding frame, better side storage, and a cleaner color palette made the kitchen feel more pulled together from wall to wall.
- The galley kitchen got brighter, not bigger. Under-cabinet lighting and pale finishes bounced light around the room. No walls were moved, but the entire kitchen looked less cramped.
- A bar cart solved the storage problem stylishly. Instead of cramming another cabinet into a tight room, a painted rolling cart created flexible storage and gave the space a fun, lived-in look.
Bedrooms and Work Corners
- The bedroom dropped the “temporary” look. Matching bedside lighting, taller curtains, and a proper headboard made the room feel finished rather than accidentally slept in.
- A spare room became a home office with actual appeal. Wall-mounted shelves, a painted desk, and a more thoughtful layout made the room functional without stripping out its warmth.
- The child’s room got smarter, not just cuter. Storage under the bed, labeled baskets, and cheerful wall color made cleanup easier and the room more playful.
- A gloomy loft bedroom got depth. Strategic paint choices embraced the sloped ceiling instead of fighting it. The before felt awkward. The after felt snug and deliberate.
- Flat wardrobe doors became custom-looking panels. Trim, paint, and patience gave plain doors architectural detail that made the entire bedroom look more expensive.
- The vanity corner finally earned its square footage. A thrifted mirror, good lighting, and compact storage created a polished beauty station where there had previously been chaos and tangled chargers.
- A guest room became genuinely inviting. Crisp bedding, calm wall color, and a small reading lamp changed the room from storage overflow into a place someone would happily stay.
- The nightstand mismatch became a feature. Instead of replacing them, the DIYer painted two different pieces the same color and created a collected, slightly quirky look.
- A bland box room got texture. A DIY slat wall or painted feature wall added enough interest to anchor the space without crowding it. Simple, bold, and very photogenic.
- The desk nook stopped feeling like punishment. Better chair choice, vertical storage, and a little styling turned “the place where bills happen” into a corner with actual charm.
Bathrooms, Hallways, and Storage Zones
- The tiny bathroom found a bigger personality. Wallpaper, upgraded mirror styling, and cleaner lines made the room memorable without demanding a full renovation budget.
- A dated vanity became a statement piece. Fresh paint, new pulls, and a better faucet made the entire bathroom look more intentional, even though the footprint stayed exactly the same.
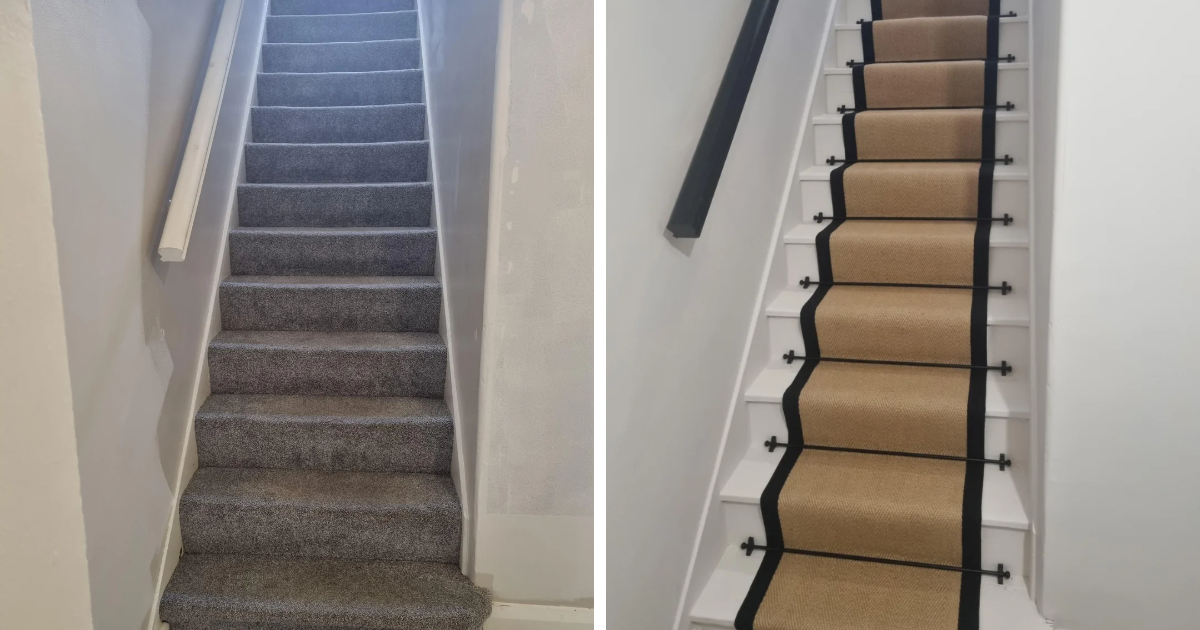
- The hallway stopped being a forgotten tunnel. Paneling, artwork, and a runner made it feel welcoming instead of merely pass-through space. First impressions matter, even to your own front door.
- Stair risers became a design moment. Paint or pattern added interest to a plain staircase, proving that even transitional spaces deserve a little style.
- The under-stairs cupboard entered its useful era. Hooks, labeled bins, and vertical storage turned a black hole of mystery into a hardworking organization hub.
- A laundry zone got surprisingly chic. Matching containers, shelf styling, and wall hooks transformed a purely functional nook into something almost suspiciously attractive.
- The bathroom floor stole attention. Budget-friendly flooring changes refreshed the room more than expensive accessories ever could. It was one of those “why didn’t we do this sooner?” projects.
- The medicine cabinet lost its chaos. Clear containers and grouped essentials made the before-and-after less glamorous than a kitchen makeover, but just as satisfying.
- The entryway became a sanity saver. A bench, shoe storage, and hooks made leaving the house faster, which might be the most underrated form of interior design.
- A plain mirror wall turned dramatic. Frame paint, lighting, and styling transformed a basic bathroom feature into something that looked much more custom.
Furniture, Garden, and Creative Wild Cards
- A thrift-store dresser got a new identity. Fresh paint, better hardware, and a sealed top turned a dated piece into one that looked custom-made for the room.
- The IKEA hack delivered again. Simple units were elevated with trim, legs, or paint until they no longer looked straight out of a cardboard instruction booklet.
- A worn garden patio became a real destination. Deck paint, potted plants, and thrifted seating transformed an ignored outdoor patch into a place for summer evenings and smug satisfaction.
- The fence makeover worked harder than expected. A cleaned and repainted fence made the plants pop and gave the entire garden a neater frame.
- Old crates became storage with personality. Stacked, painted, or mounted, they shifted from clutter magnets to practical decor with a handmade vibe.
- A boring balcony became a mini escape. String lights, a folding bistro set, and outdoor textiles gave a small space the energy of a very tiny holiday.
- The secondhand mirror became wall art. A simple paint update turned a dated frame into a statement piece that bounced light around the room beautifully.
- A sewing table or desk rose from the dead. Sanding and refinishing brought detail back to a neglected piece, proving old furniture often has better bones than new bargain buys.
- The plant corner got serious. Shelves, coordinated pots, and better light placement turned random greenery into a styled feature instead of a botanical traffic jam.
- The final makeover was confidence itself. Maybe that is the real before-and-after story here: the person who started with doubt and finished with proof that they could do more than they thought.
What Makes a Cheap DIY Project Look Expensive?
The answer is rarely “more stuff.” The most convincing DIY before-and-after photos usually share the same habits. First, the DIYer edits what is already there. Then they choose one clear direction: warmer, brighter, calmer, more modern, more colorful, more useful. After that, the magic comes from consistency. Repeating a color, matching finishes, improving lighting, hiding clutter, and upgrading the little details creates a polished result.
That is why budget DIY ideas can feel so powerful. They are not trying to trick the eye with extravagance. They are solving visual problems. A dark room needs brightness. A cramped room needs order. A bland room needs contrast or texture. A chaotic room needs storage. Once those problems are addressed, even cheap DIY projects can feel thoughtful and high-end.
Extra: Real-Life Lessons and DIY Experiences From Budget Makeovers
One of the most relatable things about these UK home makeover stories is how familiar the process feels. Nearly every DIY before-and-after begins the same way: with annoyance. A room is too dark. A cabinet looks ancient. A hallway feels depressing. A bathroom somehow manages to be both cramped and boring, which is honestly an annoying talent. Then comes the dangerous little thought: “Maybe I can fix it myself.”
That is when the real experience begins. First there is optimism, usually while standing in a hardware store holding paint swatches like a person who absolutely knows what they are doing. Then there is measurement, second-guessing, YouTube research, another trip to the store, and the realization that no project in human history has ever used only one roll of painter’s tape. Somewhere in the middle comes the low point, where the room looks worse than before and the DIYer briefly considers moving house instead of finishing the job.
But that awkward middle is exactly why the final result feels so satisfying. People remember the mess, the dust, the waiting for paint to dry, the tiny mistakes they swore nobody would notice, and the weird pride that comes from solving a problem without spending a fortune. A budget makeover is rarely just visual. It changes how a person feels in the space. The kitchen becomes easier to use. The bedroom becomes calmer at night. The entryway becomes less chaotic in the morning. The garden becomes somewhere to sit instead of somewhere to ignore.
Another common lesson from cheap DIY projects is that restraint matters. Many successful makeovers are not packed with trendy extras. They are better because someone stopped, edited, and let the room breathe. They used what they had. They painted instead of replacing. They improved flow instead of forcing in more furniture. They focused on one good mirror, one better light source, one smarter storage solution. In other words, they made the room work harder rather than simply look busier.
There is also a confidence factor that grows with each project. The person who starts by painting a side table often ends up tackling a hallway, then a wardrobe, then maybe a full bathroom refresh. Skill builds quietly. So does taste. Over time, DIYers begin to understand proportion, color balance, texture, and what a room actually needs. That is the secret ingredient in many before-and-after photos: not money, but momentum.
And perhaps that is why these transformations connect so strongly online. They are hopeful without being unrealistic. They do not say, “Spend more.” They say, “Start where you are.” Whether the budget is £30 or a bit more, the deeper appeal is the same. A person looked at something worn, plain, awkward, or overlooked and imagined a better version. Then they built it. That is not just decorating. That is proof that a home can keep changing as the people in it grow.
Final Thoughts
These before-and-after photos from talented people in the UK are more than eye candy for DIY fans. They are reminders that style does not belong only to giant budgets. With the right paint, storage, lighting, layout, and patience, a room can shift dramatically without draining your savings. The smartest DIY home transformation is not always the biggest one. Sometimes it is the one that solves a daily frustration and makes your home feel more like yours.
So if you are staring at a gloomy corner, a battered cabinet, or a room that feels one bad decision away from becoming a permanent dumping ground, consider this your sign. You probably do not need a miracle. You may just need a plan, a free weekend, and enough confidence to begin before the room talks you out of it.