Cheap digital microscopes are one of those tools that feel like science fiction until the package arrives and reality kicks down the door wearing fuzzy slippers. For the price of a pizza night, you get a tiny camera, a ring of LEDs, a USB cable, and the promise of seeing solder joints, plant cells, coin scratches, fabric fibers, and mystery crumbs in glorious magnified detail. Then you place it on the included stand, touch the focus wheel, and the entire image wobbles like a nervous jellyfish.
That is where printed upgrades come in. A low-cost USB digital microscope may have decent enough optics and a surprisingly useful camera sensor, but its weakest links are usually mechanical stability, lighting control, sample positioning, and focus precision. In other words, the microscope can see; it just needs a better chair, better lighting, and fewer bad life choices.
The idea behind “printed upgrades improve cheap digital microscope” is simple: instead of replacing the whole tool, improve the parts that make it frustrating. A sturdier base, an adjustable carriage, a smoother focus mechanism, a better stage, and flexible LED lighting can turn a bargain-bin gadget into a genuinely useful bench companion for electronics repair, classroom demonstrations, hobby science, coin collecting, insect inspection, 3D print quality checks, and everyday curiosity.
Why Cheap Digital Microscopes Are So Tempting
The appeal is obvious. A traditional microscope can be expensive, fragile, and specialized. A cheap digital microscope plugs into a computer or has its own screen, displays the image instantly, and is easy for multiple people to view at once. That makes it perfect for classrooms, maker spaces, small repair benches, and anyone who has ever wondered what the tip of a ballpoint pen looks like up close.
Digital microscopes are especially handy for electronics work. Instead of pressing your eye into an eyepiece while trying to hold tweezers, solder, and your breath at the same time, you can inspect a circuit board on a monitor. Surface-mount components, cracked solder joints, lifted pads, flux residue, tiny labels on chips, and hairline scratches all become easier to see.
The problem is that the cheapest units often save money in exactly the places where usability matters most. The camera may be acceptable, but the stand is flimsy. The LEDs may be bright, but the light is harsh and reflective. The focus wheel may work, but it shakes the microscope while you turn it. The magnification claims may sound heroic, but resolution, stability, and lighting are what actually decide whether the image is useful.
The Real Upgrade Is Not MagnificationIt Is Control
Many low-cost microscope listings shout about huge magnification numbers. That sounds exciting until you realize that “more magnification” without more detail is just a bigger blur. Useful microscopy depends on resolution, contrast, lighting, and precise positioning. A printed upgrade does not magically rewrite the laws of optics, but it can help the microscope perform closer to its actual limits.
Think of it like putting bargain tires on a shopping cart. The cart might technically move, but you would not use it for precision driving. A printed stand, adjustable stage, or carriage gives the microscope a stable structure. Once the camera stops wobbling, the image becomes easier to focus. Once the lighting improves, surface details become easier to interpret. Once the sample can be moved smoothly, inspection becomes less like chasing a mosquito with chopsticks.
Core Printed Upgrades That Make the Biggest Difference
1. A Heavier, Sturdier Base
The base is the first place to improve. Many budget USB microscopes come with a light plastic stand that tips, flexes, or vibrates whenever you breathe near it. A printed base can be made wider, thicker, and more stable. Some designs include cavities for metal washers, nuts, sand, or other ballast so the stand stays planted on the desk.
A good base should be large enough to support a PCB, slide, coin, leaf, or other specimen without forcing your hands into awkward positions. For electronics repair, the base should leave room for tools and wires. For biology or classroom use, it should keep slides flat and centered. Stability may not sound glamorous, but it is the difference between “I can see the broken trace” and “I have invented seasickness for my eyeballs.”
2. A Better Microscope Carriage
The carriage is the part that holds the microscope body. On many cheap models, the original clamp is either too loose, too tight, or positioned in a way that limits working distance. A printed carriage can be designed to fit the cylindrical microscope body more securely while allowing vertical adjustment.
For best results, the carriage should hold the microscope firmly without crushing it. A split-ring clamp with screws, a snap-fit holder, or a sliding block can work well. The goal is to stop the camera from twisting or drooping during use. If the microscope rotates every time you touch the focus ring, your inspection session quickly becomes a tiny, high-resolution wrestling match.
3. Fine Focus Control
Focus is where cheap microscopes reveal their budget origins. Many models use a focus ring on the microscope body itself. Turning that ring often moves the whole microscope, especially if the stand is weak. A printed focus upgrade can solve this by moving the camera up and down with a screw, rack, sliding rail, or flexure-style mechanism.
Even a simple threaded rod can make focusing smoother. The microscope stays fixed in its holder while the carriage moves vertically in tiny increments. That means less shake, less overshooting, and fewer moments where the image goes from blurry to sharp to “where did the object go?” in half a second.
Fine focus is especially useful at higher magnification, where depth of field becomes very shallow. When only a thin slice of the object is in focus, a smoother focusing mechanism is not a luxury; it is the difference between seeing a solder bridge and seeing a shiny gray fog.
4. A Moveable Sample Stage
A printed stage gives the sample a reliable place to sit. For transparent slides, the stage can include a central opening for transmitted light from below. For circuit boards or opaque objects, it can be flat, matte, and wide enough to support the workpiece. Some users add clips, magnets, or low-profile clamps to keep the sample from wandering.
A more advanced version is an XY stage, which lets the user move the specimen left, right, forward, and backward without touching it directly. This is extremely helpful when inspecting large PCBs, scanning a slide, or comparing multiple points on a sample. The movement does not have to be laboratory-perfect to be useful. Even simple knobs and sliding printed parts can feel like a massive upgrade over pushing a board around with your finger and hoping it does not launch itself into another ZIP code.
5. Adjustable LED Lighting
Lighting is one of the most important upgrades for any microscope. Many cheap digital microscopes include a built-in LED ring around the lens. It works, but it often creates glare on shiny objects like solder joints, metal surfaces, coins, and polished plastics. The result can look less like scientific imaging and more like a flashlight interrogation.
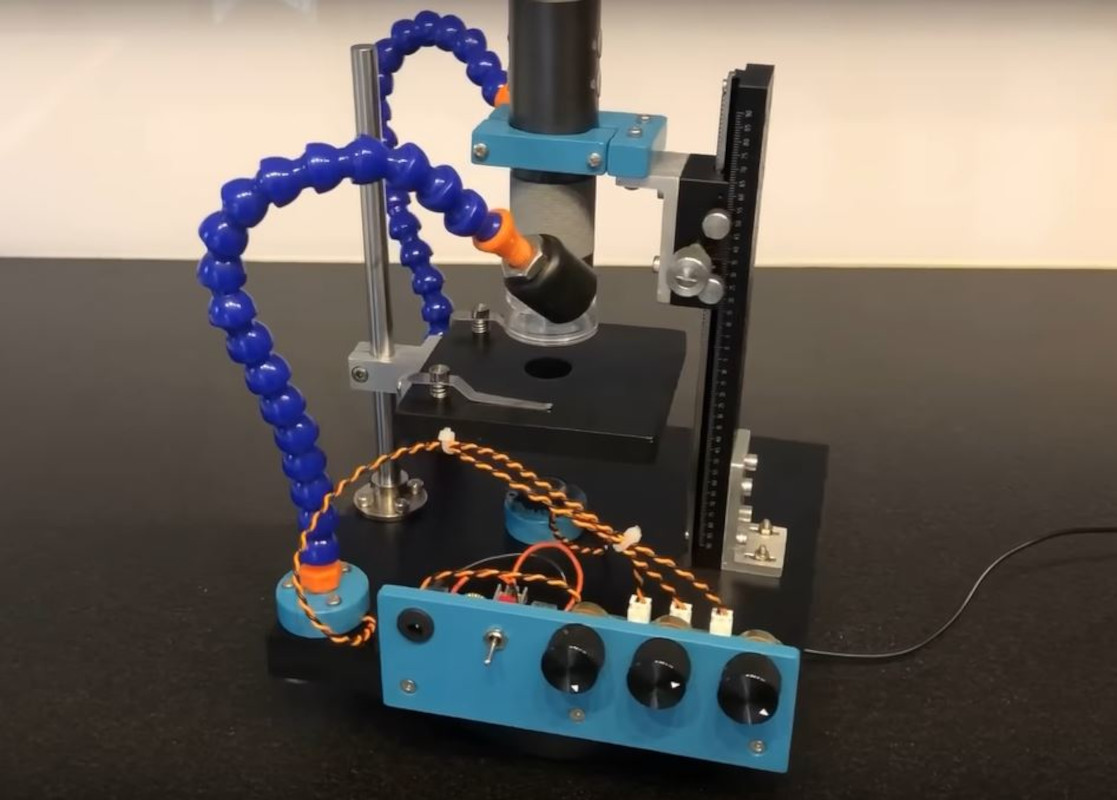
Printed LED arms or housings solve this by placing lights where they are actually useful. Side lighting can reveal surface texture. Oblique lighting can make scratches and raised features pop. Under-stage lighting can help with transparent samples. A diffuser can soften harsh reflections. Separate brightness controls make the system even better because the perfect lighting for a leaf is not the same as the perfect lighting for a microcontroller pin.
A smart upgrade might include two adjustable side LEDs and one bottom LED. The side lights help with opaque specimens such as PCBs, insects, coins, and 3D printed parts. The bottom light helps with slides, thin plant samples, and transparent materials. Add a simple LED driver or regulated power supply, and the microscope becomes far more flexible.
What the Maker Community Gets Right
The maker approach to microscope improvement is practical. It does not pretend a twenty-dollar USB microscope is secretly a research-grade optical instrument. Instead, it asks a better question: what can be fixed cheaply?
The answer is: quite a lot. A printed stand can be stronger than the original. A custom holder can fit the microscope better. A printed stage can be designed around your actual use case. A lighting system can be aimed, diffused, and adjusted. Cable routing can be improved. The work area can be made larger. The microscope can be raised high enough to inspect bigger objects. None of these changes require replacing the camera sensor or lens.
Open-source microscope projects also show how powerful printed mechanics can be. More advanced designs use 3D printed flexures, modular frames, stepper motors, and camera modules to create precise, repeatable instruments. A cheap digital microscope upgrade does not need to go that far, but it benefits from the same design wisdom: reduce wobble, control movement, manage light, and make the user’s hands less involved at the exact moment precision matters.
Printed Does Not Always Mean 3D Printed
There is an interesting twist in this topic: some microscope upgrade builds described online use handmade plastic, PVC sheet, laser-cut parts, or mixed fabrication rather than strictly 3D printed components. That is worth mentioning because the goal is not to worship one manufacturing method. The goal is to make the microscope better.
That said, 3D printing is especially convenient for this kind of project. It allows custom shapes, quick iterations, fitted clamps, cable guides, light housings, stage inserts, knobs, spacers, and adapters. If the first holder is too loose, revise the model and print another. If your microscope body is 33 millimeters wide instead of 32, adjust the diameter. If you want a taller post, print a taller post. This is where 3D printing shines: not mass production, but personal problem-solving.
Best Use Cases for an Upgraded Cheap Digital Microscope
Electronics Repair and PCB Inspection
This is probably the most common reason makers buy cheap digital microscopes. An upgraded stand and better lighting make it easier to inspect solder joints, component orientation, bridges between pins, corrosion, cracked traces, and poor rework. A large base and adjustable height are especially helpful because circuit boards come in inconvenient shapes, as if designed by people who never had to fit them under a microscope.
3D Print Quality Checks
A digital microscope is excellent for checking layer lines, nozzle artifacts, stringing, under-extrusion, over-extrusion, surface texture, and first-layer squish. With angled lighting, you can see ridges and defects more clearly. This makes the microscope useful not only as a tool improved by 3D printing, but also as a tool for improving 3D prints. That is a satisfying little loop of nerdy usefulness.
Coins, Stamps, Jewelry, and Collectibles
Collectors can use an upgraded digital microscope to inspect mint marks, scratches, surface wear, printing details, fibers, engravings, and repairs. A stable base helps maintain consistent focus while comparing details. Diffused side lighting reduces harsh glare on shiny surfaces.
Classroom and Hobby Science
For classrooms, the best thing about a digital microscope is shared viewing. Students do not have to line up one by one at an eyepiece. The image can be displayed on a screen, making discussion easier. Printed stages, slide holders, and lighting accessories can make the microscope more durable and easier to use for repeated demonstrations.
Design Tips Before You Print
Before printing upgrades, measure the microscope body carefully. Many USB microscopes look similar but vary in diameter, cable position, button placement, and focus ring location. A clamp that blocks the focus wheel or presses on a capture button will quickly become annoying.
Use matte filament or paint for parts near the optical path. Glossy plastic can reflect light into the camera and reduce contrast. Black or dark gray parts often work well around the lens and stage, while lighter parts can be useful for visibility elsewhere. Avoid flimsy arms unless you enjoy watching your microscope nod politely every time you adjust it.
For LED mounts, design adjustability into the system. Simple gooseneck arms, ball joints, hinged arms, or repositionable brackets can all work. Include room for resistors, wiring, heat management, and strain relief. Low-voltage LEDs are generally easy to work with, but the wiring should still be neat, insulated, and protected from tugging.
If you plan to inspect electronics, leave space under the microscope for tools. If you plan to view slides, include a flat stage and an opening for bottom light. If you plan to look at larger objects, make the vertical column taller and the base deeper. A microscope stand should be designed around the objects you actually want to inspect, not around a fantasy specimen that conveniently fits in the center like it read the instruction manual.
Common Mistakes to Avoid
The first mistake is chasing magnification instead of image quality. A stable 50x view is often more useful than a shaky, dim, over-magnified blur. The second mistake is ignoring lighting. If every shiny object turns into a glowing white blob, the microscope is not the problem by itself; the lighting geometry is begging for help.
The third mistake is making the stand too light. Tall printed structures need mass at the bottom. Add ballast, widen the base, or mount the stand to a board. The fourth mistake is using tight sliding printed parts without considering friction. Sanding, lubrication, better tolerances, or using metal rods can make movement smoother.
The fifth mistake is forgetting cable management. USB cables are surprisingly talented at pulling lightweight microscopes out of position. A printed cable clip or strain relief can prevent accidental movement and keep the bench cleaner.
Hands-On Experience: Living With a Printed Microscope Upgrade
The first time you use a cheap digital microscope with a proper upgraded stand, the improvement feels almost suspicious. The camera stops wobbling, the object stays where you put it, and focusing no longer feels like opening a jar while riding a bus. The microscope may still be cheap, but it suddenly behaves like a tool instead of a novelty.
For PCB work, the biggest change is comfort. With the original stand, you often end up holding the board with one hand, adjusting the microscope with the other, and using your third hand to operate the computer, which is inconvenient unless you are an octopus with a repair business. A larger printed base lets the board rest naturally. Adjustable lighting reveals solder joints from different angles. When checking a row of fine-pitch pins, side lighting can make tiny bridges much easier to spot.
Focus control is the upgrade that quietly becomes addictive. At low magnification, you can get away with rough adjustment. At higher magnification, the focus plane becomes thin, and tiny movements matter. A screw-driven carriage lets you creep into focus instead of lunging past it. It also makes image capture easier because the microscope is not shaking right when the picture becomes sharp.
Lighting takes more experimentation than beginners expect. Straight-on ring lighting is convenient, but it can flatten details and create glare. When inspecting a coin, angled light may reveal scratches and raised edges better than full frontal lighting. When examining a 3D print, light from the side makes layer lines stand out. When viewing a thin leaf section or prepared slide, bottom illumination can be more useful than top lighting. The lesson is simple: the best microscope light is not always the brightest one. It is the one coming from the right direction.
Another pleasant surprise is how useful the microscope becomes outside its original purpose. You start with solder joints, then inspect a razor blade, a leaf, a piece of paper, a fingerprint on plastic, a cracked phone cable, a ballpoint pen tip, and the mysterious dust living in your keyboard. This is the dangerous part of owning a microscope: ordinary objects become suspiciously interesting.
There are still limitations. Cheap digital microscopes often have modest optics, small sensors, narrow depth of field, and exaggerated magnification claims. Printed upgrades will not turn plastic lenses into laboratory objectives. But they can remove enough mechanical and lighting problems that the microscope becomes dependable. For hobby work, education, repair, and curiosity, that is a big win.
The best experience comes from treating the project as iterative. Print a basic holder first. Use it for a week. Notice what annoys you. Maybe the light needs a wider angle. Maybe the stage needs clips. Maybe the base needs more weight. Maybe the focus knob is too small. Then revise. The microscope improves one practical complaint at a time, which is exactly how good shop tools are born: not in a burst of perfection, but in a series of “well, that was annoying” moments followed by better parts.
Conclusion
Printed upgrades improve cheap digital microscopes because they fix the problems that matter most: stability, focus, lighting, sample control, and comfort. A budget microscope may never compete with a professional lab instrument, but it does not have to. With a stronger base, a better carriage, adjustable LEDs, and a practical stage, it can become a reliable tool for electronics repair, inspection, teaching, collecting, and exploration.
The magic is not that plastic parts are fancy. The magic is that they are specific. They can be designed for your microscope, your desk, your samples, and your workflow. That is why a small printed upgrade can feel bigger than the microscope itself. Sometimes the difference between “cheap gadget” and “useful instrument” is not a new camera. It is a better stand, smarter light, and a little bit of maker stubbornness.