Note: This article is written for web publication and synthesized from current U.S.-relevant product guidance, installation manuals, outdoor shade retailers, fabric information, and sun-safety recommendations.
Introduction: Instant Shade Without Building a Backyard Spaceship
Ready made shade sails are one of the fastest ways to turn a hot patio, deck, driveway, garden corner, or poolside hangout into a cooler, more comfortable outdoor space. They are pre-sized fabric canopies designed to stretch between anchor points, creating shade without the cost or construction drama of a permanent roof. In other words, they are the outdoor-living version of “some assembly required,” but thankfully with fewer mysterious leftover screws than flat-pack furniture.
The appeal is easy to understand. A ready made shade sail can soften harsh sunlight, reduce glare, protect outdoor furniture from constant sun exposure, and make a backyard feel more finished. Unlike custom shade sails, which are measured and fabricated for a specific site, ready made shade sails come in standard shapes and sizes. You choose a triangle, square, rectangle, or sometimes a right triangle, then install it with compatible hardware.
But “ready made” does not mean “throw it over the patio and hope for the best.” To get a clean, safe, long-lasting result, you need to understand material, size, shape, tension, anchoring, airflow, water drainage, and placement. A shade sail is simple, but it is still a tensioned outdoor structure. Treat it well, and it will look sleek. Ignore the basics, and it may flap around like a confused beach towel auditioning for a weather report.
What Are Ready Made Shade Sails?
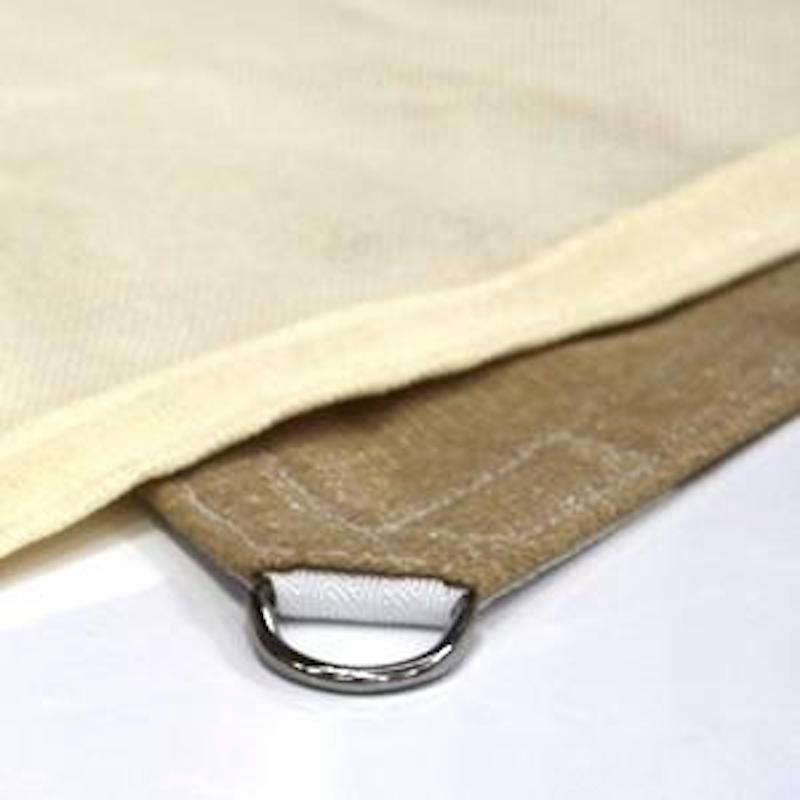
Ready made shade sails are pre-manufactured outdoor fabric panels with reinforced corners, usually fitted with stainless steel D-rings or buckles. They are designed to be mounted between posts, walls, fascia supports, pergolas, trees, or other sturdy points using hardware such as turnbuckles, pad eyes, snap hooks, carabiners, eye bolts, and tensioning cables.
The main keyword here is convenience. Instead of waiting for a custom-measured sail, homeowners can buy a ready made sun shade sail in a common size, such as 10 x 10 feet, 12 x 12 feet, 16 x 16 feet, 10 x 13 feet, 12 x 16 feet, or 20 x 20 feet, depending on the manufacturer. Many retailers carry neutral shades like sand, beige, gray, charcoal, and cream, while some offer brighter colors for playgrounds, pool areas, or bolder backyard designs.
Ready Made vs. Custom Shade Sails
A ready made shade sail is best when your space can work with standard dimensions. A custom shade sail is better when you have unusual anchor points, a large commercial space, tricky geometry, or a design that needs precise coverage. Ready made sails are usually more affordable and quicker to install, while custom sails provide better fit and often stronger long-term performance for demanding applications.
For many homes, ready made shade sails hit the sweet spot: budget-friendly, attractive, and practical. They are especially useful over patios, balconies, dog runs, outdoor dining areas, kids’ play spaces, garden benches, carports, and side yards that seem to have been personally targeted by the sun.
Popular Materials Used in Ready Made Shade Sails
The fabric matters more than many buyers realize. A shade sail is not just a decorative triangle in the sky. It has to resist sunlight, wind, moisture, stretching, and daily temperature swings.
HDPE Shade Sails
Most breathable ready made shade sails are made from HDPE, or high-density polyethylene. This knitted mesh fabric is popular because it blocks a significant amount of UV radiation while still allowing air to pass through. That airflow helps reduce trapped heat, making HDPE shade sails a smart choice for hot patios, decks, gardens, and pool areas.
HDPE shade sails are usually water permeable, meaning rain can pass through the fabric instead of pooling on top. This is a major advantage for residential installations because pooled water adds weight and stress to anchor points. If you want cooling shade more than rain protection, breathable HDPE is usually the best all-around choice.
Waterproof Shade Sails
Waterproof shade sails are designed to shed rain, but they require more careful installation. They must be angled properly so water runs off instead of collecting in the center. Waterproof fabric also catches more wind than breathable mesh, so the structure and hardware need to be stronger.
Choose waterproof ready made shade sails only when rain protection is a priority and your mounting points can handle the extra load. For casual backyard shade, breathable mesh is often easier, cooler, and more forgiving.
Fabric Weight and UV Protection
Shade sail fabric is often described by GSM, or grams per square meter. A higher GSM generally means a heavier fabric, though quality also depends on weave, UV stabilization, stitching, edge reinforcement, and hardware. Many residential ready made shade sails advertise UV blocking in the range of about 90% to 95%, while some commercial-grade fabrics claim higher levels, depending on color and construction.
One important reminder: shade helps, but it is not magic armor. Reflected and indirect UV rays can still reach your skin, especially near water, concrete, light-colored decking, sand, or bright walls. A shade sail should be part of a broader sun-safety plan that includes sunscreen, sunglasses, hats, and smart timing during peak sun hours.
Best Places to Use Ready Made Shade Sails
Ready made shade sails work best in spaces where you can create strong anchor points and maintain proper tension. The more stable the corners, the better the finished result.
Patios and Decks
A patio shade sail can make outdoor dining dramatically more comfortable. Install one over a dining table, grill prep area, conversation set, or lounge chairs. For decks, make sure posts and railings are structurally capable of handling tension. A decorative railing is not automatically a safe anchor point, no matter how confident it looks.
Pools and Play Areas
Shade sails are popular near pools because they reduce glare and help create a cooler resting zone. Over play areas, they can make swings, sandboxes, and climbing sets more usable during summer. In these spaces, placement is key. Watch how the sun moves throughout the day before installing the sail. The shade at 10 a.m. is not the same shade at 3 p.m., because the sun enjoys keeping homeowners humble.
Driveways and Carports
A rectangular shade sail can help protect vehicles from direct sun, reducing interior heat and slowing sun exposure on paint and dashboards. For driveway use, height and clearance matter. The sail must be high enough for vehicles, doors, roof racks, and walking space, but low enough to cast useful shade.
Gardens and Side Yards
Ready made shade sails can also protect delicate plants, create a comfortable potting area, or turn an awkward side yard into a usable retreat. For gardens, choose breathable fabric so air continues to circulate and heat does not build up under the canopy.
How to Choose the Right Size
The biggest mistake buyers make is choosing a sail that is the same size as the area they want to cover. A shade sail needs room around each corner for hardware and tensioning. If your anchor points are 12 feet apart, a 12-foot sail is usually too large. You need space between the sail corner and the mounting point for turnbuckles, snap hooks, and adjustment.
As a practical rule, leave roughly 10 to 12 inches or more between each sail corner and its anchor point, depending on the hardware kit and manufacturer instructions. Larger sails may require even more clearance. Always check the product’s measurement guide before drilling holes into anything expensive, sentimental, or attached to your house.
Measure Anchor Point to Anchor Point
Measure the distance between your planned mounting points, not just the patio floor. Then subtract space for hardware. Also remember that many shade sails have curved edges. These curves help create proper tension and reduce sagging, but they also mean the sail will not cover every inch inside its corner-to-corner footprint.
Understand Shape and Coverage
Triangle shade sails look modern and are easier to fit into small areas, but they provide less coverage than square or rectangular sails. Square shade sails offer balanced coverage and work well over seating areas. Rectangle shade sails are ideal for long patios, driveways, and dining zones. For larger spaces, overlapping two or three sails can create attractive layered shade while allowing airflow and visual interest.
Installation Basics for Ready Made Shade Sails
Installation is not overly complicated, but it does require planning. A shade sail should be tight, angled, and attached to strong supports. A loose sail will flap, sag, collect debris, and stress the fabric. A properly tensioned sail should look smooth and intentional, not like it lost an argument with the wind.
Common Hardware Components
Most installations use a combination of pad eyes or eye bolts, turnbuckles, snap hooks, carabiners, screws, wall plates, or cable extensions. Stainless steel hardware is preferred because it resists rust and holds up better outdoors. Turnbuckles are especially important because they allow you to tighten the sail after it is attached.
Triangle sails often need at least one turnbuckle, while square and rectangular sails usually benefit from two or more, depending on the hardware system. Larger sails may need heavier-duty fittings, posts set in concrete, and professional advice.
Mounting Points Must Be Strong
Good mounting points include properly installed posts, structural beams, masonry walls with correct anchors, or reinforced fascia brackets. Bad mounting points include weak fence pickets, thin trim boards, aging gutters, decorative pergola slats, and that one tree branch you “think will probably hold.” Outdoor tension loads can be surprisingly strong, especially during wind.
If you are attaching a shade sail to your home, check whether the mounting surface is structural. Fascia boards may need reinforcement. Masonry may need appropriate anchors. Posts should be set deep enough and secured with concrete according to local conditions, soil, sail size, and wind exposure.
Create Height Variation
A flat shade sail may look simple, but it can collect water and sag. Height variation helps with water runoff, airflow, and visual style. Many installations use a high-low pattern, with one or two corners higher than the others. This creates a dynamic architectural look and helps prevent rainwater from sitting in the middle.
Design Tips for a Better-Looking Shade Sail
A ready made shade sail should look like it belongs in the space. The goal is relaxed backyard elegance, not “temporary tarp at a pirate festival.” A few design choices can make a big difference.
Match Color to the Space
Neutral colors like sand, beige, stone, and gray blend well with most homes. Darker colors can provide a stronger shade feel and reduce glare, while lighter colors often feel airier and reflect more light. Bright colors can be fun for playgrounds, pool areas, or modern homes, but they should be used carefully unless your design goal is “tropical popsicle.”
Layer Multiple Sails
Two overlapping triangle shade sails can look more custom than one large square. Layering also allows you to control shade at different times of day. Leave space between sails so air can move and rain can drain.
Think About the Sun’s Path
The sun moves across the sky, and the shade moves with it. Before installation, observe your outdoor area in the morning, midday, and late afternoon. Place the sail where it blocks the most intense sun during the hours you actually use the space. A breakfast patio and a late-afternoon grill station may need very different shade placement.
Maintenance and Care
Ready made shade sails are generally low maintenance, but they are not maintenance-free. Dirt, pollen, leaves, bird souvenirs, and mildew can collect over time. Clean the fabric with mild soap and water, rinse thoroughly, and allow it to air dry. Avoid harsh chemicals, pressure washing at close range, and abrasive scrubbing unless the manufacturer specifically allows it.
Inspect the sail regularly for fraying, loose stitching, stretched corners, rusting hardware, or movement at anchor points. Tighten turnbuckles when needed. If the sail begins flapping loudly, that is not “character.” It is a warning sign that tension or hardware needs attention.
Seasonal Removal
In areas with snow, hurricanes, severe storms, or strong seasonal winds, remove the shade sail when conditions become risky. Most residential ready made shade sails are not designed to carry snow loads or withstand extreme weather. Taking the sail down before winter or major storms can extend its life and protect your anchor points.
Common Mistakes to Avoid
Buying the biggest sail possible sounds logical, but bigger is not always better. A sail that is too large will not tension properly. Installing it too flat can cause sagging and water collection. Using weak hardware can lead to rust, movement, or failure. Mounting it to non-structural surfaces can damage your property. And ignoring the sun’s path can result in a beautiful sail that shades absolutely nothing you care about.
Another common mistake is expecting a breathable HDPE shade sail to be waterproof. It is not. It will reduce some rain impact, but water can pass through the mesh. If rain protection is your main goal, choose a waterproof model and install it with a strong slope.
Are Ready Made Shade Sails Worth It?
For many homeowners, yes. Ready made shade sails are affordable, attractive, and flexible. They can make outdoor spaces more usable without requiring a full pergola, patio cover, or permanent roof. They are especially valuable in sunny climates, urban patios, pool areas, and backyards where natural tree shade is limited.
However, they work best when expectations are realistic. A ready made shade sail is not the same as a fully engineered commercial canopy. It will not replace building permits where required, structural design for large spans, or professional installation in high-wind locations. But for everyday residential shade, a well-chosen sail can deliver a big comfort upgrade for a relatively modest investment.
Real-World Experiences With Ready Made Shade Sails
After working with ready made shade sails in typical home settings, one thing becomes obvious: the product is simple, but the planning makes or breaks the result. The most successful installations usually start with a homeowner standing outside at different times of day, coffee in hand, studying where the sun actually lands. It sounds almost too basic, but this step prevents the classic mistake of installing a beautiful shade sail over yesterday’s shade instead of today’s heat.
One common experience is that triangle shade sails look fantastic but cover less space than expected. A 12-foot triangle may sound large in the box, but once you account for curved edges, mounting gaps, and the sun angle, the shaded area can feel smaller. This does not mean triangle sails are bad. They are stylish, affordable, and great for accent shade. But if the goal is to cover a dining table for six, a rectangle or overlapping sail layout often performs better.
Another lesson comes from hardware. Many people focus entirely on the fabric and treat the hardware like an afterthought. That is a mistake. A budget sail with good stainless steel hardware often performs better than a nicer sail attached with weak clips, undersized screws, or questionable anchors. Turnbuckles are especially useful because they allow small adjustments after the fabric stretches slightly. Without proper tension, even a good sail can sag in the middle and flap during breezy weather.
Homeowners also quickly learn that shade sails are seasonal companions, not indestructible superheroes. In calm summer weather, a properly installed HDPE sail can feel like a backyard miracle. During a thunderstorm, high wind event, or snowstorm, that same sail can become a giant fabric wing. People who remove their sails before severe weather usually get more years of use. People who leave them up through every storm sometimes get an unplanned lesson in physics, carpentry, and regret.
Color choice is another practical experience worth mentioning. Light beige and sand shades blend beautifully with fences, stucco, wood decks, and neutral outdoor furniture. Charcoal and dark gray can look sleek and may feel more dramatic, especially with modern homes. However, very dark colors can visually dominate a small patio. Bright colors can be cheerful, but they may limit future furniture choices. In most residential spaces, neutral tones are the safest long-term bet.
Cleaning is usually easier than expected. A garden hose, mild soap, and soft brush can handle most dust and pollen. The bigger issue is placement near trees. Tree sap, berries, wet leaves, and bird activity can make a sail look tired faster. If the only good anchor points are near trees, the sail can still work, but expect more frequent cleaning.
The best experience comes when the shade sail feels intentional. That means the corners line up cleanly, the fabric is tight, the slope looks deliberate, and the shaded area matches how the family actually uses the yard. Add a dining table, outdoor rug, string lights nearby, or a few planters, and a simple ready made shade sail can make a basic patio feel like a finished outdoor room. Not bad for a piece of fabric with corners.
Conclusion
Ready made shade sails are a practical, stylish, and budget-friendly way to create cooler outdoor spaces. They work especially well over patios, decks, pools, gardens, driveways, and play areas where standard sizes can fit. The key is choosing the right material, measuring carefully, allowing space for tensioning hardware, using strong anchor points, and installing the sail with proper slope and tension.
Breathable HDPE shade sails are the most common choice for homeowners because they block significant UV exposure while allowing airflow. Waterproof shade sails can help with rain, but they require stronger installation planning and better drainage angles. Whether you choose a triangle, square, or rectangle, the best shade sail is the one that matches your space, climate, and daily routine.
Think of a ready made shade sail as a smart outdoor upgrade: part comfort feature, part design element, and part summer survival tool. Installed well, it can turn a blazing patio into a place where people actually want to sit, eat, read, laugh, and linger. Installed poorly, it may become the neighborhood’s most dramatic wind sock. Measure twice, anchor once, and let the shade do its quiet, beautiful work.