There are DIY projects that solve a problem. Then there are DIY projects that look at a perfectly manageable problem, put on safety glasses, open CAD software, and say, “Yes, but what if a robot did it?” That is the delightful spirit behind the “Unnecessary” automation of a DIY star lamp build: a project where the handmade charm of a glowing celestial lamp meets the wonderfully excessive logic of machines, jigs, stepper motors, drilling guides, LEDs, and just enough overengineering to make any maker grin like they found a coupon for aluminum extrusion.
At its core, a DIY star lamp is simple: take a sphere or shade, create small points of light, add illumination, and enjoy a tiny galaxy on your desk. But the automated version turns that dreamy little craft into a miniature production system. Instead of slowly drilling holes by hand and inserting fiber-like plastic strands one at a time, the machine can orient the sphere, drill a star point, insert the light-transmitting strand, glue it, and trim it. Is that necessary? Absolutely not. Is it fascinating? Completely.
This article explores why an automated DIY star lamp build is such a perfect maker project, how the lighting and automation pieces fit together, what design lessons it offers, and why “unnecessary” automation often teaches more than practical automation ever could.
What Is A DIY Star Lamp?
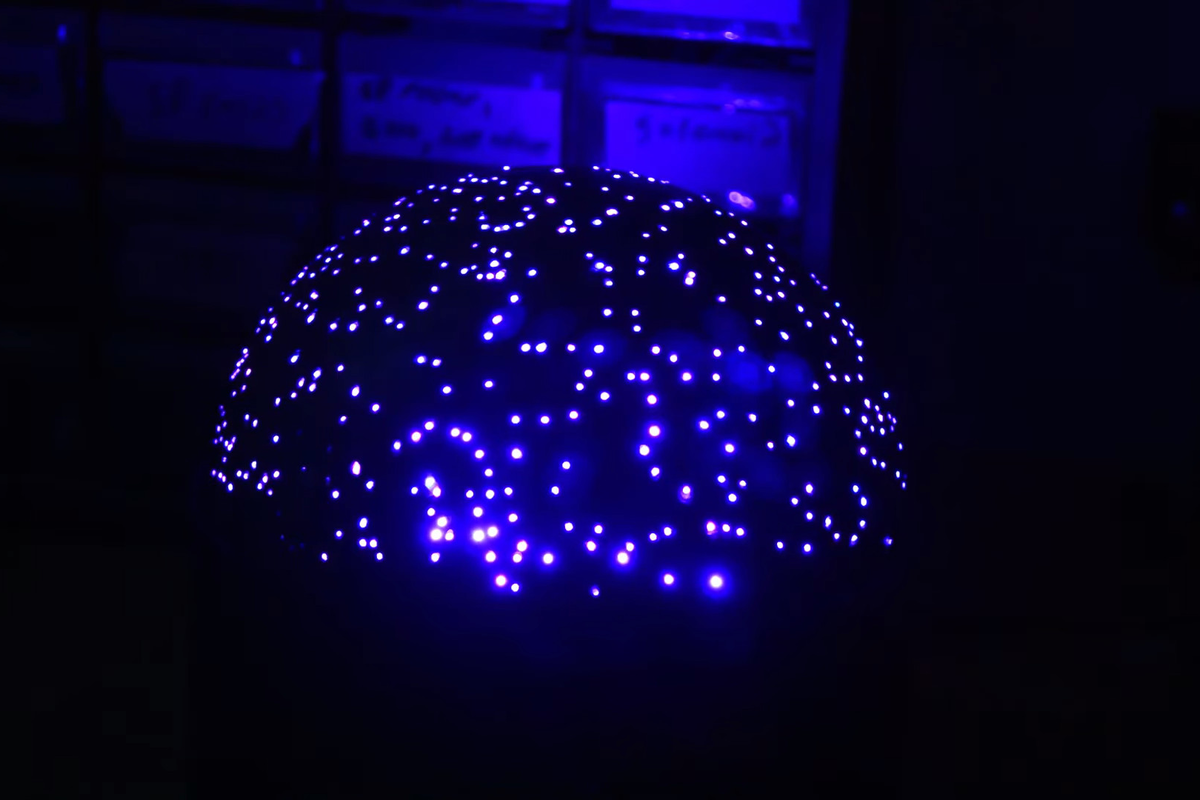
A DIY star lamp is a decorative light that mimics the appearance of stars, constellations, or a glowing night sky. Some versions use punched holes in a lampshade. Others use fiber-optic strands, addressable LEDs, laser-cut panels, or translucent materials that scatter light. The goal is usually the same: create a soft, magical glow that turns a room into a planetarium without requiring a telescope, a camping trip, or a suspicious amount of optimism about the weather.
The most charming versions are built around a sphere. The spherical shape makes the object feel like a tiny moon, planet, or celestial globe. When light shines from inside, every drilled hole or fiber end becomes a star. Add dimming, warm-white LEDs, color changes, or a slow breathing effect, and the lamp stops being just a lamp. It becomes a mood. Specifically, the mood of someone who says, “I made this,” and then casually waits for compliments.
Why Automate A Handmade Star Lamp?
The obvious answer is repeatability. A star lamp with hundreds or even a thousand points of light requires a lot of repetitive work. Drilling a few holes is fun. Drilling the 243rd hole is when you begin negotiating with the universe. Automating the process reduces hand fatigue, keeps placement more consistent, and can make a complex star pattern easier to reproduce.
But the more honest answer is curiosity. Makers automate things because automation reveals hidden problems. A human hand can adapt instantly when a drill bit slips, a surface curves unexpectedly, or glue behaves like it has personal issues. A machine cannot “just feel it out.” It needs fixtures, alignment, calibration, timing, and instructions. That is what makes this kind of project so educational.
In a star lamp build, automation can touch almost every step: positioning the globe, reading or following a star map, drilling at the correct angle, feeding a plastic fiber or wire into the hole, applying UV-curing adhesive, curing the glue, trimming the excess, and checking the final result. Suddenly, a cute lamp becomes a compact lesson in robotics, mechanical design, lighting design, and process engineering.
The Core Idea: From Star Map To Physical Lamp
A strong DIY star lamp starts with the star pattern. Some builders choose a decorative random pattern because it looks natural and forgiving. Others use a real star map, plotting recognizable constellations or the night sky from a specific date and location. Using real astronomical data can make the lamp feel more personal, especially for birthdays, anniversaries, or the night someone first realized they owned too many microcontrollers.
For a more accurate star lamp, the builder can begin with a star chart or exported sky map. Brighter stars can be represented by larger holes, thicker fiber strands, or brighter LEDs. Dimmer stars can be smaller and subtler. This creates depth and prevents the final lamp from looking like a colander with ambition.
Star Brightness Matters
In the real night sky, stars vary dramatically in apparent brightness. A good lamp design borrows that principle. If every star is the same size and brightness, the effect can look flat. By varying hole diameters or fiber sizes, the lamp gains visual rhythm. Major constellation stars stand out, while background stars create atmosphere.
Constellations Add Story
Constellations give viewers something to recognize. Orion, Ursa Major, Cassiopeia, Scorpius, and Cygnus can instantly make the lamp feel intentional. Even if the lamp is not scientifically perfect, recognizable patterns help the eye understand that this is a star field, not a tragic incident involving a drill press.
How The Automation Works
The automated star lamp concept is impressive because it combines multiple small operations into one repeatable workflow. A machine must hold a round object, rotate it accurately, bring a tool to the right location, perform the operation, and move on to the next star point. That sounds simple until you remember that spheres are basically the pranksters of geometry. They roll, shift, resist clamping, and make flat reference surfaces feel emotionally unavailable.
A practical automation system may use a rotary stage or multi-axis fixture to orient the sphere. Stepper motors can control rotation with repeatable increments. A drill carriage moves toward the surface. A feed mechanism inserts the plastic strand or fiber. A small UV light cures adhesive. A trimming blade or cutter finishes the point. Each task is small, but sequencing them reliably is the real challenge.
Step 1: Orient The Sphere
The machine needs to rotate the lamp body so each star position faces the tool head. This can be done with a motorized cradle, a two-axis gimbal, or a jig that indexes the sphere. Accuracy matters because even tiny errors become obvious when many points are arranged into constellations.
Step 2: Drill The Star Hole
Drilling creates the path for light. The hole must be clean enough to accept a fiber or translucent insert, but not so large that the lamp looks messy. A controlled drill feed helps reduce wobble and keeps the depth consistent.
Step 3: Insert The Fiber Or Plastic Strand
Fiber-optic strands or clear plastic pieces can transmit light from inside the lamp to the outside surface. Feeding them automatically is tricky because thin flexible materials bend, snag, and generally behave like cooked spaghetti with an engineering degree.
Step 4: Glue And Cure
UV-curing glue is useful because it can set quickly when exposed to ultraviolet light. That makes it attractive for automation: apply the adhesive, trigger the UV source, wait briefly, and move to the next star. The advantage is speed and control. The downside is that glue still loves to go where it was not invited.
Step 5: Trim The End
After insertion and curing, the extra fiber or plastic needs trimming. A clean cut improves the lamp’s finish and helps each star point look intentional. This final step is the difference between “handcrafted celestial sculpture” and “hedgehog found in a craft drawer.”
Lighting Choices For A DIY Star Lamp
The internal lighting system determines the mood of the lamp. The simplest option is a warm-white LED bulb or LED puck placed inside the sphere. This creates a cozy glow and works beautifully for a decorative lamp. For more control, addressable LEDs such as WS2812-style strips or APA102-style LEDs allow individual color changes, animated effects, and programmable brightness.
Addressable LEDs are popular in maker projects because a microcontroller can control color and brightness with software. That means the lamp can slowly fade from deep blue to soft white, simulate twinkling, or shift into a sunrise mode. The important detail is power. LED strips can draw more current than beginners expect, especially when many LEDs are set to bright white. A stable 5V power supply, proper wiring, and conservative brightness limits can make the difference between a reliable lamp and a tiny indoor lightning experiment.
Warm White Looks More Celestial
RGB effects are fun, but warm white often feels more elegant. A star lamp does not need to look like a gaming keyboard unless that is the goal. Warm-white LEDs create a softer, more realistic night-sky impression, especially when paired with a dimming curve.
Addressable LEDs Add Personality
If the lamp uses addressable LEDs, each region can behave differently. One constellation can gently pulse. A meteor effect can sweep across the globe. The lamp can shift colors based on time of day, music, or a smart-home trigger. This is where the project becomes “unnecessary” in the best possible way.
Microcontrollers: The Brain Behind The Glow
A DIY automated star lamp can use several common controller options. An Arduino board is excellent for simple LED fading, button controls, and basic motor control. An ESP32 is useful when Wi-Fi, Bluetooth, or smart-home integration is desired. A Raspberry Pi Pico is affordable and capable for PWM dimming, sensor input, and precise timing. The best choice depends on whether the lamp only needs beautiful light or wants to become the most dramatic object on the nightstand.
PWM, or pulse-width modulation, is especially important for dimming. Instead of lowering voltage in a simple analog way, PWM rapidly switches output on and off. The LED appears dimmer or brighter depending on the duty cycle. This is how many microcontroller projects create smooth fade effects. For a star lamp, PWM can create a breathing glow, a slow nighttime fade, or a twinkle pattern that does not look like a broken holiday decoration.
Smart Home Integration: Because The Stars Need Wi-Fi
Once the lamp has a microcontroller, smart-home features become tempting. With ESPHome or similar firmware, a DIY lamp can appear in a Home Assistant dashboard as a controllable light. That means brightness, color, transitions, effects, schedules, and automations can be handled from a phone or voice assistant.
Is it necessary for a star lamp to know when sunset happens? No. Is it delightful when it automatically turns on at dusk, fades to a deep blue at bedtime, and gently dims after midnight? Yes. This is exactly the kind of harmless overengineering that makes a home feel personal.
Useful Automation Ideas
A star lamp can turn on at sunset, dim gradually before bedtime, pulse softly as a reading light, or switch to a very low night-light mode after a certain hour. It can also run a “constellation mode” where only selected star groups brighten. If the lamp is built for a child’s room, a simple timer can prevent it from staying bright all night.
Safety And Build Quality
DIY lighting projects should stay friendly, low-voltage, and well-ventilated. A 5V or 12V LED system is typically more approachable than working directly with mains voltage. Use a quality power supply with enough current headroom, keep wiring neat, add strain relief where cords enter the enclosure, and avoid trapping heat inside a sealed globe. LEDs are efficient, but they still produce heat, especially in dense strips or high-brightness installations.
For addressable LEDs, many maker guides recommend planning power carefully, using appropriate wire thickness, and protecting LED strips from sudden current spikes with best-practice components. The exact parts depend on the LED type and total current draw, but the principle is simple: do not ask a tiny microcontroller pin to power a whole galaxy. It has hopes and dreams, but not that many amps.
Design Lessons From “Unnecessary” Automation
The beauty of this project is that it teaches serious lessons through a playful object. First, automation is not only about speed. It is about repeatability. A human can make one beautiful lamp by hand. A machine can make the same operation consistent across hundreds of stars.
Second, fixture design matters. In many automated builds, the tool is not the hardest part. Holding the workpiece is. A star lamp sphere needs careful support so it can rotate without wobbling. If the fixture is poor, every later step suffers.
Third, software and hardware must cooperate. The code can command perfect motion, but belts stretch, glue strings, drill bits wander, and plastic fibers bend. A great DIY automation project respects the physical world instead of pretending everything is a clean simulation.
Finally, unnecessary automation is a fantastic way to learn because the stakes are low. If the lamp fails, nobody’s factory shuts down. The builder gains experience with motion control, lighting, tolerances, wiring, calibration, and debugging. The final object is useful, but the real prize is the skill earned along the way.
How To Make The Lamp Feel Premium
A star lamp can easily drift from magical to messy, so finishing details matter. Sand the sphere smoothly before assembly. Choose a matte exterior finish to reduce glare. Use warm interior lighting unless color effects are part of the design. Keep the base simple and heavy enough to prevent tipping. Hide screws and wires where possible. Add a physical button even if the lamp is smart-home enabled, because nothing says “bad user experience” like needing an app to turn off a lamp two feet away.
The star pattern should also have breathing room. More stars are not always better. A dense field can look impressive, but a few intentional constellations surrounded by subtle background points may feel more elegant. The eye appreciates contrast. So does the person who has to drill all those holes.
Common Mistakes In DIY Star Lamp Builds
One common mistake is making the lamp too bright. A star lamp should glow, not interrogate the furniture. Start with lower brightness and increase only if needed. Another mistake is ignoring heat. Even low-voltage LEDs can warm a closed enclosure. Ventilation slots, aluminum backing, or lower brightness settings can help.
A third mistake is using random star placement without visual hierarchy. Randomness sounds easy, but real-looking randomness takes care. Include clusters, empty regions, varied brightness, and a few recognizable shapes. Otherwise, the lamp can look like a sneeze rendered in light.
Finally, many builders underestimate cable management. A gorgeous lamp with a chaotic wire nest inside is still a gorgeous lamp, but future troubleshooting will feel like archaeology. Label connections, leave service loops, and design the base so it can be opened without destroying the project.
Experience Notes: What Building An Automated Star Lamp Teaches You
The first experience most builders have with a DIY star lamp is surprise. On paper, it looks like a decorative project. In practice, it becomes a systems project. The sphere affects drilling. Drilling affects fiber insertion. Fiber length affects brightness. Glue affects optical clarity. Internal LED placement affects which stars glow evenly. One small decision taps another on the shoulder and says, “Congratulations, we are now a team.”
The second lesson is patience. A hand-built star lamp rewards slow work, but an automated star lamp rewards slow setup. You spend time adjusting the fixture, checking tool alignment, testing feed tension, and making sure the machine repeats the same motion without slowly drifting into chaos. It can feel silly to spend hours automating a task that could have been done by hand, but that is the point. The project changes from “make a lamp” to “make a lamp-making process.”
A useful experience is to prototype with fewer stars. Instead of jumping straight to a thousand points, test with twenty. Drill a small test pattern. Insert fibers. Try the glue. Light it from inside. Look at it in a dark room. This quick test reveals problems that no spreadsheet will confess. Maybe the holes are too large. Maybe the fiber ends are cloudy. Maybe the LEDs create hotspots. Maybe the globe material blocks more light than expected. Better to learn that after twenty stars than after five hundred, when your optimism has packed a suitcase.
Another practical experience is learning that perfect accuracy is not always necessary. A scientific star map sounds impressive, but the viewer mostly notices the overall effect. Recognizable constellations, varied brightness, and smooth lighting matter more than microscopic positional perfection. This is liberating. It means the automation should support the beauty of the lamp, not turn the project into a stress test for celestial cartography.
The most satisfying moment comes when the lamp finally turns on. Even a rough prototype can feel magical. The tiny points of light appear, the room softens, and suddenly the hours spent debugging a feeder mechanism seem reasonable. Mostly. The machine may be unnecessary, but the feeling is not. There is real joy in building something that combines craft, code, mechanics, and atmosphere into one glowing object.
If you build your own version, document the process. Take photos of the fixture, failed tests, wiring layout, and final glow. Future you will appreciate it, especially when one LED connection acts suspicious six months later. More importantly, the documentation becomes part of the project’s charm. A star lamp is beautiful; an automated star lamp with a build story is better. It proves that making is not only about the final object. It is about the strange, funny, occasionally stubborn path that gets you there.
Conclusion
The “Unnecessary” automation of a DIY star lamp build is a perfect example of why maker culture is so entertaining and valuable. It takes a simple decorative idea and stretches it into a complete engineering challenge. The result is not just a lamp. It is a conversation piece, a robotics exercise, a lighting experiment, and a tiny artificial night sky rolled into one.
For beginners, the project offers inspiration: start with a simple star lamp, learn LED basics, and add automation only where it makes the build more fun. For experienced makers, it is an invitation to go gloriously overboard. Add motorized positioning. Add smart-home control. Add real constellations. Add a sunrise mode. Add a button labeled “Deploy The Cosmos” if your household will tolerate it.
Unnecessary automation is not pointless. It is playful practice. It teaches precision, sequencing, wiring, software, mechanical design, and patience while producing something genuinely beautiful. And unlike many overly complicated projects, this one ends with a glowing star field. That is a pretty good reward for letting a robot help make a lamp.
Note: This article is intended for a low-voltage DIY lighting project. Always follow component ratings, manufacturer instructions, and basic workshop safety practices when drilling, soldering, gluing, or powering LEDs.