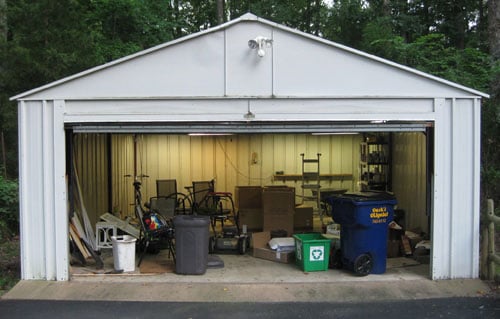
There comes a moment in every homeowner’s life when the garage stops being a garage and becomes a mysterious storage cave with a roll-up door. One day you are placing a rake neatly in the corner. The next day, you are stepping over holiday bins, mystery cords, half-empty paint cans, three lonely tennis balls, and a bicycle pump that has somehow become the emotional center of the room.
So yes, we are taking on some major garage cleaning this weekend. And honestly? It is about time. A clean garage is not just about making the space look nice for the neighbors when the door opens at exactly the wrong moment. It is about reclaiming square footage, improving home safety, finding things when you need them, and maybejust maybeparking a car in the place designed for parking cars. Wild concept, we know.
This guide walks through a practical weekend garage cleaning plan that feels doable, not dramatic. We will cover decluttering, sorting, deep cleaning, smart garage organization ideas, safe disposal, storage zones, and the small habits that keep the clutter from sneaking back in wearing a fake mustache.
Why a Weekend Garage Cleanout Is Worth the Effort
A garage cleanout can feel like a big project because, well, it is. Garages collect the things we do not want inside the house but are not ready to let go of. Tools, seasonal decorations, sports gear, lawn equipment, cleaning supplies, leftover renovation materials, and “I might use this someday” objects all gather in one place like they are attending a clutter convention.
But the benefits are immediate. A clean garage gives you more usable space, reduces tripping hazards, protects your belongings from moisture and pests, and makes daily routines easier. When everything has a home, you stop buying duplicates because you could not find the first one. That means fewer extra screwdrivers, fewer mystery extension cords, and fewer moments of standing in the aisle at the hardware store whispering, “Do I already own this?”
Even better, organizing the garage can make the rest of the house feel calmer. Items that belong in the garage stay there properly. Items that do not belong there finally leave. And the garage stops being the place where good intentions go to collect dust.
Start With a Clear Weekend Plan
The best way to clean a garage is not to wander in with a broom and a vague sense of guilt. That is how people end up rearranging clutter instead of removing it. Before touching a single bin, decide what success looks like.
Choose Your Main Goal
Do you want to park one car inside? Create a home gym corner? Build a tool station? Make room for bikes and sports gear? Store seasonal decorations without needing a treasure map? Your goal will shape every decision.
For example, if parking a car is the priority, the center floor area must stay clear. If your garage doubles as a workshop, tools should be accessible while bulky seasonal items move higher or farther back. A clear goal keeps the project from turning into a twelve-hour debate about whether the inflatable snowman deserves premium shelf space.
Gather Supplies Before You Begin
Before the garage cleanout starts, collect trash bags, heavy-duty contractor bags, boxes for donations, labels, markers, gloves, a broom, dustpan, shop vacuum, microfiber cloths, storage bins, and basic cleaning spray. If you have shelves, hooks, pegboard, or wall-mounted racks ready to install, even better.
Also set up four sorting zones: keep, donate, sell, and toss. Add a fifth zone for hazardous waste, such as old paint, pesticides, solvents, motor oil, certain batteries, and cleaning chemicals that should not go into regular trash. This separate category is important because safe disposal protects your home, sanitation workers, and the environment.
Step 1: Pull Everything OutYes, Everything
Garage cleaning works best when you can see what you actually own. Pull items out into the driveway or another open area if weather allows. This step may look terrifying at first, like your garage sneezed all over the pavement, but it is the fastest way to understand the full situation.
As items come out, group similar things together: tools with tools, sports gear with sports gear, gardening supplies with gardening supplies, holiday décor with holiday décor, car care products with car care products, and so on. Grouping helps you spot duplicates quickly. You may discover you own six hammers, four partial bags of potting soil, and enough extension cords to power a small parade.
Be honest during this phase. If an item is broken, expired, unsafe, outgrown, or unused for years, it probably does not deserve another decade of garage rent. The goal is not to throw away everything. The goal is to keep what supports your real life now.
Step 2: Declutter With Simple Rules
Decluttering the garage gets easier when you use decision rules instead of relying on feelings. Feelings are how we end up keeping cracked flowerpots because “they have potential.”
Keep Items You Use, Need, or Truly Value
Keep tools you use regularly, working equipment, current sports gear, seasonal items you actually display, and supplies for hobbies you still enjoy. If an item has a clear purpose and a practical home, it stays.
Donate Items in Good Condition
Donate duplicate tools, usable furniture, working small appliances, extra gardening supplies, and sports gear your family has outgrown. Donation is ideal for items that still have life left but no longer fit your needs. The garage gets lighter, and someone else gets a useful item. Everybody wins, except the dust bunnies.
Sell Higher-Value Items
If you have exercise equipment, power tools, bikes, shelving, or hobby gear in good condition, consider selling it. However, give yourself a deadline. If it is not listed within a week, it may need to become a donation. Otherwise, “sell pile” becomes “new clutter pile with ambition.”
Toss Broken, Unsafe, or Unusable Items
Broken plastic bins, cracked hoses, dried-out caulk, rusty hardware with no purpose, torn tarps, and mystery parts from furniture you no longer own can usually go. If you cannot identify it, use it, repair it, or safely donate it, it is probably not a family heirloom.
Step 3: Handle Hazardous Garage Items Safely
Garages often contain products that require special care. Paint, solvents, fuels, pesticides, certain cleaners, motor oil, automotive fluids, and some batteries may be considered household hazardous waste. These items should be stored and disposed of according to local rules, not poured down drains or tossed casually into household trash.
Check your city or county website for household hazardous waste drop-off days, recycling centers, or special collection events. Keep products in original containers when possible, with labels intact. Do not mix chemicals together. Wear gloves when handling old containers, especially if they are leaking, rusty, or sticky in a way that feels scientifically suspicious.
Fire safety matters, too. Flammable liquids and combustible items should be stored carefully, away from appliances, heat sources, and anything that could spark. If you have gasoline, propane, varnish, or similar products, review local storage recommendations and consider whether they belong in a detached shed instead of an attached garage.
Step 4: Deep Clean the Empty Garage
Once the garage is empty or mostly empty, take advantage of the rare opportunity to clean surfaces that have not seen daylight since the last time someone said, “We should really clean the garage.”
Sweep From Top to Bottom
Start high. Knock down cobwebs from corners, ceiling edges, shelves, and garage door tracks. Dust light fixtures and wipe down accessible surfaces. Then sweep or vacuum the floor. A shop vacuum is especially helpful for sawdust, leaves, sand, and the little gravel bits that somehow appear even if you do not live near gravel.
Clean the Floor
For general dirt, sweep thoroughly and mop with a suitable cleaner. For oil spots, use an absorbent material or a concrete-safe cleaner designed for garage floors. Always follow product instructions and ventilate the space. If the floor has cracks or moisture issues, make a note to address them later. Cleaning day is also inspection day.
Check for Moisture and Pests
Look for signs of water intrusion, mold, mildew, droppings, gnaw marks, or damaged cardboard. Garages are vulnerable to moisture and pests, especially when items sit directly on the floor. Replace cardboard storage with latching plastic bins where appropriate, and keep stored goods off the ground whenever possible.
Step 5: Create Garage Zones That Make Sense
A clean garage stays clean when it is organized by zones. Zones make it obvious where items belong, which means future cleanup takes minutes instead of a full emotional reset.
Tool Zone
Set up tools near a workbench, pegboard, cabinet, or wall-mounted system. Group hand tools, power tools, fasteners, measuring tools, and safety gear. Use small drawers, labeled containers, magnetic strips, or pegboard hooks to keep items visible. The best tool system is the one you can maintain when you are tired and holding a screwdriver in your teeth.
Lawn and Garden Zone
Store rakes, shovels, hoses, soil, planters, gloves, and lawn products together. Long-handled tools work well on wall hooks or rack systems. Keep sharp or heavy items secure, especially if kids or pets have access to the garage.
Sports and Recreation Zone
Balls, helmets, scooters, skates, camping gear, and beach supplies need easy-access storage. Use bins, baskets, wall hooks, or ball racks. If children use the items, keep them low enough to reach safely so they do not scale the shelving like tiny adventure climbers.
Seasonal Décor Zone
Holiday decorations, patio cushions, and off-season items can go higher or farther back because they are not needed every week. Clear, labeled bins are ideal. Label each bin by holiday or season, not with mysterious phrases like “misc.” Misc is not a category. Misc is where organization goes to nap.
Automotive Zone
Car cleaning supplies, tire gauges, windshield fluid, jumper cables, and other vehicle-related items should live together. Keep liquids upright in a tray or bin to contain leaks. Store anything hazardous according to label directions and local safety guidelines.
Step 6: Use Vertical Storage Like a Genius
If the garage floor is crowded, look up. Walls and ceilings are prime storage real estate. Vertical garage storage helps keep pathways clear and protects belongings from moisture, pests, and accidental tire encounters.
Wall-mounted shelves are great for bins and supplies. Pegboards work well for hand tools and small accessories. Heavy-duty hooks can hold bikes, ladders, folding chairs, hoses, and yard tools. Ceiling racks can store lightweight seasonal items, but they must be installed correctly and used within weight limits.
Before buying storage products, measure your space. Measure shelf depth, wall height, door clearance, car clearance, and the size of bins you plan to use. Nothing ruins an organizing mood faster than discovering your new storage rack blocks the garage door from opening. That is not organization. That is a sitcom plot.
Step 7: Choose Better Containers
Cardboard boxes are cheap and convenient, but garages can be rough on them. Moisture, pests, temperature swings, and heavy stacking can turn cardboard into a sad, sagging mess. For long-term garage storage, sturdy plastic bins with secure lids are usually better.
Use clear bins when visibility matters and opaque bins when the contents are not pretty but still necessary. Either way, label everything. A label should be specific enough to help future you. “Holiday lights,” “camping cookware,” “bike repair,” and “garden gloves” are useful. “Stuff” is not.
For small items like screws, nails, washers, zip ties, and picture hangers, use divided organizers, jars, small drawers, or clear containers. Tiny hardware has a special talent for spreading everywhere and making you believe you are living inside a junk drawer.
Step 8: Put Items Back With Accessibility in Mind
As you return items to the garage, think in terms of frequency. Everyday or weekly items should be easiest to reach. Monthly items can go on shelves. Seasonal items can go higher. Rarely used but necessary items can live in less accessible spots.
Keep heavy items low to reduce lifting risks. Store dangerous items out of reach of children. Avoid stacking unstable piles. Leave walkways clear. If you want to park a vehicle inside, mark the parking footprint before filling the space again. Painters tape on the floor can help define the no-clutter zone.
Also leave a small “landing zone” near the door for items that come and go frequently: reusable bags, outdoor shoes, umbrellas, dog-walking supplies, or sports equipment. A controlled drop zone prevents the entire garage from becoming one giant drop zone.
Common Garage Cleaning Mistakes to Avoid
Mistake 1: Buying Storage Before Decluttering
Buying bins before sorting is like buying luggage before deciding where you are going. Declutter first, then choose storage that fits what remains.
Mistake 2: Keeping Too Many Duplicates
One backup can be useful. Seven backups become clutter. Keep the best version of duplicate tools and donate the extras if they are safe and usable.
Mistake 3: Ignoring Safety
Old chemicals, overloaded outlets, blocked exits, unstable stacks, and flammable clutter can turn a messy garage into a risky one. Cleaning is not just cosmetic; it is preventive maintenance.
Mistake 4: Using Vague Labels
A bin labeled “garage” inside the garage is not helpful. Be specific. Future you deserves better.
Mistake 5: Forgetting Maintenance
A garage cleanout is not a once-in-a-lifetime event. Schedule a quick reset every season and a deeper declutter once or twice a year. Maintenance keeps the weekend project from becoming an annual expedition.
A Simple Weekend Garage Cleaning Schedule
Friday Evening: Prep and Plan
Gather supplies, check the weather, decide on your garage goals, and set up donation and trash zones. Move vehicles out and make sure you have enough space to sort.
Saturday Morning: Empty and Sort
Pull items out, group them by category, and make quick decisions. Keep the energy moving. If you pick up an item and stare at it for more than thirty seconds, place it in a “decide today” area and keep going.
Saturday Afternoon: Clean and Install Storage
Sweep, vacuum, wipe surfaces, clean the floor, and install shelves, hooks, pegboards, or racks. This is the moment when the garage starts looking less like a before photo and more like a place where responsible adults live.
Sunday Morning: Put Everything Back
Return items by zone. Label bins and shelves. Keep frequently used items accessible and seasonal items higher or farther back.
Sunday Afternoon: Remove the Evidence
Take donations to the car, schedule hazardous waste drop-off if needed, post sellable items online, and put trash where it belongs. Do not leave donation boxes in the garage for six months. That is not donating; that is relocating.
Real-Life Garage Cleaning Experience: What Actually Helps
Here is the honest truth about taking on major garage cleaning over a weekend: the hardest part is not sweeping, labeling, or carrying bins. The hardest part is making decisions. Every garage contains objects with tiny emotional hooks. There is the old cooler from family beach trips, the box of mismatched holiday decorations, the tool you bought for one project in 2017, and the sports equipment that represents a version of your life where everyone plays tennis every Saturday. Spoiler: nobody has touched the racket in four years.
One experience that helps is starting with the easiest category first. Trash is usually the easiest. Empty packaging, broken plastic parts, dried-out markers, cracked planters, torn bags, and unusable scraps can leave immediately. Once the obvious junk is gone, the garage feels less overwhelming. That small win builds momentum.
Another helpful trick is creating a “maybe, but not forever” box. This is for items you are unsure about but not ready to release. Label the box with a date and store it somewhere visible. If you do not open it within three to six months, you probably have your answer. This method works because it respects hesitation without letting indecision take over the garage.
During a big garage cleanout, it also becomes obvious that good storage is not about hiding everything. It is about making items easy to return. If putting something away requires moving three bins, climbing over a bike, and performing a small act of gymnastics, the system will fail. The best garage organization ideas are simple: hooks for things that hang, shelves for bins, drawers for small parts, and open zones for bulky gear.
Labels make a surprisingly big difference. At first, labeling may feel unnecessary. You know what is in the blue bin, right? Maybe today. But six months from now, that blue bin will join twelve other blue bins, and suddenly you are opening every container like a contestant on a very dusty game show. Label the front and, if bins are stacked, label the top too.
One of the best feelings after a garage cleaning weekend is discovering usable space you forgot you had. A clear wall can become bike storage. A messy corner can become a gardening station. A cluttered shelf can become a neat row of seasonal bins. The garage does not need to look like a magazine spread. It needs to function without making you sigh every time the door opens.
There is also a family benefit. When everyone knows where things belong, the garage stops depending on one person’s memory. Kids can return helmets to the sports zone. Adults can find tools without a search party. Holiday decorations can come down without unpacking camping gear by accident. A clean garage turns household storage from a guessing game into a simple routine.
And yes, the project may get messy before it gets better. Halfway through, you may wonder why you started. This is normal. Keep going. Put on music, take breaks, drink water, and celebrate visible progress. A garage cleanout is not about perfection. It is about creating a safer, cleaner, more useful space that supports the way you actually live.
Conclusion: Who’s With Us?
Taking on major garage cleaning this weekend may not sound glamorous, but it is one of the most satisfying home projects you can tackle. In just a couple of days, you can remove clutter, improve safety, protect your belongings, and turn the garage into a space that works instead of a space that quietly judges you every time you open the door.
Start with a clear goal. Pull everything out. Sort honestly. Dispose of hazardous items safely. Deep clean the space. Create zones. Use vertical storage. Label like your future sanity depends on it, because frankly, it might. By Sunday evening, your garage can feel less like a storage disaster and more like a hardworking part of your home.
So, we are in. Gloves on, bins ready, broom standing by like a loyal sidekick. Who is with us?