If winter had a mascot, it might be the snow globe: tiny, magical, and one good shake away from instant weather drama. The good news is you do not need a factory, a toy workshop, or the patience of a saint to make one. DIY snow globes are one of those rare crafts that feel fancy but are actually very doable, even if your usual crafting style is “hot glue first, ask questions later.”
In this guide, you will learn how to make homemade snow globes step by step, plus 15 creative ideas you can customize for holidays, gifts, kids’ crafts, home decor, and winter centerpieces. Whether you want a classic mason jar snow globe, a family photo snow globe, a waterless version, or something a little quirky and modern, this list has enough inspiration to keep your glitter budget working overtime.
What You Need to Make a Homemade Snow Globe
The beauty of a DIY snow globe is that the supply list is surprisingly simple. Most versions start with a clear container, a miniature scene, glitter or faux snow, and a way to seal everything securely.
- Glass jar, mason jar, plastic ornament, or recycled clear container
- Mini figurines, bottle brush trees, laminated photos, or tiny decorations
- Distilled water for liquid snow globes
- Glycerin to help the glitter fall more slowly
- Glitter, faux snow, or tiny confetti flakes
- Waterproof glue, epoxy, or strong craft adhesive
- Paint, ribbon, twine, or labels for finishing touches
One small but important detail: choose decorations that can handle moisture if you are making a water-filled globe. Plastic, ceramic, resin, and laminated paper usually behave better than cardboard, untreated paper, or anything that looks like it would cry the second it meets water.
How to Make Homemade Snow Globes: The Basic Method
Step 1: Build Your Tiny Scene
Glue your figurine, tree, or mini display onto the inside of the jar lid. Let it dry completely before moving on. This is not the moment to test whether “mostly dry” is good enough. It is not.
Step 2: Fill the Jar
Add distilled water to the jar, leaving a little space at the top. Stir in a few drops of glycerin, then add glitter or faux snow. Start small. A snow globe should look magical, not like a craft store exploded inside a pickle jar.
Step 3: Seal It Well
Run waterproof adhesive around the lid edge, then screw the jar shut. Give it enough drying time before flipping it over. If you skip this step, your “winter wonderland” can become “kitchen counter flood with sparkle.”
Step 4: Flip, Shake, Admire
Once sealed, turn the jar over and give it a shake. If the glitter falls too fast, add a touch more glycerin next time. If it barely moves, you got a little too enthusiastic. Congratulations, you made a blizzard in slow motion.
15 DIY Snow Globe Ideas to Make at Home
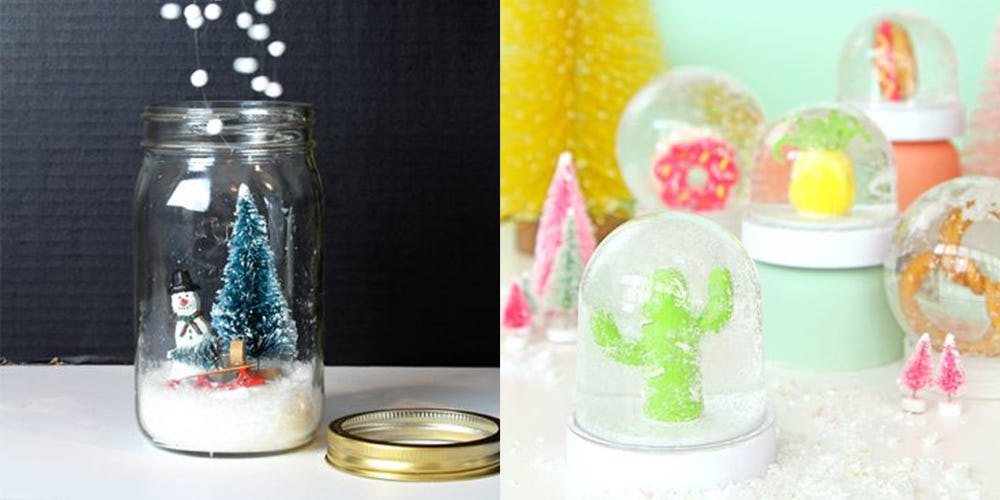
1. Classic Mason Jar Snow Globe
This is the timeless version and the best starting point for beginners. Use a mason jar, a bottle brush tree, and one tiny figurine like a deer, snowman, or little house. It looks charming on a mantel, bookshelf, or holiday table. If you are searching for an easy DIY snow globe tutorial, this is the one that says, “Relax, I got you.”
2. Family Photo Snow Globe
For a personalized homemade snow globe, laminate a family photo and attach it inside the jar with mini trees or a simple snowy backdrop. This makes a thoughtful holiday gift for grandparents, parents, or anyone who enjoys decor that doubles as a memory. Bonus: it is sentimental without requiring interpretive dance or a handwritten poem.
3. Woodland Animal Snow Globe
Mini foxes, owls, deer, squirrels, and mushrooms create a cozy forest scene with major storybook energy. Add faux moss, tiny branches, and a dusting of glitter for a rustic winter look. This DIY snow globe idea works especially well with neutral holiday decor and farmhouse-style interiors.
4. Mini Tree Farm Snow Globe
Group several bottle brush trees in different sizes to create a tiny snowy forest. This design looks fuller than a single-figurine globe and works beautifully for centerpieces. Add white glitter and maybe one small bench or lantern if you want the scene to look like the opening shot of a holiday movie where someone learns the true meaning of cocoa.
5. Recycled Jar Snow Globe
Do not underestimate the power of an empty pasta sauce jar. Clean it well, remove the label, and turn it into a budget-friendly snow globe. Recycled DIY projects are practical, eco-conscious, and surprisingly cute. This is a great option if you want to make several homemade snow globes without spending a small fortune on matching containers.
6. Waterless Snow Globe
Not every snow globe needs liquid. In a waterless version, you place faux snow, glitter, mini trees, and decorations inside a clear jar or cloche-style container without adding water. It is lower mess, easier to store, and ideal for paper crafts or delicate decorations that would not survive a swim lesson.
7. Ornament Snow Globe
Use clear plastic ornaments or lightbulb-style ornament containers to make mini hanging snow globes for a Christmas tree. These are fun for kids, party favors, or handmade gift toppers. Small-scale crafts have a sneaky charm because they look impressively detailed while using about three inches of actual materials.
8. Kid-Friendly Plastic Cup Snow Globe
If glass and children in the same sentence make you nervous, try a plastic version. Clear cups, plastic domes, and lightweight decorations make this a safer kids’ craft. Let children decorate paper bases, sprinkle fake snow, and choose fun mini scenes. It is the kind of winter craft that keeps small hands busy and living room chaos almost manageable.
9. Farmhouse Snow Globe
Think tiny wreaths, neutral ribbon, evergreen sprigs, mini lanterns, and muted colors. A farmhouse-style DIY snow globe feels elegant without trying too hard. It is perfect for people who want holiday decor that whispers “cozy sophistication” instead of screaming “red glitter emergency.”
10. Vintage-Inspired Snow Globe
Use old-fashioned figurines, antique-style mini cars, retro houses, or weathered bottle brush trees for a nostalgic look. Paint the jar lid in gold, silver, or distressed white to complete the vintage feel. This style works beautifully for collectors and anyone who wants their homemade snow globe to look like it has a charming backstory.
11. Beach or Summer Snow Globe
Who says snow globes need actual snow themes? Try a summer globe with tiny flamingos, shells, succulents, cacti, or beach chairs. Use iridescent glitter, pale blue accents, or sand-colored fillers. This is a playful twist that feels fresh, modern, and slightly rebellious in the best possible way.
12. Pet-Themed Snow Globe
Create a mini version of your dog, cat, or favorite furry household ruler. Add a tiny bowl, a faux bed, or a winter scarf detail. Personalized pet crafts make fantastic gifts, especially for people who have 900 photos of their dog and only three of actual human relatives. No judgment. The dog earned it.
13. Holiday Village Snow Globe
Instead of one focal point, build a tiny village with two or three small houses, a tree, and maybe a little path. This design works best in a wider jar or a larger globe base. It feels more like a miniature scene than a simple craft, which makes it ideal for a holiday display table or festive shelf styling.
14. Monogram or Name Snow Globe
Add a wooden or acrylic letter inside the globe for a personalized decor piece. Surround it with snow, tiny trees, stars, or metallic glitter. This is a smart option for gifts, especially teacher gifts, hostess gifts, or stocking surprises. It feels custom and thoughtful without requiring the crafting stamina of a marathon runner.
15. Glitter Glam Snow Globe
If subtle is not your thing, lean all the way in. Use bold glitter, metallic trees, bright figurines, colorful ribbon, and a painted lid. This style is cheerful, modern, and unapologetically sparkly. It is basically the snow globe equivalent of arriving at a holiday party in sequins and saying, “Yes, I am the vibe.”
Tips for Better DIY Snow Globes
Use Distilled Water
Distilled water helps keep your homemade snow globe clearer over time. Tap water can work in a pinch, but if you want a cleaner look, distilled is the smarter move.
Do Not Overdo the Glitter
A little goes a long way. Too much glitter can cloud the water and hide your scene. The goal is “gentle snowfall,” not “craft tornado.”
Choose the Right Glue
Waterproof adhesive matters. If your figurine breaks loose, your peaceful winter cottage will start drifting around like it missed the last train home.
Test the Height Before Gluing
Always place the lid inside the jar first to make sure your decorations fit. Nothing humbles a crafter faster than building a perfect tiny scene that will not allow the jar to close.
Let Everything Dry Completely
Patience is part of the process. If you rush the drying time, leaks and floating decorations become much more likely. And yes, that tiny penguin will absolutely betray you if given the chance.
Why DIY Snow Globes Never Really Go Out of Style
DIY snow globes blend nostalgia, creativity, and personalization in a way few crafts can. They work as handmade gifts, family activities, holiday decorations, classroom crafts, and keepsakes. They also let you control the theme, color palette, and mood, whether you want classic Christmas charm, minimalist winter decor, or something delightfully weird like a cactus snow globe. In a world full of mass-produced decor, a handmade snow globe feels personal. It says, “I made this tiny magical universe myself,” which is objectively cooler than buying one off a shelf next to battery packs and discount candy.
Experiences and Lessons From Making DIY Snow Globes
There is a special kind of optimism that appears right before someone starts making homemade snow globes. It usually sounds like this: “This will be a quick little craft.” That confidence lasts right up until the glitter is on your sleeves, the tiny tree falls over for the third time, and somebody asks why the fake snow now looks like soup. And honestly, that is part of the charm.
One of the most memorable things about making DIY snow globes is how different each version feels in real life. A classic mason jar snow globe is calm and satisfying, almost meditative. You glue the figurine, pour the water, add the glitter, seal it up, and suddenly you have a tiny winter scene that feels much more magical than the sum of its parts. Then you try a photo snow globe, and the whole mood changes. It becomes more personal, more giftable, and somehow more emotional for a project built with a jar lid and a few drops of glycerin.
Another common experience is learning that scale is everything. Tiny decorations that looked perfect on the table can suddenly look giant once they are inside the jar. Or worse, they fit the width but not the height, which is a crafting tragedy so universal it practically deserves its own support group. Many people also discover that restraint is a real skill. At first, it is tempting to add more glitter, more snow, more trees, more ribbon, more sparkle, and maybe one tiny deer wearing a scarf for dramatic effect. But the best homemade snow globes usually come from editing, not piling on.
Making snow globes with kids is its own adventure. They love choosing the scene, shaking the finished globe, and turning the whole craft into a winter story. They are less interested in reasonable glitter amounts or careful lid sealing. That means the experience becomes less about perfection and more about fun, laughter, and accepting that one snow globe may look elegant while the next one looks like a snowstorm attacked a toy store. Both are valid. Both are memorable.
Adults tend to enjoy DIY snow globes for a different reason. The process is oddly calming. You focus on tiny details, work with your hands, and create something cheerful and tactile. It feels seasonal in a way that scrolling never will. A finished snow globe also has surprising staying power. Long after the craft session ends, it sits on a shelf quietly being adorable, reminding you that you made something with actual effort instead of just adding another item to an online cart.
Perhaps the best part of the experience is that snow globes invite repetition. After making one, you immediately start thinking of five more. A pet-themed globe for a friend. A neutral farmhouse version for the living room. Mini ornament globes for the tree. A playful summer version with a flamingo because winter decor is not the boss of you. The project grows with your creativity. That is why DIY snow globes remain such a beloved craft: they are simple enough to start, flexible enough to personalize, and charming enough to make you want to keep going. Also, they give glitter a respectable job for once.
Conclusion
If you have been wondering how to make homemade snow globes, the answer is refreshingly simple: start with a clear container, create a tiny scene, add your snow effect, seal it carefully, and let your imagination do the rest. From classic mason jar snow globes to personalized photo globes and waterless display versions, there is a DIY style for every home, budget, and holiday mood. Make one for yourself, make a few for gifts, and do not be surprised if this turns into your favorite winter craft tradition.