Fresh dill is one of those herbs that looks delicate, smells like sunshine got invited to a pickle party, and somehow wilts the moment you look away. One day it is fluffy, fragrant, and ready to crown your salmon, potatoes, cucumbers, eggs, soups, and sauces. The next day it is lying in the crisper drawer like a tiny green mop with trust issues.
The good news? You do not have to race against the clock every time you buy a bunch of dill or harvest it from the garden. With the right preservation method, fresh dill can keep its bright, grassy, lightly anise-like flavor for weeks or months. The trick is choosing the method that fits how you cook.
This guide focuses on three practical, home-friendly methods for preserving fresh dill: freezing, drying, and making dill-infused vinegar. Each method has its own personality. Freezing keeps dill closest to fresh. Drying saves pantry space and works beautifully for cooked dishes. Dill vinegar turns extra sprigs into a tangy flavor booster that can rescue salads, marinades, sauces, and pickles from a life of blandness.
Before we begin, one quick truth: dill is not basil in a feather boa. It is tender, fragile, and full of volatile flavor compounds that fade when exposed to heat, sunlight, air, and time. That means preservation is less about making dill immortal and more about slowing down its dramatic exit from the kitchen stage.
Why Fresh Dill Needs Special Care
Dill has fine, feathery leaves that lose moisture quickly. Unlike woody herbs such as rosemary or thyme, dill does not have sturdy leaves that can sit around looking smug for a week. Fresh dill is best used soon after harvesting or purchasing, but when you have more than you need, preserving it prevents waste and keeps that distinctive flavor available long after the bunch would normally fade.
The first rule is simple: start with the freshest dill you can find. Look for perky green fronds, firm stems, and a clean herbal aroma. Avoid bunches with yellow leaves, slimy spots, or a sour smell. If the dill already looks tired, preservation will not magically turn it into a garden goddess. It will simply preserve the tiredness, and nobody needs a jar of disappointment.
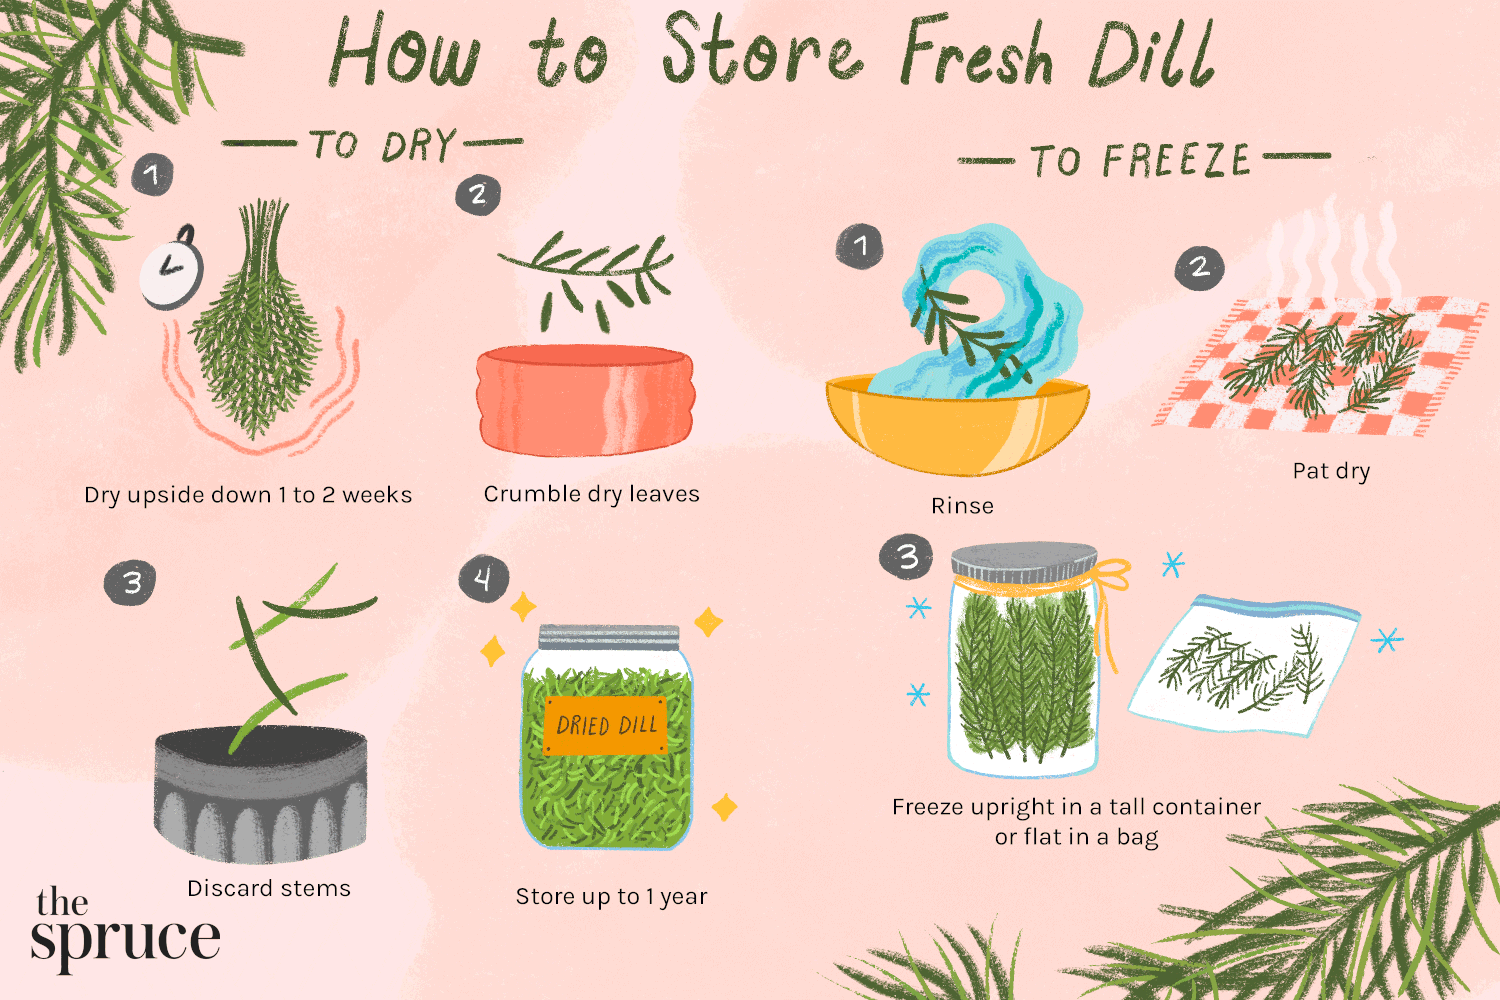
Wash and Dry Before Preserving
Before freezing, drying, or infusing dill, rinse it gently under cool water to remove dirt or grit. Then dry it thoroughly. A salad spinner works well, followed by patting with a clean towel or paper towel. Excess water can create ice crystals in the freezer, slow drying, or dilute vinegar infusions.
If the stems are thick or tough, you can separate the delicate fronds from the main stems. However, do not throw the stems away automatically. Dill stems can flavor soups, broths, pickle brines, roasted fish, and potatoes. They are not as pretty as the leaves, but they work hard behind the scenes, like the stage crew of flavor.
Method 1: Freeze Fresh Dill for the Best Fresh Flavor
Freezing is usually the best method for preserving the fresh flavor of dill. The texture changes after freezing, so thawed dill will not look like a garnish from a fancy brunch magazine. But the flavor stays bright enough for soups, stews, sauces, dips, eggs, roasted vegetables, seafood, and pickle recipes.
Frozen dill is especially useful because you can use it straight from the freezer. No thawing ceremony required. Just crumble, chop, or drop it directly into the dish. It will soften quickly as it meets heat, moisture, or dairy-based sauces.
Option A: Freeze Whole Dill Sprigs
This is the easiest freezer method and a great choice when you want flexibility.
- Rinse the dill gently and dry it very well.
- Remove any yellow or damaged fronds.
- Lay the sprigs in a single layer on a baking sheet for quick freezing.
- Freeze until firm, usually about one to two hours.
- Transfer the frozen sprigs to a labeled freezer bag or airtight freezer-safe container.
- Press out as much air as possible before sealing.
Flash-freezing the sprigs first keeps them from clumping together into one green iceberg. Later, you can grab a small amount instead of wrestling with a frozen dill brick while dinner quietly judges you.
Option B: Freeze Chopped Dill
If you often add dill to cooked dishes, chopped frozen dill is extremely convenient.
- Wash and dry the dill thoroughly.
- Strip the fronds from thicker stems.
- Chop the fronds finely with a sharp knife.
- Spoon the chopped dill into a freezer bag or small container.
- Flatten the bag into a thin layer before freezing.
Flattening the bag makes it easy to break off a pinch or tablespoon whenever you need it. This method is excellent for potato soup, chicken salad, tzatziki-style sauces, compound butter, seafood chowder, scrambled eggs, and roasted carrots.
Option C: Freeze Dill in Water or Oil Cubes
Dill cubes are perfect for soups, stews, sauces, and skillet meals. They are also a tiny gift to your future self, who may be standing over a pot of bland soup wondering where the joy went.
- Chop clean, dry dill.
- Place about one tablespoon of chopped dill into each compartment of an ice cube tray.
- Cover with water for soups and brines, or olive oil for sautés and sauces.
- Freeze until solid.
- Pop out the cubes and store them in a labeled freezer bag.
Use water-packed cubes for pickle brines, vegetable soup, chicken soup, and seafood chowder. Use oil-packed cubes for sautéed potatoes, roasted vegetables, pasta, omelets, and pan sauces.
Food safety note: herb-and-oil mixtures should stay frozen until use. Do not store fresh herbs in oil at room temperature. If you make dill oil cubes, keep them in the freezer and add them directly to cooking.
How Long Frozen Dill Lasts
For best flavor, use frozen dill within about six months. It may remain safe longer if continuously frozen, but the flavor becomes softer over time. Labeling the container with the date helps prevent mystery herb archaeology in the back of the freezer.
Method 2: Dry Fresh Dill for Pantry-Friendly Storage
Drying fresh dill is the classic low-tech preservation method. It saves freezer space, requires no special equipment, and gives you a shelf-stable herb that can be stored in a small jar. The trade-off is flavor. Dried dill is useful, but it does not taste exactly like fresh dill. Its flavor is milder and more delicate, so it shines best in cooked dishes, dressings, dips, and spice blends.
The key to drying dill successfully is gentle airflow and protection from direct sunlight. Sun drying may sound charming, like something from a farmhouse painting, but too much light and heat can weaken color and flavor. Dill prefers a calm, airy place where it can dry without being cooked.
Air-Drying Dill
Air-drying works best if your kitchen or pantry is warm, dry, and well ventilated.
- Rinse dill lightly only if needed, then dry it very well.
- Gather small bundles of stems. Keep bundles loose so air can circulate.
- Tie the stems with kitchen string.
- Hang the bundles upside down in a dark, dry, airy spot.
- Optionally cover each bundle with a paper bag punched with small holes to keep dust away.
- Check after several days. Dill is ready when the leaves feel dry and crumble easily.
Do not make large, dense bundles. If air cannot move through the dill, drying slows down and quality suffers. Small bundles dry more evenly and reduce the chance of moisture getting trapped inside.
Drying Dill on a Tray
If hanging bundles is not practical, spread dill fronds in a single layer on a clean towel, drying screen, or parchment-lined tray. Place the tray somewhere warm, dry, and away from direct sun. Turn the dill occasionally so it dries evenly.
This method is good for small harvests or store-bought bunches. It also avoids the “why is there a tiny forest hanging in your laundry room?” conversation with houseguests.
Using a Food Dehydrator
A food dehydrator gives more control, especially in humid climates. Arrange dill in a single layer on dehydrator trays and use a low herb-friendly temperature according to your dehydrator’s instructions. Check often because dill dries quickly. Over-drying can weaken the aroma.
How to Store Dried Dill
Once the dill is fully dry, crumble it lightly and store it in an airtight glass jar or spice container. Keep it in a cool, dry, dark cabinet. Heat, light, moisture, and air are the four villains of dried herbs. They do not wear capes, but they absolutely steal flavor.
For the best quality, use dried dill within six months to one year. To check whether it is still useful, crush a small pinch between your fingers and smell it. If the aroma is faint, add more to the recipe or replace it.
Best Uses for Dried Dill
Dried dill works well in:
- Ranch-style seasoning blends
- Potato salad dressing
- Greek yogurt dips
- Chicken soup
- Egg salad
- Roasted potatoes
- Homemade crackers or savory biscuits
- Fish rubs and marinades
As a general kitchen guideline, dried herbs are more concentrated by volume than fresh herbs, but dill is a little unusual because it can lose some of its bright flavor when dried. Start with a modest amount, taste, and adjust. Your taste buds are better than a rigid conversion chart.
Method 3: Preserve Dill in Vinegar for Big Flavor
Dill-infused vinegar is a smart way to preserve dill’s personality in liquid form. It is tangy, aromatic, and useful in far more than pickles. Think salad dressings, cucumber salads, marinades, deviled eggs, slaws, potato salad, quick pickled onions, roasted vegetables, and sauces for fish or chicken.
This method does not preserve dill as a leafy herb for sprinkling. Instead, it captures dill’s flavor in vinegar. If freezing is the method for cooks who want fresh-tasting dill, and drying is the method for pantry planners, dill vinegar is the method for people who like flavor shortcuts that make them look organized.
Choose the Right Vinegar
Use a food-grade vinegar with 5% acidity. Distilled white vinegar gives the cleanest pickle-style flavor. Apple cider vinegar adds fruitiness. White wine vinegar tastes softer and works beautifully in salad dressings. Rice vinegar can be pleasant too, though it is milder, so check the acidity label before using it for preservation-style infusions.
Basic Dill Vinegar Recipe
Here is a simple home method:
- Wash a clean glass jar and lid thoroughly.
- Rinse several fresh dill sprigs and dry them well.
- Lightly bruise the dill with the back of a spoon to release aroma.
- Place the dill in the jar.
- Heat vinegar just until warm, not boiling.
- Pour the vinegar over the dill, making sure the herbs are fully covered.
- Cover and store in the refrigerator while the flavor infuses.
- Taste after several days. Strain when the flavor is strong enough.
- Store the strained vinegar in a clean bottle or jar.
For a pint of vinegar, a few fresh dill sprigs are usually enough. You can add extras such as peppercorns, mustard seed, garlic, lemon peel, or a small dried chile, but keep the flavor balanced. Dill should be the star, not a background extra in its own movie.
How to Use Dill Vinegar
Dill vinegar is wonderful in a quick vinaigrette. Whisk one tablespoon of dill vinegar with three tablespoons of olive oil, a teaspoon of Dijon mustard, a little honey, salt, and black pepper. Pour it over cucumbers, greens, tomatoes, roasted beets, or warm potatoes.
You can also splash dill vinegar into mayonnaise-based salads to brighten them. A teaspoon or two can wake up tuna salad, egg salad, chicken salad, and potato salad. It adds that familiar dill-pickle energy without requiring you to chop pickles into every dish, though frankly, that is also a respectable lifestyle.
Important Safety Tips for Dill Vinegar
Use clean jars, clean herbs, and vinegar with proper acidity. Keep herbs fully submerged while infusing. If the vinegar becomes cloudy, moldy, fizzy, slimy, or smells unpleasant, discard it. Do not use random vinegar infusions as canning liquids unless you are following a tested canning recipe. Canning is not the place for creative improvisation. Save the jazz solos for dinner seasoning.
Which Dill Preservation Method Is Best?
The best method depends on how you plan to use dill later.
Choose Freezing If You Want Fresh Flavor
Freezing is the winner for flavor closest to fresh dill. Use it for soups, sauces, seafood, eggs, dips, pickles, roasted vegetables, and cooked dishes. The texture softens, so frozen dill is less ideal as a fresh garnish.
Choose Drying If You Want Shelf-Stable Convenience
Drying is excellent when you want a pantry herb that does not take freezer space. It is convenient for seasoning blends, dips, dressings, soups, and dry rubs. The flavor is more delicate than fresh or frozen dill, so taste as you cook.
Choose Dill Vinegar If You Love Tangy Flavor Boosters
Dill vinegar is ideal for salads, marinades, slaws, potato dishes, pickles, and creamy sauces. It will not replace fresh dill in every recipe, but it adds instant brightness with almost no effort.
Common Mistakes to Avoid When Preserving Fresh Dill
Preserving Wet Dill
Moisture is the enemy of quality. Wet dill freezes with more ice crystals, dries unevenly, and can dilute vinegar infusions. Always dry dill thoroughly after rinsing.
Using Old or Yellowing Dill
Preservation works best with fresh, fragrant dill. If the bunch is already yellow, slimy, or limp beyond repair, compost is the kinder ending.
Drying Dill in Direct Sunlight
Direct sunlight can reduce color and flavor. Dry dill in a shaded, airy place instead.
Forgetting to Label Containers
Always label frozen, dried, or infused dill with the date. Otherwise, three months from now, you may find a mysterious green thing and have to ask, “Is this dill, parsley, or evidence?”
Expecting Preserved Dill to Behave Like Fresh Garnish
Frozen and dried dill are best added to recipes, not displayed like fresh fronds on top of a finished dish. If presentation matters, buy or harvest a small amount of fresh dill for garnish and use your preserved dill for flavor.
Simple Recipe Ideas Using Preserved Dill
Frozen Dill Potato Soup
Add one or two frozen dill cubes to creamy potato soup during the final five minutes of cooking. Finish with black pepper and a spoonful of sour cream or Greek yogurt.
Dried Dill Yogurt Sauce
Mix Greek yogurt, dried dill, lemon juice, grated cucumber, garlic powder, salt, and pepper. Let it rest for fifteen minutes so the dried dill can hydrate and release flavor.
Dill Vinegar Cucumber Salad
Slice cucumbers thinly and toss them with dill vinegar, a little sugar or honey, salt, black pepper, and thinly sliced red onion. Chill before serving. It tastes like summer learned how to use a calendar.
Experience Notes: What Actually Works in a Real Kitchen
After working with fresh dill in everyday cooking, the biggest lesson is that dill rewards speed. The faster you preserve it after buying or harvesting, the better it tastes later. I have tried leaving dill in the refrigerator with the optimistic belief that “I’ll use it tomorrow,” only to discover that tomorrow apparently meant “after it has transformed into green lace sadness.” Fresh dill is not patient. It wants a plan.
For most home cooks, freezing chopped dill is the most practical method. It takes only a few minutes, and the payoff is huge. A flat freezer bag of chopped dill can save dinner repeatedly. Break off a small piece and stir it into scrambled eggs, salmon patties, chicken soup, lemon butter sauce, or warm potatoes. It does not look glamorous once thawed, but the flavor still shows up ready to work.
Dill cubes are another kitchen lifesaver, especially if you cook soups often. Water cubes are best when the dish already has liquid, such as broth, brine, or stew. Oil cubes are better for skillet meals, but they should stay frozen until cooking. I like using oil cubes with roasted carrots or pan-seared fish because the dill flavor spreads quickly and evenly. It feels like a fancy chef trick, even though the freezer did most of the labor.
Drying dill is useful, but it requires realistic expectations. If you dry dill and expect it to taste exactly like fresh dill, disappointment may enter wearing tap shoes. Dried dill is gentler. It needs time to bloom in moist foods such as yogurt, sour cream, mayonnaise, soup, or dressing. Add it early enough to hydrate, then taste again before serving. Many recipes improve after the dried dill has rested for ten to twenty minutes.
Dill vinegar is the most underrated method. It does not preserve the fluffy texture of dill, but it captures the herb’s sharp, garden-fresh personality in a bottle. A splash can brighten potato salad, coleslaw, cucumbers, lentils, roasted vegetables, and marinades. It is also helpful when you want dill flavor but do not want green flecks everywhere. This is especially handy for smooth sauces and dressings.
One practical habit makes all three methods easier: preserve dill in small portions. Giant bags, huge jars, and oversized bundles sound efficient until you need one teaspoon and accidentally defrost enough dill for a neighborhood fish fry. Small portions keep the flavor fresher and make cooking easier. Tablespoon-sized cubes, thin freezer bags, small spice jars, and pint-sized vinegar batches are usually more useful than bulk storage.
Another lesson is to keep stems separate from fronds when possible. The fronds are best for freezing, drying, and finishing dishes. The stems are stronger and can be used to flavor broths, brines, and vinegar. Instead of discarding them, freeze stems in a separate bag labeled “dill stems for stock or pickles.” It feels wonderfully thrifty, like your kitchen suddenly got a tiny sustainability badge.
Finally, preserved dill works best when paired with the right foods. Lemon, potatoes, cucumbers, eggs, yogurt, sour cream, salmon, tuna, chicken, carrots, cabbage, mustard, garlic, and vinegar all love dill. When in doubt, choose something creamy, tangy, starchy, or seafood-related. Dill walks into those dishes like it owns the place, and honestly, it kind of does.
Conclusion
Preserving fresh dill is one of the easiest ways to stretch a small bunch into months of flavor. Freezing keeps dill closest to its fresh taste and is the best all-purpose method for everyday cooking. Drying turns dill into a convenient pantry herb for dips, soups, dressings, and seasoning blends. Dill vinegar captures its bright, tangy character in a bottle that can wake up salads, marinades, sauces, and vegetables.
The best approach is not always choosing just one method. If you have a large bunch, freeze most of the fronds, dry a small amount for the spice cabinet, and turn the stems or extra sprigs into vinegar. That way, you get fresh flavor, shelf-stable convenience, and a tangy secret weapon for future meals. Fresh dill may be delicate, but with a little planning, it does not have to disappear before you get to enjoy it.
Note: This article is written for web publication and is based on established home food preservation practices, university extension guidance, and practical cooking methods for freezing, drying, and infusing fresh herbs safely.