

There are two kinds of Mac users: those who say, “I only checked that website for five minutes,” and those whose Screen Time report politely exposes them like a digital courtroom witness. Whether you want to block distracting sites, protect kids from inappropriate content, prevent accidental access to unsafe pages, or simply stop yourself from visiting “just one more” online sale, learning how to block and unblock websites on a Mac is a genuinely useful skill.
The good news is that macOS gives you several ways to do it. Some are beginner-friendly, like Screen Time. Others are more technical, like editing the hosts file. You can also use Safari settings, browser extensions, DNS filtering, or router-level controls depending on how serious you want the block to be.
This guide walks through five practical methods to block websites on a Mac, explains how to unblock them, and helps you choose the right option for parents, students, remote workers, business owners, and anyone who has ever lost an hour to a “quick” video.
Why Block Websites on a Mac?
Blocking websites is not just about parental controls. It can also be a productivity tool, a cybersecurity habit, or a way to create healthier screen boundaries. A Mac can access the web through Safari, Chrome, Firefox, apps, email links, and background services, so the best blocking method depends on your goal.
You may want to block websites on a Mac to:
- Limit adult content for children or shared family devices
- Reduce distractions from social media, shopping, gaming, or video platforms
- Block known phishing, malware, or scam websites
- Set study or work boundaries during specific hours
- Manage access across multiple browsers
- Control website access for a home office or small business network
Before you begin, remember one important rule: no blocking method is magic. A determined adult with admin access can usually undo simple restrictions. For stronger protection, combine methods, use a separate non-admin account, and lock settings with a password.
Method 1: Use Screen Time to Block Websites on a Mac
Screen Time is the easiest built-in way to block websites on a Mac. It is designed for content restrictions, app limits, downtime, and family controls. If you want a clean, Apple-approved method without touching Terminal, start here.
Best for: Parents, students, shared Macs, and simple website restrictions
Screen Time can limit adult websites automatically, allow only approved websites, or block specific URLs. This makes it especially helpful for child accounts or family Mac setups.
How to block websites using Screen Time
- Click the Apple menu and open System Settings.
- Select Screen Time in the sidebar.
- Turn on Screen Time if it is not already enabled.
- Open Content & Privacy.
- Enable Content & Privacy Restrictions.
- Choose the web content setting you want.
- Select Limit Adult Websites to automatically restrict many adult sites.
- Click Customize to add specific sites to the restricted list.
For example, if you want to block example-social-site.com, add that domain to the restricted websites list. You may need to add both the main domain and the “www” version, because the internet enjoys making simple things slightly annoying.
How to unblock websites in Screen Time
- Return to System Settings.
- Open Screen Time.
- Go to Content & Privacy.
- Open the web content restrictions.
- Remove the website from the restricted list.
- Change the setting back to Unrestricted Access if you want to remove web filtering completely.
Screen Time is convenient, but it is not always the best option for advanced blocking. It works best when the user does not have the Screen Time passcode. For children, make sure you lock Screen Time settings with a passcode that is not “1234,” “0000,” or the family dog’s birthday. Kids are tiny detectives with snacks.
Method 2: Block Websites with App Limits in Screen Time
If your goal is not to ban a website forever but to limit how long someone can use it, App Limits is a smart option. Instead of fully blocking a website, you can set a daily time allowance. This is perfect for sites that are useful in small doses but suspiciously capable of swallowing an entire afternoon.
Best for: Productivity, study schedules, and reducing screen time
App Limits can be used for apps and websites. For example, you might allow 20 minutes per day on a social media site, 30 minutes on a video platform, or 10 minutes on a news site that somehow turns into a doom-scroll buffet.
How to set a website time limit on Mac
- Open System Settings.
- Click Screen Time.
- Select App Limits.
- Turn on App Limits.
- Click Add Limit.
- Find the website you want to limit, or add it if available.
- Choose a daily time limit.
- Click Done.
Once the limit is reached, macOS will block access unless more time is approved. If this is for your own productivity, you can technically approve more time yourself, but that is between you, your conscience, and the tab you promised not to open.
How to unblock or change website limits
- Go to System Settings.
- Open Screen Time.
- Select App Limits.
- Choose the website limit.
- Turn it off, delete it, or edit the allowed time.
This method is softer than a hard block. It is excellent when you want balance rather than total restriction. For children, employees, or students, pair App Limits with a Screen Time passcode so the limit cannot be casually dismissed like a calendar reminder.
Method 3: Use Safari Settings and Content Blockers
Safari gives Mac users website-specific controls. While Safari settings are not the same as a full parental control system, they are useful for managing pop-ups, content blockers, autoplay, camera access, location permissions, notifications, and other website behaviors.
Best for: Safari users who want cleaner browsing and fewer intrusive websites
Content blockers are especially useful for blocking ads, trackers, pop-ups, and certain unwanted page elements. They may not block every website entirely, but they can make annoying or risky pages much less powerful.
How to manage website settings in Safari
- Open Safari.
- Click Safari in the menu bar.
- Select Settings.
- Click the Websites tab.
- Choose a category such as Content Blockers, Pop-up Windows, Notifications, or Auto-Play.
- Select the website and choose the permission you want.
For example, you can prevent a site from showing pop-up windows or sending notifications. This is helpful when a website behaves like a door-to-door salesperson who found your address and brought confetti.
Using Safari content blocker extensions
Safari also supports content blocker extensions from the App Store. These tools can block ads, trackers, scripts, and certain categories of web content. After installing one, you can enable it in Safari settings and adjust its rules.
To disable or unblock content, return to Safari settings and turn off the relevant blocker for a specific site or remove the extension entirely.
How to unblock a website in Safari
- Open Safari Settings.
- Go to the Websites tab.
- Select the permission or blocker category.
- Change the website setting to Allow, Off, or the default option.
- If using an extension, open the extension settings and remove the site from its block list.
Safari controls are useful, but they only affect Safari. If someone opens Chrome or Firefox, Safari-specific restrictions will not follow them. For stronger website blocking across browsers, use Screen Time, DNS filtering, or the hosts file.
Method 4: Block Websites by Editing the Mac Hosts File
The hosts file is a local system file that tells your Mac where to send requests for specific domains. By pointing a website to your own computer instead of the real website server, you can stop the site from loading. This is a more technical method, but it works across browsers because it affects how macOS resolves the domain.
Best for: Advanced users who want browser-wide blocking
Before editing the hosts file, be careful. This is a system-level file, and typos can cause connection problems. The good news is that the process is not difficult if you move slowly and avoid treating Terminal like a video game boss fight.
How to block a website using the hosts file
- Open Finder.
- Go to Applications > Utilities.
- Open Terminal.
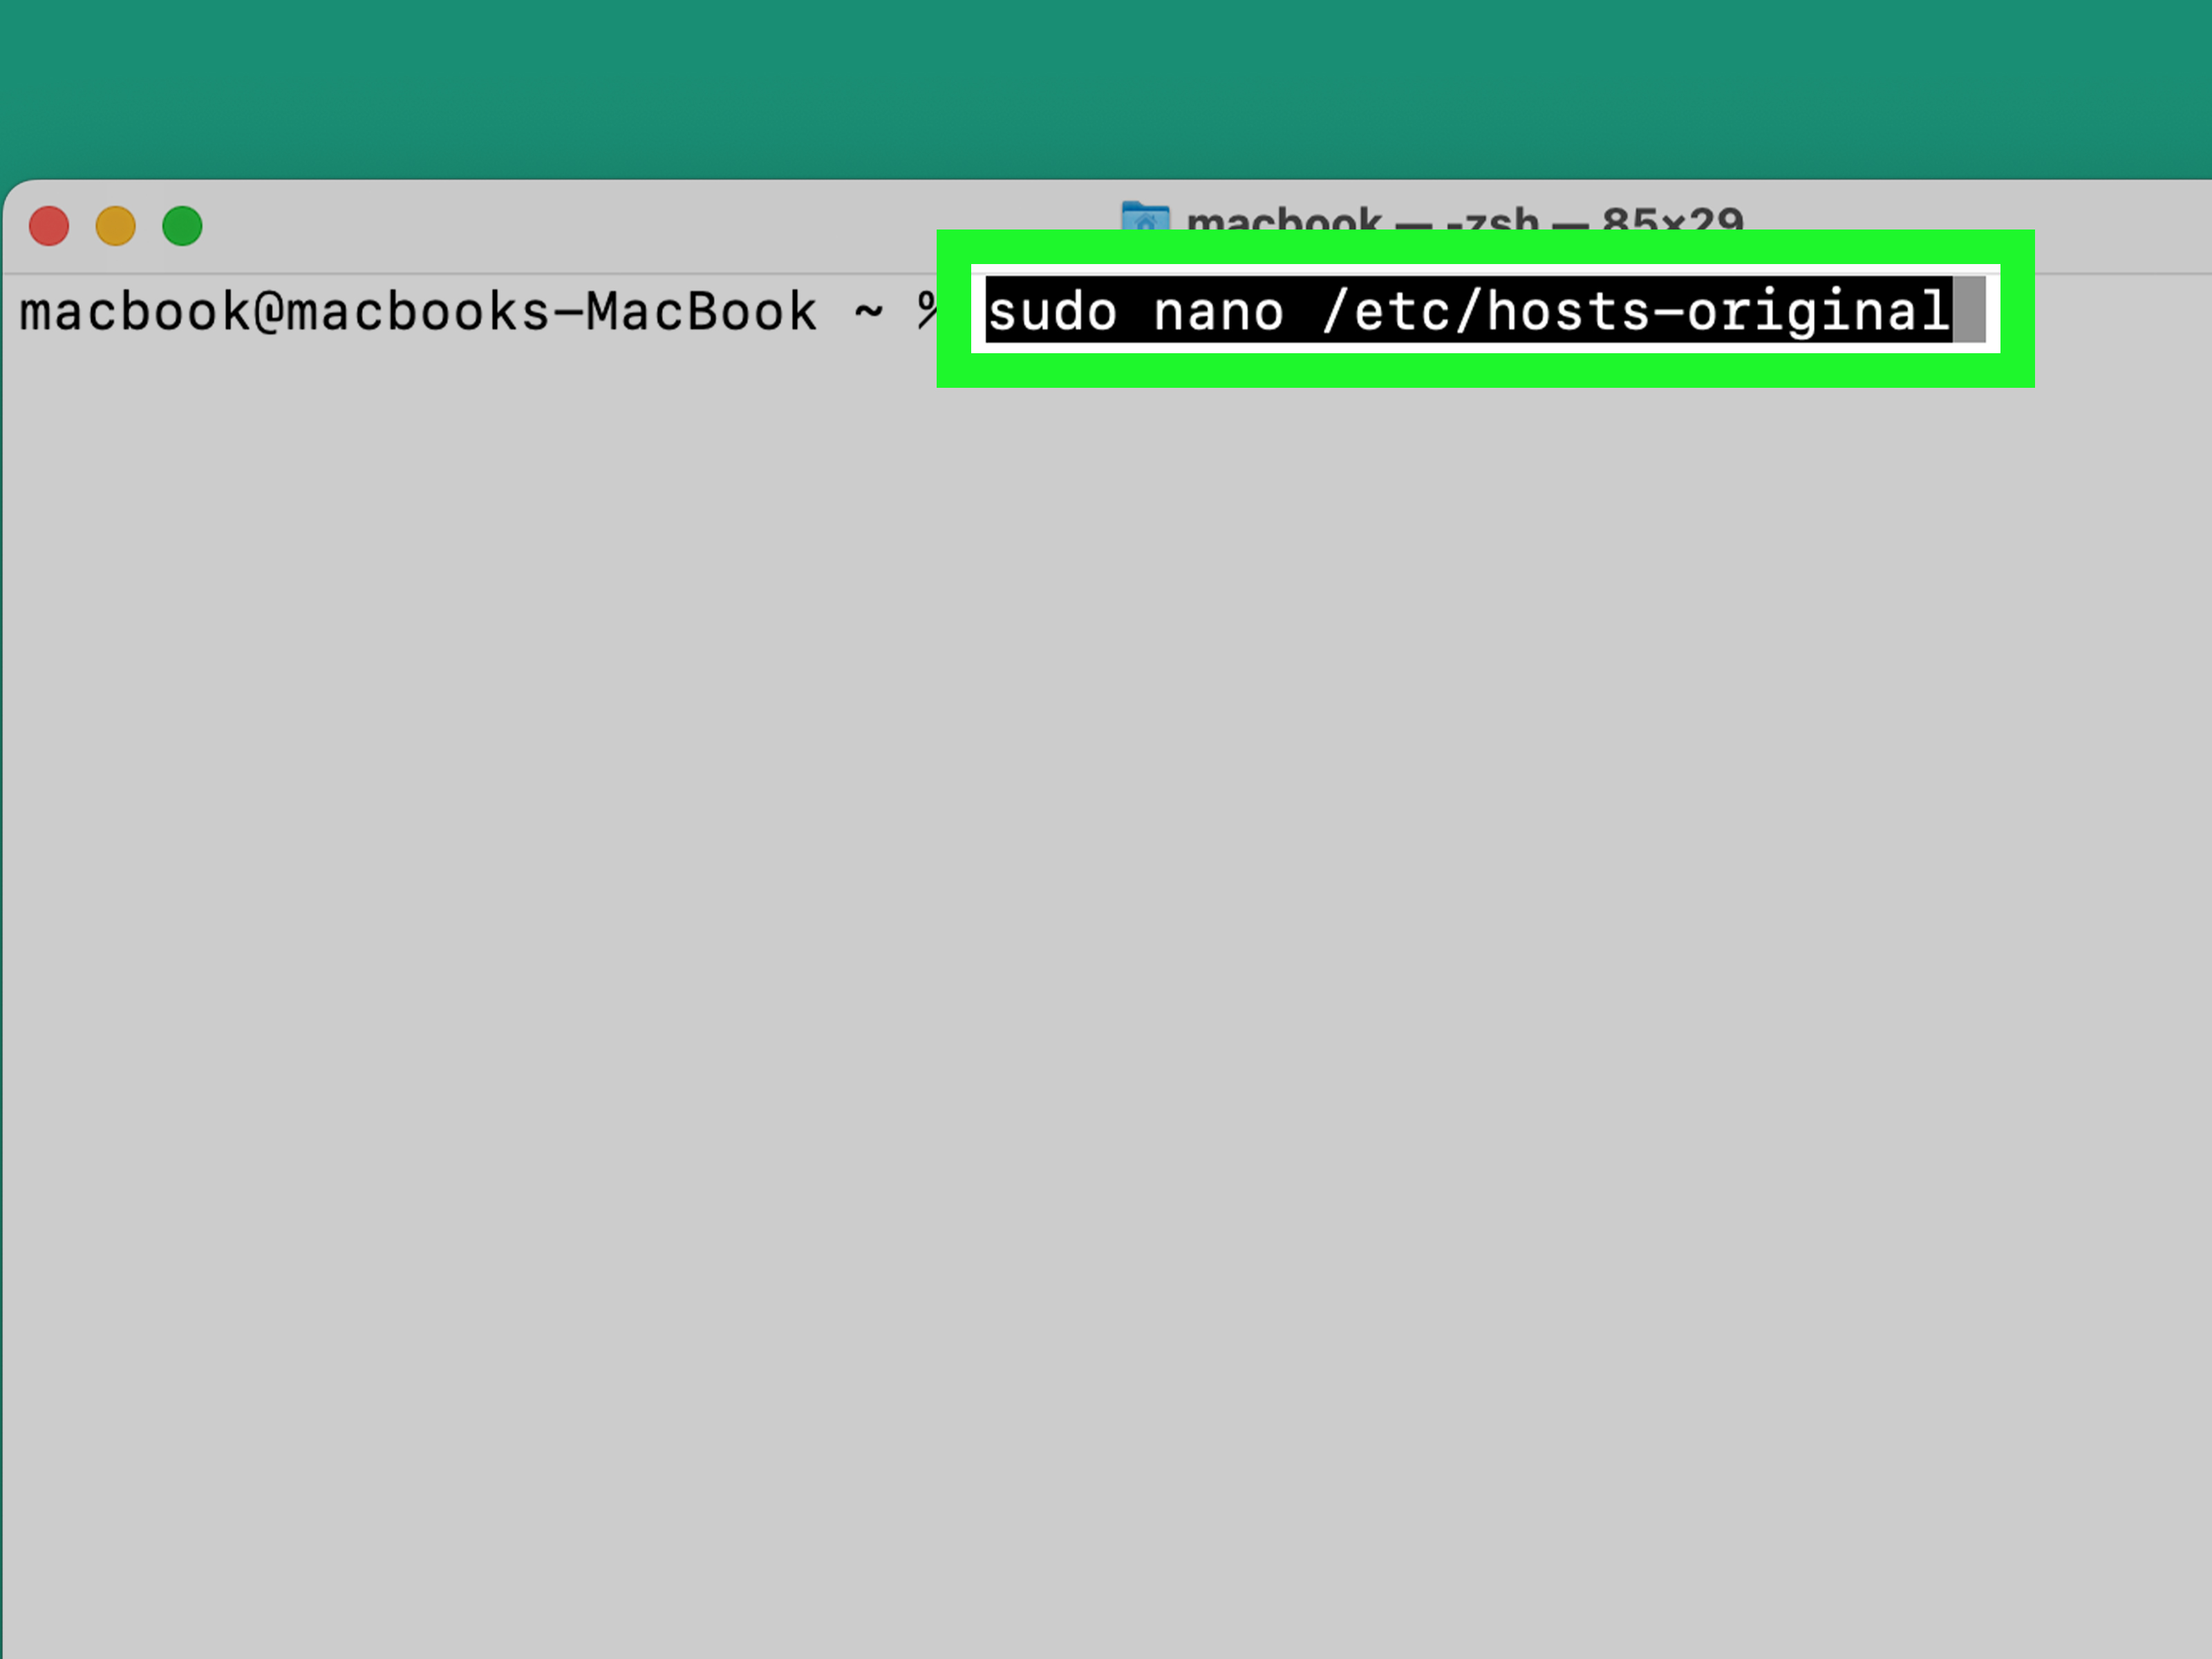
- Type the following command:
- Press Return.
- Enter your Mac administrator password. The password may not appear as you type.
- Use the arrow keys to move to the bottom of the file.
- Add a new line for each site you want to block.
- Press Control + O to save.
- Press Return to confirm.
- Press Control + X to exit Nano.
- Flush the DNS cache so the change takes effect faster.
Now try visiting the blocked site. In many cases, it should fail to load. Add both the root domain and common subdomain versions, such as example.com and www.example.com, because some websites use multiple addresses.
How to unblock websites from the hosts file
- Open Terminal again.
- Run the hosts file command:
- Find the lines you added.
- Delete those lines.
- Save with Control + O.
- Exit with Control + X.
- Flush DNS again:
The hosts file method is powerful, but it is not perfect. It may not catch every subdomain, and it does not provide friendly reports, schedules, or category-based filtering. It is best for blocking a short list of specific websites.
Method 5: Block Websites with DNS Filtering, Router Settings, or Browser Extensions
If you want broader protection, especially across multiple devices, DNS filtering and router-level blocking are excellent choices. DNS filtering works by preventing certain domain names from resolving before the website loads. Instead of blocking only Safari or one Mac account, it can protect every device connected to your network if configured on the router.
Best for: Families, home networks, small offices, and multi-device control
Popular DNS filtering services can block adult content, malware domains, phishing sites, or other categories. Some services are simple and preconfigured, while others offer dashboards where you can customize categories and block lists.
How to change DNS settings on a Mac
- Open System Settings.
- Click Network.
- Select your active connection, such as Wi-Fi.
- Open the connection details.
- Go to DNS.
- Add the DNS server addresses provided by your filtering service.
- Save the settings and reconnect if needed.
For whole-home blocking, log in to your router and change the DNS settings there. That way, phones, tablets, smart TVs, game consoles, and Macs can use the same filtering rules. This is useful if your home network contains several devices and at least one family member who can find YouTube on anything with a screen.
How to unblock websites blocked by DNS filtering
- Open your Mac network DNS settings or router DNS settings.
- Remove the filtering DNS servers.
- Replace them with your preferred DNS servers or automatic ISP settings.
- If the DNS service has a dashboard, remove the website from the blocked list or add it to the allowed list.
- Restart the browser or flush DNS if the site still does not load.
Using browser extensions to block websites
Browser extensions are another practical option. Chrome and Firefox both support extensions that can block websites, redirect pages, set focus schedules, and protect settings with a password. These are easy to install and great for personal productivity.
To block sites with a browser extension, install a trusted website blocker from the official browser store, add websites to its block list, and customize schedules or password settings. To unblock a website, remove it from the extension’s block list or disable the extension.
Be careful with extensions. Only install tools from reputable developers, review permissions, and remove anything you do not recognize. A blocker that asks for access to every website you visit may be normal for its function, but it also means trust matters.
Which Website Blocking Method Should You Choose?
The best method depends on what you want to accomplish. If you are helping a child use a Mac safely, Screen Time is the most user-friendly starting point. If you want to cut distractions for yourself, App Limits or a browser extension may be enough. If you want a stronger browser-wide block, the hosts file works well. If you want protection across your home, DNS filtering or router settings are better.
Quick comparison
| Method | Best Use | Difficulty | Works Across Browsers? |
|---|---|---|---|
| Screen Time Web Restrictions | Parental controls and simple blocking | Easy | Mostly, depending on settings |
| Screen Time App Limits | Reducing time on distracting sites | Easy | Yes, for tracked websites |
| Safari Settings | Managing Safari permissions and blockers | Easy | No |
| Hosts File | Hard blocking specific domains | Medium | Yes |
| DNS or Router Filtering | Network-wide family or office filtering | Medium | Yes |
Common Problems When Blocking or Unblocking Websites on Mac
The website is still loading after I blocked it
Check whether the site uses a different domain or subdomain. Blocking example.com may not block videos.example.com, m.example.com, or www.example.com. Add each version if needed.
The block works in Safari but not Chrome
You probably used a Safari-specific setting or extension. Use Screen Time, DNS filtering, or the hosts file if you want blocking across multiple browsers.
I unblocked a website, but it still will not open
Flush the DNS cache, restart the browser, and check whether another tool is blocking the site. A website can be blocked by Screen Time, a browser extension, DNS filtering, router rules, security software, or the hosts file. Yes, website blocking can become a small detective novel.
The site is blocked only on one Wi-Fi network
The block may be set at the router or DNS level. If the website works on a mobile hotspot but not home Wi-Fi, check your router settings or DNS provider dashboard.
Security and Privacy Tips Before You Block Websites
Website blocking is helpful, but it should be done thoughtfully. If you are managing a child’s Mac, explain the reason for restrictions. If you are managing workplace devices, follow company policy and applicable privacy rules. If you are managing your own focus, be honest about what kind of block you need. A gentle limit is fine for mild distraction. A locked-down setup may be better if the site has become a daily productivity trap wearing a fake mustache.
Use strong administrator passwords, keep macOS updated, and avoid installing random blocker apps from unknown websites. For families, create separate user accounts and avoid giving children administrator privileges. For businesses, consider managed device tools instead of relying only on manual settings.
Real-World Experience: What Actually Works Best?
After testing different website blocking methods on a Mac, the biggest lesson is simple: the best solution is the one that matches the behavior you are trying to change. People often look for the strongest technical block first, but the strongest block is not always the most useful one. Sometimes you need a wall. Sometimes you just need a speed bump.
For everyday productivity, App Limits and browser extensions tend to feel the most practical. They are quick to set up, easy to adjust, and flexible enough for real life. For example, completely blocking a video site may sound noble on Monday morning, but by Friday evening you may reasonably want to watch a tutorial, a recipe, or one raccoon stealing cat food with Olympic confidence. A time limit gives you control without turning your Mac into a digital prison.
For parents, Screen Time is usually the best starting point because it is built into macOS and does not require installing extra software. The ability to restrict adult websites, allow approved sites, and lock settings with a passcode makes it friendly for family use. The important experience-based tip is to test the restrictions from the child’s account, not just the parent account. Many setup mistakes happen because the adult configures settings, assumes everything works, and later discovers the browser had other ideas.
The hosts file method is excellent when you want a clean, no-frills block for a few specific domains. It is also satisfying in a slightly nerdy way. You type a few lines, flush DNS, and suddenly the distracting site disappears like it forgot to pay rent. However, it becomes annoying when you need schedules, categories, reports, or frequent changes. Editing Terminal every time you want to unblock a site is not difficult, but it is not exactly cozy either.
DNS filtering is the most useful option for households with multiple devices. If you configure filtering on the router, you avoid repeating the same setup on every Mac, iPad, phone, and smart TV. This is especially helpful for families because children rarely use just one device. The drawback is that DNS filtering can occasionally block a site you actually need, so you should learn how to use allow lists before a homework website gets mistaken for trouble.
Safari settings are best viewed as a comfort and privacy layer, not a complete blocking system. They are great for stopping pop-ups, notifications, autoplay, and unwanted content behavior. But if your goal is to fully block a website, Safari-only controls are too narrow unless everyone uses Safari and nobody knows other browsers exist. Spoiler: they do.
The most reliable setup often combines two methods. For example, a parent might use Screen Time on the Mac and DNS filtering on the home router. A remote worker might use App Limits during the day and a browser extension for deep-focus hours. A technical user might use the hosts file for a short list of “never again” sites and Safari settings for cleaner browsing.
One final tip from experience: keep a small note of what you changed. Write down whether you blocked a website in Screen Time, Safari, DNS, an extension, or the hosts file. Future you will be grateful. Future you does not want to spend 40 minutes wondering why a website will not load while present you quietly forgets about that one Terminal command from three months ago.
Conclusion
Blocking and unblocking websites on a Mac can be simple or advanced, depending on how much control you need. Screen Time is the easiest built-in solution for families and basic restrictions. App Limits are great for productivity. Safari settings help manage website behavior. The hosts file gives advanced users system-wide domain blocking. DNS filtering and router controls are best for protecting multiple devices across a home or office network.
The smartest approach is to choose the lightest method that solves the problem. Start with Screen Time or App Limits, then move to hosts file or DNS filtering if you need stronger control. And when it is time to unblock a website, retrace the same method you used to block it. Your Mac is powerful, but it is not psychic. Yet.