Note: This article is for educational purposes only and does not replace medical advice. Always follow your diabetes care plan and ask your healthcare provider or diabetes educator how often you should test and what your personal blood sugar targets should be.
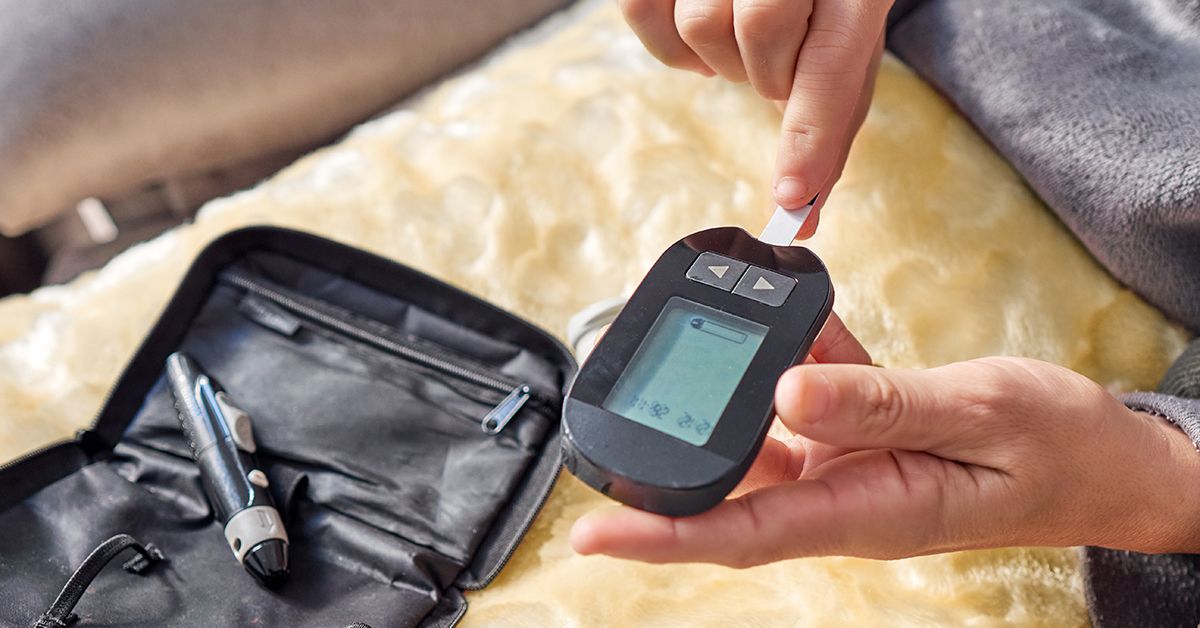
Using a blood glucose monitor can feel a little intimidating at first. There is a meter, a test strip, a lancet, a tiny drop of blood, and one number that can suddenly seem more dramatic than the season finale of your favorite TV show. But once you understand the process, a blood glucose monitor becomes less like a scary medical gadget and more like a practical dashboard for your health.
A blood glucose monitor, also called a blood sugar meter or glucometer, measures the amount of glucose in a small blood sample, usually from your fingertip. For many people with diabetes, this simple test helps guide daily decisions about food, activity, medication, insulin, illness, stress, and safety. It does not tell the whole story of diabetes management, but it gives you an important snapshot of what is happening in your body right now.
The key is learning how to use the device correctly. A good meter can still give confusing results if your hands are sticky from fruit, your test strips are expired, your sample is too small, or your testing routine is as random as socks disappearing in the laundry. The good news is that accurate testing is a skill, and like any skill, it gets easier with practice.
Below are six practical tips to help you successfully use a blood glucose monitor, understand your readings, and turn those numbers into useful information instead of daily stress.
Why Blood Glucose Monitoring Matters
Blood sugar monitoring helps people with diabetes see how their body responds to meals, exercise, medication, insulin, sleep, stress, and illness. For example, testing before breakfast may show how your blood sugar behaved overnight. Testing one to two hours after a meal can help you see how that meal affected your glucose level. Testing before driving, exercise, or sleep may help reduce the risk of low blood sugar if you are using insulin or medications that can cause hypoglycemia.
For some people, especially those using insulin, blood glucose monitoring may be needed several times a day. Others may test less often, depending on their treatment plan. The right schedule is personal. Your doctor, pharmacist, or diabetes care and education specialist can help you decide when to check, how often to check, and what to do when your readings are outside your target range.
Tip 1: Start With the Right Meter and Supplies
The best blood glucose monitor is not always the fanciest one. It is the one you can use correctly, afford consistently, read easily, and carry without feeling like you packed for a three-day camping trip.
Choose a meter that fits your daily life
When selecting a blood glucose meter, look for features that match your needs. A large screen can help if you have vision changes. A backlit display can make nighttime testing easier. A talking meter may be useful for people with low vision. Some meters store many readings, connect to apps, or allow data sharing with your healthcare team. These features are helpful only if they make your routine simpler, not more complicated.
Also consider the cost and availability of test strips. The meter itself may be affordable, but strips are the recurring expense. Before choosing a device, check whether your insurance covers the meter and strips, whether your local pharmacy stocks them, and whether you can reorder supplies easily.
Use matching test strips
Test strips are not universal. Each meter is designed to work with specific strips, and using the wrong strip can lead to errors or inaccurate readings. Keep strips in their original container, close the lid tightly, and store them according to the manufacturer’s instructions. Heat, humidity, moisture, and expiration dates matter more than most people realize. A test strip is small, but it is doing serious chemistry work. Treat it like a tiny scientist with boundaries.
Avoid buying pre-owned or opened test strips from unreliable sellers. You may not know how they were stored, whether they are expired, or whether the container was exposed to moisture. Inaccurate readings can lead to wrong decisions about food, insulin, medication, or emergency care.
Tip 2: Wash and Dry Your Hands Before Every Test
This sounds almost too simple, but clean hands are one of the biggest secrets to accurate blood glucose monitoring. Food residue, lotion, alcohol, dirt, or even a little fruit juice on your fingers can affect the result. If you peeled an orange, grabbed a cookie, or touched something sugary, your meter may think your blood sugar is throwing a party when it is actually your fingertip causing the drama.
Use warm water and soap
Before testing, wash your hands with soap and warm water, then dry them completely. Warm water can help improve blood flow to your fingers, making it easier to get a good drop of blood. Drying matters because water can dilute the sample or make the strip harder to use correctly.
Be careful with alcohol wipes
If soap and water are not available, an alcohol wipe may be used, but let the finger dry fully before lancing. Testing while the skin is still wet with alcohol can interfere with the sample and may sting more than necessary. Nobody needs extra finger drama before breakfast.
If you frequently have trouble getting enough blood, try warming your hands, gently shaking your hand below heart level, or massaging from the base of the finger toward the fingertip before lancing. Do not squeeze the fingertip aggressively, because too much pressure may affect the sample and can make testing more painful.
Tip 3: Use Good Lancing Technique
The lancing device is often the part people dislike most, which is understandable. It is the tiny spring-loaded poke machine. But good technique can reduce discomfort and help you get a better sample.
Prick the side of your fingertip
Use the side of the fingertip instead of the center pad. The sides usually hurt less because they have fewer nerve endings than the middle of the fingertip. Rotate fingers so one poor finger does not become the unpaid intern of your diabetes routine.
Use a fresh lancet regularly. A dull lancet can hurt more and may not work as well. Many people reuse lancets longer than recommended because it seems convenient, but a sharp, clean lancet is better for comfort and hygiene. Follow your device instructions and your care team’s advice.
Adjust the depth setting
Most lancing devices allow you to change the depth of the puncture. If the setting is too shallow, you may not get enough blood. If it is too deep, testing may hurt more than necessary. Start with a moderate setting and adjust until you can get a sufficient drop with minimal discomfort.
Once you have a drop of blood, touch the edge or tip of the test strip to the sample as directed by your meter instructions. Do not smear blood across the strip unless your device specifically tells you to. Most modern strips draw in the blood automatically by capillary action.
Tip 4: Know When to Test and What the Numbers Mean
A blood glucose monitor gives you a number, but the number is only useful when you know the context. A reading of 160 mg/dL may mean something different before breakfast, after dinner, during illness, after exercise, or after treating a low. Numbers need a story.
Common testing times
Your provider may recommend checking at certain times, such as:
- Before meals
- One to two hours after meals
- Before bedtime
- Before, during, or after exercise
- When you feel symptoms of low or high blood sugar
- Before driving, especially if you use insulin or medications that may cause low blood sugar
- During illness or unusual stress
Many adults with diabetes are given general target ranges, such as 80 to 130 mg/dL before meals and below 180 mg/dL one to two hours after starting a meal. However, your target may be different depending on your age, pregnancy status, medications, risk of hypoglycemia, other health conditions, and overall diabetes plan. Always use the goals your healthcare provider gives you.
Do not panic over one number
One unexpected reading does not automatically mean you failed. Blood sugar can rise or fall because of food, exercise, stress, sleep, illness, medications, dehydration, hormones, or testing technique. Instead of judging yourself, ask: “What might explain this?” A single reading is a clue. A pattern is a conversation.
If your reading is very high, very low, or does not match how you feel, wash your hands and test again. If the result still seems wrong or you have symptoms, follow your diabetes action plan or contact your healthcare provider. Seek emergency help if you have severe symptoms such as confusion, fainting, difficulty breathing, persistent vomiting, or signs of severe low blood sugar that do not improve with treatment.
Tip 5: Keep a Useful Blood Sugar Log
A glucose meter number becomes more powerful when you record it with context. The goal is not to create a diary so detailed it deserves its own Netflix documentary. The goal is to spot patterns that can help you and your care team make smarter decisions.
What to write down
Your log can be paper, an app, a spreadsheet, or your meter’s built-in memory. Include the date, time, blood sugar reading, and any helpful notes. For example:
- Before breakfast: 118 mg/dL
- Two hours after lunch: 192 mg/dL after rice bowl and sweet tea
- Before walk: 92 mg/dL
- Bedtime: 145 mg/dL after stressful workday
- 3 a.m.: 68 mg/dL, treated with fast-acting carbohydrate
Food, medication, insulin doses, physical activity, stress, sleep, menstrual cycle changes, illness, and missed meals can all help explain readings. Over time, these notes may reveal patterns. Maybe your blood sugar rises after a certain breakfast. Maybe evening walks help. Maybe skipping lunch makes your afternoon glucose behave like a roller coaster with questionable safety inspections.
Share your data
Bring your log or meter to appointments. If your meter connects to an app, ask your healthcare team whether they want printed reports or digital uploads. The more accurate information they have, the easier it is to adjust your plan safely.
Do not change medication or insulin doses on your own unless your provider has trained you to do so. Blood glucose data is powerful, but it works best when paired with professional guidance.
Tip 6: Check Accuracy and Troubleshoot Problems
Blood glucose monitors are usually accurate when used correctly, but they are not magic. Several factors can affect results, including dirty hands, expired strips, damaged strips, too little blood, extreme temperatures, low battery, incorrect coding on older meters, or using a sample from an alternate site at the wrong time.
Use control solution when needed
Some meters come with a control solution, which is used to check whether the meter and strips are working properly. You may need to use control solution when opening a new container of strips, if you drop the meter, if results seem unusual, or if the manufacturer recommends routine checks. Follow the instructions for your specific meter.
Compare with lab results carefully
Sometimes your provider may compare your home meter reading with a laboratory blood glucose result. Because timing matters, the comparison should be done correctly. A home reading taken much earlier or later than the lab sample may not match because blood sugar changes throughout the day.
If your meter repeatedly gives results that do not match how you feel, do not ignore it. Check the strips, battery, expiration date, storage conditions, and technique. Call the meter company’s customer support or ask your pharmacist, diabetes educator, or healthcare provider to watch you test and troubleshoot the process.
Common Mistakes to Avoid
Even experienced users can slip into habits that reduce accuracy. Here are some common mistakes:
- Testing with unwashed hands
- Using expired or poorly stored strips
- Leaving the strip container open
- Using too small a blood sample
- Pressing or squeezing the finger too hard
- Not rotating fingers
- Ignoring symptoms because the meter gives one unexpected number
- Testing randomly without recording meal, activity, or medication context
- Using devices that claim to measure glucose without a skin puncture but are not cleared or approved for that purpose
The fix is usually simple: slow down, follow the instructions, and build a repeatable routine. Good blood glucose monitoring is not about perfection. It is about consistency.
Blood Glucose Monitor vs. Continuous Glucose Monitor
A blood glucose monitor measures glucose from a small blood sample at one moment in time. A continuous glucose monitor, or CGM, uses a sensor under the skin to estimate glucose levels in interstitial fluid throughout the day and night. CGMs can show trends, alerts, and patterns, which can be especially helpful for people using insulin or those who experience frequent highs or lows.
However, many people still use fingerstick meters, either as their main monitoring method or to confirm CGM readings when symptoms do not match the device. Your healthcare provider can help you decide which technology fits your diabetes type, treatment plan, budget, insurance coverage, comfort level, and lifestyle.
Real-Life Experience: What Successful Testing Feels Like Over Time
At first, using a blood glucose monitor can feel like adding a tiny laboratory to your morning routine. You may line up the meter, strip, lancet, tissue, logbook, and snacks like you are preparing for a very small medical mission. The first few tests may take longer than expected. You might not get enough blood. You might forget to wash your hands. You might stare at the test strip wondering which end is the business end. This is normal. Nobody is born knowing how to operate a glucometer with the grace of a concert pianist.
After a week or two, most people start to develop a rhythm. The meter lives in one reliable place. The strips stay closed and dry. The lancets are nearby. Testing before breakfast becomes as automatic as brushing your teeth, except with more beeping. You learn which finger gives a good sample, which lancing depth is comfortable, and how much blood the strip needs. The process becomes less emotional and more practical.
One helpful experience is learning that blood sugar readings are not moral grades. A higher number after a big pasta dinner does not mean you are “bad.” A lower number after exercise does not mean you are “perfect.” These readings are information. They help you understand cause and effect. For example, you may discover that oatmeal with nuts keeps your blood sugar steadier than a sweet breakfast pastry. You may notice that walking after dinner improves your bedtime number. You may find that stress from a hectic workday raises your glucose even when your meals are unchanged. That is not failure; that is useful data.
Another real-world lesson is that preparation saves frustration. Keeping extra strips, lancets, batteries, and fast-acting carbohydrates on hand can prevent small problems from becoming big ones. If you travel, pack more supplies than you think you need. A weekend trip can become less charming when your last test strip vanishes into the mysterious black hole under the car seat.
People also learn that patterns matter more than isolated readings. If your blood sugar is high after one meal, make a note and move on. If it is high after lunch several days in a row, that pattern is worth discussing with your healthcare team. Maybe the meal needs adjusting. Maybe medication timing matters. Maybe stress, sleep, or activity is playing a role. The monitor does not solve the mystery by itself, but it gives you clues.
Over time, successful blood glucose monitoring can build confidence. You start to understand your body’s signals. You can check when you feel shaky, tired, unusually thirsty, or “off.” You can make safer decisions before exercise, driving, or bedtime. You can walk into appointments with actual data instead of vague guesses. That is empowering.
The most successful users are not the people who never get surprising readings. They are the people who stay curious, keep good habits, ask questions, and use the numbers to support better decisions. In other words, they do not let the meter boss them around. They make the meter work for them.
Conclusion
Using a blood glucose monitor successfully comes down to a few reliable habits: choose the right device, store supplies properly, wash and dry your hands, use good lancing technique, test at meaningful times, record useful context, and troubleshoot accuracy issues when something seems off. The process may feel awkward at first, but it becomes easier with repetition.
A glucose meter is not there to judge you. It is there to inform you. When you understand your readings and share them with your healthcare team, those numbers can help shape a safer, more personalized diabetes care plan. With the right technique and a calm mindset, blood glucose monitoring becomes less of a chore and more of a practical tool for everyday confidence.