

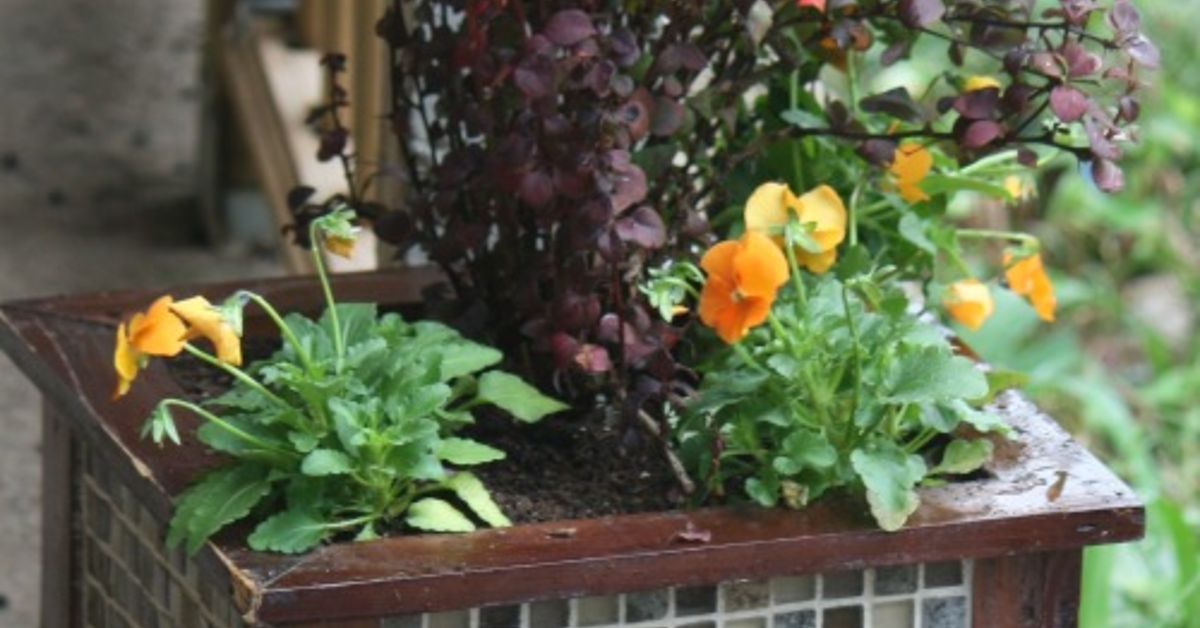
A tiled garden container planter can make an ordinary patio look as though an interior designer wandered outside and refused to leave. The polished tile, crisp grout lines, and tailored shape bring a custom architectural finish to porches, balconies, entryways, and small gardens. The delightful secret is that the finished planter can look expensive without requiring an expensive base, imported stone, or a contractor who arrives with a clipboard and alarming invoices.
This project combines a simple framed container, exterior-rated tile materials, and a removable planting insert. The insert holds the soil and plants, while the tiled outer shell provides the decorative drama. Separating those two jobs reduces moisture problems, makes seasonal planting easier, and lets you replace a damaged liner without dismantling your masterpiece.
The project is manageable for a confident beginner, although patience matters. Tile rewards careful measuring and punishes the “close enough” approach with tiny crooked lines that somehow become the only thing you can see.
Why a Tiled Planter Looks So Upscale
Tile adds color, pattern, texture, and reflective detail that painted plastic cannot quite imitate. Even inexpensive mosaic sheets can resemble handcrafted Mediterranean ceramics, boutique hotel planters, or custom architectural cladding when they are installed neatly.
The design can also connect an outdoor space to the materials already used around the home. A planter covered in matte charcoal porcelain can echo modern patio pavers. Blue-and-white mosaics complement coastal decor. Warm terracotta-look tile works beautifully with cottage gardens, while slim vertical tiles can make a small urban balcony feel surprisingly sophisticated.
There is also a practical advantage. A well-built tiled shell creates a substantial visual anchor for tall grasses, compact shrubs, flowering annuals, or trailing vines. Large planters help balance bulky outdoor furniture and can define an entrance without building permanent walls.
Choose the Right Construction Method
There are two common ways to make a tiled garden container planter. The safer DIY method is a decorative outer shell containing a removable nursery pot or plastic planter. The more advanced method is a fully waterproofed planter that holds soil directly.
Method One: A Decorative Tiled Shell
This article focuses on the decorative-shell method. An exterior-rated frame supports cement backer board, which receives waterproofing, mortar, tile, and grout. A separate plastic planting container sits inside the finished shell.
This arrangement keeps constantly damp soil away from the tiled assembly. It also allows excess irrigation water to leave through the insert’s drainage holes instead of soaking into hidden corners. You can lift out the insert to repot plants, repair irrigation, or turn a summer flower display into a winter arrangement.
Method Two: A Direct-Soil Tiled Planter
A planter intended to hold soil directly needs a complete waterproofing and drainage system approved for planter applications. Simply covering the inside with leftover shower membrane is not automatically sufficient. Corners, penetrations, the upper edge, and the drainage outlet all require compatible components.
Some professional waterproofing systems are specifically approved for planters, but product requirements vary. For that reason, direct-soil construction is better suited to experienced tile installers or homeowners working from a complete manufacturer-approved system. Water is remarkably talented at locating the one seam you felt confident enough to ignore.
Materials and Tools
For a square planter approximately 18 inches wide and 20 inches tall, gather the following materials:
- Exterior-rated lumber or another rigid, weather-resistant framing material
- Exterior-rated cement backer board
- Corrosion-resistant backer-board screws
- Alkali-resistant mesh tape for cement-board joints
- Exterior-rated waterproofing membrane compatible with the backer board
- Porcelain, quarry, or ceramic tile specifically rated for exterior use
- Polymer-modified thinset mortar approved for exterior applications
- Exterior-rated cementitious grout
- Exterior silicone or flexible sealant for changes of plane
- A removable plastic planter with drainage holes
- Pot feet, spacers, or a raised interior support
- Optional exterior trim for the top edge
Useful tools include a tape measure, pencil, square, level, drill, utility knife or approved cement-board cutting tool, notched trowel, margin trowel, grout float, buckets, sponge, tile spacers, rubber gloves, eye protection, and a wet tile saw or tile nippers.
Cutting cement board, mortar products, masonry, and some tiles can release silica-containing dust. OSHA recommends dust-control methods such as wet cutting or approved dust-collection equipment, along with following the tool and product manufacturers’ safety instructions. Work outdoors when practical and use the protective equipment specified for the task.
Select Tile That Can Survive Outdoors
A discount tile is not a bargain if it begins flaking after the first wet winter. The Tile Council of North America advises choosing tile that the manufacturer specifically rates for exterior use. In areas with freezing weather, the product should also be suitable for freeze-thaw exposure. Porcelain and quarry tile are frequently good candidates, but the manufacturer’s published rating remains more important than the category name printed on the shelf label.
Porcelain is popular because certified porcelain has a low water-absorption rate. That does not make every porcelain tile automatically appropriate for every outdoor installation, so confirm the specifications before buying. Proper drainage and installation still matter because water trapped behind even frost-resistant tile can freeze, expand, and damage the assembly.
Small mosaic tiles are forgiving on compact planters and require fewer difficult cuts. Large tiles create a sleek contemporary appearance but may need precise planning around corners. Tile remnants, discontinued sheets, and sample boards can dramatically reduce the cost. Inspect all bargain material for chips, inconsistent thickness, or missing pieces before celebrating your financial genius.
Plan the Size, Pattern, and Budget
Measure the removable planter first. The tiled shell should provide enough interior clearance for the insert to slide in and out without scraping the walls. Allow space underneath for drainage and airflow, and leave room around the rim so you can grip the insert.
A finished exterior size of roughly 18 by 18 inches works well for many medium nursery containers. Taller shells create a more architectural look, but remember that tile, mortar, cement board, soil, and water collectively weigh far more than they appear to in cheerful project photos.
Place the empty structure in its final location before adding the planting insert. If mobility is essential, build the planter on a properly rated outdoor plant caddy or concealed casters designed for the expected load.
Dry-lay the tile pattern on a flat surface. Center decorative motifs on the most visible face and arrange cuts so narrow slivers do not land at prominent corners. If mosaic sheets have visible mesh gaps, trim and rearrange individual pieces to disguise the sheet boundaries.
How to Build the Tiled Garden Container Planter
Step 1: Build a Square and Rigid Frame
Construct a simple cube-like frame using exterior-rated lumber. Make the top and bottom frames first, checking each corner with a carpenter’s square. Connect them with four vertical corner supports.
Add intermediate supports when required by the cement-board manufacturer or when the sides feel flexible. Tile needs a stable substrate. If the planter wall bends when gently pressed, the tile layer will not magically persuade it to become rigid later.
Keep the bottom open or partially open so water from the inner planter can escape. A few sturdy cross supports can hold the insert above the ground without creating a water-catching box.
Step 2: Attach Exterior-Rated Cement Board
Cut cement board panels to cover the four sides. Cement board is a tile substrate, not a structural panel, so it must be properly supported and fastened to the frame. Use the board manufacturer’s recommended screws, edge clearances, spacing, and joint treatment.
USG, for example, identifies exterior-rated cement board as a water-durable substrate for exterior finish systems and requires appropriate exterior joint reinforcement for exterior installations. Product lines differ, so verify that the exact board you purchase is approved for your intended outdoor use.
Fasten the panels without driving screw heads so deeply that they crush the board. Cover joints and outside corners with alkali-resistant mesh tape embedded in the mortar recommended by the board manufacturer. Let the joint treatment cure as directed.
Step 3: Waterproof the Exterior Surface
Although cement board tolerates moisture, it is not a substitute for a complete waterproofing layer. Apply an exterior-rated membrane that is compatible with the board, thinset, and climate. Treat seams, corners, fastener heads, and the upper edge according to the membrane instructions.
Water management is especially important in climates with freezing winters. Tile-system manufacturers warn that moisture entering the substrate or mortar bed can contribute to freeze-thaw damage. Waterproofing, complete mortar coverage, suitable materials, and effective drainage work together; no single bucket of miracle goo replaces the others.
Allow the membrane to dry for the full required period. Do not rush because the surface looks dry around the edges. Drying and curing schedules are not decorative suggestions.
Step 4: Dry-Fit the Tile
Mark horizontal and vertical reference lines on each face. Lay out the first side without mortar and confirm where the cuts will fall. Continue the pattern around the corners so the planter feels like one designed object rather than four unrelated tile experiments sharing a frame.
For mosaic sheets, stagger the sheets when possible and adjust individual pieces to maintain consistent spacing. At outside corners, you can use finished-edge tile, metal profiles rated for exterior use, mitered tile, or carefully planned overlapping edges.
Step 5: Set the Tile With Exterior Thinset
Mix only as much mortar as you can use within the product’s working time. Follow the specified water ratio, mixing period, resting period, and remixing instructions. Adding extra water because the mortar feels inconvenient can reduce performance.
Spread mortar with a notched trowel appropriate for the tile size. Work on one small section at a time. Comb the ridges in a consistent direction, press the tile firmly into place, and periodically remove a tile to inspect coverage.
Exterior tile assemblies are exposed to rain, temperature swings, and extended moisture. Manufacturers commonly call for exterior-grade mortar and high mortar coverage rather than scattered dots or hollow pockets. The mortar chosen must be compatible with the tile, membrane, and substrate.
Use spacers to maintain even joints. Check the surface frequently with a level or straightedge. Clean mortar from the tile faces and grout joints before it hardens, since dried mortar has the charming permanence of a bad tattoo.
Step 6: Let the Mortar Cure
Protect the planter from direct rain, strong sun, freezing temperatures, and accidental bumps while the mortar cures. The required waiting period depends on the product and weather conditions. Some systems permit grouting after about 24 hours under standard conditions, but cool or damp weather may extend the schedule.
Do not install cement-based products when temperatures fall outside the manufacturer’s limits. Fresh mortar can be permanently damaged if it freezes before developing adequate strength.
Step 7: Grout the Tile
Choose a grout approved for exterior use and for the width of your joints. Mix it according to the package instructions and force it firmly into the joints with a rubber float. Work diagonally across the tile so the float does not repeatedly dig into fresh grout lines.
After the grout begins to firm, clean the surface with a damp sponge. Use light passes and rinse the sponge frequently. Excess water can weaken cementitious grout or cause uneven color.
Use a compatible flexible sealant rather than rigid grout at changes of plane when required by the installation system. Corners and material transitions experience movement, and a flexible joint gives that movement somewhere to go besides directly through your tile.
Once the grout has cured, apply sealer only if the grout or tile manufacturer recommends it. Some modern grouts do not require sealing. Sealer may help with stain resistance, but it does not transform an incorrectly built planter into a waterproof submarine.
Step 8: Install the Inner Planter
Place pot feet, plastic spacers, or another moisture-resistant support inside the shell. The removable insert should sit level while leaving its drainage openings unobstructed.
Drainage holes are essential because waterlogged container soil loses the air roots need. University extension guidance consistently recommends free drainage and a well-aerated container mix rather than dense garden soil.
Do not add a thick layer of gravel to the bottom of the planting insert in an attempt to improve drainage. Research-based extension guidance notes that coarse material below potting mix can actually interfere with drainage rather than improving it. Use a quality container mix, maintain open drainage holes, and place a small screen or coffee filter over the openings only when needed to limit soil loss.
Planting Ideas for a Designer Finish
For a classic mixed container, use the familiar “thriller, filler, and spiller” arrangement. Place a tall focal plant in the center or toward the back, add mounding plants around it, and finish with trailing varieties that soften the planter’s edges.
A modern planter may look better with one strong plant, such as ornamental grass, snake plant in a sheltered climate, compact evergreen, dwarf palm, or sculptural succulent. A patterned mosaic planter already provides plenty of visual activity, so the plants do not always need to audition for a botanical talent show.
Match plants according to sunlight and watering requirements. Combining a moisture-loving coleus with a drought-tolerant succulent may look wonderful for a week, followed by a long and complicated custody dispute over the watering can.
For an edible container, use an insert made from material intended for growing food and fill it with fresh container mix. Herbs such as parsley, thyme, chives, compact basil, and oregano can create a useful miniature garden, provided their light and moisture needs are compatible.
Ways to Keep the Project Frugal
- Shop discontinued tile: Small planters require limited square footage, making clearance lots especially useful.
- Ask for sample pieces: Tile showrooms sometimes sell or discard display samples that can become accent bands.
- Use plain field tile strategically: Cover most of the planter with inexpensive tile and reserve decorative mosaics for one stripe or front panel.
- Reuse a sound nursery pot: Clean it thoroughly and verify that the drainage holes remain open.
- Borrow specialized tools: A wet saw rental may cost less than purchasing a tool that later spends ten years judging you from a garage shelf.
- Keep the shape simple: Straight sides and square corners reduce cutting waste and installation time.
Maintenance and Seasonal Care
Inspect grout joints, flexible seals, the top edge, and corner details each spring. Repair small defects before water has time to enter the assembly. Clean the tile with products approved for the tile and grout type, avoiding harsh acids or abrasive tools unless the manufacturer specifically permits them.
Keep drainage openings clear of roots, leaves, and soil. Lift the inner planter occasionally to remove trapped debris and check for standing water. Where winters are severe, move the insert to a protected area or follow the plant’s overwintering requirements.
The tiled shell should not sit directly in a puddle. Pot feet create a small drainage and drying gap beneath the structure. In freezing climates, reducing trapped water is important even when the selected tile is rated for freeze-thaw exposure.
Project Experience: Lessons From Building a Tiled Planter
The first lesson from making a tiled garden container planter is that planning saves considerably more time than enthusiastic improvisation. On an early version, I began setting mosaic sheets immediately because the pattern looked simple. By the third side, the horizontal grout lines had climbed nearly half an inch. The planter was technically square, but the tile appeared to be escaping uphill. Removing several sheets while the mortar was still fresh was messy, yet much easier than pretending the slope was an intentional artistic statement.
Since then, I mark a level reference line around all four sides before opening the mortar. I also dry-fit one complete row around every corner. This reveals whether the pattern will meet properly at the final edge. Mosaic sheets often look perfectly uniform in the package, but the spacing between sheets can be wider than the spacing between individual tiles. Separating a few pieces from the mesh and placing them by hand makes those transitions almost disappear.
The second major lesson concerns weight. An empty tiled shell seems manageable. Add a large plastic insert, damp potting mix, a mature plant, and a generous watering, and the project becomes a small decorative boulder. My first planter was assembled on a worktable and planted before being moved. That decision resulted in two people performing an awkward slow-motion shuffle across the patio while trying not to grip the fresh grout.
Now I place the finished shell in its permanent location before inserting soil or plants. When mobility is necessary, I use a load-rated plant caddy selected before construction begins. Choosing the caddy early allows the planter dimensions to conceal it instead of leaving four mysterious wheels protruding from the bottom.
Another useful discovery is that a removable planting insert is worth the small amount of extra planning. In a direct-soil decorative container, roots, wet soil, fertilizer residue, and drainage water are always interacting with the structure. With an insert, I can lift out the entire planting arrangement, rinse the outer shell, inspect the drainage space, and replace seasonal plants on a comfortable work surface.
The insert also provides flexibility. One tiled shell can hold spring bulbs, summer flowers, ornamental peppers in fall, and clipped evergreen branches in winter. The planter remains in place while the lightweight insert changes. It is the outdoor-decor equivalent of owning one excellent jacket and changing the accessories.
Color selection produced another surprise. Bright patterned tile looked restrained on a sample sheet but became much more intense across four planter walls. For highly decorative mosaics, I now use the pattern on the front panel and choose a coordinating solid tile for the other sides. The result still feels custom but is calmer, less expensive, and easier to match at corners.
Grout color matters almost as much as tile color. Strongly contrasting grout emphasizes every joint and every small inconsistency. A grout shade close to the dominant tile color creates a smoother, more forgiving appearance. Before committing, I make a small sample board using leftover cement board, tile, mortar, and grout. This also confirms that the grout will not stain porous tile or change the appearance of natural stone.
Weather taught the final lesson. Mortar and grout cure best within their specified temperature and moisture ranges. Starting the project immediately before a rainstorm led to an elaborate arrangement of tarps, chairs, bricks, and clips that looked less like home improvement and more like an unsuccessful campsite. Checking the forecast and creating a protected curing area beforehand is far easier.
Despite these small adventures, a tiled garden planter remains one of the most satisfying ways to create upscale outdoor decor on a limited budget. It turns tile remnants and a straightforward frame into a substantial decorative feature. More importantly, the finished planter looks deliberate. Visitors see polished tile, lush plants, and a custom designnot the clearance stickers, mortar-splattered gloves, or moment when a mosaic sheet slid slowly toward the ground while everyone watched.
Conclusion
A successful tiled garden container planter depends on more than choosing an attractive mosaic. The frame must be rigid, the backer board must be approved for the application, and every tile-setting product must be compatible with exterior exposure. Proper drainage, waterproofing, mortar coverage, flexible joints, and adequate curing time protect the decorative finish from weather and moisture.
The removable-insert design offers the best balance of durability, affordability, and beginner-friendly construction. It keeps the planting environment separate from the tiled shell while making maintenance and seasonal decorating considerably easier. With clearance tile, a simple shape, and careful layout, the result can look custom-built without consuming the entire landscaping budget.
Note: Product approvals and installation requirements vary. Follow the written instructions for the exact backer board, membrane, mortar, grout, tile, and sealant being used. This article synthesizes guidance from U.S. university extension programs, OSHA, the Tile Council of North America, and established tile-system manufacturers including LATICRETE, Custom Building Products, MAPEI, Schluter Systems, USG, James Hardie, and Daltile.