A kitchen island has a talent for becoming the busiest piece of furniture in the house. It hosts breakfast, homework, meal prep, grocery bags, unopened mail, and at least one mysterious charging cable that belongs to nobody. Unfortunately, an island can also become the visual equivalent of a beige office cubicle: useful, technically acceptable, and not remotely exciting.
An island makeover offers a way to transform the kitchen without replacing every cabinet or launching a renovation that requires eating takeout beside a stack of drywall for three months. With thoughtful paint, trim, storage, seating, lighting, and countertop upgrades, an ordinary builder-grade island can become a practical focal point that looks intentionally designed.
The best results begin with function rather than decoration. Before choosing a dramatic green paint or ordering brass pulls at midnight, consider how the island should work, what currently causes frustration, and which improvements will make everyday life easier.
Start Your Island Makeover With an Honest Assessment
Stand in the kitchen and study the island as though you are meeting it for the first time. Is it too large for the room? Does it lack storage? Are stools blocking the main walkway? Does the countertop provide enough room for food preparation? Is the finish chipped, greasy, or simply dull?
Write down the island’s three biggest problems. This simple exercise keeps a makeover focused. Otherwise, a project that began with “Let’s paint the base” can somehow end with a new sink, six pendant lights, imported stone, and a budget that needs emotional support.
Measure the Surrounding Walkways
A beautiful island is not successful if everyone has to turn sideways to pass it. Many kitchen plans allow approximately 36 to 42 inches between the island and nearby cabinets, with additional room where multiple cooks, open appliance doors, or heavy traffic are involved.
Measure from the island countertop edge rather than the cabinet base. Also test refrigerator doors, dishwashers, ovens, and drawers in their fully open positions. Painter’s tape can help outline a proposed extension before any permanent changes are made.
Decide What the Island Must Do
A kitchen island can serve several purposes, but it does not need to perform every kitchen task simultaneously. Choose the functions that matter most:
- Food preparation and baking
- Casual dining and homework
- Cookware or small-appliance storage
- Trash and recycling organization
- A sink, cooktop, or beverage station
- Entertaining and buffet service
A household that bakes frequently may value a broad, uninterrupted worktop and deep drawers for mixing bowls. A family with children may prefer easy-clean seating and hidden storage for lunch supplies. People who entertain often might prioritize an overhang, outlets, and a clear serving surface.
Choose the Right Level of Makeover
An island makeover can be cosmetic, functional, or structural. Defining the scope early protects both the schedule and the budget.
Cosmetic Refresh
A cosmetic makeover may include paint, new hardware, decorative trim, updated stools, and restrained styling. It is often the fastest and most affordable approach, especially when the cabinet box and countertop remain in good condition.
Functional Upgrade
A functional project may add pull-out shelves, deep drawers, a trash cabinet, bookcase-style shelving, seating, or a larger worktop. These changes require more planning but can significantly improve daily use.
Structural Transformation
Removing cabinets, relocating plumbing, installing a cooktop, changing electrical service, or replacing a heavy stone countertop belongs in the structural category. These upgrades may require permits and licensed professionals. Cutting into an island without checking for wiring or plumbing is a poor way to discover that the cabinet contains more than expired takeout menus.
Paint the Island for Maximum Visual Impact
Painting only the island is one of the most effective ways to introduce contrast without repainting an entire kitchen. A separate island color can make standard cabinetry look layered and custom rather than mismatched.
Dark blue, deep green, charcoal, warm taupe, muted black, and earthy clay shades can anchor a light kitchen. Softer neutrals work well where natural light is limited. The chosen color should coordinate with the undertones of the flooring, surrounding cabinets, backsplash, and countertop.
Do Not Skip Surface Preparation
Kitchen islands collect cooking oils, fingerprints, food splashes, and shoe marks. Paint applied directly over that invisible layer of kitchen history may peel quickly.
- Remove doors, drawer fronts, knobs, and pulls when practical.
- Label every piece so reassembly does not become a puzzle.
- Clean the surface thoroughly with an appropriate degreaser.
- Repair dents, loose joints, and damaged veneer.
- Lightly sand glossy surfaces and remove all dust.
- Apply a compatible bonding or stain-blocking primer.
- Use a cabinet-grade enamel designed for high-touch surfaces.
- Allow the finish to cure before returning the island to full service.
Satin and semi-gloss finishes are common choices because they balance durability with a refined appearance. Extremely shiny finishes reveal every flaw, while very flat paint can be difficult to wipe clean.
Add Trim for a Custom-Built Appearance
Plain drywall or unfinished cabinet backs often make an island look like an afterthought. Decorative paneling can give it the presence of a furniture piece.
Popular options include board-and-batten trim, Shaker-style panels, vertical slats, beadboard, applied molding, fluted wood, and simple framed end panels. The design should echo details already found in the room. A highly ornate island surrounded by minimal flat-panel cabinets may look as though it arrived from a different kitchen.
Before attaching trim, calculate the complete thickness of the new material. Extra layers can interfere with stools, outlets, cabinet doors, and floor vents. Mock up the pattern with painter’s tape first. This reveals awkward spacing while changes still cost nothing.
Use Corbels and Legs Carefully
Decorative legs or corbels can visually support a countertop overhang and give the island a substantial, crafted appearance. They should not reduce knee space or create shin-level obstacles. Structural support for heavy countertop extensions must be designed independently of purely decorative pieces.
Upgrade the Countertop Strategically
The countertop is usually the most visible and expensive component of an island makeover. Replacement is worthwhile when the existing surface is damaged, undersized, difficult to maintain, or visually disconnected from the kitchen.
Quartz and Engineered Surfaces
Engineered quartz offers a broad range of colors and patterns with relatively straightforward maintenance. It works well in households that want a polished stone appearance without routinely sealing the surface.
Natural Stone
Granite, quartzite, marble, and soapstone bring natural variation and character. Maintenance requirements differ by material, so appearance should not be the only deciding factor. Marble, for example, can develop etching and patina. Some homeowners love that lived-in quality; others interpret every mark as a personal betrayal.
Butcher Block
Wood adds warmth and can soften an otherwise cool kitchen. Butcher block requires proper finishing and ongoing care, especially around sinks and frequent spills. It can be an excellent choice for a prep-focused island when the owner accepts that wood changes with use.
Budget-Friendly Alternatives
Quality laminate, wood overlays, tile, refinishing systems, and carefully executed countertop coatings can update an island for less than premium stone. These approaches work best when product limitations are understood. A decorative coating should not be treated like indestructible granite simply because it survived a thirty-second online demonstration.
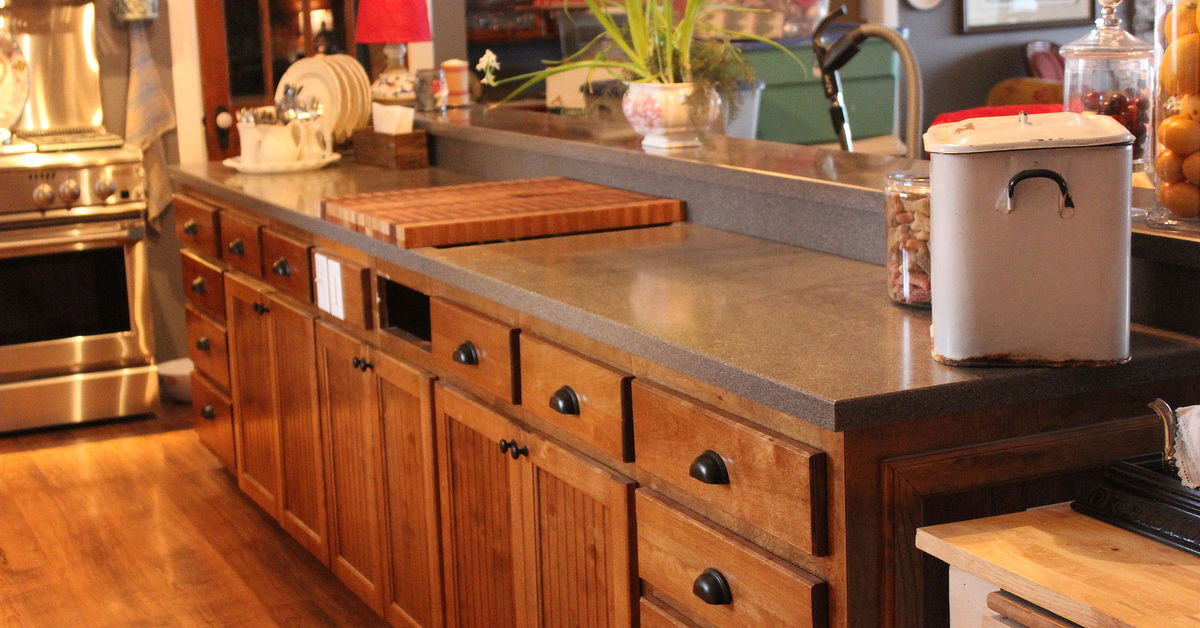
Make Storage Work Harder
A successful island makeover should reduce countertop clutter rather than create a prettier platform for it. Look inside the existing cabinets before adding new storage. Poor organization is sometimes the problem, not insufficient space.
High-Value Storage Improvements
- Full-extension drawers for cookware and mixing bowls
- Vertical dividers for baking sheets and cutting boards
- Pull-out trash and recycling bins
- Tray dividers near the food-preparation area
- Shallow drawers for utensils, wraps, and lunch supplies
- Open shelves for cookbooks or frequently used serving pieces
- Hidden charging storage for phones and tablets
Store items where they are used. Baking tools belong near the main mixing surface. Food-storage containers work best near the refrigerator or cleanup area. Everyday dishes can be placed where family members can reach them without interrupting the cook.
Open shelves should be selective. They are attractive when displaying a few useful objects, but they also expose everything to dust, grease, and visual chaos. Closed storage remains the better choice for the blender with the missing lid and the seasonal platter shaped like a turkey.
Improve Island Seating and Comfort
Adding stools can turn the island into a breakfast bar, homework zone, or social area. Seating must be planned around countertop height, knee clearance, overhang depth, and traffic flow.
Choose stools that allow users to sit naturally without pressing their knees against the cabinet. Backless stools tuck away neatly, while stools with backs provide more comfort for longer meals. Swivel models are convenient but may repeatedly strike freshly painted panels, so consider how they move before purchasing.
Allow enough width for each seated person to eat without conducting accidental elbow negotiations. Also keep seats away from active cooking surfaces whenever possible.
Refresh Lighting and Electrical Features
Lighting can make a newly finished island look dramatically better while improving food preparation. Pendants should provide useful illumination without blocking views or overwhelming the room. One large fixture may suit a compact island, while a longer surface may need two or three appropriately scaled lights.
Warm or neutral LED lighting usually creates a comfortable residential atmosphere. Dimmers allow the island to shift from bright task station to relaxed evening gathering place.
Outlets can support mixers, laptops, chargers, and small appliances, but electrical rules vary by location and project type. Hire a qualified electrician for new wiring, relocated outlets, cooktops, or appliance circuits. Local code requirements should be checked before paneling over existing electrical components.
Finish With Hardware and Simple Styling
Hardware functions like jewelry for the island, although it is generally frowned upon to wear twelve cabinet pulls to dinner. Choose knobs or pulls that relate to nearby faucets, lighting, appliances, or cabinet hardware without forcing every metal finish to match perfectly.
Keep countertop styling restrained. A fruit bowl, vase, wooden board, or small tray is usually enough. The island’s most valuable decoration is open work space. If every inch is occupied by candles, oversized branches, cookbooks, and ceramic chickens, food preparation becomes an elaborate obstacle course.
Sample Island Makeover Plans for Different Budgets
Low-Cost Weekend Refresh
Clean and paint the base, install new hardware, repair damaged caulk, replace worn stool seats, and add one practical centerpiece. This approach delivers strong visual impact while retaining the original structure and countertop.
Midrange Functional Makeover
Add decorative panels, repaint the cabinetry, install pull-out storage, replace stools, and upgrade the pendant lighting. A butcher-block or quality laminate top can further change the look without entering premium-stone territory.
Higher-Investment Transformation
Replace the countertop, modify cabinets, add integrated trash storage, extend seating, improve electrical access, and install professionally designed lighting. This level should begin with accurate drawings, material samples, and contractor estimates rather than enthusiasm alone.
A Real-World Island Makeover Experience: The Honest Version
The following composite experience reflects the lessons commonly encountered during hands-on kitchen island makeovers. The project began with a familiar problem: the island was sturdy but forgettable. It had a flat beige finish, basic hardware, shallow cabinets, and a countertop overhang that technically allowed seating if nobody expected to possess knees.
The first idea was to paint everything dark green over a single weekend. Measuring changed the plan. One stool sat directly in a main walkway, and extending the countertop would have made the passage even tighter. Instead of chasing a larger island, the makeover focused on better use of the existing footprint.
Preparation took longer than painting. The cabinet base looked clean until degreaser revealed years of cooking residue. Every drawer front was labeled with painter’s tape, a small step that prevented a surprisingly annoying reassembly problem. Scratches were filled, glossy areas were sanded, and a bonding primer was applied before the cabinet enamel.
The new color appeared alarming after the first coat. It looked uneven, too bright, and suspiciously similar to a school chalkboard. The second coat created depth, and the cured finish looked richer and calmer than it had while wet. This was an important reminder not to judge cabinet paint during its awkward adolescence.
Simple rectangular trim was added to the exposed back and side panels. The original plan included elaborate molding, but a painter’s-tape mockup showed that the smaller island looked crowded. The restrained design matched the surrounding cabinet doors and made the base appear built-in rather than decorated for a costume party.
Inside, one fixed shelf was replaced with two pull-out trays. Baking sheets moved into a vertical divider, mixing bowls occupied a deep drawer, and the least-used appliances were relocated elsewhere. No new square footage appeared, yet the island seemed to hold more because every item finally had an assigned location.
The hardware created another lesson. Beautiful extra-long brass pulls looked elegant in photographs but felt awkward on the narrow drawer fronts. Smaller pulls provided better proportion and cost less. Samples prevented an expensive box of regrettable metal from entering the house.
New counter stools were selected only after testing seat height and movement. Models with bulky arms were comfortable in the showroom but could not tuck beneath the overhang. Slimmer stools with supportive backs kept the walkway open and proved more practical.
The final step was editing the countertop. Most decorative objects were removed, leaving a wooden tray, a fruit bowl, and enough room to prepare dinner. The completed makeover did not make the kitchen physically larger, but it changed how the room felt and functioned. The island became easier to clean, more comfortable to use, and visually connected to the rest of the home.
The biggest lesson was that successful island makeovers are rarely about adding the most features. They are about identifying friction and removing it. Better drawer access mattered more than decorative corbels. Correct stool dimensions mattered more than trendy upholstery. Careful paint preparation mattered more than buying the most expensive color.
There were imperfect moments: one trim piece was cut twice, the first hardware template slipped, and the island remained off-limits longer than planned while the paint cured. Still, those annoyances were minor compared with the improvement. The finished island felt custom because every decision responded to the room rather than copying a single inspiration photograph.
Conclusion
An island makeover can deliver the satisfaction of a kitchen renovation without replacing the entire kitchen. Begin with measurements and workflow, then choose upgrades that solve real problems. Paint and trim create visual character, while better storage, seating, lighting, and countertop materials improve daily function.
The most impressive island is not necessarily the largest, darkest, trendiest, or most expensive. It is the one that fits the room, supports the household, and leaves enough open counter space to make a sandwich without relocating a miniature indoor forest.