Your phone charger is probably living the same chaotic life as the junk drawer: tangled, dusty, mildly suspicious, and somehow always missing when your battery hits 2%. A DIY charging station made from pallet wood scraps can solve that problem without requiring a furniture-making degree, a giant workshop, or a bank loan approved by a very serious-looking person in a tie.
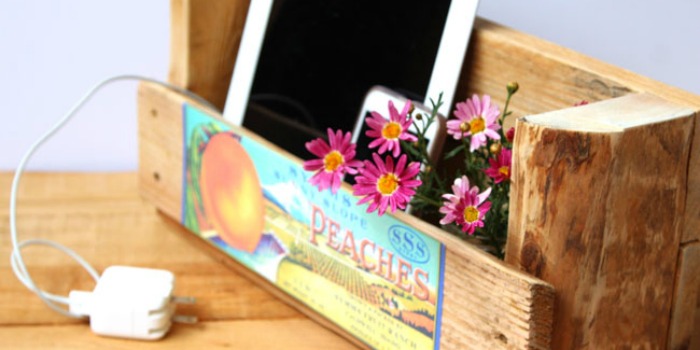
This simple pallet wood project creates one organized home for phones, tablets, earbuds, smartwatches, and other small everyday devices. Better yet, it gives those leftover pallet boards something useful to do besides leaning against the garage wall like forgotten lumber with unresolved emotional issues.
A pallet wood charging station can be rustic, modern, farmhouse-inspired, industrial, or delightfully imperfect. The key is building a practical organizer that manages cords safely, keeps devices easy to reach, and does not turn into a sealed wooden cave full of heat and electrical clutter.
Why Make a Pallet Wood Charging Station?
Most households have more rechargeable devices than available outlets. Phones, tablets, wireless earbuds, e-readers, smartwatches, portable speakers, and gaming accessories all compete for charging space. The result is usually a messy counter full of cords that look like they were arranged by a family of caffeinated squirrels.
A DIY charging station gives every device a predictable place to land. Instead of searching under couch cushions for your charging cable, you can create a dedicated charging zone near an entryway, kitchen counter, desk, bedside table, or family command center.
Using pallet wood scraps also makes the project affordable. Small charging stations do not need long, flawless boards. In fact, short offcuts, narrow slats, and slightly weathered pieces often work beautifully. A few boards can become dividers, shelves, a back panel, or a front lip that keeps devices from sliding away during the night.
There is also something satisfying about turning old wood into a useful household tool. You are not just making a charger organizer. You are rescuing a pile of scraps from becoming garage décor.
Safety First: Build an Organizer, Not a Wooden Oven
Before cutting anything, it helps to understand the goal. This project should organize chargers and devices. It should not tightly enclose power strips, charger blocks, or batteries where heat can build up.
Use the charging station for small personal electronics such as phones, tablets, smartwatches, earbuds, e-readers, and low-power accessories. Do not treat a pallet wood charging station as a charging cabinet for electric bikes, scooters, power tools, large battery packs, or damaged lithium-ion batteries.
Choose a quality, listed power strip or surge protector with overload protection. Use manufacturer-approved chargers or chargers designed specifically for the device. Avoid cheap mystery chargers that arrived in a plastic bag with a name like “Super Power Fast Turbo Ultra 9000.” Your phone deserves better, and so does your smoke detector.
Design the station with an open back, cable openings, and plenty of airflow. Never cover chargers with fabric, stack devices tightly together, or bury a power strip beneath piles of paper, mail, or wooden scraps. Keep the station away from sinks, damp areas, curtains, bedding, and other flammable clutter.
Check cords regularly. Replace cables that are frayed, crushed, loose, hot to the touch, or visibly damaged. If a battery begins swelling, leaking, overheating, smelling strange, or making unusual noises, stop using it immediately and follow the manufacturer’s disposal guidance.
Choose the Right Pallet Wood
Not every pallet belongs in your home. Pallets can be exposed to dirt, moisture, chemicals, industrial environments, and rough handling. For an indoor charging station, use only clean, dry boards that do not have an oily smell, obvious stains, mold, insect damage, or chemical residue.
Look for Heat-Treated Pallets
Many pallets carry a stamp that identifies how the wood was treated. Look for the marking HT, which generally means heat treated. Avoid pallets marked MB, which indicates methyl bromide fumigation. When the stamp is missing or the wood’s history is unknown, choose another pallet. There are plenty of boards in the world; no charging station is worth a chemistry experiment.
Inspect Before You Cut
Set aside any boards that are cracked, heavily warped, saturated with unknown substances, or covered in deep nail holes. A little weathering adds personality. A board that looks like it survived a forklift argument does not.
Wear gloves while dismantling pallets because old boards can hide splinters, staples, and rusty nails. Safety glasses are smart when prying boards apart or sanding. A dust mask or respirator is also useful when working with old wood, especially if you are sanding indoors.
Tools and Materials for a Pallet Wood Charging Station
You can make this project with basic tools. The exact materials depend on the size and style of your charging station, but a simple version usually needs:
- Clean pallet wood scraps
- A compact power strip or surge protector
- Wood screws or brad nails
- Wood glue
- Sandpaper or an orbital sander
- Handsaw, circular saw, miter saw, or jigsaw
- Drill and drill bits
- Measuring tape and pencil
- Clamps, if available
- Wood stain, paint, or clear protective finish
- Rubber feet, felt pads, or small bumpers
- Cable clips, hook-and-loop straps, or adhesive cord organizers
A basic charging station can be built from four main pieces: a base, a back panel, two side walls, and a few front dividers. You can add a shelf for a power strip, a slot for tablets, hooks for headphones, or a small tray for keys and sunglasses.
Plan Your Charging Station Before Cutting
Measure the devices you actually use. This sounds obvious, but many DIY projects become decorative storage for objects that do not fit. Measure your largest phone, tablet, charger block, and power strip before deciding on dimensions.
A practical family charging station might be about 18 to 24 inches wide, 8 to 10 inches deep, and 8 to 12 inches tall. A small bedside charging organizer can be much narrower, perhaps 10 to 14 inches wide.
Leave enough space between slots for thick phone cases. A divider spacing of around 1 to 1.5 inches works for many phones, while a tablet slot may need 1.5 to 2 inches. Make one oversized section for larger devices or a wireless charging pad.
Simple Layout Idea
One easy design uses a rectangular base with a vertical back panel. Add three to five short divider boards along the front half of the base. The devices rest upright between the dividers, while the charging cables pass through holes or slots in the back panel.
The power strip can sit behind the back panel on an open shelf or in a rear compartment with generous ventilation. Keep plugs accessible so you can inspect them, unplug devices, and avoid creating a hidden tangle that requires a flashlight and a minor prayer to fix.
Step-by-Step: Make a Charging Station from Pallet Wood Scraps
Step 1: Break Down and Clean the Pallet Wood
Carefully remove usable pallet boards with a pry bar, pallet buster, or reciprocating saw. Pull out nails, staples, and metal fragments. Run a magnet over the boards if you have one, especially before using a saw blade.
Brush off dirt and wipe the boards with a slightly damp cloth. Let them dry fully before sanding or finishing. Do not soak pallet wood, because it may warp, split, or take forever to dry while mocking you from the workbench.
Step 2: Sand the Boards Smooth
Start with medium-grit sandpaper to remove rough splinters and uneven spots. Move to finer grit for surfaces that will touch phones, tablets, or charging cables. You do not need furniture-store perfection, but you do want smooth edges that will not scratch a screen or snag a cord.
Round over sharp corners with sandpaper. A charging station gets handled frequently, often while someone is half-awake and looking for coffee. Friendly edges are a gift to future-you.
Step 3: Cut the Main Pieces
For a simple station, cut one base board, one back board, two side boards, and several divider boards. Example dimensions for a five-device charging station might include:
- Base: 20 inches long by 8 inches deep
- Back panel: 20 inches long by 10 inches tall
- Side panels: 8 inches deep by 10 inches tall
- Dividers: 6 inches deep by 4 to 6 inches tall
These measurements are only a starting point. Adjust them based on your devices, power strip size, and available pallet boards.
Step 4: Create Cable Openings
Drill cable holes in the back panel before assembly. A 1-inch hole works for many charging cables, though you may want larger openings if your cords have bulky connectors. Place the holes behind each device slot so cables can pass through neatly.
You can also cut a long horizontal slot near the bottom of the back panel. This option gives you more flexibility when changing cables later. Sand the edges carefully so cords do not rub against rough wood.
Step 5: Assemble the Frame
Attach the back panel to the base using wood glue and screws. Add the side panels next. Pre-drill screw holes to reduce the chance of splitting thin pallet boards.
Use clamps while the glue dries if you have them. If you do not have clamps, carefully position the pieces and secure them with screws. The project does not need to survive a hurricane, but it should remain upright when someone plugs in a tablet with the enthusiasm of a competitive gamer.
Step 6: Install the Device Dividers
Mark the divider positions on the base. Check spacing by placing your actual devices between the marks. Once the layout feels right, glue and screw the dividers into place.
Keep the dividers low enough that they support devices without covering the screen. A front lip can help prevent devices from slipping, but it should not block charging ports located near the bottom edge.
Step 7: Add a Power Strip Shelf
Instead of sealing the power strip inside the charging station, create an open rear shelf or mounting area. Leave room around the strip for airflow and easy access.
Some people mount a power strip underneath a desktop or behind a wall-mounted organizer. For a pallet charging station, an open back compartment works well. Use cable clips or hook-and-loop straps to keep cords from drooping into a tangled noodle convention.
Step 8: Finish the Wood
Choose a finish that fits your home. A clear water-based polyurethane preserves the rustic pallet look. A dark stain gives the station a more polished farmhouse style. White paint can make it look clean and modern, while black hardware can create a simple industrial feel.
Let all finishes cure completely before placing electronics inside the station. Fresh stain or paint fumes and charging devices are not a charming combination.
Step 9: Add Protective Feet and Cable Management
Attach rubber feet or felt pads underneath the station to protect countertops and prevent sliding. Add cable clips behind the unit to guide each cord toward its slot.
Label cables if multiple people use the station. Small tags marked “Mom,” “Dad,” “Tablet,” or “Mystery Earbuds That Nobody Claims” can save time and prevent charger theft accusations at breakfast.
Creative Charging Station Features to Add
Once the basic structure is finished, you can customize the charging station to match your household habits.
Add a Mail and Keys Shelf
A shallow top shelf can hold keys, wallets, sunglasses, and incoming mail. This turns the charging station into a small entryway command center. Just avoid piling receipts directly on top of chargers or power strips.
Include a Tablet Slot
Create one wider divider slot for a tablet, e-reader, or cookbook screen. This is useful in kitchens where a tablet may charge while displaying recipes, music, or a very important video explaining how to make sourdough starter.
Install Headphone Hooks
Screw small hooks onto each side panel for headphones, charging cables, or smartwatches. Keep hooks away from the cord path so cables do not become accidental wall art.
Add a Wireless Charging Pad Area
Leave a flat open section for a wireless charging pad. Do not bury the pad under thick wood, metal hardware, or decorative objects. Wireless chargers need clear contact with compatible devices and should remain easy to inspect.
Make It Wall Mounted
A wall-mounted pallet charging station saves counter space and looks great in a mudroom, office, or kitchen. Use sturdy wall anchors or screw directly into wall studs. Keep the station near an outlet, but do not stretch cords across walkways.
Common DIY Charging Station Mistakes
The biggest mistake is creating a beautiful box that traps heat. Charger blocks need room around them. Avoid fully enclosed compartments, packed cable bundles, and layers of devices stacked on top of one another.
Another mistake is choosing pallets based only on appearance. A weathered board may look amazing, but it still needs to be clean, dry, structurally sound, and safe for indoor use.
Do not use damaged cords just because they “still work.” A cable that only charges when bent at a mysterious 37-degree angle is not a cable. It is a warning sign with a USB connector.
Finally, do not overload the power strip. Small devices usually draw relatively modest power, but the total load still matters. Follow the power strip manufacturer’s instructions and avoid plugging in high-wattage appliances such as space heaters, hair tools, coffee makers, or anything that belongs in a completely different category of household chaos.
How to Keep Your Pallet Wood Charging Station Organized
Once your charging station is complete, give it a few simple rules. Keep only active chargers in the station. Remove broken cables, duplicate adapters, and mysterious cords that belong to devices from 2013.
Assign each family member a device slot. Use cord labels or colored cable ties so everyone knows which charger belongs where. Clean dust from the station regularly, especially around outlets, plugs, and cable openings.
Do a quick monthly safety check. Look for loose screws, splintered wood, frayed cords, overheating chargers, and device batteries that seem swollen or damaged. The goal is not to turn your charging station into a tiny electrical inspection department. It is simply to notice problems before they become expensive surprises.
Experiences and Lessons from Building a Pallet Wood Charging Station
The first time I built a charging station from pallet scraps, I made the classic beginner mistake: I designed it around the wood instead of the devices. I had a beautiful row of divider slots that looked great from across the room. Unfortunately, my phone cases were wider than the slots, my tablet did not fit anywhere, and the charging cables entered from an angle that made every connector look like it was doing yoga.
The lesson was simple. Measure the devices first. Pallet wood is forgiving, but electronics are not. A phone with a rugged case can be much wider than a bare phone, and a tablet charging cable may need room to bend without being pinched. Before attaching dividers permanently, I now place the actual phones, tablets, and charger blocks on the base and test the layout.
Another lesson involved cable holes. I originally drilled tiny round holes because they looked neat. They were neat until I tried to pull a charging cable through one with a bulky connector. It felt like threading a needle while wearing oven mitts. On later builds, I used larger holes or a long slot across the back panel. The station looked just as clean, but changing cords became dramatically easier.
I also learned that rustic does not have to mean rough. Pallet boards often have wonderful character: nail holes, grain variation, faded color, and little dents that make the wood feel lived in. But a device charging station is handled every day. A few minutes of sanding transformed the project from “cool reclaimed wood object” into something that did not threaten to scratch every phone in the house.
The finish made a bigger difference than expected. One version received a dark walnut stain and looked like it belonged in a farmhouse-style office. Another was painted soft white and placed on a kitchen counter, where it blended into the cabinets and looked surprisingly polished. My favorite version used a clear matte finish because it kept the pallet wood’s imperfect personality without making the surface feel unfinished.
My most useful upgrade was adding a rear cable-management zone. Instead of allowing cords to spill behind the station like spaghetti escaping a pot, I installed simple adhesive cable clips and hook-and-loop straps. Suddenly, each cable had a route. Phones could be unplugged without pulling three other cords loose, and the back of the charging station stopped looking like a tiny haunted jungle gym.
Family use revealed another truth: labels are not optional in a shared charging station. Without labels, people will absolutely borrow chargers, move cords, and insist they did not touch anything. A small tag on each cable saves arguments. It also helps guests know where to charge their phones without wandering around the kitchen looking for an outlet.
I found that an open design is more practical than a fully enclosed one. A box with a lid may look tidy in photos, but it makes it harder to inspect charger blocks, feel for unusual heat, or replace a cable. An open-back station may reveal a little more hardware, yet it is easier to maintain and safer for everyday use.
The final lesson was about location. A charging station works best where people naturally unload their devices. Near the entryway, it becomes a drop zone for phones and keys. Near a desk, it keeps work accessories organized. In a kitchen, it becomes a family electronics hub. At a bedside table, it prevents chargers from sliding behind furniture and beginning a long-term relationship with dust bunnies.
Building a charging station from pallet wood scraps is not complicated, but it is surprisingly rewarding. You start with old boards, a pile of cords, and a little frustration. A few cuts, screws, and sanding sessions later, you have a useful piece of furniture that makes daily life feel slightly more organized. And honestly, any project that reduces cable clutter deserves at least one dramatic victory lap around the room.
Conclusion
A pallet wood charging station is a small DIY project with a big everyday payoff. It turns leftover lumber into a functional organizer, gives rechargeable devices a proper home, and helps keep cords from multiplying across countertops like tiny electronic vines.
Build it with clean pallet wood, smooth edges, open airflow, accessible cables, and a quality power strip. Keep the design simple, customize it for the devices you use most, and resist the temptation to turn it into a tightly sealed charger bunker. With a little planning, your pallet scraps can become one of the most useful projects in your home.
Note: Use clean, heat-treated pallet wood when possible, keep chargers ventilated, and use the station only for small personal electronics with approved charging equipment.