Mini blinds are the quiet workhorses of home decor: they block glare, protect privacy, collect dust with Olympic-level dedication, and somehow become crooked five minutes before guests arrive. The good news is that mini blind maintenance is not complicated. With the right cleaning routine, a few small repair tricks, and a little patience, you can keep vinyl and aluminum mini blinds looking sharp and working smoothly for years.
This guide covers practical mini blind cleaning tips, simple repairs, safety reminders, and real-life maintenance experiences that actually work in busy homes. No dramatic home makeover montage required.
Why Mini Blind Maintenance Matters
Mini blinds may look simple, but they have several moving parts: slats, lift cords, ladders, tilt mechanisms, bottom rails, plugs, brackets, and sometimes hidden cordless lift systems. When dust, moisture, grease, and rough handling build up over time, blinds can become hard to raise, uneven, stained, noisy, or permanently bent.
Routine maintenance helps prevent three common problems: dirty slats, tangled cords, and damaged hardware. It also keeps your windows looking cleaner overall. Even a spotless room can feel unfinished when the blinds are dusty enough to write your name on them. And yes, someone will eventually write their name on them.
Know Your Mini Blinds Before You Clean Them
Most mini blinds are made from vinyl, PVC, or aluminum. These materials are popular because they are affordable, lightweight, and easier to wipe clean than many fabric window treatments. However, not all mini blinds should be treated exactly the same way.
Vinyl Mini Blinds
Vinyl mini blinds are common in bedrooms, rentals, laundry rooms, and budget-friendly home updates. They handle light moisture well, but they can bend or crack if pulled aggressively. Clean them with mild dish soap, warm water, microfiber cloths, or a gentle vacuum brush attachment.
Aluminum Mini Blinds
Aluminum mini blinds are slim, durable, and good for areas where you want a crisp, clean look. Their slats can crease if squeezed too hard, so avoid heavy scrubbing. Use a microfiber cloth, soft sponge, or vacuum brush. For greasy buildup, a mild soap solution works better than harsh cleaners.
Cordless Mini Blinds
Cordless mini blinds look cleaner because there are no dangling lift cords, but they still have internal cords and lift mechanisms inside the headrail or bottom rail. Raise and lower them from the center of the bottom rail to prevent uneven tension. If you yank one side like you are starting a lawn mower, the blind will not thank you.
How Often Should You Clean Mini Blinds?
A realistic mini blind maintenance schedule depends on the room. Blinds in kitchens collect grease and airborne cooking residue. Bathroom blinds deal with moisture. Living room and bedroom blinds mostly collect dust, pet hair, pollen, and the mysterious gray fuzz that appears out of nowhere.
- Weekly: Light dusting in high-traffic rooms or homes with pets.
- Every 2 to 4 weeks: Standard dusting for most bedrooms, offices, and living spaces.
- Every 2 to 3 months: Deeper cleaning with mild soap and water.
- As needed: Spot cleaning for food splashes, fingerprints, bug marks, or window condensation stains.
The easiest rule is this: clean your blinds whenever you dust the windowsill. If the sill is dusty, the blinds are probably pretending to be fine while secretly holding an entire weather system.
The Best Tools for Mini Blind Cleaning
You do not need a closet full of specialty gadgets. In fact, the most useful mini blind cleaning tools are simple, inexpensive, and probably already in your home.
- Microfiber cloths
- Vacuum with a soft brush attachment
- Mild dish soap
- Warm water
- White vinegar for vinyl or metal blinds
- Soft sponge
- Old clean sock or dusting glove
- Kitchen tongs wrapped with microfiber cloths
- Towels for drying
- Flat-head screwdriver for bottom rail plugs
Avoid abrasive pads, bleach, strong ammonia-based cleaners, and soaking methods on blinds that have fragile hardware. Strong chemicals can discolor slats or make plastic brittle over time.
How to Clean Mini Blinds Without Taking Them Down
For regular maintenance, leave the blinds in place. This is faster, easier, and far less likely to turn into a Saturday afternoon wrestling match with mounting brackets.
Step 1: Lower and Close the Blinds
Lower the blinds completely. Tilt the slats closed in one direction. This gives you a broad surface to clean instead of chasing each slat individually.
Step 2: Dust From Top to Bottom
Use a microfiber cloth, dusting mitt, or vacuum brush attachment. Work from the top slats downward so dust does not fall onto areas you already cleaned. Then tilt the slats in the opposite direction and repeat.
Step 3: Spot Clean Stains
Mix warm water with a few drops of mild dish soap. Dip a microfiber cloth into the solution, wring it well, and wipe the stained area. For vinyl or aluminum mini blinds, a 50/50 mix of warm water and white vinegar can help with sticky grime. Rinse with a clean damp cloth and dry the slats afterward.
Step 4: Dry the Slats
Moisture left on blinds can attract more dust or cause metal parts to corrode. Wipe each cleaned area with a dry microfiber cloth. It takes a few extra minutes, but it prevents the “why are these streaky now?” problem.
Deep Cleaning Mini Blinds in the Bathtub
Sometimes mini blinds need more than a polite dusting. Kitchen blinds, garage blinds, or blinds that have not been cleaned since flip phones were cool may need a deeper wash.
Remove the blinds carefully from their brackets and place towels in the bathtub to protect the slats from scratches. Fill the tub with warm water and a small amount of mild dish soap. Soak vinyl or aluminum blinds for a short time, then wipe slats gently with a sponge or cloth. Rinse with clean water and dry completely before rehanging.
Do not soak blinds with delicate fabric tapes, wood components, or questionable old hardware. Also, avoid very hot water, which can warp vinyl. If the blinds are already brittle, cracked, or badly yellowed, replacement may be a better investment than a heroic rescue mission.
Quick Fixes for Common Mini Blind Problems
Problem 1: Slats Are Bent
Vinyl slats can sometimes be flattened by hand using gentle pressure. Aluminum slats are trickier because they crease easily. If a slat is badly bent, replace it with a spare slat from the bottom of the blind. Many blinds have extra slats that can be removed without changing the finished length too much.
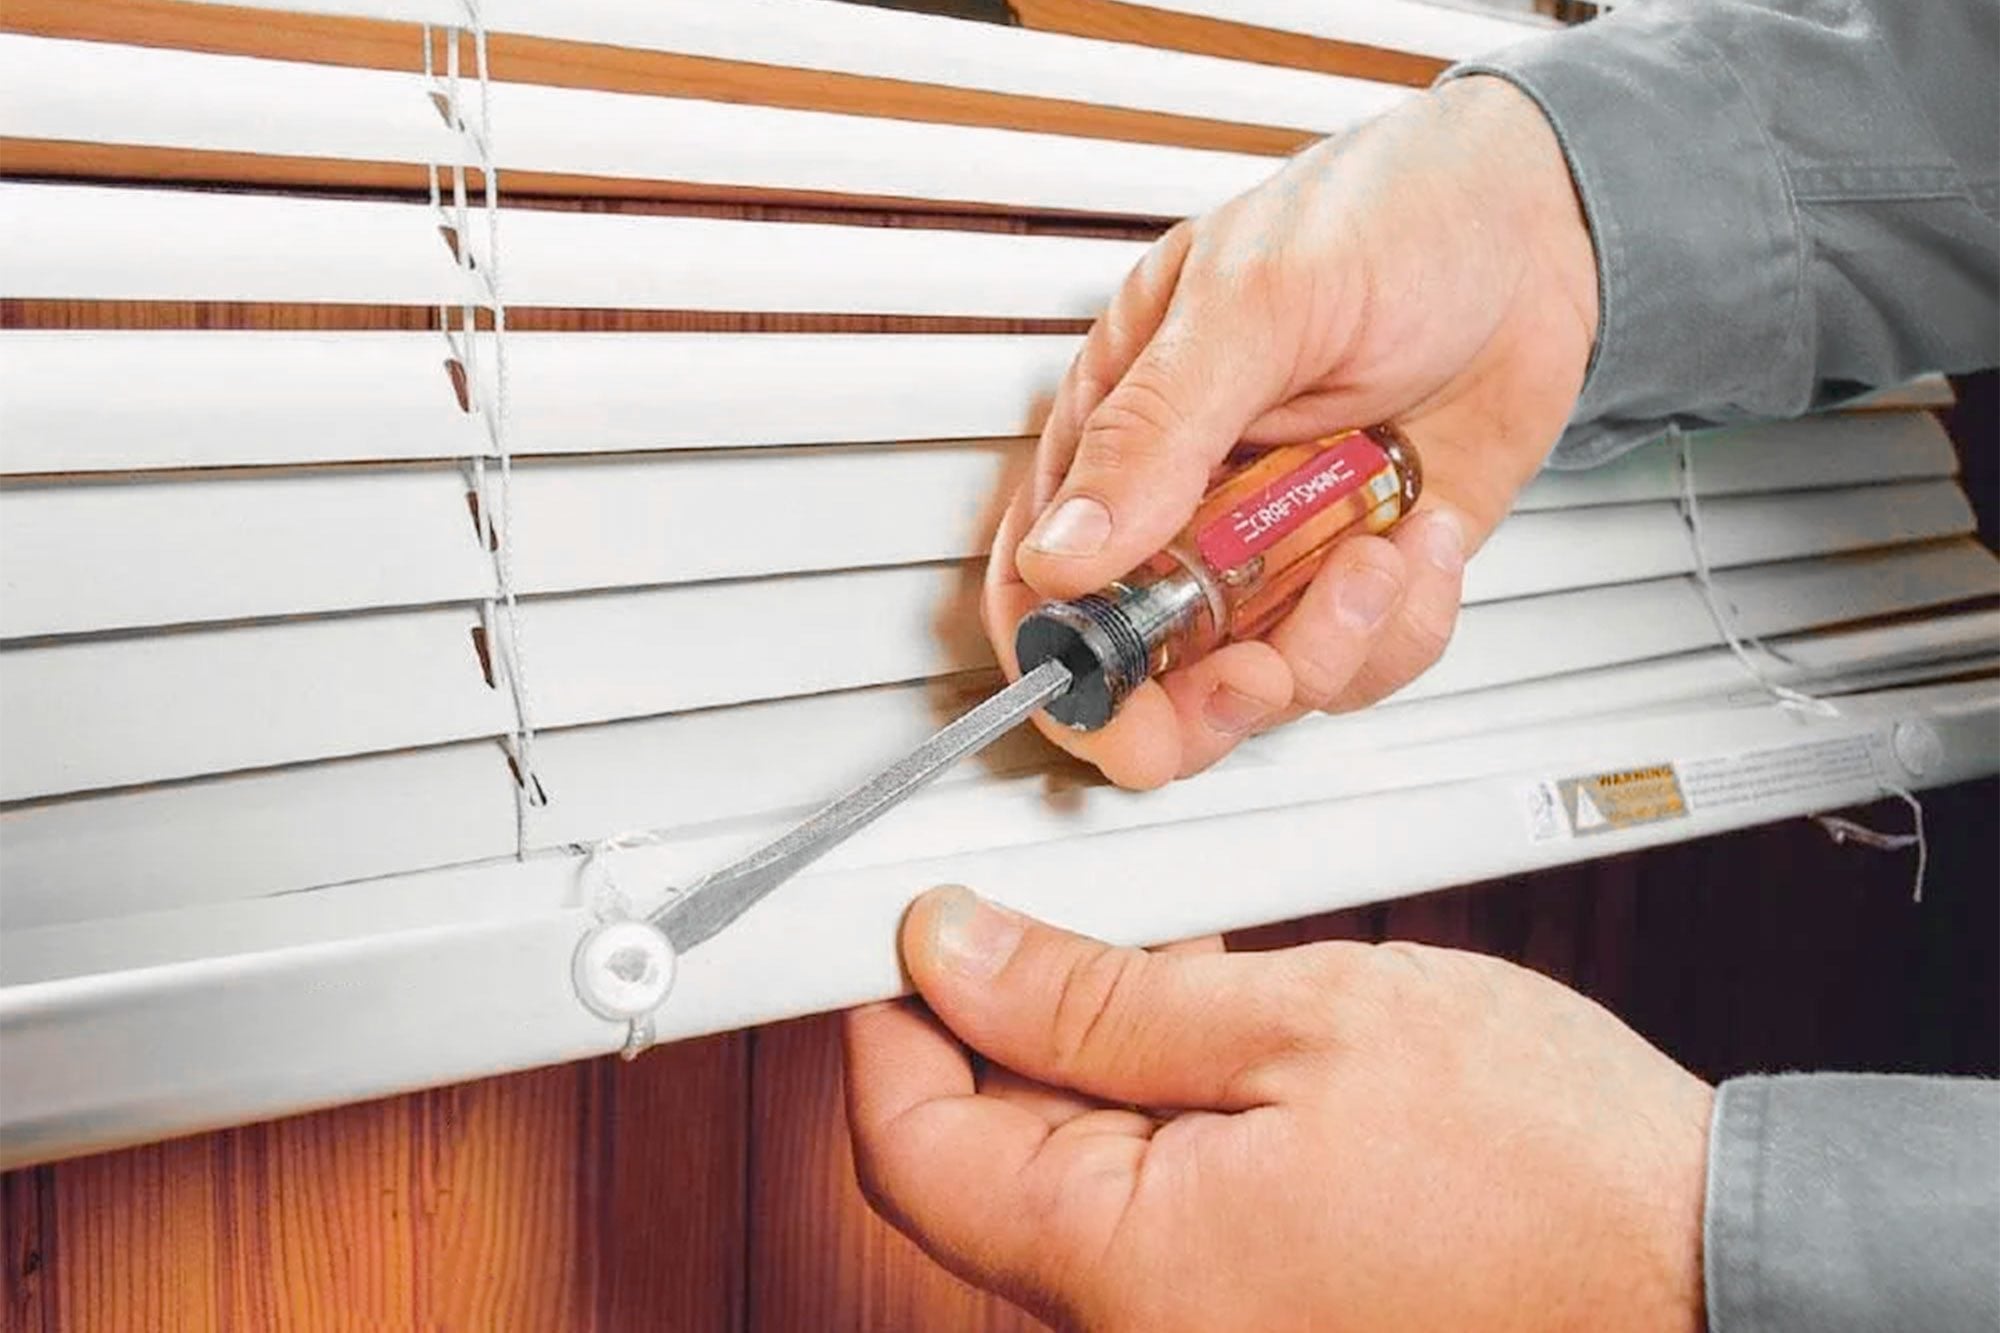
Problem 2: One Slat Is Broken
To replace a broken mini blind slat, remove the plugs from the bottom rail, untie or release the lift cords, slide out slats until you reach the damaged one, replace it with a spare, then restring the cords through the ladder openings. Reattach the bottom rail plugs securely. Take a photo before disassembling anything so you have a visual map when it is time to put everything back.
Problem 3: Blinds Will Not Tilt
If the slats do not tilt, the tilt wand, tilt gear, or internal mechanism may be disconnected or broken. First, check whether the wand hook is still attached. If the wand spins without moving the slats, the tilt mechanism inside the headrail may need replacement. Many standard horizontal blinds use replaceable tilt mechanisms, but measure and match the part carefully.
Problem 4: Blinds Raise Unevenly
Uneven blinds often happen when lift cords are tangled, worn, or pulled from one side too often. Lower the blinds fully, then raise them slowly while holding the bottom rail in the center. For cordless blinds, always lift from the middle. If one side still hangs lower, inspect the cord path and internal mechanism for obstructions.
Problem 5: Lift Cord Is Frayed or Broken
A frayed cord is both a function problem and a safety concern. Replacement cord kits are available, but restringing can be time-consuming. If the blind is inexpensive, old, or installed in a child’s room, replacing it with a cordless model may be the smarter choice.
Problem 6: Blinds Are Stuck in the Raised Position
Traditional corded blinds can lock if the cord is pulled at the wrong angle. Hold the cord level with the headrail and gently pull to release the lock. Do not yank. If the lock is jammed, remove the blind and inspect the cord lock mechanism. Dust or worn parts may be preventing smooth movement.
Mini Blind Safety Tips Every Homeowner Should Know
Window covering cords can be dangerous for young children and pets. If your home has older corded mini blinds, keep cords short, secured, and out of reach. Cord stops should be properly positioned near the headrail when the blind is fully lowered. In bedrooms, playrooms, nurseries, and pet areas, cordless blinds or blinds with inaccessible cords are the safer choice.
Also avoid placing cribs, beds, chairs, desks, or climbable furniture near corded window coverings. A clean blind is nice. A safer room is better.
How to Prevent Dust and Damage
Prevention is the most underrated part of mini blind maintenance. Keep windowsills clean, vacuum nearby floors regularly, and avoid spraying hair products, cooking oils, or room sprays near blinds. Sticky particles in the air grab dust and create that stubborn film that makes cleaning ten times harder.
When opening or closing blinds, use the wand or lift system gently. Tilt the slats open before raising the blinds. Raising them while the slats are tightly closed puts extra stress on cords and ladders. If you have children at home, teach them that blinds are not ladders, drums, accordions, or indoor jungle vines.
When Should You Replace Mini Blinds Instead of Repairing Them?
Repair makes sense when the blind is fairly new, matches other window coverings, or has only one broken part. Replacement makes more sense when several slats are cracked, the cords are worn, the headrail is damaged, the blind no longer raises smoothly, or the material has yellowed beyond cleaning.
As a practical rule, compare the cost of replacement parts and your time against the price of a new blind. Basic vinyl mini blinds are often affordable, while custom sizes, specialty colors, and higher-quality aluminum blinds may be worth repairing.
Room-by-Room Mini Blind Maintenance Tips
Kitchen
Kitchen mini blinds collect grease faster than blinds in other rooms. Use mild dish soap and warm water for monthly wipe-downs. Do not wait until the slats feel sticky. Once grease hardens, dust sticks to it like it signed a long-term lease.
Bathroom
Bathroom blinds need moisture control. Run the fan, open the window when possible, and wipe condensation from the slats. Vinyl blinds usually work better than metal in damp spaces because they resist moisture-related issues more easily.
Bedroom
Bedroom blinds mainly need dust control. A microfiber cloth or vacuum brush every few weeks is usually enough. If allergies are an issue, clean blinds more often and vacuum curtains, rugs, and window tracks too.
Home Office
In a home office, blinds often get adjusted throughout the day to control glare. Raise, lower, and tilt them gently to protect the lift system. If one window gets strong sun, rotate slat angles during peak heat to reduce fading and warping.
Real-Life Experience: What Actually Works With Mini Blind Maintenance
After dealing with mini blinds in apartments, bedrooms, rental homes, and busy family spaces, one lesson becomes obvious: the best cleaning method is the one you will actually repeat. A complicated system involving three buckets, specialty spray, a folding table, and emotional preparation may work once. A microfiber cloth kept in a drawer near the window works every week.
One of the most useful habits is cleaning blinds in short sessions. Instead of declaring “today is blind cleaning day,” which sounds like a punishment invented by a very tidy villain, clean one or two windows at a time. For example, dust the bedroom blinds while changing sheets. Wipe kitchen blinds while waiting for the coffee maker. Vacuum office blinds before cleaning your desk. Small habits prevent the dreaded deep-clean marathon.
The microfiber tong method is surprisingly effective for horizontal mini blinds. Wrap each side of kitchen tongs with microfiber cloths, secure them with rubber bands, and pinch each slat gently while sliding across. It cleans both sides at once and saves time. It is not perfect for extremely dirty blinds, but for normal dust it works well. The only warning: do not squeeze too hard, especially on aluminum slats. You are cleaning blinds, not testing sandwich grip strength.
For kitchen blinds, mild dish soap is the hero. Greasy dust does not respond well to dry dusting because it smears. A damp microfiber cloth with warm soapy water cuts through the film better. The trick is to wring the cloth thoroughly. Too much water drips into the bottom rail and makes a mess on the sill. After wiping, follow with a clean damp cloth and then a dry cloth. That final drying step is what makes the blinds look finished instead of streaky.
Repairs are also less intimidating once you understand how mini blinds are assembled. Replacing a broken slat is fiddly, but not mysterious. The bottom rail plugs come out, the cords are released, and the slats slide free. The key is patience. Lay the blind flat, keep the cords organized, and take photos before removing anything. Many failed repairs happen because someone thinks, “I’ll remember how this goes.” That sentence has defeated many confident people.
The most common mistake is forcing a stuck blind. If the blind will not raise, lower, or tilt, stop pulling. Check whether the slats are tilted closed, whether the lift cord is caught, or whether the bottom rail is uneven. For cordless blinds, reset the blind by lowering it fully and raising it from the center. For corded blinds, adjust the pull angle gently. Force usually turns a minor jam into a broken mechanism.
Another experience-based tip: keep spare parts. If you shorten blinds, save extra slats, plugs, and brackets in a labeled bag. Tape the bag inside a closet or store it with household hardware. Months later, when one slat cracks or a bracket disappears into another dimension, you will be grateful. Future you enjoys gifts like that.
Finally, know when to replace. A blind with one broken slat is a repair candidate. A blind with brittle slats, frayed cords, a cracked headrail, and a tilt wand that spins like a game-show wheel is asking for retirement. Maintenance should save money and reduce waste, not turn your weekend into a tiny engineering crisis.
Conclusion
Mini blind maintenance is mostly about consistency, gentle handling, and using the right cleaning method for the material. Dust regularly, spot clean with mild solutions, dry the slats well, and fix small problems before they become full-blown window drama. Whether you are cleaning vinyl blinds in a rental, repairing aluminum blinds in a home office, or replacing old corded blinds with safer cordless options, the goal is simple: blinds that look good, move smoothly, and do their job without demanding too much attention.
With a microfiber cloth, mild soap, a few repair basics, and a little common sense, mini blinds can stay fresh and functional for years. They may never be the most glamorous part of your home, but when they are clean, straight, and working properly, they quietly make every room feel more polished.
SEO Tags
Note: This article is written in original standard American English for web publishing and synthesizes practical home-care, cleaning, repair, and safety guidance from reputable U.S.-focused sources without copying source text.