

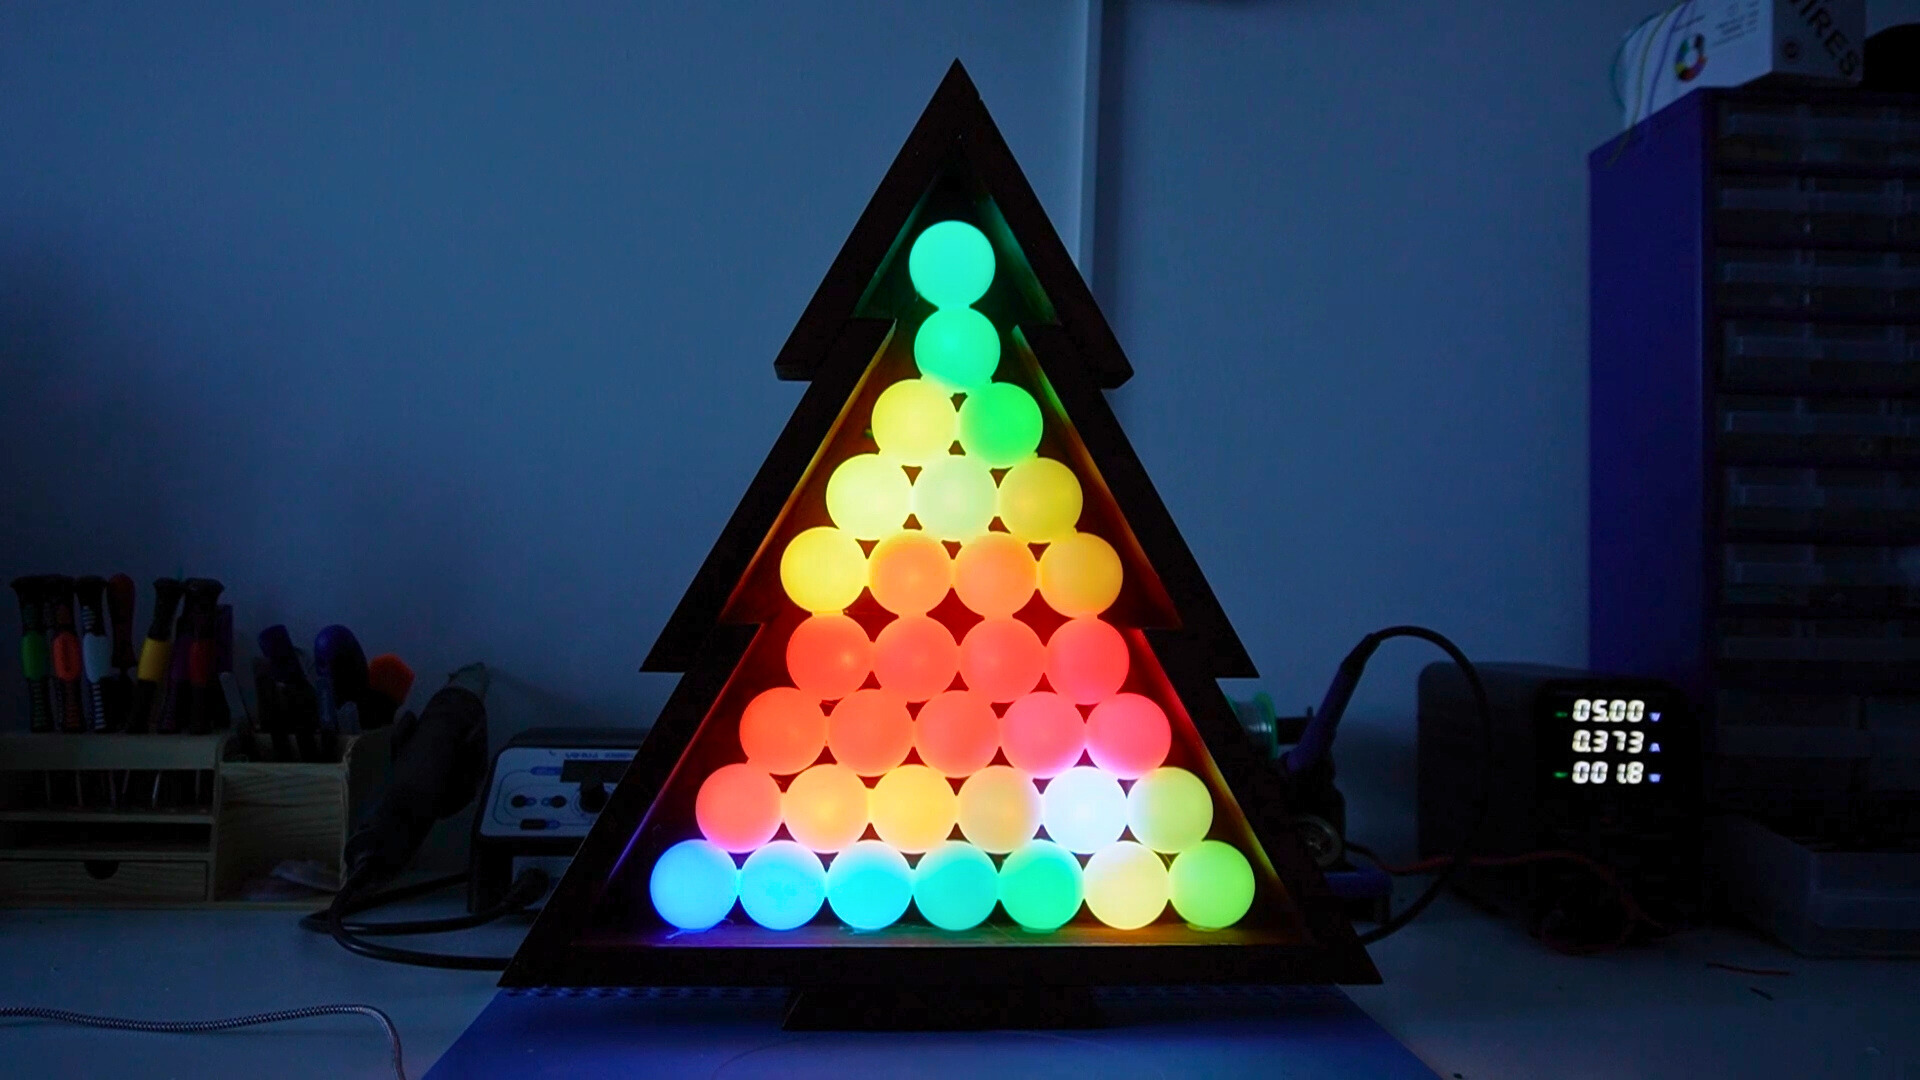
A Christmas tree already has one job: stand there, sparkle, and make the living room look like it has been personally approved by a snow globe committee. But a musically-reactive LED Christmas tree takes the job description one step further. Instead of blinking randomly like it just remembered an embarrassing moment from 2014, the tree responds to music, beats, volume changes, and rhythm. Play a soft jazz track, and the lights can shimmer gently. Turn on a holiday pop playlist, and the tree can burst into color like Santa hired a concert lighting designer.
At its heart, a musically-reactive LED Christmas tree combines addressable LED lights, a small controller, and an audio input method. The result is a display that feels alive. It does not simply decorate the room; it participates in the room. Whether you are a DIY electronics hobbyist, a holiday decorator with ambition, or someone who has stared at a normal string of lights and thought, “Nice, but what if it had stage presence?” this project is a cheerful blend of creativity, technology, and seasonal drama.
This guide explores how a music-reactive Christmas tree works, what parts are commonly used, how to design lighting effects, what safety details matter, and why this kind of project has become such a favorite among makers. We will keep things practical, fun, and realisticbecause nothing ruins holiday magic faster than a project that requires three engineering degrees and a snack break every eleven minutes.
What Is a Musically-Reactive LED Christmas Tree?
A musically-reactive LED Christmas tree is a holiday tree fitted with LEDs that change color, brightness, animation speed, or pattern based on sound. The lights may react to the loudness of music, the beat of a song, or different frequency ranges such as bass, mids, and treble. In a simple version, the tree glows brighter when the music gets louder. In a more advanced version, the lower branches might pulse with bass while the upper branches sparkle with high notes.
Unlike traditional Christmas lights, addressable LEDs allow each individual light to be controlled separately. This means the tree can display waves, spirals, rainbows, falling snow effects, beat flashes, color wipes, and patterns that look surprisingly professional. The same basic idea is used in stage lighting, gaming setups, DIY art installations, and music visualizers.
The Basic Idea
The project usually works like this: a microphone or audio source detects sound, a microcontroller reads that signal, software interprets the music, and the LED strip displays a visual response. The process happens quickly enough that the lights appear to move with the song. It feels magical, but it is really a clever loop of sensing, processing, and glowing. Holiday magic, apparently, enjoys data.
Core Components of a Music-Reactive Christmas Tree
You do not need a warehouse full of electronics to build a music-reactive LED Christmas tree. Most versions use a handful of common maker components. The exact parts depend on whether the project is simple, intermediate, or advanced.
1. Addressable LED Strips or Pixels
The star of the show is the addressable LED. Popular options include WS2812B-style LED strips, NeoPixel-style strips, LED strings, or pixel nodes. These lights are different from standard Christmas lights because each LED can receive its own color instruction. Instead of the whole strand turning red at once, one light can be red, the next blue, the next green, and the next doing its best impression of a tiny disco ball.
For a Christmas tree, flexible LED strips can be wrapped around branches, while individual pixel strings can be distributed more like traditional holiday lights. LED strips give cleaner lines and smoother animations. Pixel strings often look more natural on a tree because they can be tucked between branches. Either approach can work beautifully.
2. A Microcontroller
The microcontroller is the brain of the display. Common choices include Arduino-compatible boards, ESP32 boards, Raspberry Pi boards, or similar small computers. An Arduino-style controller is great for simple volume-based effects. An ESP32 offers more processing power and wireless options. A Raspberry Pi can handle more advanced audio analysis and larger projects, especially when music is played directly from the device.
For beginners, an Arduino-compatible board with an LED library is often the most approachable route. For makers who want Wi-Fi control, app integration, or more advanced visualizations, an ESP32 or Raspberry Pi may be a better fit.
3. Audio Input
A musically-reactive tree needs a way to “hear” the music. The simplest option is a sound sensor or microphone module. These modules detect changes in sound level and send a signal to the controller. A more advanced setup may use a direct audio feed, which can be cleaner than a microphone because it does not pick up room noise, people talking, or the family dog barking at the bass drop.
Microphone-based systems are easier to place anywhere in the room. Direct audio systems are better when you want precise synchronization with a playlist. Both can create impressive results, but they behave differently. A microphone listens to the environment. A direct audio input listens to the song itself.
4. Power Supply
Power planning matters more than beginners expect. Addressable LEDs can draw significant current when many pixels are bright white at the same time. A small test strip may run from a modest supply, but a full tree display needs careful power budgeting. The goal is not just to make the lights turn on; it is to make them run reliably without flicker, overheating, or voltage drop.
Many DIY builders use a dedicated 5V power supply for WS2812B-style LEDs. Larger trees may need power injected at multiple points along the LED run so the far end of the strip does not appear dim or discolored. Good wiring, correct polarity, and proper strain relief are not glamorous, but they are the quiet heroes of a successful holiday build.
How the Music Reaction Works
The simplest music-reactive effect is based on volume. The controller reads the audio level and maps that value to brightness or color intensity. When the music gets louder, the tree lights up more dramatically. When the song gets quiet, the tree fades down. This is easy to understand and surprisingly satisfying.
More advanced systems analyze frequency. Bass notes can trigger deep reds or blues near the trunk. Vocals can create soft waves across the middle branches. Treble can sparkle near the top like little digital snowflakes. This creates a visual separation that makes the display feel more musical and less like a random light storm.
Volume-Based Effects
Volume-based animation is the best starting point. The controller reads how loud the sound is and adjusts the LEDs accordingly. A quiet verse may create a slow breathing effect. A loud chorus may trigger a full-tree flash. This style works well for holiday playlists because many seasonal songs have clear changes in energy.
Beat Detection
Beat detection tries to identify rhythmic peaks in the music. When the beat hits, the tree responds with a pulse, burst, ripple, or color change. This is where the tree starts to feel less like decoration and more like it has been practicing choreography in the garage.
Frequency Visualization
Frequency visualization divides the music into ranges. Low frequencies represent bass, middle frequencies carry much of the melody and vocals, and high frequencies add brightness and detail. Mapping these ranges to different sections of the tree can create a layered effect that feels polished and dynamic.
Designing the Tree Layout
A musically-reactive LED Christmas tree is not just about electronics. Layout matters. The way LEDs are placed on the tree affects how animations look. A spiral layout produces sweeping motion. A vertical layout makes rising and falling effects easier. A random-but-even layout looks more like classic Christmas lights and works well for twinkle effects.
Spiral Layout
Wrapping the LEDs around the tree in a spiral is popular because it creates a natural path for animations. A color wave can travel from bottom to top. A beat pulse can spin around the branches. The spiral method is visually clean, especially with LED strips.
Vertical Strand Layout
Running strands vertically from the top down makes it easier to create rain, snowfall, equalizer bars, and rising flame effects. This layout can look especially good on artificial trees where the branches provide predictable spacing.
Classic Distributed Layout
Pixel strings can be placed around the tree more like traditional lights. This creates a cozy holiday look while still allowing modern animations. It is less mathematically perfect, but sometimes that is the point. Christmas trees are allowed to have personality.
Lighting Effects That Look Great With Music
The best musically-reactive LED Christmas tree effects are not always the most complicated ones. In fact, simple effects often look better because they let the tree breathe with the music instead of attacking the room with every color in the visible spectrum.
Warm White Pulse
A warm white pulse is elegant and easy on the eyes. The tree glows gently during quieter parts of a song and brightens on stronger notes. This is ideal for classic holiday music, acoustic tracks, and family gatherings where nobody wants the tree to look like it joined a nightclub.
Bass Burst
A bass burst triggers a short flash or color bloom when the low end of the music hits. Red, gold, blue, or purple can work well. The trick is restraint. A quick burst feels exciting. A constant strobe feels like the tree is trying to communicate with aircraft.
Rainbow Wave
A rainbow wave moves color across the branches in time with the song. This effect is bright, playful, and great for upbeat tracks. It works especially well with a spiral LED layout because the movement follows the shape of the tree.
Snowfall Sparkle
A snowfall sparkle uses small white or pale-blue flashes that appear and fade across the tree. When paired with soft music, it creates a peaceful winter effect. When paired with energetic music, it becomes festive confetti.
Equalizer Tree
In an equalizer-style display, different levels or zones of the tree represent different audio intensities. The bottom section may react to bass, the middle to vocals, and the top to treble. This is one of the most recognizable music visualization styles and can make the tree look like a living sound meter.
Software and Animation Logic
The software behind a musically-reactive LED Christmas tree usually follows a repeating loop. It reads audio data, smooths the signal, decides which effect should happen, updates the LED colors, and displays the result. Good animation is not just about reacting instantly. It also needs smoothing, fading, and timing so the lights feel musical rather than nervous.
LED libraries such as FastLED-style tools are popular because they simplify color control, brightness control, palettes, fades, and animation timing. Instead of manually calculating every single color from scratch, makers can use reusable functions and focus on the creative behavior of the tree.
Signal Smoothing
Raw audio readings can jump around. If the lights respond to every tiny change, the tree may flicker in a distracting way. Smoothing helps average the signal so the movement feels intentional. Think of it as teaching the tree to dance gracefully instead of panic-blinking through the entire playlist.
Thresholds
A threshold tells the system when a sound is strong enough to trigger an effect. For example, a beat flash may only happen when the audio level rises above a certain point. This prevents small background noises from triggering major animations.
Color Palettes
Color palettes keep the display visually consistent. A classic Christmas palette might include red, green, gold, and warm white. A winter palette might use blue, silver, and soft white. A party palette might include saturated rainbow colors. Choosing a palette prevents the tree from looking like it fell into a paint factory and enjoyed it.
Safety Considerations for a DIY LED Christmas Tree
A music-reactive tree should be fun, but safety is not optional. Use low-voltage LED products from reputable sources, inspect wires before use, avoid damaged cords, and choose power supplies rated for the intended load. If the tree is artificial, keep wiring neat and avoid pinching cables in hinges or metal branch frames. If the tree is real, keep it watered and never allow electronics to sit where moisture can collect.
Avoid overloading extension cords. Do not cover power supplies with fabric, tree skirts, wrapping paper, or decorations. Power supplies need ventilation. Also, turn off the display when leaving the house or going to sleep. A smart plug or timer can make this habit easier.
For indoor trees, use components intended for indoor use. For outdoor displays, use outdoor-rated lights, connectors, and enclosures. Moisture and electricity are not a festive pairing. They are more of a “call someone responsible” pairing.
Beginner-Friendly Project Approach
If you are building your first musically-reactive LED Christmas tree, start small. Test the LED strip on a table before putting it on the tree. Confirm the controller can change colors. Then test the audio sensor. Then combine the two. This step-by-step approach makes troubleshooting much easier.
A smart beginner setup might use a short addressable LED strip, an Arduino-compatible board, a sound sensor module, and a basic brightness-reactive effect. Once that works, you can increase the number of LEDs, add better patterns, and improve the audio response.
Step One: Test the Lights
Before the tree gets involved, make sure the LEDs work on their own. Run a simple color test. Try red, green, blue, and white. If the colors are wrong, the color order may need adjustment in software. If only part of the strip lights up, check the data direction, power, and ground connection.
Step Two: Test the Sound Input
Next, test whether the microphone or sound sensor responds to claps, speech, or music. Many sound modules provide changing values as audio levels rise and fall. Watch for a clear difference between silence and sound. If the signal barely changes, adjust sensitivity or placement.
Step Three: Combine Audio and Light
Once the LED test and audio test work separately, combine them. Start with a simple mapping: louder sound equals brighter lights. Then add color changes, pulses, and fades. Build complexity slowly. The tree does not need to perform a full Broadway number on day one.
Common Problems and Practical Fixes
Like most DIY electronics projects, a musically-reactive LED Christmas tree may occasionally behave like it has strong opinions. Fortunately, many problems have predictable causes.
The LEDs Flicker Randomly
Random flicker can come from weak power, poor grounding, long data wires, or unstable connections. Keep wiring short where possible, use a suitable power supply, and make sure the controller and LED strip share a common ground.
The Far End of the Tree Looks Dim
This is often voltage drop. Long LED runs lose voltage along the strip, especially at higher brightness. Lowering maximum brightness may help. Larger displays may need power connected at more than one point.
The Tree Reacts to Every Noise
If footsteps, talking, or snack-bag crinkling trigger the lights, the microphone may be too sensitive. Reduce gain, raise the trigger threshold, move the sensor closer to the speaker, or use a direct audio source for cleaner results.
The Effects Look Too Chaotic
Too many colors and too many fast transitions can make the tree visually exhausting. Reduce brightness, use a limited palette, slow the animations, and allow fades between effects. A good display needs contrast. Even holiday lights need a moment to breathe.
Creative Ideas for a Standout Display
Once the basic tree is working, the creative options open up quickly. You can create different modes for different playlists. A calm mode can use warm white and gold. A party mode can use bold rainbow waves. A movie-night mode can use subtle blue and silver sparkle. A “kids have taken control” mode can use everything at once and possibly summon a small weather event.
You can also add a button or remote control to switch modes manually. Wi-Fi-enabled controllers can allow control from a phone or browser. Some advanced builders even sync multiple trees, window lights, or room LEDs into one coordinated holiday show.
Why This Project Is So Popular
A musically-reactive LED Christmas tree sits at a perfect intersection of technology and emotion. It is technical enough to be satisfying but visual enough that everyone can enjoy it. You do not need to explain the code to guests. They can simply watch the tree shimmer with a song and say, “Okay, that is extremely cool.”
It also gives makers a chance to personalize the holiday season. Store-bought lights are convenient, but a custom reactive tree reflects your own taste. You choose the colors, the rhythm, the mood, and the level of sparkle. In other words, you become the creative director of one very festive cone-shaped light machine.
Experience Notes: What Building a Musically-Reactive LED Christmas Tree Teaches You
The first experience most people have with a musically-reactive LED Christmas tree is surprise. The moment the lights respond to a clap, a song, or a bass note, the project suddenly feels alive. Before that moment, it is just wires, code, LEDs, and a tree waiting patiently in the corner. After that moment, it becomes a holiday centerpiece with timing, rhythm, and personality.
One practical lesson is that testing matters. It is tempting to wrap the whole tree first and troubleshoot later, but that is how a cheerful project turns into a pine-scented puzzle. Testing a small section of LEDs before decorating saves time and frustration. It also helps you understand how brightness, color order, and animation speed will look in real life. A pattern that looks amazing on a desk may look too intense on a full tree. Scale changes everything.
Another important experience is learning that less can look better. Many beginners want to use every possible color and effect immediately. That is completely understandable. Addressable LEDs are exciting, and the first instinct is to unleash the rainbow. But the most attractive trees often use restraint. A warm pulse during quiet music, a gold sparkle during vocals, or a short red flash on the beat can look more professional than constant full-speed animation.
Placement also becomes a learning process. LEDs near the front of the tree dominate the look, while lights buried deep in the branches create depth. If all the LEDs sit on the surface, the display can look flat. If some are tucked inside, the tree glows from within. That inner glow is especially beautiful with warm white, amber, blue, or soft green effects.
Audio response takes patience. A microphone placed too far from the speaker may react weakly. A microphone placed too close may react too aggressively. Background noise can confuse simple sound-reactive systems. The best results often come from experimenting with position, sensitivity, and software thresholds. Once adjusted, the tree feels much more intentional.
Power planning is another lesson that sticks. Beginners often underestimate how much power LEDs need at high brightness. A tree may look perfect at low brightness but flicker or fade when set to full white. Setting a reasonable brightness limit is not a failure; it is smart design. Most indoor displays look better at moderate brightness anyway. Nobody needs a Christmas tree bright enough to guide ships.
Finally, the project teaches that holiday DIY is not only about the finished object. It is about the small discoveries along the way: the first successful color test, the first beat pulse, the first time a guest notices the lights moving with the music. A musically-reactive LED Christmas tree is memorable because it turns decoration into interaction. It makes the room feel playful. It gives familiar songs a new visual life. And yes, it gives you the right to casually say, “Oh, the tree is synced to the music,” as if that is a normal household sentence.
Conclusion
A musically-reactive LED Christmas tree is one of the most enjoyable holiday maker projects because it combines visual design, sound, electronics, and seasonal atmosphere. With addressable LEDs, a controller, an audio input, and thoughtful software, a simple tree can become a glowing music visualizer. The project can be beginner-friendly or advanced, subtle or spectacular, classic or wildly colorful.
The best version is not necessarily the brightest or most complicated. It is the one that fits your room, your music, your safety needs, and your personal style. Start small, test carefully, plan your power, choose attractive color palettes, and let the tree find its rhythm. Once it does, ordinary blinking lights may suddenly feel a little underqualified.