A fiber optic ring light is one of those tools that looks boring until you actually need it. Then, suddenly, it becomes the tiny sun your workbench has been begging for. Whether you are inspecting circuit boards, photographing small parts, lighting a microscope stage, or trying to see the microscopic villain hiding in a solder joint, a ring light gives you bright, even illumination right where your eyes need it.
The good news is that you do not need a bulky halogen illuminator or a commercial lab-grade light source to get useful results. With a high-power LED, a proper constant-current driver, thoughtful thermal management, and a decent way to couple light into the fiber bundle, you can build an LED source for a fiber optic ring light that is compact, efficient, and surprisingly capable. The bad news? Light is sneaky. It bounces, scatters, leaks, overheats things, and generally behaves like a cat with a physics degree. So the design matters.
This guide explains how to build a practical LED illuminator for a fiber optic ring light, what parts matter most, and how to avoid common mistakes that turn a promising project into an expensive hand warmer.
What Is a Fiber Optic Ring Light?
A fiber optic ring light uses a bundle of optical fibers to deliver light from a separate source to a circular ring around a lens, microscope objective, camera, or inspection area. Instead of placing LEDs directly around the subject, the light travels through fibers and exits evenly around the ring.
The result is 360-degree illumination that reduces harsh shadows and helps reveal surface details. This is especially useful for microscopy, machine vision, electronics repair, jewelry inspection, macro photography, and small-object documentation. Because the heat-producing light source sits away from the ring, the subject stays cooler. That matters when you are working with delicate samples, plastics, adhesives, insects, flowers, or anything else that does not enjoy being slowly roasted under a lamp.
Why Build an LED Source Instead of Buying One?
Commercial fiber optic illuminators are excellent, but they can be expensive. Many older units use halogen lamps, which are bright but inefficient, hot, and not always friendly to long work sessions. An LED source can be smaller, cooler, more energy-efficient, and easier to dim. LEDs also have long operating lives when they are driven correctly and kept cool.
A DIY LED source makes sense if you already own a fiber optic ring light guide, want to retrofit an old illuminator, or need a custom light source for a specific bench setup. It is also a great project for learning about optics, heat sinks, current regulation, and why “just add more brightness” is not always the engineering masterpiece it sounds like at midnight.
Core Design Goals
Before choosing parts, decide what your LED light source needs to accomplish. A microscope inspection setup may need stable, flicker-free white light. A macro photography setup may prioritize brightness and color quality. A machine-vision system may need repeatable intensity, fast switching, or a narrow wavelength such as red, blue, green, or near-UV.
For most hobbyist and workshop builds, the main goals are simple:
- Enough brightness to fully illuminate the ring light.
- A stable constant-current LED driver.
- Good heat sinking for the LED.
- Efficient optical coupling into the fiber bundle.
- Smooth dimming without obvious flicker.
- A safe enclosure that blocks stray light and protects wiring.
Choosing the Right LED
The LED is the heart of the project. For a fiber optic ring light source, a high-power white LED in the 3-watt to 20-watt range is usually a practical starting point. A 10-watt LED module is popular because it provides plenty of light without requiring extreme cooling or exotic power electronics.
White LED vs. Single-Color LED
A neutral white LED, usually around 4000K to 5000K, is a strong all-purpose choice. It gives a natural-looking image and works well for inspection, photography, and general microscopy. Cool white LEDs can appear brighter, but they may make colors look harsh or slightly blue. Warm white LEDs are pleasant, but they may not show fine details as crisply in technical work.
If your project is for machine vision or fluorescence work, a single-color LED may be better. Red LEDs can improve contrast on certain materials. Blue or violet LEDs can excite fluorescent compounds. Infrared LEDs can support camera inspection where visible light is not desired. For general bench use, however, a high-CRI white LED is the friendly multitool of the group.
Color Rendering Matters
Color rendering index, or CRI, describes how accurately a light source reveals colors compared with a reference light. If you are photographing objects or inspecting color-coded wires and components, choose an LED with a CRI of 80 or higher. For photography or documentation, CRI 90+ is even better. Low-CRI LEDs can make reds, browns, and subtle surface tones look strange, which is not helpful when you are trying to tell whether something is copper, rust, flux residue, or yesterday’s snack crumb.
Use a Constant-Current LED Driver
High-power LEDs should not be powered directly from a simple voltage supply. LEDs are current-driven devices, and their forward voltage changes with temperature. As the LED warms up, it can draw more current, produce more heat, and start a nasty cycle known as thermal runaway. This is the electrical equivalent of “I can totally handle one more cup of coffee.”
A constant-current driver solves this by regulating the current through the LED. For example, if your LED is rated for 700 mA, use a driver designed to supply 700 mA at the voltage range required by the LED. Many 10-watt LED modules run near 9 to 12 volts at around 900 mA, but always check the datasheet for your specific LED.
Driver Features to Look For
- Correct current rating: Match the LED’s recommended drive current.
- Voltage headroom: The driver must support the LED’s forward voltage range.
- PWM dimming: Useful for brightness control without shifting color much.
- Analog dimming: Can provide smooth control, though color may shift slightly at low current.
- Thermal protection: A valuable safety feature for high-power builds.
- Low flicker: Important for cameras, microscopes, and long viewing sessions.
For a benchtop build, a buck LED driver is often a good choice if your power supply voltage is higher than the LED voltage. A boost driver is useful when your supply voltage is lower than the LED string voltage. A ready-made constant-current LED driver module is usually the simplest route and saves a lot of debugging time.
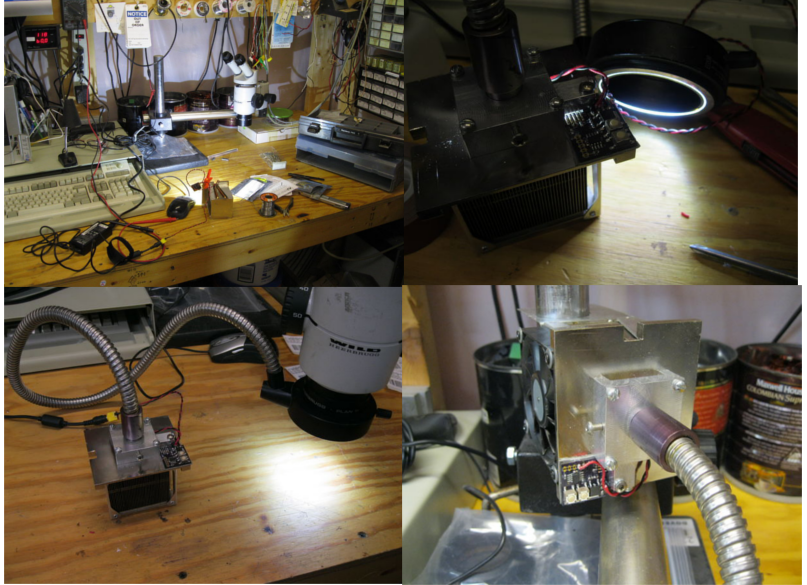
Thermal Management: The Part You Cannot Ignore
High-power LEDs are efficient compared with old incandescent lamps, but they still generate heat. A 10-watt LED does not turn all 10 watts into light. Much of that energy becomes heat at the LED junction. If that heat is not moved away quickly, output drops, color can shift, and LED life gets shorter.
Mount the LED on a metal-core PCB or star board, then attach it to a properly sized heat sink using thermal paste or a thermal pad. Screws are better than glue because they provide firm pressure and allow future replacement. If your LED runs above a few watts, passive cooling may work, but a small fan can dramatically improve performance.
A Practical Heat Sink Test
After running the LED at full brightness for 15 to 30 minutes, the heat sink should be warm but not alarming. If you cannot comfortably keep a finger on it, the LED is probably running hotter than ideal. This is not a laboratory measurement, but it is a useful first warning. For a more serious build, attach a thermistor or digital temperature sensor to the heat sink near the LED and design a fan or dimming cutoff if temperatures climb too high.
Coupling Light Into the Fiber Bundle
The optical coupling stage is where many DIY builds lose brightness. Your LED may be powerful, but if the light spreads everywhere except into the fiber bundle, the ring light will look weak. The goal is to collect as much useful light as possible and direct it into the input end of the fiber optic light guide.
Many commercial fiber-coupled LEDs use butt coupling, where the fiber is positioned close to the LED or an optical interface. For a DIY ring light source, you can improve performance with a condenser lens between the LED and the fiber input. The lens collects diverging LED light and focuses it toward the fiber bundle. A short focal length glass lens, an aspheric lens, or a salvaged projector/flashlight lens can work, depending on the LED size and fiber input diameter.
Alignment Is Everything
The LED die, lens, and fiber bundle input should share the same optical axis. Even a small offset can waste a surprising amount of light. Make the LED and lens adjustable during testing. Slot holes, 3D-printed holders, threaded lens mounts, or simple sliding brackets can help. Once you find the brightest position, lock it down.
Also pay attention to the fiber bundle’s acceptance angle. Optical fibers only accept light within a certain cone. If your lens focuses light too steeply, some of it will not enter the fibers effectively. In plain English: brighter at the LED does not always mean brighter at the ring. The light has to enter at an angle the fiber can actually accept.
Mechanical Design and Enclosure
A good enclosure does three jobs: it holds the parts in alignment, manages airflow, and keeps stray light out of your eyes. Black interior surfaces reduce reflections. Aluminum enclosures help with heat. Plastic boxes are easier to drill and modify, but they need careful heat separation from the LED and heat sink.
A basic layout might include the LED mounted on a heat sink at the rear, a condenser lens in the middle, and a fiber adapter at the front. Add a dimmer knob, power switch, DC input jack, and ventilation holes. If you include a fan, place it so air moves across the heat sink rather than just making dramatic little wind noises inside the box.
Fiber Adapter Options
The adapter that holds the fiber bundle input is important. It should keep the fiber end square to the optical axis and close to the focused light spot. If your ring light has a standard ferrule or metal input sleeve, build a matching socket. If not, measure the diameter carefully and create a snug holder from aluminum tube, a 3D-printed collar, or a drilled block. Avoid clamping so tightly that you damage the fiber bundle.
Dimming and Brightness Control
Dimming is not just a luxury. It makes the light source much more usable. Full brightness may be perfect for high-magnification inspection but too harsh for shiny metal, glass, or photography. A good dimmer lets you dial in the exact amount of light needed without washing out details.
PWM dimming rapidly switches the LED on and off while varying the duty cycle. It is efficient and keeps color more stable, but low-frequency PWM can cause visible flicker or banding in cameras. Use a driver with a PWM frequency high enough for your application. Analog dimming changes the current directly, which can be very smooth, but some LEDs shift color slightly at lower currents.
Testing the Finished LED Source
Once everything is assembled, test the system in stages. First, power the LED through the driver without the optics and confirm the current is correct. Next, check temperature rise over time. Then add the lens and fiber bundle and adjust alignment for maximum output. Finally, inspect the ring light pattern on a white card or matte surface.
The light should appear even around the ring, with no dead zones or obvious hot spots. If one side is dim, the ring light itself may have uneven fiber distribution, or the input coupling may be misaligned. Rotate the fiber input if possible. If the bright area rotates with the fiber, the ring light guide is the cause. If it stays fixed, your source alignment needs more attention.
Common Mistakes to Avoid
Driving the LED From a Plain Voltage Supply
This is the classic shortcut that usually ends in sadness. Use a constant-current driver. Your LED will be happier, brighter, and less likely to perform its final smoke-based magic trick.
Underestimating Heat
A high-power LED on a tiny heat sink may work for a minute, then fade as it heats. Give the LED a real thermal path, and test it at full brightness for longer than you think necessary.
Ignoring Optical Alignment
If the LED, lens, and fiber input are not aligned, most of your expensive photons will illuminate the inside of the enclosure. Photons are not cheap when you had to solder for them.
Using a Low-Quality LED for Imaging
For inspection, almost any bright white LED may work. For photography, documentation, or color-sensitive tasks, choose a high-CRI LED. Your camera will thank you, and your images will look less like they were taken in a suspicious parking garage.
Example Build Configuration
Here is a realistic configuration for a compact bench illuminator:
- 10-watt neutral white high-CRI LED on a metal-core PCB.
- Constant-current buck driver set around the LED’s rated current.
- 12-volt or 24-volt DC power supply with enough current capacity.
- Aluminum heat sink with thermal paste and screw mounting.
- Small 40 mm fan for active cooling.
- Glass condenser or aspheric lens mounted between LED and fiber input.
- Adjustable fiber holder for alignment.
- PWM dimmer or driver dimming input connected to a front-panel knob.
- Matte black enclosure interior to reduce stray reflections.
This setup is powerful enough for many microscope and macro lighting tasks while remaining manageable for a careful DIY builder. If you need more brightness, improve coupling and cooling before simply jumping to a larger LED. Often, a well-aligned 10-watt source beats a sloppy 30-watt build that spends half its output lighting the inside of a box.
Safety Notes
High-power LEDs can be painfully bright and may be hazardous to stare into directly. Always test with the light aimed away from your eyes. Use a diffuser, safety glasses, or temporary shield during alignment. Also protect the LED driver and wiring from shorts, especially in metal enclosures. Add strain relief to the power cable, insulate exposed terminals, and include a fuse if your power supply can deliver high current.
If you use UV or near-UV LEDs, be much more careful. UV light can harm eyes and skin even when it does not look bright. For general ring light work, visible white LEDs are safer and more practical.
Field Notes: Practical Experience From Building an LED Source for a Fiber Optic Ring Light
The most important lesson from building an LED source for a fiber optic ring light is that the project is not really one project. It is three small projects wearing one trench coat: electronics, thermal design, and optics. The electronics may work perfectly, but if the LED overheats, the light output drops. The cooling may be excellent, but if the lens is misaligned, the ring light looks weak. The optics may be perfect, but if the driver flickers, your camera may capture ugly bands. Success comes from treating all three parts as equally important.
One practical experience that shows up quickly is the value of temporary adjustability. Do not glue the LED, lens, and fiber holder in place during the first test. Build a rough alignment jig instead. Even a simple arrangement with slots, clamps, and painter’s tape can reveal where the brightest coupling position is. Move the lens forward and backward slowly while watching the ring light output on a white card. You may find that the best position is not where the math casually suggested it would be. Real lenses, real LED dies, and real fiber bundles enjoy humbling people.
Another useful lesson is that brightness at the source can be misleading. A bare 10-watt LED looks wildly bright, but the fiber bundle may only accept a portion of that light. The shape and size of the LED emitter matter. A smaller emitter can sometimes couple more effectively than a larger LED array because it is easier to focus into the fiber input. This is why optical efficiency should be improved before increasing wattage. More power without better coupling usually means more heat, not necessarily more useful light.
Heat testing also deserves patience. A build that seems fine for five minutes may become too hot after half an hour. Run the LED at full brightness with the enclosure closed, because open-air testing can lie. A closed box traps heat, changes airflow, and reveals whether the fan placement actually works. If the heat sink climbs too high, add airflow, use a larger heat sink, lower the drive current, or improve the thermal interface. A slightly underdriven LED often lasts longer and still provides plenty of light for a ring guide.
Dimming quality is another area where real-world testing beats assumptions. For visual inspection, almost any smooth dimmer may feel fine. For camera use, test at different shutter speeds and frame rates. Some PWM drivers create banding at low brightness settings. If that happens, increase PWM frequency, use a better driver, or choose analog dimming if color stability is acceptable.
Finally, enclosure details matter more than expected. Stray light leaks are annoying during microscope work. A shiny interior can bounce light into odd places. A loose fiber adapter can ruin alignment every time the cable moves. Small improvements such as black interior paint, a secure strain relief, rubber feet, a labeled dimmer knob, and a proper power switch make the device feel less like a science fair emergency and more like a reliable bench tool. The best LED source is not only bright; it is predictable, safe, and pleasant to use day after day.
Conclusion
Building an LED source for a fiber optic ring light is a rewarding project because it combines practical electronics, hands-on optics, and just enough mechanical problem-solving to keep things interesting. The key is balance. Choose a suitable high-power LED, drive it with a proper constant-current circuit, give it serious cooling, and spend time aligning the optical path into the fiber bundle. Do those things well, and you can create a compact illuminator that performs beautifully for microscopy, macro photography, electronics repair, and precision inspection.
The project does not need to be perfect on the first attempt. Start with a modest LED, make the optical parts adjustable, test heat carefully, and improve one variable at a time. When the ring finally lights up evenly around your subject, you will know the effort was worth it. Your workbench gets better light, your photos get cleaner detail, and your microscope stops looking like it is working by candlelight. Everybody wins, except maybe the shadows.