Some desserts walk into the room quietly. Others arrive wearing sunglasses indoors, carrying a tiny kitchen torch, and asking where the nearest party is. These Creme Brulee Cheesecake Bars belong firmly in the second group. They combine the creamy tang of classic cheesecake, the buttery crunch of a graham cracker crust, and the glassy caramelized sugar top of crème brûlée. Basically, it is two fancy desserts shaking hands and agreeing to make your oven feel important.
The best part? You do not need to be a pastry chef, own a French café, or pronounce “brûlée” with dramatic confidence. This recipe is designed for home bakers who want a dessert that looks elegant, tastes luxurious, and cuts neatly into bars for parties, holidays, birthdays, potlucks, or those mysterious evenings when the fridge “accidentally” needs cheesecake.
In this in-depth guide, you will learn how to make creamy cheesecake bars with a crisp caramel topping, how to avoid cracks and lumps, when to chill the bars, what sugar works best for brûlée, and how to serve them without turning the topping into sweet golden gravel. Let’s make dessert behave beautifully.
What Are Creme Brulee Cheesecake Bars?
Creme Brulee Cheesecake Bars are dessert bars made with three main layers: a crumbly cookie-style crust, a smooth baked cheesecake filling, and a thin caramelized sugar topping. The filling gives you the dense, creamy richness of cheesecake, while the topping gives you the dramatic crack of crème brûlée. That tiny spoon-tap moment? Yes, we are absolutely chasing that.
Traditional crème brûlée is a baked custard made with cream, egg yolks, sugar, and vanilla, then finished with caramelized sugar. Cheesecake, meanwhile, relies on cream cheese, eggs, sugar, and usually sour cream or heavy cream for richness. This recipe borrows the best traits from both desserts: creamy structure from cheesecake and caramelized crunch from crème brûlée.
Why You Will Love This Creme Brulee Cheesecake Bars Recipe
This recipe has the “fancy bakery case” look without requiring bakery-level stress. Bars are easier to slice, transport, and serve than a full cheesecake. They also bake more evenly because the filling is thinner than a tall cheesecake, which helps reduce cracking and overbaking.
Here is why these bars are worth making:
- Elegant but approachable: They look sophisticated but use simple grocery-store ingredients.
- Perfect texture: The filling is creamy, smooth, and lightly tangy.
- Party-friendly: Bars are easier to serve than slices of full cheesecake.
- Make-ahead friendly: The cheesecake layer needs chilling, so the dessert fits easily into a planned menu.
- That caramel top: A thin layer of sugar is torched until golden and crisp, giving every bite a crackly finish.
Ingredients for Creme Brulee Cheesecake Bars
The ingredients are simple, but each one has a job. Think of them as a dessert team where cream cheese is the captain, vanilla is the charming one, and sugar is clearly the drama queen.
For the Graham Cracker Crust
- 1 1/2 cups graham cracker crumbs
- 1/4 cup granulated sugar
- 6 tablespoons unsalted butter, melted
- 1/4 teaspoon fine salt
For the Cheesecake Filling
- 24 ounces full-fat brick-style cream cheese, softened to room temperature
- 3/4 cup granulated sugar
- 1/2 cup sour cream, room temperature
- 1/4 cup heavy cream, room temperature
- 3 large eggs, room temperature
- 2 teaspoons pure vanilla extract
- 1/8 teaspoon fine salt
For the Creme Brulee Topping
- 1/3 to 1/2 cup granulated sugar, for sprinkling
- Fresh berries, optional for serving
- Whipped cream, optional for serving
Recommended Equipment
You do not need a professional kitchen, but a few tools make this recipe smoother than a cheesecake filling after a very good nap.
- 9×13-inch baking pan
- Parchment paper
- Electric hand mixer or stand mixer
- Mixing bowls
- Rubber spatula
- Measuring cups and spoons
- Kitchen torch
- Sharp knife for slicing
A kitchen torch gives the best brûlée topping because it caramelizes the sugar quickly without warming the cheesecake too much. If you do not have one, a broiler can work in a pinch, but it requires close attention. The broiler has one mood: enthusiastic.
How to Make Creme Brulee Cheesecake Bars
Step 1: Prepare the Pan
Preheat the oven to 325°F. Line a 9×13-inch baking pan with parchment paper, leaving extra paper hanging over the sides. This parchment overhang works like dessert handles, helping you lift the chilled cheesecake bars out of the pan later.
Step 2: Make the Graham Cracker Crust
In a medium bowl, combine graham cracker crumbs, sugar, melted butter, and salt. Stir until the mixture resembles damp sand. Press it firmly and evenly into the bottom of the prepared pan. Use the bottom of a measuring cup to compact it. A firmly packed crust slices better and does not crumble like it just received shocking news.
Bake the crust for 8 to 10 minutes, then remove it from the oven and let it cool slightly while you prepare the filling.
Step 3: Beat the Cream Cheese
Place the softened cream cheese in a large mixing bowl. Beat on low to medium-low speed until smooth and creamy, about 1 to 2 minutes. Scrape down the sides and bottom of the bowl. This step matters because cold or unevenly mixed cream cheese can leave lumps in the filling.
Step 4: Add Sugar, Sour Cream, Cream, Vanilla, and Salt
Add the granulated sugar and mix until combined. Add sour cream, heavy cream, vanilla extract, and salt. Beat on low speed just until smooth. Avoid whipping too much air into the batter. Cheesecake prefers calm mixing. It is not a birthday balloon.
Step 5: Add the Eggs Gently
Add the eggs one at a time, mixing on low speed after each addition just until blended. Scrape the bowl again to make sure everything is evenly incorporated. Overmixing after adding eggs can introduce extra air, which may cause the cheesecake to puff, sink, or crack.
Step 6: Bake the Cheesecake Layer
Pour the cheesecake filling over the baked crust and smooth the top with a spatula. Bake at 325°F for 35 to 42 minutes, or until the edges are set and the center has a slight jiggle. The middle should not look liquid, but it should move gently when the pan is nudged.
Do not wait until the center is completely firm. Cheesecake continues to set as it cools. Overbaking is one of the fastest ways to lose that creamy texture.
Step 7: Cool Slowly
Turn off the oven, crack the oven door, and let the bars rest inside for about 15 minutes. Then move the pan to a wire rack and cool at room temperature for 1 hour. This gradual cooling helps protect the smooth surface.
Step 8: Chill Until Firm
Cover the pan and refrigerate for at least 4 hours, preferably overnight. Chilling is not optional. It gives the bars their clean structure and creamy bite. Trying to slice warm cheesecake is like trying to fold soup.
Step 9: Slice the Bars
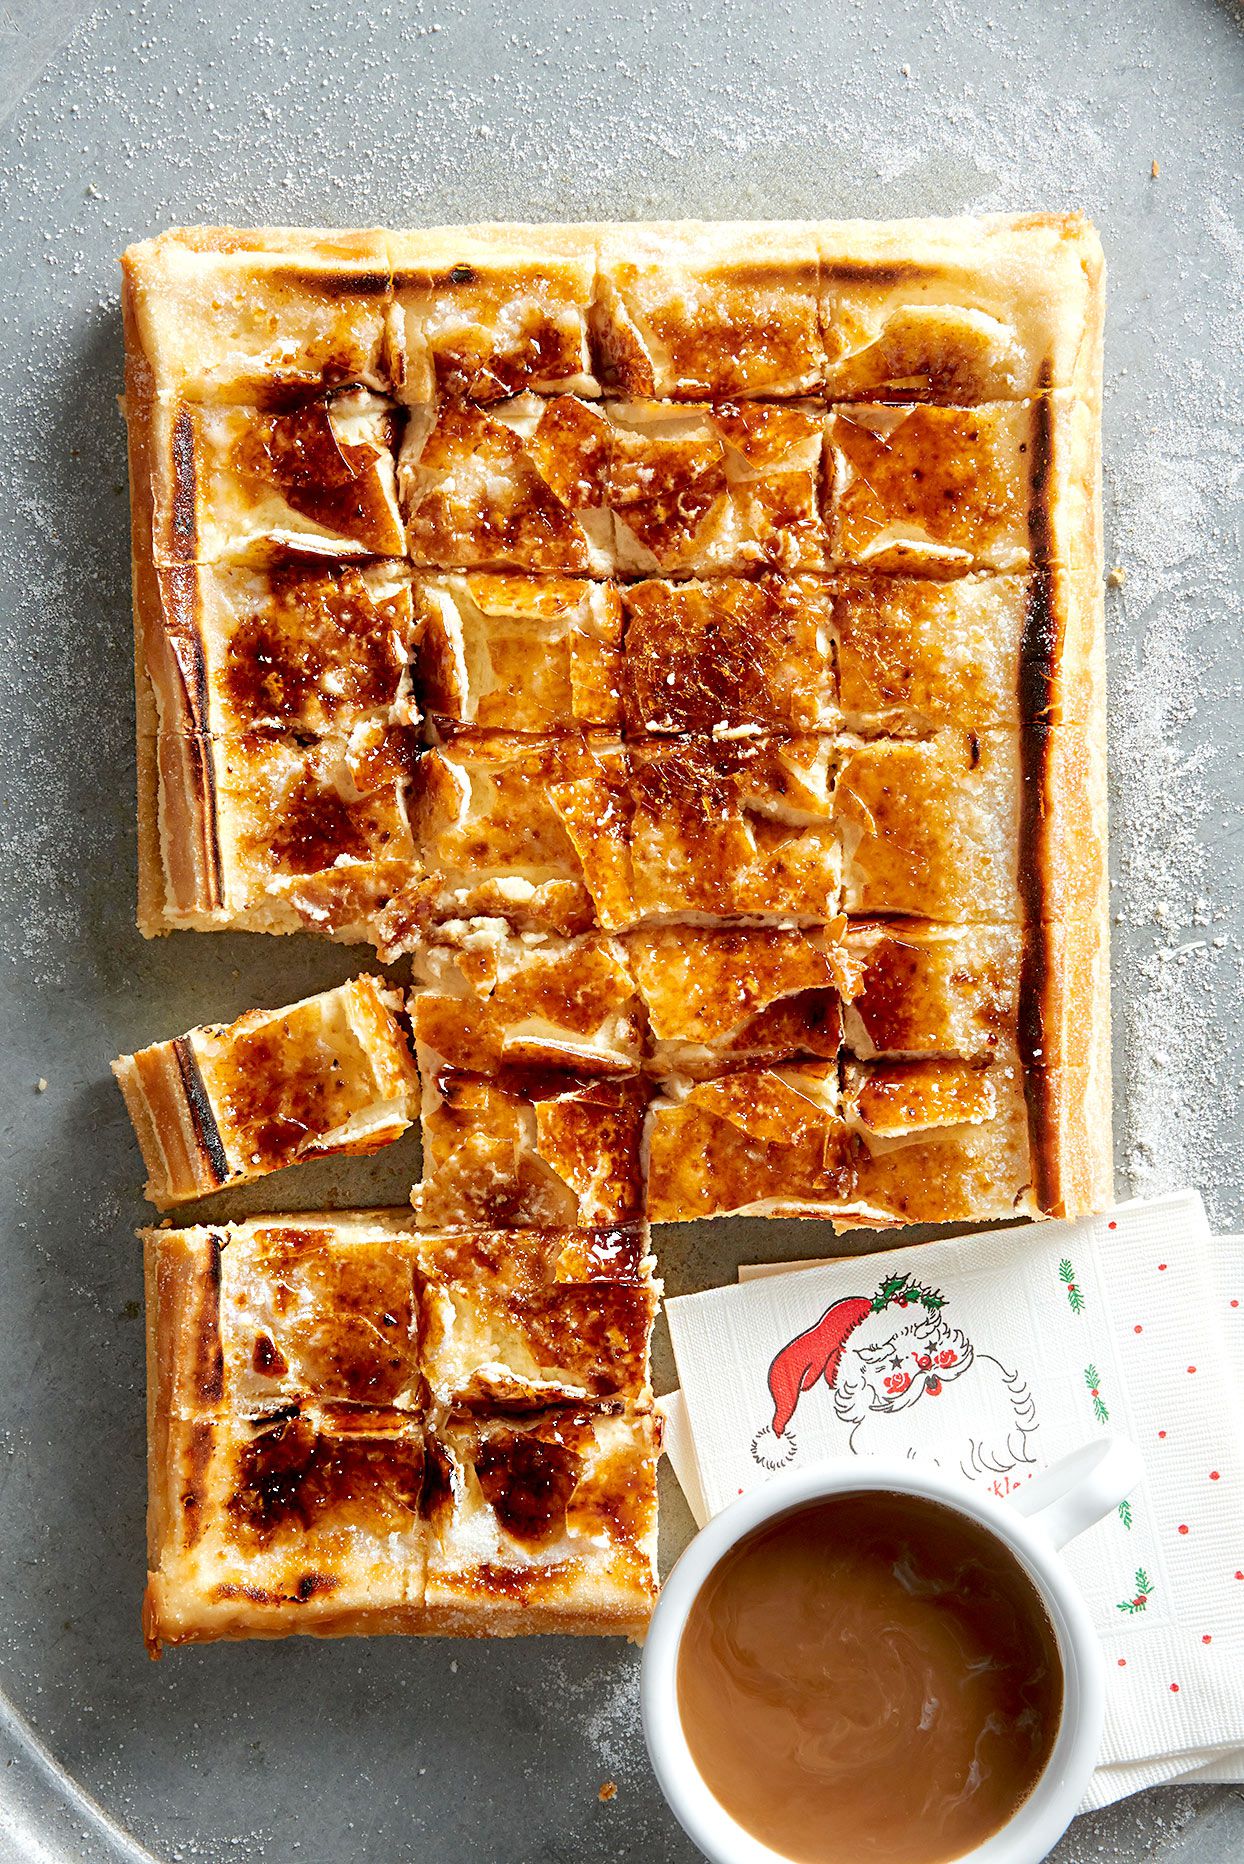
Lift the chilled cheesecake from the pan using the parchment overhang. Place it on a cutting board. For neat slices, use a sharp knife dipped in hot water and wiped dry between cuts. Trim the edges if you want bakery-style bars.
Step 10: Brulee the Tops
Just before serving, sprinkle a thin, even layer of granulated sugar over each bar. Use a kitchen torch to melt and caramelize the sugar until it turns golden amber. Let the topping sit for 1 to 2 minutes so it hardens into a crisp shell.
Important: brûlée the bars shortly before serving. The caramelized sugar topping is crispest when fresh and may soften in the refrigerator.
Pro Tips for the Best Cheesecake Bars
Use Room-Temperature Ingredients
Room-temperature cream cheese, eggs, sour cream, and heavy cream blend more smoothly. This helps create a silky cheesecake filling without lumps. If you forgot to take the cream cheese out early, cut it into cubes and let it sit at room temperature until softened.
Mix Slowly and Scrape Often
Cheesecake batter should be smooth, not fluffy. Mix on low speed and scrape the bowl regularly. Too much air can create bubbles that rise during baking and leave cracks or uneven texture.
Do Not Overbake
The bars are done when the edges are set and the center still jiggles slightly. A fully firm center in the oven usually means an overbaked cheesecake after cooling.
Chill Before Slicing
Cold cheesecake slices cleaner. For the sharpest edges, chill overnight and wipe the knife between cuts. This is a small step with big “I definitely know what I’m doing” energy.
Use a Thin Sugar Layer
A thin, even coating of sugar melts faster and forms a better shell. Too much sugar can burn in spots while staying grainy in others. Dessert drama is welcome; sugar chaos is not.
Can You Make Creme Brulee Cheesecake Bars Without a Torch?
Yes, but a torch is easier. To use a broiler, arrange the chilled and sliced bars on a heat-safe baking sheet. Sprinkle sugar over the tops and place them under a very hot broiler for 1 to 2 minutes, watching constantly. Rotate the pan as needed so the sugar caramelizes evenly.
The downside is that broilers heat the whole dessert more than a torch does. For best texture, keep the bars very cold before broiling and serve them soon after.
Flavor Variations
Vanilla Bean Creme Brulee Cheesecake Bars
Replace vanilla extract with vanilla bean paste or add the seeds from one vanilla bean. This gives the filling a deeper vanilla flavor and those lovely little specks that say, “Yes, I am fancy today.”
Espresso Creme Brulee Cheesecake Bars
Add 1 teaspoon of instant espresso powder to the cheesecake filling. Coffee balances the sweetness and pairs beautifully with the caramelized sugar top.
Orange Creme Brulee Cheesecake Bars
Add 1 tablespoon of finely grated orange zest to the filling. Orange gives the bars a bright, fragrant lift and makes them especially nice for holiday dessert tables.
Chocolate Crust Version
Swap graham cracker crumbs for chocolate cookie crumbs. The result tastes like cheesecake, crème brûlée, and a chocolate cookie all met at a very successful dessert conference.
How to Store Creme Brulee Cheesecake Bars
Store the cheesecake bars without the brûlée topping in an airtight container in the refrigerator for up to 4 days. Add and torch the sugar topping just before serving for the crispest texture.
If you have already caramelized the tops, leftovers can still be refrigerated, but the sugar shell will soften. They will still taste delicious, but they may lose that signature crackly finish.
Can You Freeze Them?
Yes. Freeze the cheesecake bars before adding the sugar topping. Place sliced bars on a baking sheet and freeze until firm, then wrap them tightly and store in a freezer-safe container for up to 2 months. Thaw overnight in the refrigerator, then sprinkle with sugar and brûlée before serving.
Serving Ideas
These bars are rich, so simple garnishes work best. Fresh raspberries, strawberries, blueberries, or blackberries add color and acidity. A small swirl of whipped cream is lovely, but do not bury the caramel top. It worked hard for that spotlight.
For a dinner party, serve each bar on a small dessert plate with a few berries and a light dusting of powdered sugar around the plate. For a casual gathering, place the bars on a chilled tray and torch them just before guests arrive.
Common Mistakes to Avoid
Using Spreadable Cream Cheese
Use full-fat brick-style cream cheese, not whipped or tub-style cream cheese. Spreadable cream cheese contains more moisture and stabilizers, which can change the texture of the filling.
Skipping the Chill Time
The bars need time to set. Cutting too early leads to soft, messy squares. Delicious? Yes. Pretty? Not unless you are going for “abstract cheesecake.”
Adding the Brulee Topping Too Early
Caramelized sugar absorbs moisture from the cheesecake and refrigerator air. For the best crunch, torch the sugar shortly before serving.
Using Too Much Heat in One Spot
Move the torch slowly and evenly. Holding the flame too close in one place can burn the sugar before the rest melts. Aim for golden amber, not tiny dessert campfire.
Frequently Asked Questions
Can I make these Creme Brulee Cheesecake Bars ahead of time?
Yes. Bake and chill the bars one day ahead. Slice them while cold, then add and torch the sugar topping right before serving.
Can I use brown sugar for the topping?
Granulated white sugar is the easiest choice for a crisp, even brûlée shell. Brown sugar contains more moisture, so it can clump and caramelize unevenly.
Why did my cheesecake bars crack?
Cracks usually happen from overmixing, overbaking, sudden temperature changes, or ingredients that were too cold. Mix gently, bake until just set, and cool gradually.
Can I make this recipe gluten-free?
Yes. Use gluten-free graham crackers or gluten-free vanilla cookies for the crust. Check all ingredient labels to make sure they fit your needs.
How do I get clean slices?
Chill the bars thoroughly, use a sharp knife, dip the knife in hot water, wipe it dry, and clean it between cuts. This method creates neat edges and a polished presentation.
Personal Experience: What I Learned Making Creme Brulee Cheesecake Bars
The first time I made Creme Brulee Cheesecake Bars, I treated them like ordinary cheesecake squares. I baked them, chilled them briefly, sprinkled sugar on top, and attacked them with a torch like I was trying to signal a rescue helicopter. The result tasted wonderful, but the topping was uneven, the slices were soft, and the kitchen smelled faintly like panic and caramel. Lesson learned: this dessert rewards patience.
The biggest improvement came from letting the bars chill overnight. Four hours works, but overnight chilling gives the filling a cleaner, denser, creamier texture. The bars lift from the pan more easily, the knife cuts through them neatly, and the crust holds together better. If you are making these for guests, bake them the day before. Future you will be grateful, and present you can enjoy the rare luxury of not rushing around with cream cheese on your sleeve.
I also learned that the sugar layer needs to be thin. At first, I assumed more sugar meant more crunch. Technically, yes, but it also meant some parts burned while others stayed sandy. A light, even coating melts more consistently and creates that beautiful glassy shell. The goal is a delicate crack, not a caramel roof tile.
Another helpful trick is slicing the cheesecake before torching the sugar. If you brûlée the whole slab and then slice it, the caramel topping can crack in unpredictable directions. It may still look rustic and charming, but individual bars look much cleaner when each piece gets its own sugar topping. This also lets you brûlée only what you plan to serve, keeping leftovers fresh for later.
For flavor, vanilla matters more than expected. A good pure vanilla extract or vanilla bean paste gives the cheesecake filling that warm custard-like aroma associated with classic crème brûlée. Sour cream adds a gentle tang that keeps the bars from becoming too sweet, while heavy cream softens the texture. The combination makes the filling taste rich but balanced.
Finally, serving temperature makes a difference. The bars should be cold when you brûlée them, but after torching, let them sit for a minute or two so the sugar hardens. That tiny pause is worth it. When someone taps the top with a fork and hears the crack, the dessert suddenly feels restaurant-level. It is a small sound, but emotionally, it is applause.
Conclusion
Creme Brulee Cheesecake Bars are the kind of dessert that makes people pause after the first bite. The buttery graham cracker crust, creamy vanilla cheesecake filling, and crisp caramelized sugar topping create a balance of textures that feels special without being overly complicated. With room-temperature ingredients, gentle mixing, proper chilling, and a freshly torched sugar shell, you can make bakery-worthy cheesecake bars at home.
Whether you are planning a holiday dessert, a dinner party finale, or a weekend baking project with dramatic flair, this recipe delivers elegance in neat little squares. And honestly, any dessert that lets you use a kitchen torch deserves a place in the rotation.