

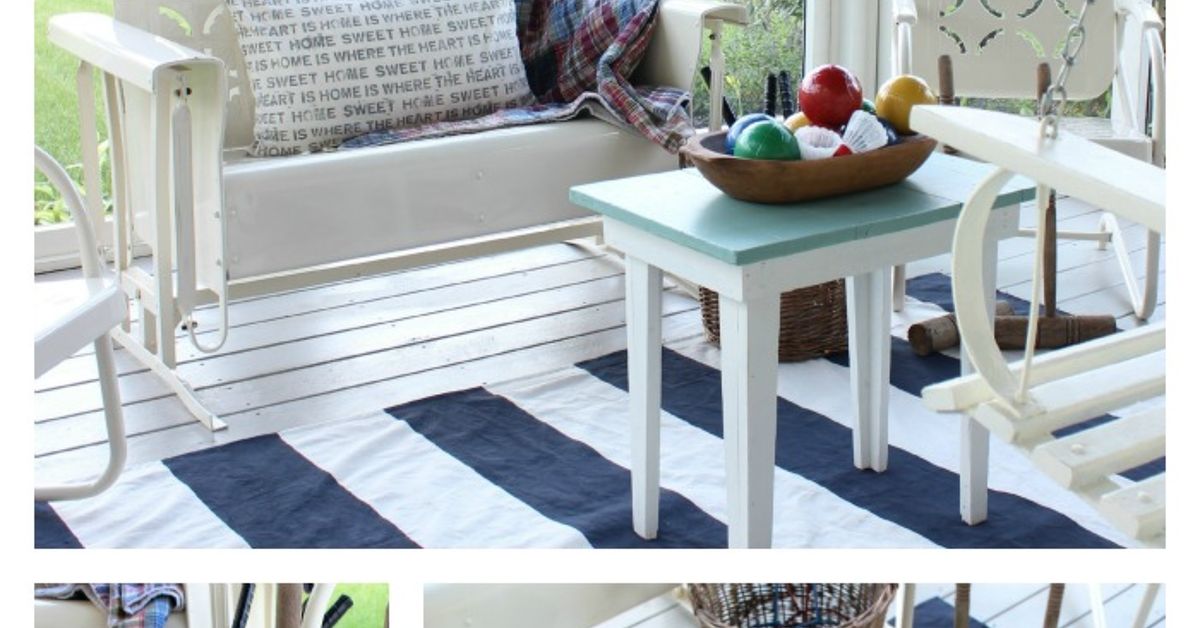
A canvas drop cloth may begin life catching paint drips, but with bold stripes, careful measuring, and a little patience, it can become a handsome custom rug. This DIY drop cloth rugby stripe rug delivers classic color, casual texture, and plenty of personality without requiring a designer-sized budget.
Why Make a Rugby Stripe Rug from a Drop Cloth?
Rugby stripes are broad, confident bands of color inspired by traditional rugby shirts. They feel sportier than pinstripes and less busy than a complicated geometric pattern. On a rug, they can make a narrow room appear wider, connect colors used throughout a space, or wake up a plain floor without shouting for attention.
A heavy cotton canvas drop cloth is a practical foundation because it is durable, reusable, easy to cut, and widely available. Its natural oatmeal color also provides a warm neutral background. Unlike a deep-pile rug, a painted canvas rug has a slim profile that works well in home offices, covered porches, laundry rooms, craft spaces, and beneath lightweight furniture.
However, a drop cloth is not automatically a finished floor covering. It needs stable edges, flexible paint, adequate curing time, and a nonslip rug pad. Think of the project as a traditional floor cloth’s relaxed younger cousingood-looking, affordable, and slightly less interested in formal manners.
Materials and Tools
- Heavyweight cotton canvas drop cloth, preferably 8 to 12 ounces
- Measuring tape, yardstick, and fabric-safe marking pencil
- Sharp fabric scissors or rotary cutter and cutting mat
- Iron and ironing surface
- Sewing machine and heavy-duty thread, or washable fusible hem tape
- Low- or medium-adhesion painter’s tape
- Water-based fabric paint, or acrylic or latex paint compatible with fabric medium
- Fabric painting medium, if required by the selected paint
- Small high-density foam roller and paint tray
- Paintbrush for edges and touch-ups
- Plastic sheeting or a second leak-resistant drop cloth
- Ruler, carpenter’s square, and optional chalk line
- Nonslip rug pad suitable for the flooring underneath
Choose an uncoated cotton canvas rather than a drop cloth with plastic backing. Plastic-backed material may resist paint, wrinkle awkwardly, and behave more like a tarp than a rug. Inspect the package carefully because products sold under the same general name can have very different weights and finishes.
Plan the Rug Before Opening the Paint
Choose the Finished Dimensions
Measure the intended location instead of relying on the size printed on the drop cloth package. Canvas drop cloths are utility products, so their dimensions and corners may not be perfectly exact. Some also have factory seams running through the middle.
A 3-by-6-foot runner is manageable for a first attempt. A larger 6-by-9-foot floor cloth makes a stronger visual statement but requires more working space, paint, and time. Leave enough clearance for doors to swing freely and keep the rug away from floor vents.
Create a Rugby Stripe Pattern
Classic rugby stripes are wide enough to look deliberate from across the room. For a 72-inch-long runner, one approachable pattern is a sequence of 10-inch painted bands separated by 4-inch natural canvas bands. Another option combines 12-inch main stripes with narrow 2-inch accent stripes.
Draw the entire pattern on paper first. Add every stripe width and confirm that the total matches the rug’s finished length. If the last stripe ends up an awkward 1.37 inches wide, the rug is not being artistic; the math has tackled you. Adjust the widths before transferring the plan to the fabric.
Select a Practical Color Palette
Navy and natural canvas produce a coastal or collegiate look. Forest green and cream feel traditional, while charcoal and camel suit modern interiors. Burgundy with dusty blue adds vintage sporting-club character. Limiting the design to two main colors and one optional accent usually creates the strongest rugby stripe effect.
Test each paint mixture on a canvas scrap. The dry result may look lighter than the wet paint, and heavily applied paint can become stiff. Bend and rub the test piece after it cures. If the surface cracks, flakes, or feels like a cafeteria tray, revise the mixture or apply thinner coats.
How to Make a DIY Drop Cloth Rugby Stripe Rug
1. Inspect and Prepare the Canvas
Unfold the drop cloth and inspect it for stains, holes, thick seams, and irregular edges. Check the manufacturer’s care instructions before washing. If the cloth is washable, prewashing helps remove dust and allows initial cotton shrinkage to happen before the stripes are measured.
Wash it separately with mild detergent and avoid fabric softener, which can leave a coating that affects paint adhesion. Dry according to the product label. Press the clean canvas thoroughly so wrinkles do not become permanent little speed bumps beneath the paint.
If the manufacturer does not recommend washing, vacuum the material and wipe away surface dust instead. Do not wash a waterproofed or plastic-lined drop cloth unless its instructions specifically permit it.
2. Square, Cut, and Hem the Rug
Spread the canvas on a large, flat surface. Use a carpenter’s square and yardstick to mark a true rectangle. Add approximately 2 inches to each finished dimension for a double-fold hem.
Cut the fabric, fold each raw edge inward by 1 inch, and press. Fold it inward another inch to conceal the raw edge. Stitch around the rug with heavy-duty thread, stopping periodically to confirm that the canvas is feeding evenly. Mitered corners give the cleanest finish, but neatly overlapped corners also work.
For a no-sew version, use washable fusible hem tape rated for heavyweight fabric. Follow its heat instructions precisely and test it on a scrap. Fusible tape is convenient, although a sewn hem generally withstands flexing and repeated cleaning better.
3. Protect the Work Surface
Paint can bleed through woven canvas even when the fabric looks substantial. Place plastic sheeting or a leak-resistant covering beneath the entire rug, extending it beyond every edge. Tape the protective layer to the floor so it cannot bunch while the rug is rolled.
Work in a well-ventilated area, follow all paint-label precautions, and keep children and pets away until the coating has cured. Water-based, low-odor products are convenient, but ventilation remains important.
4. Mark the Stripe Layout
Decide whether the stripes will run across the short dimension or along the rug’s length. Bands running across a narrow runner create the most recognizable rugby-shirt effect.
Measure from one consistent starting edge. Make small marks on both sides of the canvas, then connect corresponding marks with a straightedge. Recheck the first, middle, and final measurements before applying tape. Measuring every stripe from the previous line can compound small errors; measuring each position from the same starting point keeps the pattern accurate.
5. Tape and Burnish the Edges
Apply painter’s tape along the outside of each area that will receive paint. Mark the sections to be painted with small pieces of tape or removable notes. This prevents the classic DIY tragedy of painting the correct color into the wrong stripe.
Press the tape firmly into the canvas weave using a clean plastic card or a seam roller. Fabric is textured, so painter’s tape cannot create the same mechanical seal it creates on a smooth wall. A thin coat of clear fabric medium or the rug’s base color along the tape edge can help close tiny gaps. Let that sealing coat dry according to its label before adding the stripe color.
6. Apply Thin Coats of Paint
Mix the paint with fabric medium only in the ratio specified by the product manufacturer. There is no universal recipe because paint and medium formulations differ. Stir gently but thoroughly.
Load a small foam roller lightly, remove the excess in the tray, and roll from the tape toward the center of each stripe. Avoid pushing a saturated roller directly into the tape edge. Two or three thin coats usually produce a more flexible, even result than one heroic puddle.
Maintain consistent pressure and complete one stripe at a time. Allow each coat to dry for the labeled recoat period. If the canvas weave remains faintly visible, that can be attractive; the goal is a textile finish, not a sheet of colored plastic.
7. Remove the Tape and Make Touch-Ups
After the final coat has set but before it becomes excessively hard, pull the tape back slowly at approximately a 45-degree angle. Follow the paint manufacturer’s timing guidance. If a dry paint bridge begins lifting, score it carefully with a sharp craft knife without cutting into the canvas.
Use a small artist’s brush to correct obvious gaps. Do not chase every tiny irregularity. The weave naturally softens the edges, and minor variations reinforce the handmade character.
8. Cure and Install the Rug
Dry paint is not necessarily cured paint. Leave the rug flat and undisturbed for the full curing period listed on the product. Depending on the coating, environmental conditions, and number of layers, this may take several days.
Once cured, place the rug on a nonslip pad selected for the type of flooring beneath it. Trim the pad slightly smaller than the rug so it remains hidden. Test the combination before regular use, particularly on polished wood, vinyl, laminate, or tile. A compatible pad reduces sliding and helps keep the thin canvas from wrinkling into a tripping hazard.
Where This Painted Canvas Rug Works Best
A DIY canvas rug is best suited to dry, low- or moderate-traffic locations. Try it beside a bed, beneath a home-office desk, in a reading nook, or on a covered porch if the chosen paint is rated for that environment.
Avoid placing it on stairs, in a shower area, directly beside a bathtub, or in an entryway that regularly receives rain and mud. Canvas is thin, and wet walking surfaces require especially dependable slip resistance. Households with older adults, energetic children, or anyone with mobility concerns should be particularly careful about flat installation and secure backing.
Cleaning and Maintenance
- Vacuum using low suction and avoid an aggressive rotating beater bar.
- Blot spills promptly instead of scrubbing them deeper into the weave.
- Spot-clean with mild soap after testing an inconspicuous area.
- Avoid soaking the rug unless every paint, medium, adhesive, and hem component is labeled washable.
- Rotate the rug occasionally to distribute wear and sun exposure.
- Check the rug pad and corners regularly for movement or curling.
Do not assume that a washable drop cloth remains machine washable after it has been painted. The finished rug’s care requirements are determined by its least washable component. A painted, fused, and backed rug may need gentle spot cleaning even when the original canvas could survive a washing machine.
Common Problems and Easy Fixes
Paint Bleeds Beneath the Tape
The tape may not have been pressed deeply enough into the weave, or the roller may have carried too much paint. Burnish the tape, seal its edge with a compatible clear medium or base color, and apply lighter coats.
The Painted Stripes Feel Too Stiff
Thick paint layers are usually responsible. Test a fabric medium, use a foam roller, and spread multiple thin coats. Do not thin paint with water unless the product instructions permit it, because excessive dilution can weaken coverage and adhesion.
The Rug Will Not Lie Flat
Wrinkles, uneven hems, heavy paint buildup, or insufficient curing can cause curling. Press the unpainted reverse side with an iron only if all materials allow it. Then leave the rug flat beneath clean, evenly distributed weight. Never iron directly over painted areas unless the paint manufacturer specifically recommends heat-setting.
The Rug Slides
A thin canvas rug should not be used loose on a smooth floor. Add a properly sized nonslip pad approved for the flooring material. Replace the pad if it deteriorates, transfers residue, or stops gripping.
Design Variations Worth Trying
For a vintage finish, use slightly muted colors and leave some canvas texture visible. For a modern room, combine black, warm white, and one narrow mustard accent. A child’s room can handle brighter bands, but use products intended for the setting and allow them to cure completely before use.
You can also add a painted border around the finished rugby stripes. Keep it narrow so it frames rather than competes with the pattern. Another option is to alternate two broad stripe widths, such as 12 inches and 7 inches, while maintaining a predictable rhythm. Consistency matters more than perfect symmetry.
Maker Experience Notes: What the Project Teaches You
The most common surprise during a DIY drop cloth rugby stripe rug project is that the canvas has opinions. It stretches slightly while being measured, relaxes after pressing, and may refuse to have four perfectly square corners. The practical lesson is to prepare the fabric first and trust a carpenter’s square more than the factory fold lines. Those creases were created for packaging convenience, not for your decorating ambitions.
Another useful experience is learning how dramatically paint quantity affects the final texture. A heavily loaded roller seems efficient during the first stripe because it provides instant, satisfying color. After drying, however, that section may feel noticeably harder than the bands painted later with a nearly dry roller. Thin coats take longer, but they preserve more of the canvas’s flexibility and make the entire rug feel consistent underfoot.
Tape removal is usually the most exciting partand the moment when a person discovers whether measuring carefully was worth the trouble. A few softly feathered edges are normal on woven material. Trying to correct every microscopic wobble often creates a more obvious patch than the original flaw. Touch up distractions, then step back several feet. If the stripe looks straight from the doorway, it has passed the test.
Color can also behave differently at floor level. A navy sample that appears almost black on a worktable may look lighter in a sunny room, while bright red can dominate a small space once repeated across six feet of canvas. Taping large sheets of colored paper to the floor before purchasing paint is an inexpensive way to evaluate scale and contrast. Tiny swatches are excellent at choosing wall paint and surprisingly sneaky when planning broad rug stripes.
Many makers also discover that the rug pad is not an optional afterthought. Without one, the finished canvas can migrate several inches during ordinary use or wrinkle beneath a rolling desk chair. A suitable nonslip pad gives the project a more finished feel, protects the floor from abrasion, and makes the lightweight rug behave like an intentional furnishing rather than a decorative escape artist.
The project rewards patience more than advanced skill. Measuring twice, applying light coats, and respecting curing time have a greater effect on the result than artistic talent. It is tempting to install the rug as soon as the surface feels dry, but premature traffic can leave impressions, encourage sticking, or weaken the finish. Giving the coating its full curing time is not glamorous, yet neither is explaining a blue footprint in the hallway.
Finally, a handmade stripe rug becomes easier to appreciate once it is placed in the room. Minor differences in the canvas weave disappear into the overall pattern, while the large blocks of color create the visual impact. The best result is not an imitation of a machine-produced rug. It is a practical floor cloth with a relaxed texture, a custom palette, and enough character to make people ask where it came from.
Conclusion
A DIY drop cloth rugby stripe rug turns inexpensive utility canvas into a bold home accent using basic measuring, hemming, taping, and painting techniques. The keys to success are choosing heavyweight uncoated canvas, planning the complete stripe sequence, testing the paint mixture, and building color with thin coats.
Once the design has cured, install it over a flooring-compatible nonslip pad and use it in a dry, sensible location. Treat the painted surface gently, accept a little handmade texture, and enjoy having a custom rug that did not require wrestling a luxury price tag.