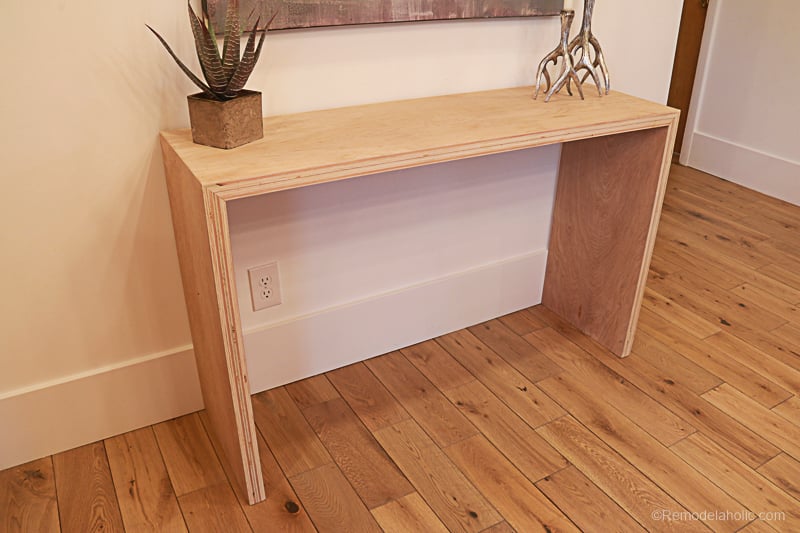
A DIY waterfall plywood console table is the kind of project that makes guests say, “Where did you buy that?” and lets you answer, with heroic restraint, “Oh, I made it.” It looks sleek, modern, and expensive, yet it can be built with basic woodworking tools, one good sheet of plywood, careful measuring, and a healthy respect for 45-degree cuts.
The magic is in the waterfall shape. Instead of separate legs slapped under a tabletop, the top appears to fold down into the sides. The grain, or in plywood’s case the layered edge pattern, continues around the corner like a tiny architectural cliff. Done well, it looks clean and intentional. Done badly, it looks like geometry filed a complaint. The good news: with patience, reinforcement, sanding, and a smart finishing plan, this project is very achievable for a confident beginner or intermediate DIYer.
This guide walks through design choices, materials, tools, construction steps, finishing ideas, mistakes to avoid, and real-world workshop experience so you can build a plywood console table that belongs in an entryway, hallway, behind a sofa, or anywhere that needs a narrow landing zone for keys, lamps, plants, books, and the mysterious pile of mail nobody wants to open.
What Is a Waterfall Plywood Console Table?
A waterfall console table is a narrow table where the top and side panels meet at mitered corners, creating the illusion that one continuous surface bends downward. Traditional waterfall furniture often uses continuous wood grain, especially on slabs or veneered panels. With plywood, the design celebrates something different: the stacked layers along the exposed edges.
That layered plywood edge can be the star of the piece. When sanded smooth and sealed with a clear finish, it gives the table a modern, Scandinavian-inspired, slightly industrial look. If you prefer a cleaner solid-wood appearance, you can cover the edges with veneer edge banding or solid wood strips. Either approach works; the best one depends on whether you want to hide the plywood or proudly let it wear its stripes like a tiny wooden zebra.
Why Build It Yourself?
Buying a modern console table can be surprisingly expensive, especially if you want solid construction and clean design. Building your own gives you control over the dimensions, thickness, finish, and style. Need a very narrow table behind a sofa? Make it 10 to 12 inches deep. Want an entryway table with a dramatic chunky profile? Laminate two layers of plywood together for a 1 1/2-inch thickness. Want it to match your floors, cabinets, or trim? Test stain and finish samples until the color behaves itself.
A DIY plywood console table is also a great project for learning useful woodworking skills: cutting panels square, laminating plywood, making miters, reinforcing joints, filling voids, sanding evenly, and applying a durable topcoat. In short, it is furniture school without the tuition bill.
Best Dimensions for a DIY Console Table
Console tables are usually slim and practical. A good general size for this project is about 48 inches long, 30 inches tall, and 12 to 15 inches deep. That size works well in many entryways and behind sofas without blocking traffic. If you have a larger wall, you can stretch the table to 60 inches. If your hallway is narrow, reduce the depth before you reduce the length; a console table should feel useful, not like a shin-level obstacle course.
Recommended Starter Dimensions
- Length: 48 inches
- Height: 30 inches
- Depth: 14 to 15 inches
- Finished thickness: 1 1/2 inches if using doubled 3/4-inch plywood
For a sofa table, measure the sofa back first. The console should usually sit at or slightly below the sofa height. For an entry table, 30 to 32 inches feels comfortable for setting down keys, a tray, a small lamp, or a vase that you promise yourself you will keep filled with fresh flowers.
Choosing the Right Plywood
The quality of your plywood matters. This project exposes large flat surfaces and possibly the plywood edges, so avoid rough construction sheathing unless you are going for “jobsite chic,” which is rarely as charming as it sounds. Look for sanded hardwood plywood, such as birch, maple, oak, or walnut veneer plywood. Baltic birch is excellent if available because its plies are usually more consistent and attractive along the edge.
A 3/4-inch sheet is the standard choice. If you want a thicker modern profile, laminate two matching pieces together. This creates a strong, substantial top and side panels. It also makes the exposed edges more dramatic, which is the furniture equivalent of wearing a tailored jacket instead of a hoodie.
Plywood Shopping Tips
- Choose the flattest sheet you can find.
- Inspect both faces for dents, patches, and veneer damage.
- Look for clean, consistent edges if you plan to expose them.
- Buy one extra small panel or keep offcuts for finish testing.
- Let the plywood acclimate indoors before building if it came from a damp storage area.
Tools and Materials
You do not need a professional cabinet shop, but accuracy matters. A table saw is helpful for clean, repeatable cuts, while a track saw with a guide rail can be excellent for breaking down a full sheet. The most important tool is not glamorous: it is a reliable measuring system. Measure twice, cut once, and then measure again because plywood has no undo button.
Materials
- One 4-by-8-foot sheet of 3/4-inch sanded hardwood plywood
- Wood glue
- Biscuits, splines, dowels, or loose tenons for reinforcing miters
- Clamps
- Wood filler for small voids
- Painter’s tape or masking tape
- Sandpaper: 120, 180, 220, and 320 grit
- Clear polyurethane, hardwax oil, lacquer, or paint
- Optional veneer edge banding or solid wood edging
Tools
- Table saw or track saw
- Miter gauge, crosscut sled, or reliable cutting guide
- Biscuit joiner, router, doweling jig, or Domino-style joinery tool
- Random orbit sander and sanding block
- Clamps long enough for panel glue-ups
- Square and tape measure
- Drill or driver
- Eye protection, hearing protection, and dust protection
Cut List for a Simple Waterfall Console
The following cut list creates a clean, chunky table using doubled plywood panels. Rough-cut the pieces slightly oversized first, glue them into thicker panels, and then trim them to final dimensions. This helps you clean up glue lines and get crisp edges.
Rough Cuts
- Two top pieces: 50 inches by 15 3/4 inches by 3/4 inch
- Four side/leg pieces: 32 inches by 15 3/4 inches by 3/4 inch
Final Pieces After Lamination
- One top: 48 inches by 15 inches by 1 1/2 inches
- Two sides: 30 inches by 15 inches by 1 1/2 inches
You can adjust these numbers to fit your room. Just keep the side panels identical and the top perfectly square. In waterfall furniture, small mistakes become visible quickly. A 1/16-inch error may not sound dramatic, but at a mitered corner it can glare at you like it knows what you did.
Step-by-Step: How to Build a DIY Waterfall Plywood Console Table
Step 1: Break Down the Plywood
Start by cutting the plywood into rough panels. If you are using a circular saw or track saw, place the good face down or up depending on your blade direction to reduce tear-out. Support the sheet fully with foam insulation board, sawhorses, or a cutting table. Large plywood sheets are awkward, and wrestling one alone is a quick way to invent new vocabulary.
Step 2: Laminate the Panels
Spread wood glue evenly between matching pieces and clamp them together. Use cauls or scrap boards wrapped in packing tape to distribute pressure and keep the panels flat. Do not drown the plywood in glue; an even film is enough. Too much glue creates squeeze-out, sliding panels, and a cleanup session that feels longer than the build itself.
Let the panels dry fully according to the glue manufacturer’s directions. Overnight is a safe choice. Once dry, scrape away excess glue and trim the top and side panels to final width and length.
Step 3: Cut the 45-Degree Miters
The waterfall look depends on clean 45-degree miters where the top meets each side. Set your saw carefully and test the angle on scrap pieces before cutting your real panels. If the test joint does not close tightly, adjust the blade. Do not convince yourself that “wood filler will fix it.” Wood filler is helpful, but it is not a licensed therapist for bad miters.
Cut the miter on each end of the top and on the upper end of each side panel. Keep the orientation consistent so the outside faces flow correctly. Label the inside faces with painter’s tape to prevent flipping a part by accident.
Step 4: Reinforce the Miter Joints
A long miter joint looks beautiful, but it needs reinforcement. Glue alone can be risky because end-grain-like miter surfaces do not provide as much strength as long-grain joints. Biscuits, splines, dowels, or loose tenons help align the joint and add strength.
Biscuits are a practical choice for many DIYers. Mark matching locations along the miter, cut biscuit slots, dry-fit the table, and check that the joints close. Splines are another excellent option, especially if you want serious strength. A routed groove and hardwood spline can lock the corner together while staying hidden inside the joint.
Step 5: Dry Fit Before Glue-Up
Assemble the table without glue first. Check the height, width, squareness, and joint fit. Measure diagonally from corner to corner; if both diagonal measurements match, the assembly is square. If one side is longer, gently adjust clamps or temporary braces until the table behaves.
This is the moment to solve problems. Once glue enters the conversation, the clock starts ticking and everyone becomes dramatic.
Step 6: Glue and Clamp the Waterfall Corners
Apply glue to the miter faces and reinforcement pieces. Bring the side panels into position and clamp carefully. Use scrap braces to keep the sides parallel and square while the glue cures. A temporary cross brace near the bottom can prevent the legs from drifting inward or outward.
Wipe away wet glue with a damp cloth, but do not smear it across the visible plywood face. Dried glue can block stain and leave pale patches. If you plan to use a clear finish, glue cleanup matters even more.
Step 7: Fill Voids and Refine Edges
Plywood sometimes has small voids in the inner plies. If you are exposing the edges, fill gaps with a matching wood filler or tinted epoxy. Let it cure, then sand smooth. For a painted table, wood filler is perfectly fine. For a natural clear finish, test filler colors on scrap first because “natural” filler can still look like beige toothpaste if it does not match.
Step 8: Sand Smooth Without Overdoing It
Sand the table progressively. Start around 120 grit only if needed, then move to 180 and 220. Be careful on veneered plywood faces because the top veneer can be thin. Sand lightly and evenly. The goal is to smooth the surface, not excavate it.
Use a sanding block on edges and corners to keep them crisp. Slightly ease sharp edges so the finish holds better and the table feels comfortable to touch. Do not round over the waterfall edges too much unless you want a softer look.
Edge Options: Exposed Plywood, Edge Banding, or Solid Wood
The edge treatment changes the personality of the table. Exposed plywood edges look modern and honest. Edge banding gives a cleaner furniture-grade look. Solid wood strips add durability and can make the table look more expensive.
Option 1: Exposed Plywood Edges
This is the simplest and most distinctive option. Sand the edges carefully, fill voids, and seal with a clear finish. The layered lines become a design feature. This works especially well with Baltic birch or high-quality hardwood plywood.
Option 2: Iron-On Edge Banding
Iron-on veneer edge banding is thin real wood with heat-activated adhesive. It can be trimmed flush and stained or sealed. Use this if you want the table to look more like solid wood. It is beginner-friendly, but take your time trimming because one wild utility-knife move can turn elegance into regret.
Option 3: Solid Wood Edging
Solid wood edging is the most durable option. Glue narrow hardwood strips to the plywood edges, clamp them, and sand flush. It protects vulnerable corners and gives the table a substantial look. This is especially useful if the table will live in a busy entryway where bags, shoes, and children with questionable steering skills pass by daily.
Finishing Ideas for a Modern Plywood Console Table
A clear satin finish is a classic choice because it protects the table while showing off the plywood. Water-based polyurethane keeps the color lighter, while oil-based finishes can warm the wood and add amber tones. Hardwax oil gives a soft, natural look and is pleasant to touch, though it may need more maintenance over time.
If you want color, test stain first. Some plywood veneers absorb stain unevenly, especially softer or more porous species. A pre-stain conditioner can help reduce blotchiness. Gel stain is another option when you want more control. For a painted console, prime well, sand between coats, and choose a durable enamel or furniture paint.
Simple Finish Schedule
- Sand to 220 grit and remove dust.
- Apply stain or leave natural.
- Apply the first thin coat of clear finish.
- Let dry fully.
- Sand lightly with 320 grit.
- Apply two more thin coats.
- Let cure before heavy use.
Thin coats are better than thick ones. A thick coat may sag, bubble, or cure slowly. Furniture finishing rewards patience, which is annoying because patience is not sold in the paint aisle.
Styling Your Waterfall Console Table
Once the table is finished, keep styling simple so the shape can shine. In an entryway, add a tray for keys, a small lamp, a ceramic bowl, and a mirror above it. Behind a sofa, use books, a narrow lamp, and a few sculptural objects. In a hallway, try framed art and a plant with trailing leaves.
Because the waterfall table has such a clean silhouette, avoid overcrowding the top. Negative space is part of the design. That means you do not need seventeen candles, three baskets, two lamps, and a decorative object shaped like a pear. Unless the pear is important to you. In that case, let the pear live its truth.
Common Mistakes to Avoid
Using Low-Quality Plywood
Cheap plywood can have warped sheets, thin face veneer, and ugly voids. Spend a little more on a furniture-grade panel. The finished result will look better and require less repair.
Skipping the Dry Fit
Always dry fit before glue-up. It reveals gaps, alignment issues, clamp problems, and parts that were accidentally cut backward.
Trusting Glue Alone on Long Miters
Reinforce waterfall miters with biscuits, splines, dowels, or loose tenons. The joint will be stronger, easier to align, and more likely to survive real life.
Over-Sanding Veneer
Plywood face veneer can be thin. Sand lightly, especially with power sanders. Once you sand through veneer, the repair options are limited and your table may suddenly become a painted table.
Rushing the Finish
Let each coat dry properly. Sand lightly between coats when required. A rushed finish can stay tacky, trap dust, or show brush marks.
Safety Notes Before You Build
Woodworking is satisfying, but sawdust and spinning blades deserve respect. Wear eye and hearing protection. Use dust collection when cutting and sanding. A respirator or dust mask is smart when sanding plywood, especially indoors. Keep hands away from blades, use push sticks, and do not remove guards unless a specific safe operation requires it.
Also, read the labels on stains, fillers, adhesives, and finishes. Work in a ventilated area and dispose of oily rags safely according to the product directions. A beautiful console table is wonderful; a garage fire is not part of the design plan.
Cost Expectations
The cost depends heavily on plywood quality and finish choice. A budget painted version may be relatively affordable, while premium hardwood plywood and specialty finishes will raise the price. Still, a DIY build can often deliver a custom look for less than many store-bought modern console tables. More importantly, it gives you bragging rights, and those are priceless, though sadly not accepted at lumberyards.
Builder’s Field Notes: Real Experience From Making a DIY Waterfall Plywood Console Table
The first thing you learn while building a DIY waterfall plywood console table is that plywood has a personality. In the store, it looks flat, calm, and cooperative. In the shop, it suddenly becomes a 4-by-8-foot sail that wants to knock over your coffee, your clamps, and possibly your confidence. The best experience-based advice is to break the sheet down safely and slowly. Use support under the full panel. Mark every cut clearly. If you are working alone, do not pretend you are a forklift. Make rough cuts first, then refine them.
The second lesson is that the waterfall miter is where the project earns its drama. A tiny gap at 45 degrees can look huge once the table is assembled. Before cutting the real pieces, I like making two test cuts from scrap and checking them with a square. Then I push the pieces together under a bright light. If light sneaks through the joint, the saw setting needs adjustment. This little test saves a lot of muttering later.
Glue-up is another memorable event. The table looks simple because it has only three main parts, but clamping those parts square can feel like persuading a folding chair to become architecture. Temporary braces are your best friends. Cut scrap boards to hold the legs at the correct distance, clamp or screw them where they will not damage visible surfaces, and measure diagonally. When both diagonals match, stop touching things. Many DIYers make the mistake of adjusting one more time and turning a square assembly into a parallelogram with ambition.
Exposed plywood edges are beautiful, but they are honest. They show every saw mark, glue smear, and void. Sanding them smooth takes time. I like using a pencil line across the edge before sanding; when the pencil disappears evenly, the surface is usually consistent. If a small void appears, fill it neatly and let it dry completely before sanding. Rushing filler is like frosting a cake before it cools: technically possible, emotionally disappointing.
Finishing is where the table starts to look like furniture instead of a shop experiment. My favorite approach for a modern plywood console is a clear satin finish. It keeps the look clean, protects the surface, and lets the layers show. The trick is thin coats. Thick finish does not make the table more protected faster; it makes drips, bubbles, and sadness. Sand lightly between coats with a fine grit and wipe away dust thoroughly.
The biggest practical reward comes after installation. A waterfall plywood console table is narrow, useful, and surprisingly versatile. It can hold keys by the door, a lamp behind the sofa, plants in a hallway, or books under a mirror. Every time you pass it, you notice the continuous shape and the layered edge. It feels custom because it is custom. And if someone asks where you bought it, you can smile, pause for dramatic effect, and say, “I made it from plywood.” That sentence alone may be worth the sawdust.
Conclusion
A DIY waterfall plywood console table is a rewarding furniture project because it balances simplicity with style. The design uses basic geometry, but the result feels polished, architectural, and custom. With quality plywood, accurate miter cuts, reinforced joints, careful sanding, and a durable finish, you can build a console table that looks at home in a modern entryway, hallway, living room, or behind a sofa.
The key is patience. Take your time selecting plywood, dry fitting the parts, strengthening the miters, and finishing the surface. This is not just a table; it is a practical lesson in clean design and careful craftsmanship. Plus, it gives you a beautiful place to put your keys, your favorite lamp, and your well-earned sense of accomplishment.