A Newton’s cradle is one of those rare objects that manages to be smart, stylish, and just a little smug. It sits on a desk making that famous click-clack sound while silently reminding everyone in the room that physics is undefeated. Better yet, you do not have to buy one. You can build a surprisingly effective Newton’s cradle yourself with a few carefully chosen materials, a little patience, and the willingness to measure things twice instead of eyeballing them like a chaos goblin.
If you have ever wondered why one ball swings in and one ball swings out, or why homemade versions sometimes behave like sleepy grapes on a clothesline, this guide will walk you through both the how and the why. You will learn what materials work best, how to assemble the frame, how to align the pendulum balls, and how to troubleshoot the common mistakes that turn a beautiful science build into a confused jewelry rack.
What Is a Newton’s Cradle, Exactly?
A Newton’s cradle is a device made of identical hanging balls that demonstrates several physics ideas at once, especially momentum transfer, near-elastic collisions, and the back-and-forth conversion between potential energy and kinetic energy. Pull one ball back, let it go, and the impact sends energy through the line so that one ball on the opposite side swings out. Pull two back, and two usually swing out. It is part pendulum, part collision lab, part desktop drama.
The reason it works so well is that the parts are supposed to be as close to identical as possible. The balls should have the same mass, the strings should have the same length, and the frame should hold everything in a single plane of motion. When those conditions are met, the cradle gives a clear visual demonstration of physics. When they are not, the cradle gives a clear demonstration of disappointment.
Before You Build: What Makes a Good Newton’s Cradle?
If you want a cradle that actually performs well, keep these design rules in mind:
1. The balls should match
Use five identical balls or beads. Matching size and mass matter more than people expect. If one ball is heavier, lighter, or shaped differently, the energy transfer gets messy fast.
2. Harder materials usually work better
Classic Newton’s cradles use metal balls because hard, elastic materials lose less energy during collisions. Steel gives that crisp, satisfying motion. Wooden beads can still work for a beginner build, but the action is softer, shorter, and less dramatic. Think “gentle science demo” instead of “executive desk thunder.”
3. The frame must be rigid
If the frame flexes or wobbles, some of the energy goes into shaking the structure instead of moving the balls. That is why flimsy cardboard frames often fail unless they are reinforced. A stable wood, acrylic, or thick craft-board frame performs better.
4. Every string length must be equal
The balls should hang so their centers line up perfectly. Uneven string lengths change the timing of the swings. A pendulum’s period depends mainly on its length, so even small differences can make the cradle behave badly.
5. The balls should just barely touch
Too much gap and the balls hit with awkward timing. Too much pressure and they bind up. The sweet spot is simple: they should rest in a straight line and just touch each other.
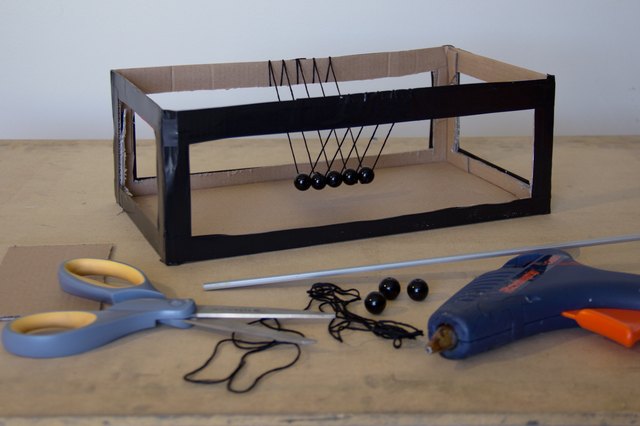
Materials for a Simple DIY Newton’s Cradle
Here is a beginner-friendly version that balances performance and practicality:
- 5 identical round beads, craft spheres, or pre-mounted metal balls
- Strong nylon thread or thin fishing line
- 2 horizontal crossbars
- 2 side supports
- 1 sturdy base
- Ruler or measuring tape
- Pencil for marking placement
- Craft glue suitable for your materials
- Tape or clamps to hold parts while assembling
For the easiest beginner build, large wooden beads with centered holes are friendly to work with. For better motion, use identical metal spheres designed for crafts or replacement cradle parts. If any step requires sharp tools, heavy-duty adhesive, or anything beyond simple craft assembly, get adult help. Physics is cool; accidental trips to the medicine cabinet are less cool.
How to Build a Newton’s Cradle Step by Step
Step 1: Build the frame
Create a rectangular frame with a heavy base and two upright supports. Add two horizontal crossbars near the top, one in front and one behind where the balls will hang. These bars should be parallel to each other and level. The point is to suspend each ball with two strings so it swings in one plane instead of twisting like it just heard gossip.
Make sure the frame is sturdy before moving on. If the top bars wiggle, strengthen the joints now. Waiting until later is the DIY equivalent of hearing a weird car noise and turning the radio up.
Step 2: Cut equal lengths of string
Cut ten equal lengths of string if you are making a five-ball cradle with two strings per ball. Precision matters here. If one piece is even slightly longer, that ball may swing at a different rate. Use one string as a master template and cut all the others against it.
Step 3: Attach two strings to each ball
Each ball should hang from two strings, one connected to the front crossbar and one to the rear crossbar. This setup keeps the ball moving straight forward and backward. If your balls are pre-drilled or already fitted for hanging, great. If not, use the most secure, symmetrical attachment method available for your material.
The goal is not artistic mystery. The goal is symmetry. Each ball should hang evenly, with the attachment points placed so the ball does not tilt or rotate.
Step 4: Hang the middle ball first
Start with the center ball. Adjust both strings until the ball hangs level and still. Then add the balls next to it, one at a time, keeping all centers aligned horizontally. This is where patience earns its paycheck.
As you add each ball, check three things:
- The ball hangs straight.
- The center height matches the others.
- The ball just touches its neighbor without pushing it aside.
Step 5: Fine-tune the spacing
Once all five balls are hanging, look at the row from the front and from above. They should form a straight line. If one sits forward or backward, adjust the string attachment until the row is clean and even. Poor alignment is one of the biggest reasons homemade cradles produce weird half-swings, accidental side bumps, or sad little taps that sound like someone politely knocking on a door.
Step 6: Test with one ball
Lift one end ball and release it. Ideally, the ball on the opposite end should swing out while the middle balls stay nearly still. Do not expect laboratory perfection on the first try. Real-world cradles always lose some energy, so the outgoing ball usually rises a little less than the one you released.
If the result looks sloppy, do not panic. Newton is not mad at you. You probably just need small adjustments.
Why Your Newton’s Cradle Works
When you lift one ball, you give it gravitational potential energy. When you release it, that energy turns into kinetic energy as the ball accelerates downward. On impact, momentum and energy move through the row of balls. In a well-built cradle, the far ball receives most of that transfer and swings outward.
The pendulum part matters, too. Each ball swings like a pendulum, and pendulum timing depends mainly on length. That is why equal string lengths are so important. If one ball hangs lower or higher than the others, its motion is out of sync, and the cradle stops looking elegant and starts looking confused.
Real cradles are never perfect. Some energy escapes as sound, some becomes heat during tiny deformations at impact, some is lost to air resistance, and some disappears into a shaky frame or bad alignment. That is why the motion eventually dies out. So yes, the click-clack is charming, but it is also the sound of your system paying the universe an energy tax.
Best Materials for Better Performance
Wooden beads
Easy to find, easy to hang, great for practice builds, and good for classroom demonstrations. The downside is that wood absorbs more energy than steel, so the action is less crisp.
Metal spheres
These are closest to the classic Newton’s cradle look and performance. Identical steel balls produce cleaner collisions and better motion. They are the better choice if you care about the satisfying visual effect.
Fishing line or nylon thread
Use something strong, thin, and low-stretch. Thick fuzzy string adds friction and visual clutter. Thin line usually makes the build cleaner and more precise.
Heavy base
A stable base helps the whole device behave. If the frame shifts every time a ball hits, you are secretly building a Newton’s wobble.
Common Problems and How to Fix Them
The middle balls move too much
This usually means the balls are not identical, the row is misaligned, or the balls are not resting in light contact. Recheck spacing and center alignment.
The end ball barely rises
You may be losing too much energy to soft materials, frame movement, or sloppy attachments. Try a more rigid frame and harder, more uniform balls.
The balls twist or swing sideways
This is often caused by uneven string attachment or single-string hanging. Two-string suspension helps keep motion in a single plane.
The cradle stops quickly
Some energy loss is normal, but rapid stopping suggests too much friction, poor alignment, or materials that deform too much on impact.
How to Make Your DIY Newton’s Cradle Look Better
Once the physics works, you can upgrade the style. Paint or stain the base, use a clean matte black frame, or choose brushed metal hardware for a modern look. Clear line can make the balls appear to float, which is a nice touch if you enjoy your science with a side of drama.
Just remember the golden rule of decorative physics: pretty is nice, but precise is nicer. A beautiful cradle that does not work is basically sculpture with trust issues.
Final Thoughts
Building a Newton’s cradle is one of the most satisfying small engineering projects you can do at home because it rewards both creativity and precision. It is simple enough for a weekend build, but deep enough to teach real lessons about motion, energy transfer, alignment, materials, and patience.
The biggest secret is that a Newton’s cradle is not hard because the physics is complicated. It is hard because the physics is picky. A few millimeters of error, a slightly crooked ball, or a wobbly frame can change the whole result. But once you dial it in, you get a project that is part science demo, part conversation starter, and part tiny applause machine for good craftsmanship.
So build it, adjust it, test it, and enjoy that first clean click-clack. It is the sound of momentum doing exactly what it was always planning to do.
Real-World Experiences Building a Newton’s Cradle
People usually imagine a Newton’s cradle as a quick little craft project: hang some balls, let one go, and bask in the glory of physics. Then real life arrives wearing work boots. The first surprise is how much alignment matters. A build can look perfect from the front and still fail because one ball sits slightly forward, one string is a touch longer, or the frame leans just enough to throw off the swing. That is often the moment when a builder learns the difference between “close enough” and “actually correct.” In a Newton’s cradle, those are very different neighborhoods.
Another common experience is the materials lesson. Plenty of first-time builders start with whatever is nearby: soft beads, thick string, lightweight cardboard, maybe a heroic amount of optimism. The result usually works a little, but not well. Instead of that classic one-ball-out response, the entire row wiggles like it is trying to agree on a group project. That is not failure. That is feedback. It teaches that physics is not only about ideas on paper; it is also about how real materials behave when they bend, flex, compress, and waste energy in annoying little ways.
Builders also discover that the best progress often comes from tiny adjustments. Shorten one string by a few millimeters. Nudge a support inward. Rehang the center ball. Test again. Suddenly the motion improves. This makes the project strangely satisfying because it rewards careful observation more than brute force. You do not win by doing everything bigger. You win by doing everything straighter, cleaner, and more consistently.
There is also a genuinely fun emotional arc to the project. At first, it feels like craft work. Then it becomes troubleshooting. Then, without warning, it becomes a tiny engineering obsession. You release one ball. It almost works. You adjust. You release it again. Better. A third try gives you that clean transfer you wanted, and now you are standing there grinning at five swinging balls like you just built a particle accelerator in your kitchen.
One of the best parts of building a Newton’s cradle is that it makes abstract science feel physical and memorable. Words like momentum, elastic collision, and energy transfer stop being textbook decorations and start becoming things you can see and hear. That click-clack is no longer just a desk sound. It becomes proof that careful design, symmetry, and material choice all matter. For students, hobbyists, and curious tinkerers, that shift is huge. You are not just reading about physics. You are negotiating with it.
In the end, most people walk away with more than a cool object. They gain a better feel for precision, patience, and how real systems differ from ideal ones. They also usually gain respect for every polished Newton’s cradle they have ever seen in an office lobby. Those things may look effortless, but anyone who has built one knows the truth: behind every elegant swing is a small mountain of measuring, adjusting, and muttering, “Why are you doing that?”