Carving letters into wood is one of those projects that looks mysterious until you try it. Then you discover the truth: the alphabet is basically a collection of straight lines, curves, tiny corners, and opportunities to say, “Well, that was almost an E.” Whether you want to make a rustic family sign, personalize a jewelry box, create a garden marker, or add a handmade nameplate to a gift, learning how to carve wood letters is a practical skill with a lot of creative payoff.
The good news is that you do not need to become a master woodcarver overnight. You only need a clean design, the right piece of wood, a patient setup, and a method that matches your comfort level. In this guide, we will cover two simple ways to carve letters in wood: a hand-carving method for classic, artistic lettering and a template-guided router method for faster, cleaner, more repeatable results.
Before you begin, remember that carving tools and routers are sharp, powerful, and not toys pretending to be hobbies. Work in a supervised, well-lit space, clamp your wood securely, wear eye protection, and follow the safety instructions that come with your tools. The goal is to carve beautiful letters, not create a dramatic shop story everyone hears at Thanksgiving.
Choosing the Best Wood for Letter Carving
The wood you choose can make the project feel smooth and satisfyingor like arguing with a tree that has already made up its mind. For beginners, basswood is one of the easiest woods to carve because it is soft, fine-grained, and forgiving. It holds detail well without fighting every tool mark. Pine is affordable and easy to find, but its alternating soft and hard grain can cause uneven cuts. Butternut is another friendly option with attractive color and a pleasant carving feel.
Hardwoods such as oak, maple, and walnut can produce stunning carved signs, but they require sharper tools, more control, and extra patience. If this is your first wood lettering project, start with a practice board before carving the final piece. A simple scrap of basswood can save your dream sign from becoming a very fancy coaster.
Wood Grain Matters
Wood grain is the direction of the fibers in the board. When carving letters, grain can either help your tool glide cleanly or cause splintering around delicate edges. For most horizontal signs, position the lettering so the grain runs left to right. This helps long strokes and straight letter forms look cleaner. Avoid boards with knots, cracks, wild grain, or soft punky areas because these defects can break small details and make the carving unpredictable.
Tools and Materials You May Need
Your exact tool list depends on the method you choose, but most wood letter carving projects use a few common supplies:
- A smooth wood board, preferably basswood, butternut, pine, cedar, or another carveable species
- Printed letter design, stencil, or hand-drawn layout
- Graphite paper, transfer paper, or painter’s tape
- Pencil, ruler, square, and eraser
- Carving gouges, V-tool, or small chisels for hand carving
- Router, letter templates, guide bushing, or sign-making kit for routed letters
- Clamps or a vise to secure the workpiece
- Safety glasses and dust protection when sanding or routing
- Fine sandpaper, brush, stain, paint, or clear finish
Do not skip the clamps. A moving board is the villain in almost every messy woodworking story. Secure the piece before carving, sanding, or routing so your layout stays accurate and your hands stay away from the active cutting area.
Planning Your Letter Design
Great carved lettering starts before any wood is removed. Spend extra time on the layout, because crooked letters become very loyal once they are carved into a board. Use a bold, readable font for your first project. Block letters, simple serif letters, and clean Roman-style letters are easier than thin script fonts or decorative calligraphy.
Print your design at the final size and place it on the board before transferring it. Check spacing between letters, the height of each line, and the margins around the text. A sign that says “WELCOME” should not look like “WEL COME” unless you are greeting guests with emotional distance.
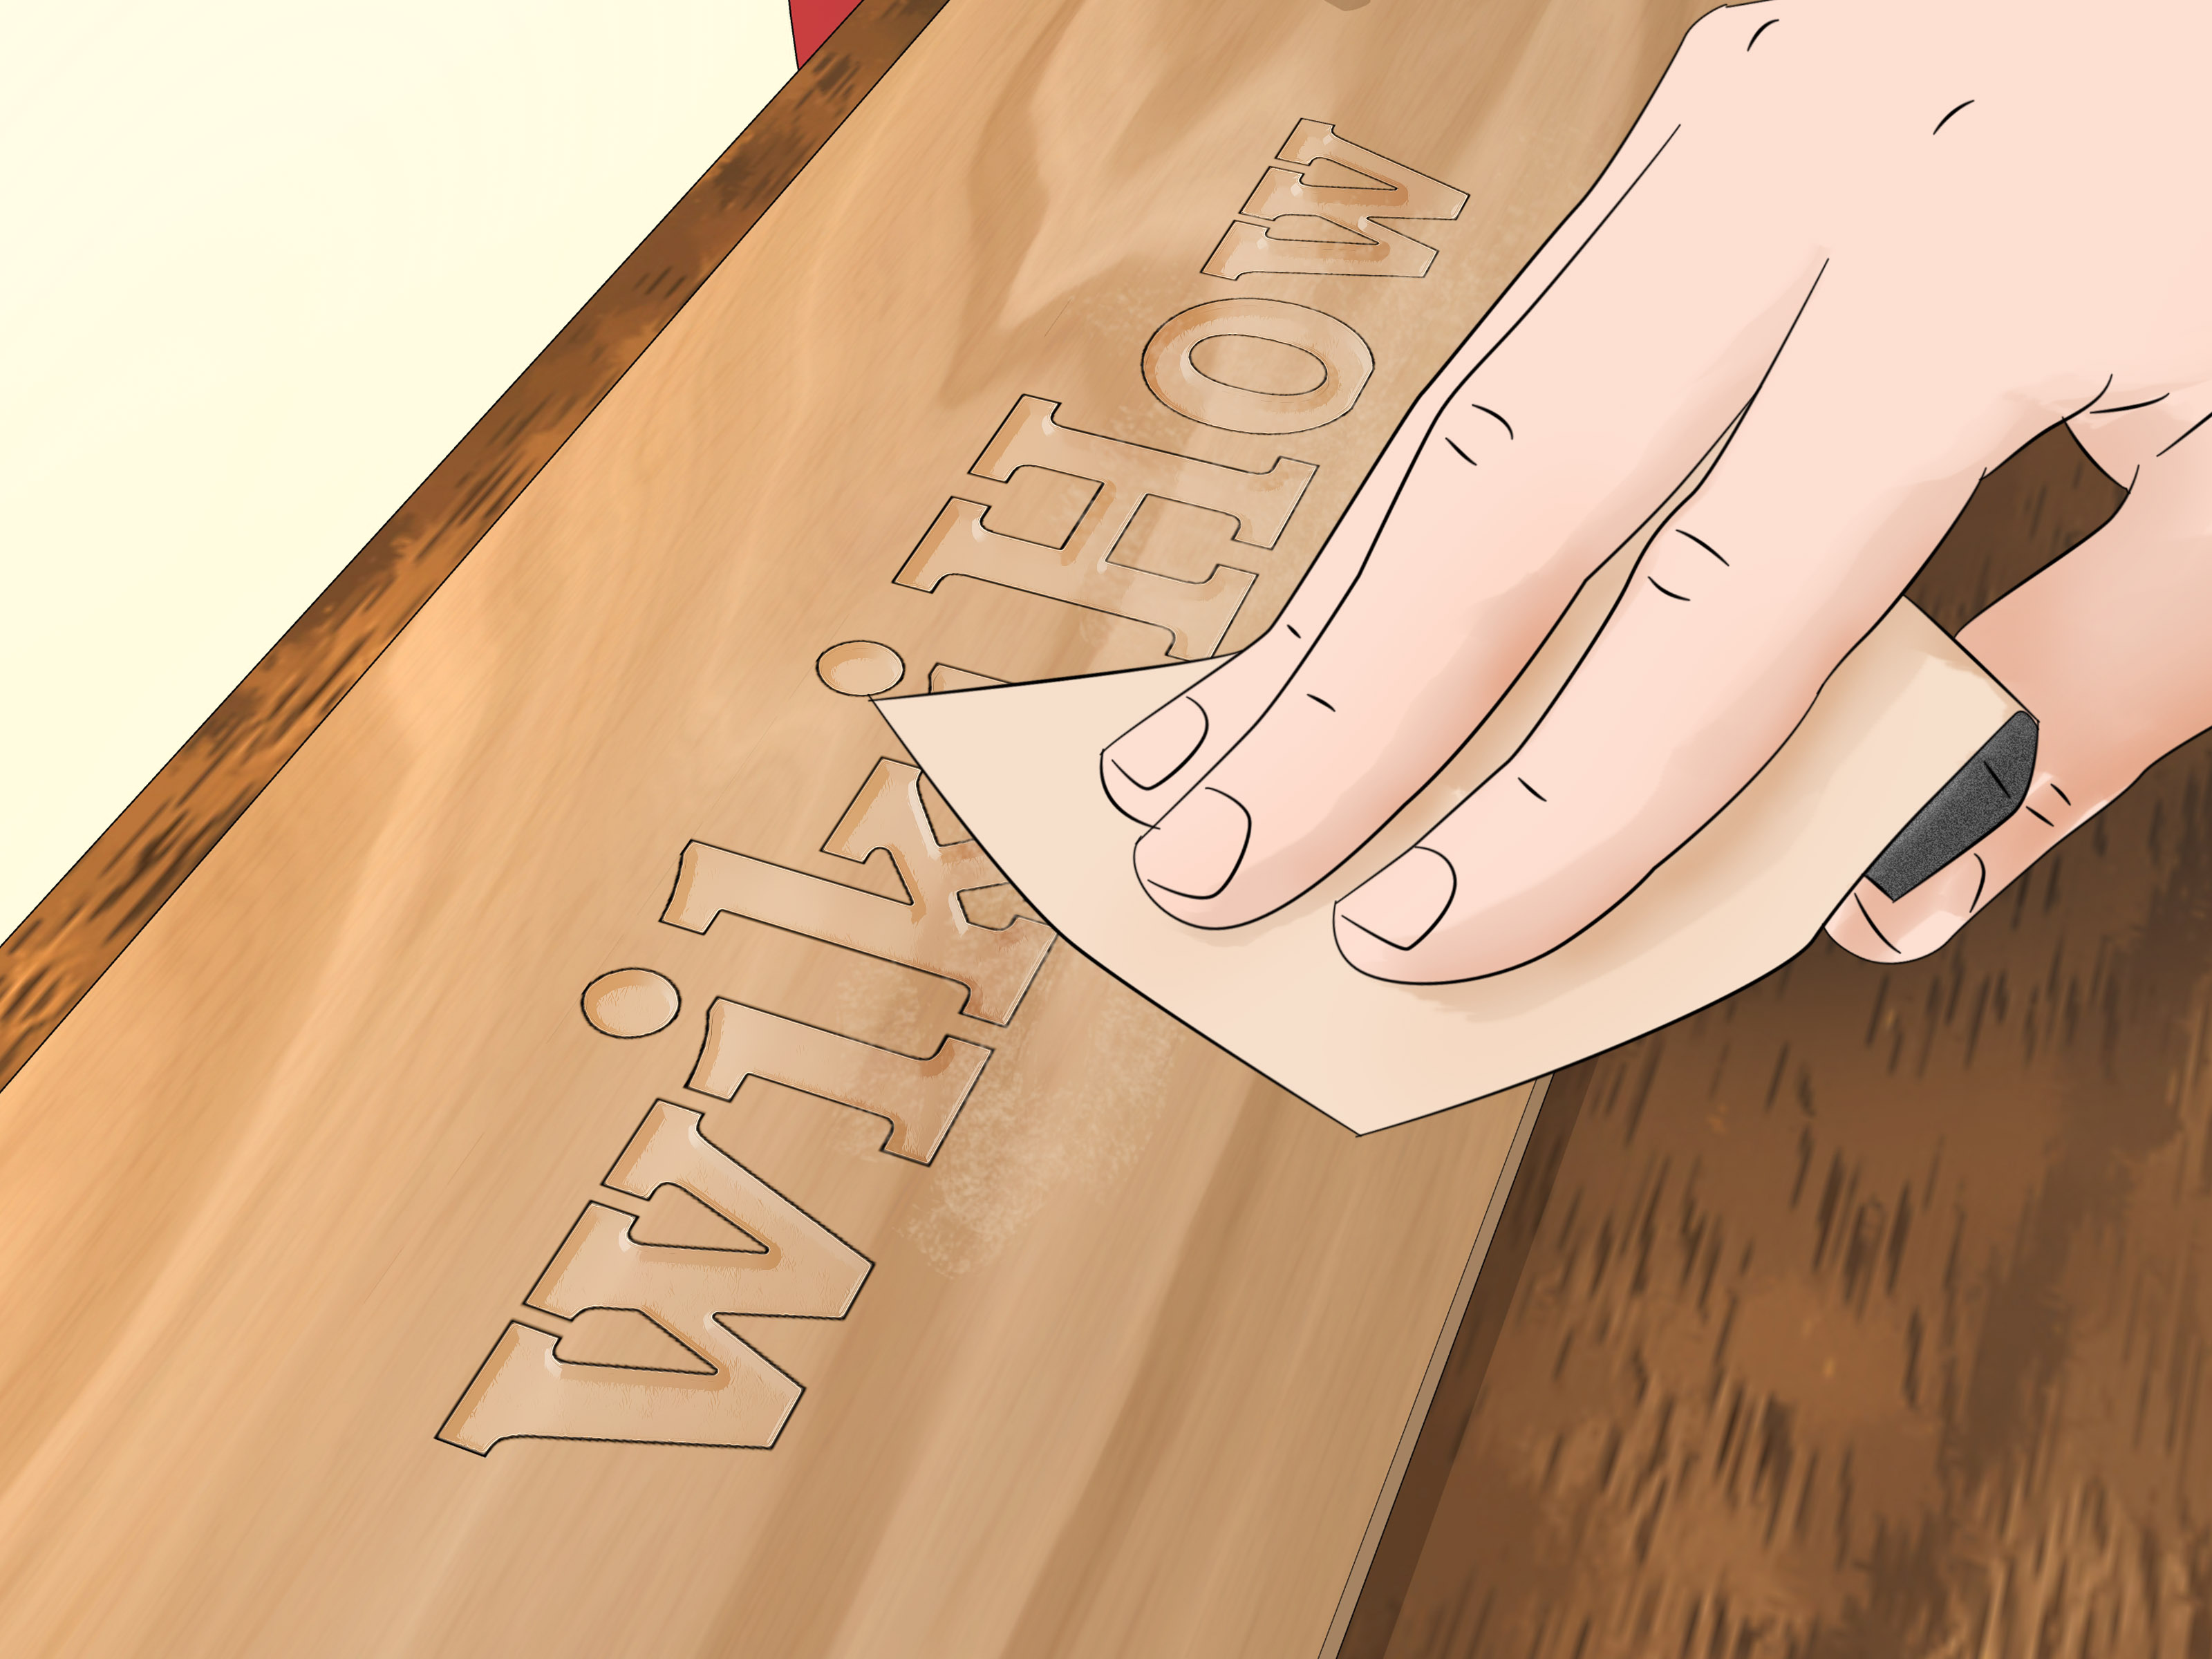
How to Transfer Letters to Wood
The easiest transfer method is to place graphite paper between the printed design and the wood, then trace the letters with a pencil. Use light pressure so the lines are visible but not deeply dented. You can also shade the back of the printed paper with pencil, tape it in place, and trace from the front. For repeat projects, reusable stencils or template kits save time and keep the letters consistent.
Method 1: Hand-Carving Wood Letters
Hand-carving is the traditional way to carve wood letters. It gives the finished piece warmth, character, and small variations that say, “A real person made this,” not “A machine had a productive afternoon.” This method is ideal for nameplates, decorative plaques, memorial boards, heirloom gifts, and signs where craftsmanship matters more than speed.
Step 1: Prepare and Secure the Board
Start with a flat, smooth board. Sand the surface lightly before transferring the design so your pencil lines are easy to see. Clamp the board to a sturdy workbench or secure it in a carving vise. Good support helps you carve more accurately and reduces the chance of accidental slips.
Step 2: Transfer the Lettering
Place your printed design exactly where you want it. Tape the paper at the top edge so it can lift like a hinge. Slide graphite paper underneath, trace the letters, and check the transfer before removing the template. If a line is missing, retrace it now. Guessing later is how an O becomes a potato.
Step 3: Define the Letter Shape
Use shallow, controlled passes to define the outline of each letter. For incised lettering, the goal is often a V-shaped groove that catches shadows and makes the letters readable. For raised lettering, the background around the letters is lowered so the letters stand proud of the surface. Beginners usually find incised lettering faster and less complicated.
Work slowly around corners, curves, and narrow spaces. Straight letters such as I, T, L, and E are easier to practice on. Curved letters such as S, C, G, and O require more patience because the grain changes direction as the curve moves. Let the layout guide the tool rather than trying to correct everything in one heavy pass.
Step 4: Carve the Center Grooves
For classic V-carved letters, gradually deepen the center of each stroke. The widest parts of the letter should usually be deeper than the thin ends, giving the letter natural contrast. This is what makes carved lettering look crisp instead of scratched onto the surface.
Take your time at intersections, such as where the arms of a K, A, or R meet. These areas can chip if rushed. It is better to make several careful passes than one heroic move that removes half the alphabet.
Step 5: Clean Up Edges and Details
After the basic shape is carved, inspect the letters under angled light. Shadows reveal rough ridges, fuzzy fibers, and uneven depths. Clean up ragged edges with light finishing passes. Avoid overworking the letters. The charm of hand-carved wood lettering comes partly from its human touch, so do not sand away every sign of craftsmanship.
Step 6: Sand and Finish
Sand the surrounding flat surface carefully, but avoid rounding over sharp letter edges. A small folded piece of fine sandpaper can help soften rough spots without blurring the design. To make the letters stand out, paint or stain inside the carved grooves, then wipe the surface clean. A clear finish such as oil, polyurethane, shellac, or water-based topcoat can protect the wood and deepen the color.
Method 2: Carving Wood Letters with a Router and Templates
If hand-carving is the slow, soulful acoustic version, router lettering is the efficient studio recording. A router with letter templates can create clean, consistent carved letters much faster than hand tools. This method works especially well for outdoor signs, shop signs, address plaques, directional signs, and projects where repeatability matters.
A router is a powerful tool, so this method is best for adults or supervised shop environments. Always read the router manual, use the correct bit and guide system, clamp the board securely, and wear eye and hearing protection.
Step 1: Choose a Router Lettering System
Most router letter carving uses plastic or metal templates, a guide bushing, and a V-groove or sign-making bit. The template controls the shape of each letter while the router cuts the groove. Interlocking template kits are helpful because they keep spacing and alignment consistent. Some kits include letters, numbers, punctuation, and decorative symbols.
Step 2: Lay Out the Sign
Measure the board and mark a centerline. Arrange the templates before routing anything. Check that the word fits the board with enough space on both sides. If the sign has more than one line, mark guide lines so the words do not slope downhill like they are tired.
For long words, start from the center and work outward, or lay out the entire word first and adjust spacing before cutting. Consistent spacing makes routed letters look professional.
Step 3: Secure the Template and Board
Clamp the board to the bench and secure the template according to the kit instructions. The template should not shift while the router is moving. Any movement can distort the letter shape, and unfortunately wood does not come with an undo button.
Step 4: Rout the Letters in Shallow Passes
Instead of trying to carve the full depth at once, use shallow passes. This helps reduce tear-out, improves control, and creates cleaner edges. Let the guide bushing follow the template smoothly without forcing the router. Keep the base flat and steady on the work surface.
After each letter, clear dust and chips so you can see the cut clearly. Dust buildup can hide mistakes and interfere with the template. Good visibility is part of good craftsmanship.
Step 5: Refine and Finish the Sign
Once the letters are routed, inspect the grooves for fuzz, burn marks, or uneven areas. Light sanding and small touch-ups can improve the final look. Many woodworkers paint the routed grooves black, white, or a contrasting color, then sand the surface lightly after the paint dries. This creates sharp, readable letters with strong visual contrast.
For outdoor signs, choose an exterior-grade finish and seal all surfaces, including the back and edges. Outdoor wood expands, contracts, gets wet, dries out, and generally behaves like it has a busy schedule. A good finish helps protect your lettering from weather and wear.
Hand Carving vs. Router Carving: Which Method Is Better?
The best method depends on your project. Hand-carving is better when you want an artistic, traditional, one-of-a-kind result. It is quiet, affordable, and satisfying, especially for small signs and personal gifts. It also allows you to vary the depth and style of each letter in a way that feels organic.
Router carving is better when you want speed, consistency, and clean repeatable letters. It is ideal for larger signs, multiple copies, or crisp commercial-looking lettering. The setup takes longer, and the tool requires more safety awareness, but the actual cutting is much faster once everything is aligned.
If you are brand new, try hand-carving a few letters on scrap wood before investing in a full router sign-making kit. If you already own a router and enjoy precision, template-guided carving may be the easiest path to professional-looking results.
Common Mistakes When Carving Wood Letters
Using a Complicated Font Too Soon
Script fonts, thin lines, and decorative curls look beautiful on paper but can be difficult to carve cleanly. Start with simple uppercase letters. Once you understand spacing, grain direction, and depth control, move on to more decorative lettering.
Skipping the Practice Board
Practice boards are not wasted wood. They are tuition. Test your layout, tool feel, depth, paint, and finish before touching the final project. Even professionals make samples because wood is natural, tools vary, and confidence improves when you have already made the mistake somewhere harmless.
Carving Too Deep Too Fast
Deep cuts can chip letter edges and make the final design look rough. Shallow, repeated passes usually produce cleaner results. Think of carving as sneaking up on the final depth rather than attacking it like a raccoon in a trash can.
Ignoring Letter Spacing
Good lettering depends on spacing as much as carving. Some letters naturally need more visual room than others. For example, the space between A and V often looks larger than the space between two straight-sided letters. Step back often and judge the word as a whole, not just one letter at a time.
Finishing Ideas for Carved Wood Letters
A carved letter can disappear if the finish does not create enough contrast. For a rustic look, stain the whole board and darken the carved grooves. For a modern look, paint the background one color and fill the letters with another. For outdoor signs, use exterior paint or spar urethane for better durability.
You can also create depth with shadows alone. V-carved letters in a medium or dark wood can look elegant under natural light because the grooves create their own contrast. This works especially well for walnut, cherry, cedar, and stained pine.
Experience Notes: What Actually Helps When Carving Wood Letters
The biggest lesson from carving wood letters is that preparation matters more than bravery. Beginners often think the hard part is removing wood, but the real magic happens before carving begins. A smooth board, a clean layout, and a readable font solve half the problems before the first chip falls. When the design is rushed, every later step becomes a rescue mission. When the design is careful, carving feels calmer and the result looks more intentional.
Another useful experience is to practice letters in groups. Straight letters like H, L, T, and I teach control. Letters with diagonals like A, M, N, and V teach how to manage changing angles. Curved letters like O, C, S, and G teach patience. Do not start with the word “Sassy” unless you enjoy being personally challenged by the letter S five times in a row.
It also helps to carve larger letters at first. Tiny letters require excellent control and very sharp detail work. A three-inch-tall capital letter is much easier to learn on than a half-inch monogram. Larger letters give you room to see the shape, correct small uneven areas, and understand how depth affects shadows.
Lighting makes a surprising difference. Carved letters look flatter under overhead light but reveal depth under angled light. When checking your progress, move a lamp to the side of the board. The shadows will show whether the grooves are consistent and whether any rough fibers need cleanup. This simple trick can make your finished sign look far more polished.
Paint and stain should be tested before the final finish. Some woods absorb pigment unevenly, especially pine. A pre-stain conditioner can help reduce blotching on softwoods. If you want painted grooves, apply the paint carefully, let it dry, and sand the top surface lightly to remove smudges. The contrast can make even simple lettering look sharp and professional.
One more real-world tip: stop before you are tired. Wood lettering rewards steady hands and clear judgment. The last letter of the day is often where mistakes happen, because people rush to finish. If your focus starts drifting, leave the project clamped, clean the area, and return later. The wood will not complain. It has been waiting for years already.
Finally, do not judge your first carved letters too harshly. Handmade work has personality. A tiny wobble, a slightly deeper stroke, or a softened corner does not ruin the project. It reminds people that the piece was made by hand. With every sign, nameplate, or plaque, your spacing improves, your tool control gets steadier, and your eye becomes sharper. That is the quiet pleasure of wood carving: the project teaches you while you make it.
Conclusion
Learning how to carve wood letters is a rewarding way to personalize woodworking projects, from farmhouse signs to keepsake boxes. Start with a simple design, choose a beginner-friendly wood, secure the board properly, and pick the method that fits your tools and confidence. Hand-carving gives you traditional charm and artistic control, while router carving delivers clean, consistent letters with less time once the setup is complete.
Whichever method you choose, patience is your best tool. Carved lettering is not about rushing through the alphabet. It is about building clean shapes, readable words, and a finished piece that feels personal. Practice on scrap wood, keep your layout tidy, and let each letter teach the next one how to behave.
Note: This article is written for general woodworking education and web publishing. Readers should follow manufacturer instructions, use proper safety equipment, and seek experienced supervision when working with sharp hand tools or power tools.