Cloudy headlights are like sunglasses your car never agreed to wear. They make your vehicle look tired, they reduce nighttime visibility, and they can quietly turn a simple evening drive into a guessing game called “Is that a pothole, a raccoon, or my imagination?” The good news is that learning how to clean headlights does not require a professional detailing bay, a secret mechanic handshake, or a garage full of expensive tools.
Many drivers search for quick fixes like WD-40, toothpaste, baking soda, vinegar, or store-bought headlight restoration kits. Some of these methods work better than others, and some are more like a clever temporary disguise than a real repair. WD-40, for example, can make foggy headlights look clearer for a short time because it leaves an oily film that reduces the appearance of haze. But it does not truly remove oxidation. For long-lasting results, you usually need to clean, polish, and protect the plastic lens.
This guide breaks down the most practical DIY headlight cleaning methods, explains when WD-40 makes sense, and shows how to restore foggy headlights without accidentally giving your car a spa treatment it did not ask for.
Why Do Headlights Get Cloudy in the First Place?
Most modern headlights are made with polycarbonate plastic. It is strong, lightweight, and better at handling road debris than older glass lenses. The downside? Plastic headlights are vulnerable to ultraviolet rays, weather, road salt, dirt, chemicals, and tiny scratches from everyday driving.
When a vehicle is new, the headlight lens usually has a protective clear coating. Over time, that coating wears down. Once UV rays reach the plastic underneath, oxidation begins. That is why headlights often turn yellow, cloudy, or dull. The haze is not just dirt sitting on the surface. It is often damaged plastic and worn coating, which is why a basic car wash may not fix the problem.
Common signs your headlights need cleaning
- The lenses look yellow, milky, or foggy.
- Your low beams seem weaker than they used to.
- The car looks older from the front even after washing.
- You notice scattered or uneven light at night.
- One headlight looks clearer than the other.
Cloudy headlights are not only a cosmetic issue. Reduced light output can affect how far ahead you see at night. Clear headlights help your bulbs do their job properly, especially on dark roads, during rain, or in poorly lit neighborhoods.
Can You Clean Headlights With WD-40?
Yes, you can clean headlights with WD-40, but there is a catch big enough to need its own parking space. WD-40 can make headlights look clearer quickly, but the effect is temporary. It does not sand away oxidation, rebuild the damaged clear coat, or protect the plastic long-term.
Think of WD-40 as a quick visual refresh. It can help if you need your headlights to look better for a short period, such as before selling a car, taking photos, or checking whether the lens is surface-hazy rather than deeply damaged. However, if your headlights are seriously yellowed, WD-40 will not perform miracles. It is a wipe-on improvement, not a full restoration.
How to clean headlights with WD-40
- Wash the headlights with car soap and water to remove dirt and grit.
- Dry the lens completely with a microfiber towel.
- Spray a small amount of WD-40 onto a clean microfiber cloth, not directly into gaps around the light.
- Wipe the headlight in circular motions until the lens looks evenly coated.
- Let it sit briefly, then buff away excess product with a dry microfiber towel.
- Repeat on the other headlight for an even look.
Do not leave the surface greasy. Extra residue can attract dust, streak in rain, or make the lens look blotchy. Also, avoid spraying near painted panels, rubber trim, sensors, or electrical openings. A little product goes a long way; this is not the time to baptize the front bumper.
Pros and cons of WD-40 for headlights
Pros: It is fast, cheap, easy to apply, and can create an immediate improvement on lightly hazy headlights.
Cons: It is temporary, does not remove oxidation, offers limited protection, and may need to be reapplied often. It is best used as a short-term cosmetic fix rather than a true headlight restoration method.
DIY Alternative #1: Toothpaste for Light Haze
Toothpaste is one of the most popular DIY headlight cleaning hacks because it contains mild abrasives. Those tiny polishing particles can help remove light oxidation from plastic lenses. The trick is using plain white toothpaste, not gel toothpaste, whitening strips, charcoal paste, or anything that looks like it belongs in a science fair volcano.
How to clean headlights with toothpaste
- Wash and dry the headlight lens.
- Apply painter’s tape around the headlight to protect paint and trim.
- Put a small amount of plain white toothpaste on a damp microfiber cloth.
- Scrub the lens in small circular motions for 3 to 5 minutes.
- Rinse thoroughly with clean water.
- Dry and inspect the result.
- Apply automotive wax or UV protectant for short-term protection.
Toothpaste works best on mild haze. If the headlight is deeply yellow, scratched, or rough to the touch, toothpaste may help a little but probably will not restore full clarity. It is a good starter method because it is low-cost and low-risk when done gently.
DIY Alternative #2: Baking Soda Paste
Baking soda is another household favorite. It is mildly abrasive, which means it can polish away some grime and surface oxidation. It is slightly more aggressive than toothpaste, so use a gentle hand. Headlights are not cast-iron pans; they do not need a wrestling match.
How to use baking soda on headlights
- Mix baking soda with water until it forms a thick paste.
- Wash and dry the headlight lens.
- Apply the paste using a microfiber cloth or soft sponge.
- Rub in circular motions for several minutes.
- Rinse the lens completely.
- Dry with a clean towel.
- Finish with a UV protectant or wax.
Some drivers mix baking soda with white vinegar. The fizz looks exciting, but the cleaning power mostly comes from the mild abrasive action of the baking soda. Vinegar may help cut residue, but it is not a magic oxidation eraser. Use it carefully and rinse well.
DIY Alternative #3: Vinegar and Water for Surface Film
White vinegar can help remove mineral deposits, light grime, and cloudy surface residue. It is not the strongest option for oxidized plastic, but it can be useful when headlights look dirty rather than yellowed.
Mix one part white vinegar with two parts water in a spray bottle. Spray the headlight, let it sit for a minute, wipe with a microfiber cloth, then rinse and dry. This method is best for maintenance, not restoration. If your headlights look like they spent ten years staring into the desert sun, vinegar alone will politely give up.
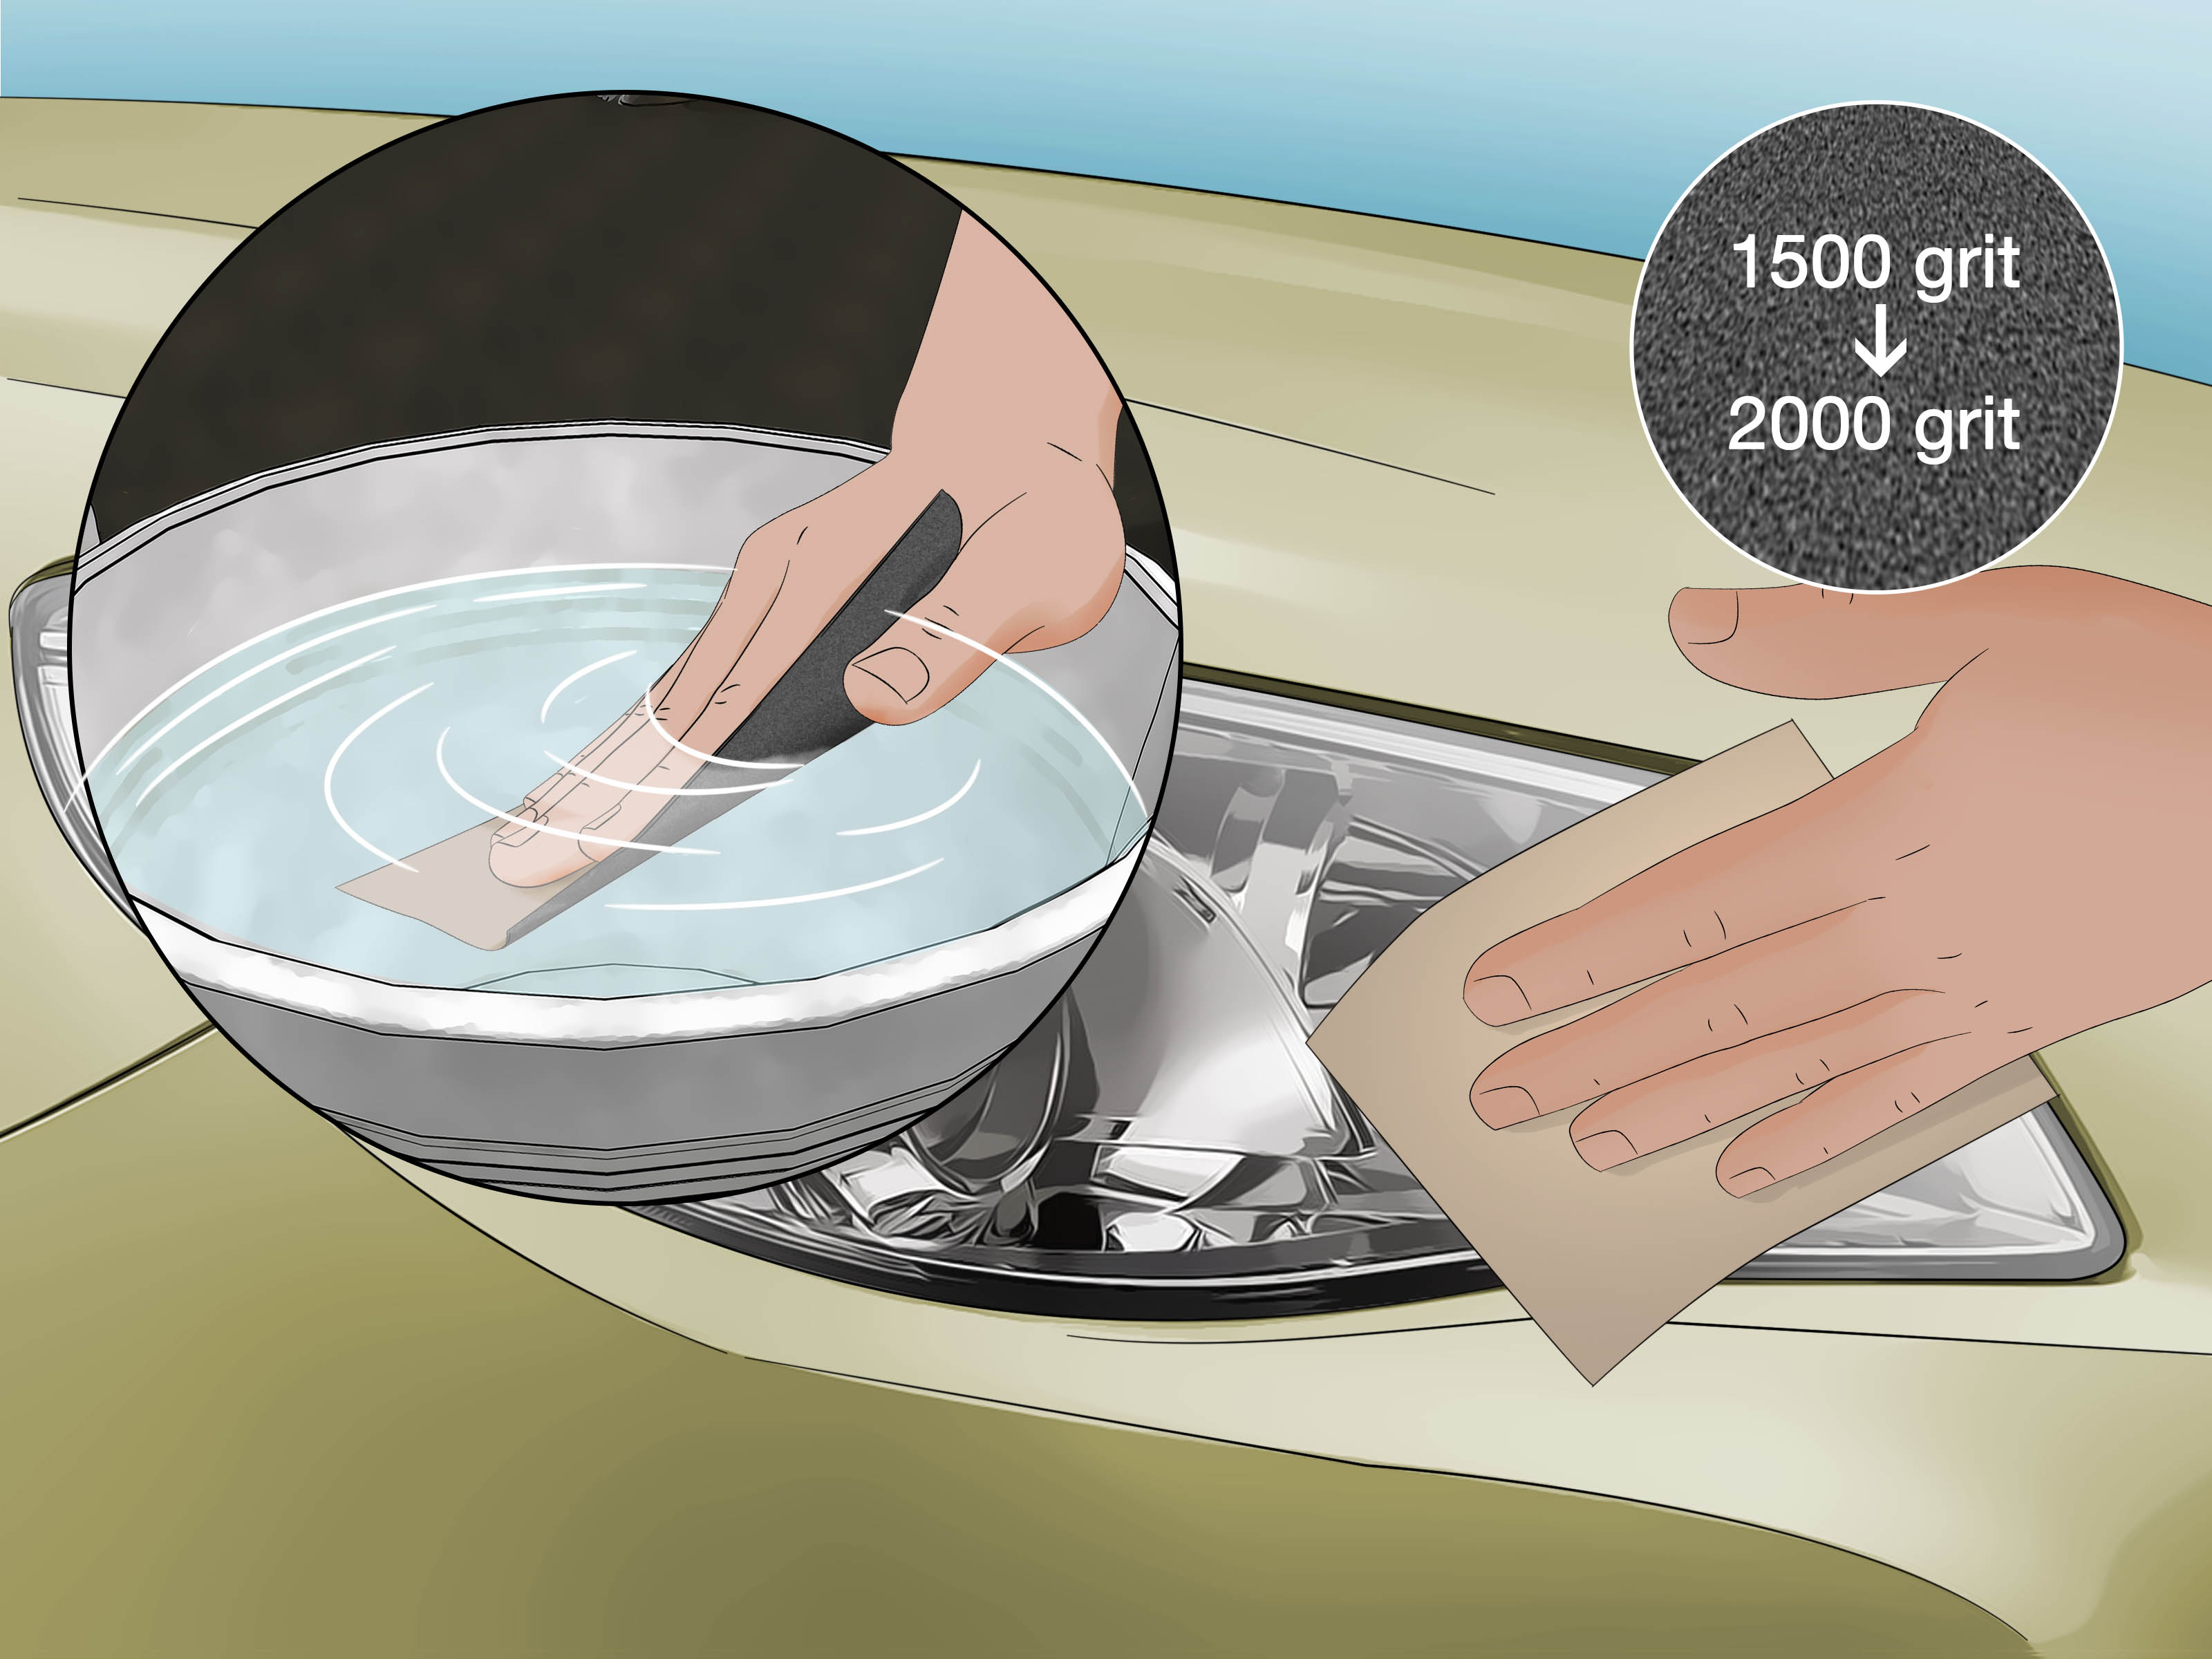
DIY Alternative #4: Wet Sanding for Heavy Oxidation
Wet sanding is the serious DIY method for headlights with heavy yellowing or cloudy buildup. It physically removes the damaged outer layer of plastic. Done correctly, it can make a dramatic difference. Done carelessly, it can leave scratches or uneven patches, so patience matters.
Basic wet sanding process
- Wash and dry the headlights thoroughly.
- Tape around the lens with painter’s tape to protect paint.
- Start with a suitable fine grit sandpaper, often around 800 to 1000 grit for moderate oxidation.
- Keep the sandpaper and lens wet while sanding.
- Sand horizontally with one grit, then switch direction with the next finer grit.
- Progress to finer grits such as 1500, 2000, or 3000 grit.
- Polish the lens with plastic polish or rubbing compound.
- Apply a UV sealant or headlight clear coat.
The most important step is the final protection. Sanding removes damaged material, but it also removes whatever protective coating was left. If you skip UV sealant, the headlight may haze again quickly. That is the DIY equivalent of cleaning your room and then dumping a laundry basket on the bed.
DIY Alternative #5: Headlight Restoration Kits
For most drivers, a headlight restoration kit is the best balance of cost, effort, and results. These kits usually include sanding pads or discs, polishing compound, applicators, tape, and a UV sealant. Some are designed for hand use, while others work with a drill.
The advantage of a kit is that the steps are already organized. Instead of guessing which sandpaper grit to use or which polish is safe for plastic, you follow the instructions. The best kits remove oxidation and add a protective coating to slow future yellowing.
When a restoration kit is better than household hacks
- Your headlights are yellow, not just dusty.
- Toothpaste made only a small improvement.
- You want results that last longer than a few days or weeks.
- The lens feels rough when you run your fingers across it.
- You drive often at night and need better visibility.
Restoration kits are still not permanent. Sun exposure, weather, and road conditions will keep working against the plastic. However, a proper kit with UV protection can last much longer than WD-40, toothpaste, or baking soda alone.
What Not to Use on Headlights
DIY does not mean “try every bottle under the sink and hope the car forgives you.” Some products can damage plastic lenses, paint, or trim.
- Harsh solvents: Strong chemicals may cloud or weaken plastic.
- Steel wool: It can scratch the lens badly.
- Magic erasers used aggressively: They are abrasive and may dull the surface.
- Dry sanding: It can create deep scratches and heat marks.
- Random clear spray paint: Use products made for headlights or automotive plastics.
If you are unsure, test a small area or choose a dedicated headlight restoration product. Your headlights are safety equipment, not a kitchen countertop.
How to Protect Headlights After Cleaning
Cleaning is only half the job. Protection is what keeps the clarity from disappearing like a snack at a road trip rest stop. After polishing or sanding, apply a UV-resistant headlight sealant, ceramic coating, or plastic-safe automotive protectant.
Simple protection tips
- Park in a garage or shaded area when possible.
- Wash headlights regularly to remove dirt, salt, and road film.
- Apply UV protectant after restoration.
- Reapply protection according to product directions.
- Avoid abrasive scrubbing during regular washes.
Routine maintenance matters. A quick wash every few weeks and occasional protection can slow oxidation. It is much easier to maintain clear headlights than to rescue lenses that have turned the color of old lemonade.
WD-40 vs. Toothpaste vs. Restoration Kit: Which One Should You Choose?
The best method depends on how bad your headlights are and how long you want the results to last.
Choose WD-40 if:
You need a fast, temporary improvement and your headlights are only lightly hazy. It is quick and convenient, but do not expect long-term restoration.
Choose toothpaste if:
Your headlights have mild oxidation and you want a cheap DIY polish. It may improve clarity, especially when followed by wax or UV protection.
Choose baking soda if:
You want a slightly stronger household abrasive for light to moderate haze. Be gentle and rinse thoroughly.
Choose a restoration kit if:
Your headlights are yellowed, rough, or significantly cloudy. A kit offers the most complete DIY process because it usually includes sanding, polishing, and sealing.
Choose professional restoration or replacement if:
The lens is cracked, moisture is inside the headlight housing, the reflector is damaged, or the plastic remains cloudy after proper restoration. In those cases, the problem may be deeper than the outer lens.
Step-by-Step Best DIY Method for Long-Lasting Results
If you want the most reliable at-home approach, use this practical process:
- Clean first: Wash the lens with soap and water to remove dirt.
- Inspect: Decide whether the haze is mild, moderate, or severe.
- Try polish: For mild haze, use toothpaste, baking soda paste, or plastic polish.
- Wet sand if needed: For heavy oxidation, use progressively finer sandpaper.
- Polish: Restore clarity with a plastic-safe polish or compound.
- Seal: Apply UV protection to prevent fast re-clouding.
- Maintain: Wash regularly and reapply protectant as needed.
This method works because it treats the actual problem: oxidation and worn protective coating. Quick fixes improve appearance, but restoration removes damage and adds protection back to the lens.
Real-World Experience: What Actually Happens When You Clean Headlights Yourself
The first thing most people learn when cleaning headlights is that the job looks easier online than it feels in the driveway. In a short video, someone wipes a lens three times and suddenly the headlight looks showroom-new. In real life, the headlight usually improves in stages. First, the dirt comes off. Then the yellow film starts to fade. Then you notice tiny scratches you never saw before. Then you wonder whether you are restoring a headlight or auditioning for a low-budget car-care documentary.
WD-40 is often the most satisfying in the first five minutes. You wipe it on, and the lens looks clearer almost instantly. That instant shine is why so many drivers love the trick. But after rain, washing, sun exposure, or a few days of driving, the haze usually begins to return. The experience teaches an important lesson: shine is not always restoration. WD-40 can make oxidation less visible, but it does not remove the damaged plastic layer.
Toothpaste feels more honest. It takes more elbow grease, and the results are usually less dramatic at first, but you can see a real polishing effect on mildly foggy headlights. The best experience comes from using a damp microfiber cloth, working in small circles, and being patient. Scrubbing too hard does not speed things up; it just makes your arm question your life choices. After rinsing, the headlight may look noticeably cleaner, especially if the original problem was light haze rather than deep yellowing.
Baking soda paste can feel a little more powerful, but it is messier. It dries quickly, leaves white residue in seams, and makes you appreciate why professional detailers use controlled products. Still, for budget cleaning, it can help. The key is to rinse carefully and avoid letting the paste sit too long around rubber seals or trim.
The biggest transformation usually comes from a restoration kit or wet sanding process. At first, sanding the headlight feels wrong. The lens may become even cloudier during the early steps, which can cause mild panic. That is normal. The magic happens as you move to finer grits and polish the lens. Once the surface smooths out, clarity returns. The final sealant step is where many beginners get impatient, but it is the part that protects the work. Skipping it is why some DIY restorations look great on Saturday and disappointing by next month.
One practical tip from experience: do both headlights, even if only one looks bad. A single restored headlight beside a cloudy one makes the car look like it is winking awkwardly. Also, take before-and-after photos. Not for social media bragging, although that is allowed, but because the improvement is easier to judge when you compare images in the same lighting.
Another lesson: outdoor conditions matter. Work in shade, not direct sun. Heat can dry products too quickly and make polishing harder. Wind can blow dust onto the lens while you are working. A calm, shaded spot with good lighting makes the process smoother. Keep several clean microfiber towels nearby because one towel will become dirty faster than expected.
Finally, DIY headlight cleaning is worth doing because it gives an older vehicle an instant facelift and can improve nighttime confidence. The front of the car looks fresher, the lights appear brighter, and the whole vehicle seems better cared for. Just remember the golden rule: cleaning makes headlights look better, but protection keeps them that way.
Conclusion
Cleaning headlights with WD-40 can be a handy quick fix, especially when you want a fast improvement with almost no effort. But if your goal is long-lasting clarity, WD-40 is only the opening act. Toothpaste and baking soda can help with light oxidation, vinegar can remove surface film, and a proper headlight restoration kit is usually the strongest DIY choice for yellowed or heavily foggy lenses.
The best results come from understanding the cause of cloudy headlights. Oxidation, UV damage, and worn protective coating require more than a wipe-down. Clean the lens, polish or sand away the damaged surface when needed, and always finish with UV protection. Your headlights will look better, your car will appear newer, and your nighttime drives will feel less like a mystery tour.
Note: This article is for general DIY vehicle maintenance. If your headlights are cracked, leaking, severely damaged, or still dim after cleaning, consider professional inspection or replacement.