Learning how to make loom bands with beads is one of those crafts that looks fancy, feels relaxing, and somehow leaves you wondering why there are tiny rubber bands hiding under the couch three weeks later. The good news? A beaded loom band bracelet is much easier than it appears. With a handful of colorful rubber bands, a few beads, a hook, and either a loom or two sturdy pegs, you can make a bright, stretchy bracelet that looks like it came from a craft fair table instead of your kitchen counter.
This guide walks you through a simple six-step method for making loom bands with beads, using beginner-friendly techniques that work for kids, teens, and adults who need a screen-free hobby that does not involve sourdough starter. You will learn what supplies to choose, how to load beads onto bands, how to keep the pattern neat, how to finish the bracelet securely, and how to avoid the most common mistakes.
The main keyword here is how to make loom bands with beads, but this tutorial also naturally covers related ideas such as beaded loom band bracelet, Rainbow Loom bracelet with beads, pony bead bracelet, rubber band bracelet, C-clip closure, and beginner loom band patterns.
What Are Loom Bands with Beads?
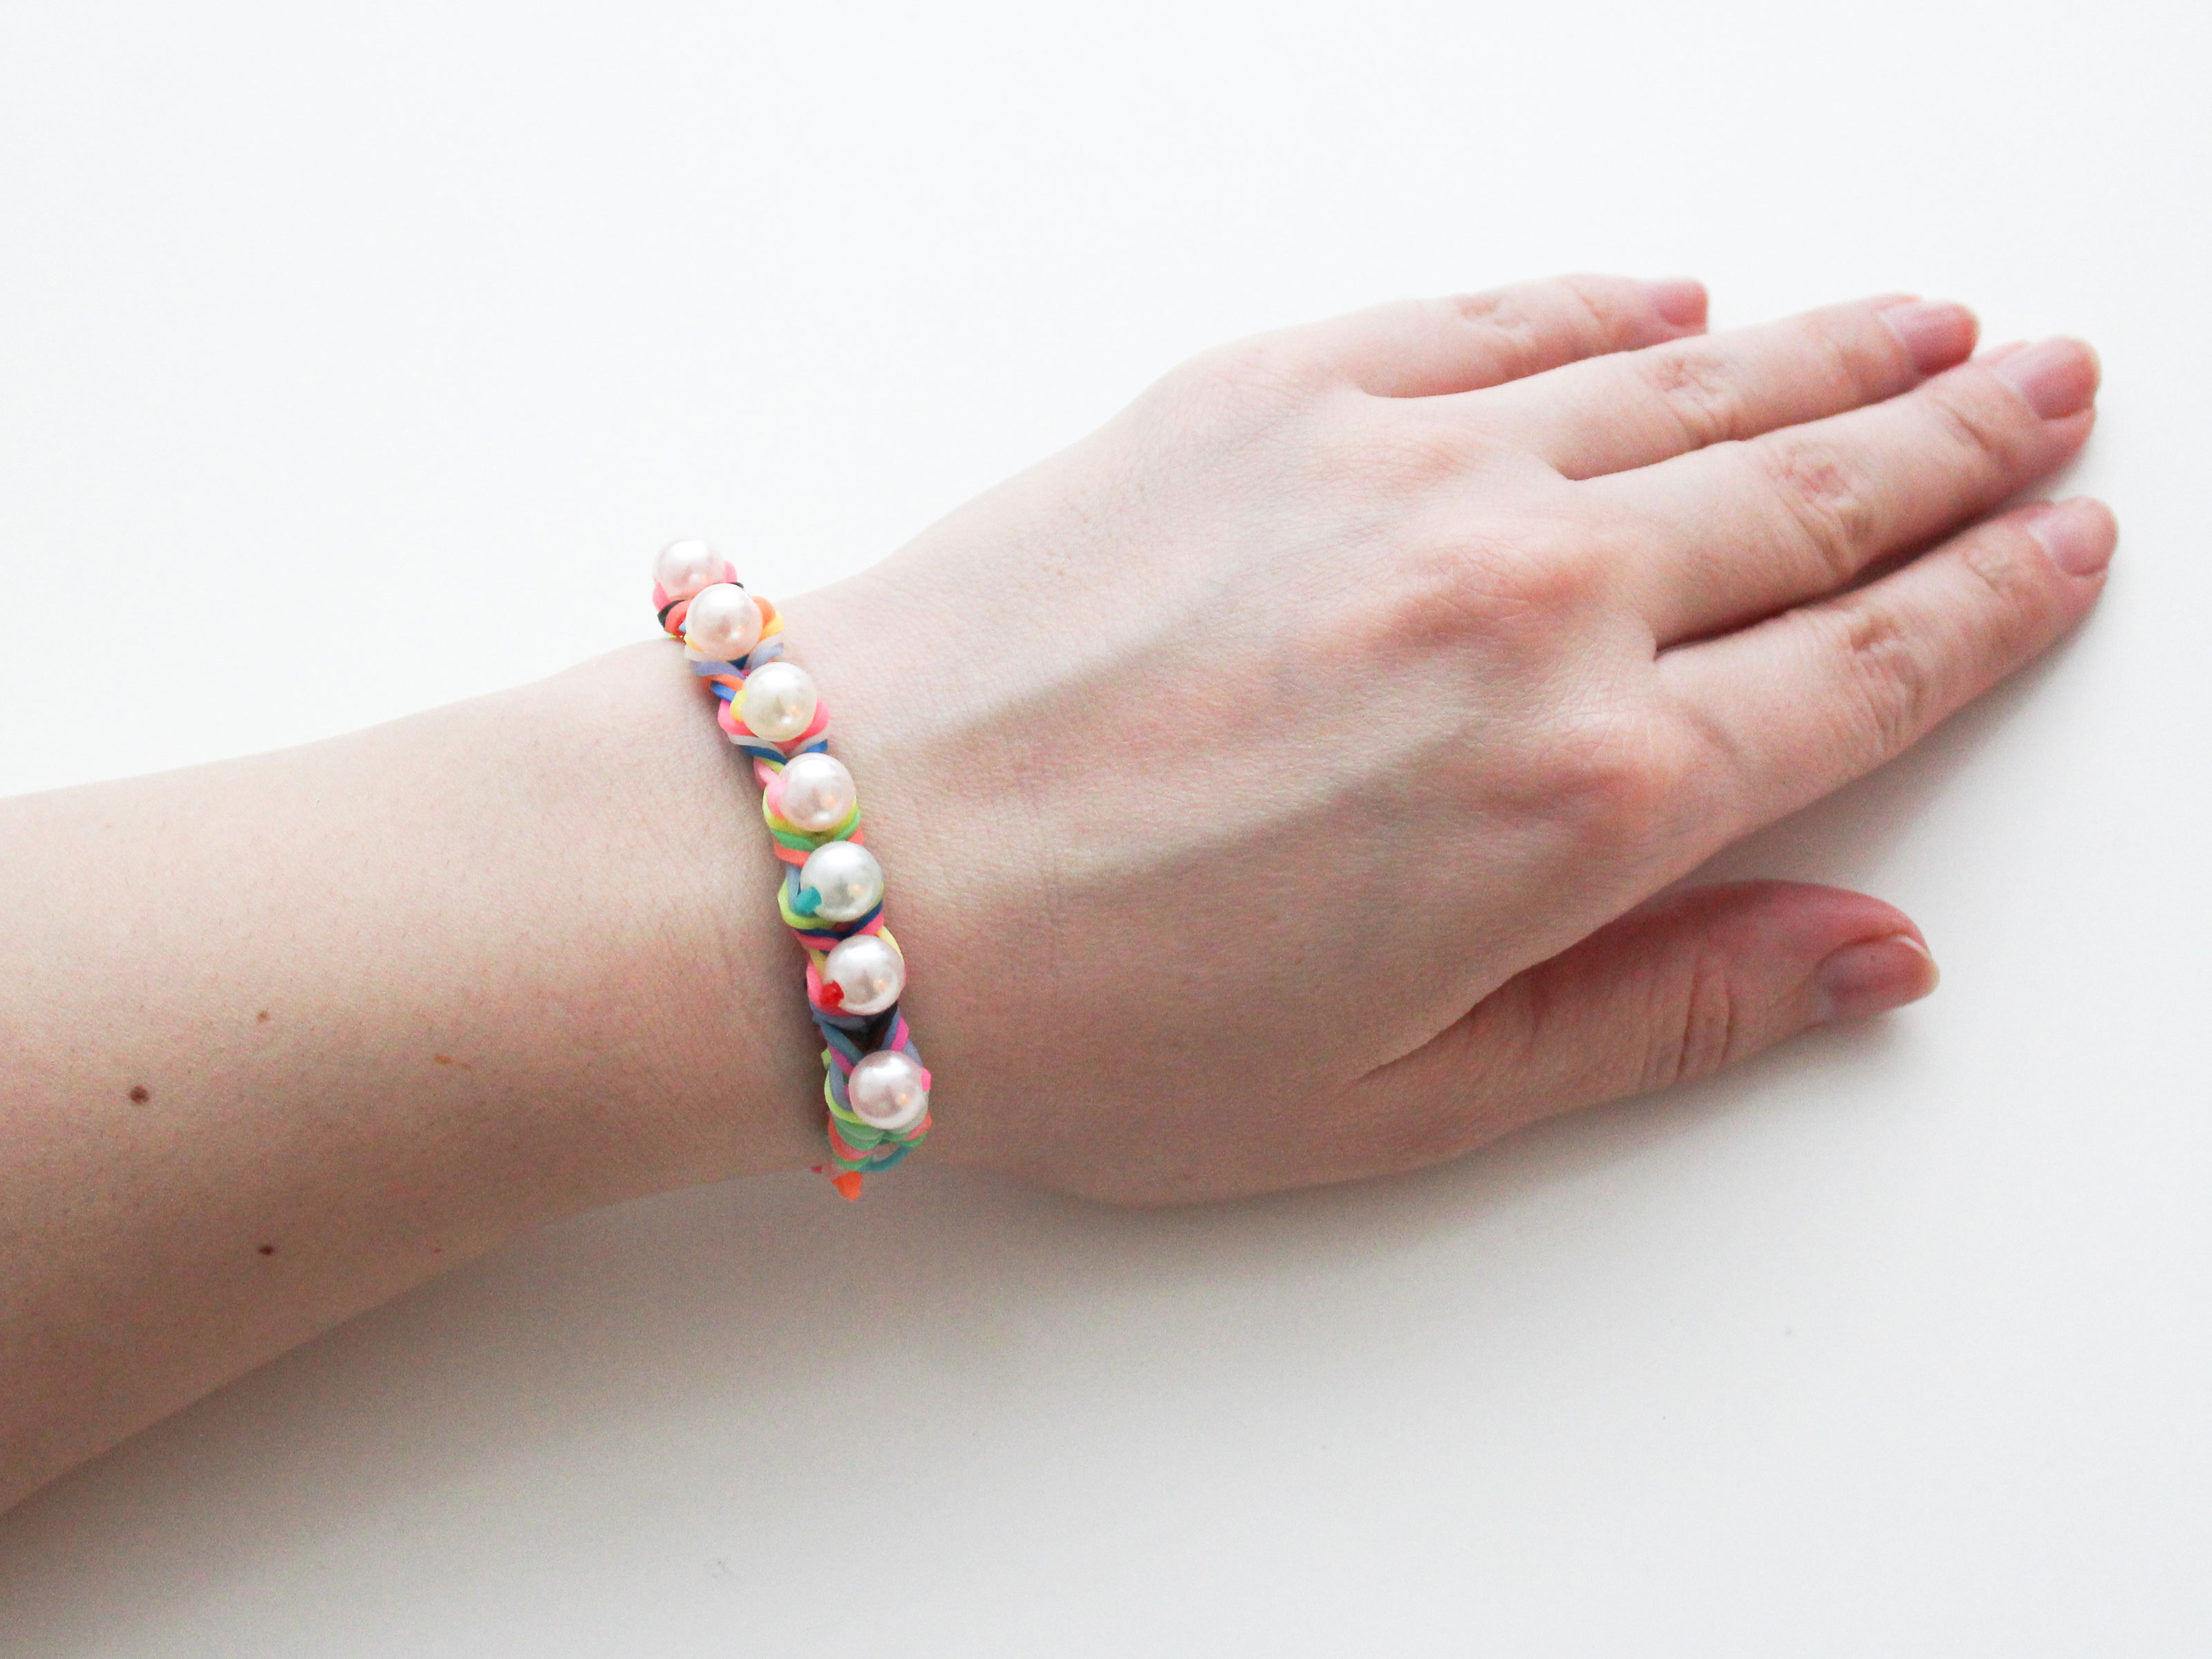
Loom bands are small elastic bands used to weave bracelets, charms, rings, keychains, and other colorful accessories. Beads add decoration, weight, texture, and personality. Instead of a plain rubber band chain, you get a bracelet with tiny pops of color sitting between the loops. The result can be playful, polished, or wonderfully chaotic, depending on your bead choices. In other words, the bracelet can say “rainbow unicorn party” or “minimalist summer accessory,” and both are valid life choices.
Most beaded loom band bracelets use pony beads, Perler-style beads, alphabet beads, or other lightweight plastic beads with holes large enough for a rubber band to pass through. The easiest beginner version uses a simple fishtail or chain pattern on two pegs. More advanced versions use a full loom and create bead ladder, starburst, or double-band designs.
Materials You Need
Before you start, gather everything in one place. Loom bands have a special talent for rolling away at the exact moment you need them, so a tray, bowl, or small container is helpful.
Basic Supplies
- 40 to 60 loom bands, depending on wrist size and pattern
- 12 to 20 beads with wide holes, such as pony beads or Perler-style beads
- A loom, mini loom, two pencils, two fork prongs, or even two fingers
- A loom hook or small crochet hook
- One C-clip or S-clip for closing the bracelet
- A flat work surface with good lighting
For a child-size bracelet, you may need around 40 to 48 bands. For a teen or adult wrist, plan on 50 to 60 bands. The final number depends on how tightly you loop, how large the beads are, and how stretchy your bands feel. If your bracelet looks too short, do not panic. Loom band bracelets are friendly little creatures; you can add a short extension chain before clipping the ends together.
Choosing the Right Beads
The best beads for loom bands are lightweight and smooth. Pony beads are popular because their holes are wide, their colors are bold, and they slide onto rubber bands without requiring the patience of a monk. Perler-style beads can also work well, especially if you want a slimmer bracelet, but the hole must be wide enough for the band to pass through without tearing.
Avoid heavy glass beads for beginner projects. They may look beautiful, but they can pull on the bands and make the bracelet feel awkward. Also avoid beads with sharp edges, because sharp plastic or metal can cut into the elastic over time. If a bead feels rough, skip it. Your bracelet deserves better.
Safety Tips Before You Begin
Loom bands, beads, and C-clips are small parts. Keep them away from children under three years old and pets. Younger crafters should work with adult supervision, especially when using hooks or tiny beads. If a band snaps, throw it away rather than trying to stretch it back into service like a tiny rubber hero. Broken bands weaken the bracelet and can create loose pieces.
If the bracelet is for someone with sensitive skin, choose high-quality craft bands and check the product label carefully. Some official loom products are marketed as non-latex or latex-free, but people with severe allergies should still use caution and stop wearing the bracelet if irritation appears.
How to Make Loom Bands with Beads: 6 Steps
This beginner method uses a two-peg setup, which means you do not need a full loom board. A mini loom, two pencils taped together, or two pegs on a standard loom will work. The finished design resembles a simple beaded fishtail or chain bracelet.
Step 1: Plan Your Pattern
Lay out your bands and beads before you start. This is not just for neatness; it helps you avoid a bracelet that begins as “cute pastel rainbow” and ends as “leftover craft drawer soup.” Choose two or three band colors and one to three bead colors. Beginners often get the cleanest result by using one band color and changing the bead colors. For example, white bands with pink, blue, and yellow beads create a soft candy look. Black bands with neon beads create a bold, sporty style.
Decide how often you want to add beads. A bead on every other loop gives a balanced look. A bead on every loop creates a fuller design. For a beginner bracelet, start with 12 to 16 beads and add more only if needed.
Step 2: Set Up the First Band
Place your first loom band around two pegs in a figure-eight shape. To do this, stretch the band over one peg, twist it once in the middle, and place the other side over the second peg. This first twist anchors the bracelet and helps the weave stay secure.
Now place two more bands above the figure-eight band, but do not twist them. You should have three bands on the pegs: one twisted band on the bottom and two straight bands above it. If you are using two pencils, keep them steady with one hand or tape them together at one end so they do not wobble like nervous chopsticks.
Step 3: Loop the Bottom Band Over the Top
Use your hook to grab the bottom band on the left peg. Pull it up, over the two upper bands, and release it into the center between the pegs. Repeat on the right peg. The bottom band should now sit in the middle, forming the first woven link.
Add one new band across the two pegs. You should always keep three bands on the pegs before looping. This “three-band rhythm” is the secret sauce of many simple loom band patterns: add a band, lift the bottom band over, add another band, lift again. It is easy once your hands understand the motion.
Step 4: Add Beads to the Bands
Now comes the sparkle. Slide a bead onto your hook first. Then catch one side of a new rubber band with the hook and pull the band through the bead. Center the bead on the band so it sits in the middle. Place both ends of that band over the two pegs, just like a normal band.
Once the beaded band is in place, use your hook to lift the bottom band over the top on both sides. The bead will settle into the center of the bracelet. If it leans sideways, gently tug the bracelet tail downward. The bead should straighten out as the pattern tightens.
Continue the pattern: add a plain band, loop the bottom band over, then add a beaded band, loop again. This alternating method keeps the bracelet flexible and prevents the beads from crowding each other. If you want a bead-heavy bracelet, you can add a beaded band every time, but beginners usually get a neater result by spacing them out.
Step 5: Continue Until the Bracelet Fits
As you work, gently pull the forming bracelet downward between the pegs. This helps the loops line up and keeps the bracelet from bunching. Every few minutes, pause and check the length around the wrist. Do not stretch it too tightly while measuring. A loom band bracelet should fit comfortably, not perform a wrestling move on your circulation.
For a child’s wrist, you may stop after 12 to 14 beads. For a larger wrist, use 16 to 20 beads or add extra plain bands at the end. If your beads are large, you may need fewer because they take up more space. If your beads are small, add more links for length.
Step 6: Finish with a C-Clip or S-Clip
When the bracelet reaches the right size, stop adding new bands. You should have two bands left on the pegs. Loop the bottom band over the top one on both sides, leaving one final band. Move both loops of that last band onto one peg, then attach a C-clip or S-clip through both loops. Carefully remove the bracelet from the pegs.
Find the first loop at the starting end of the bracelet and attach it to the other side of the clip. Check the closure by giving the bracelet a gentle tug. If the clip is secure, your beaded loom band bracelet is ready to wear, trade, gift, or admire dramatically under a desk lamp.
Common Mistakes and How to Fix Them
The Beads Will Not Fit on the Bands
If a bead will not slide onto the band, the hole is too small or the band is too thick. Try using pony beads, larger Perler-style beads, or a smaller hook. Do not force the bead through, because overstretching the band can weaken it before the bracelet is even finished.
The Bracelet Looks Twisted
A little twist is normal at the beginning. Pull the bracelet downward as you work and straighten each bead before adding the next band. If the entire bracelet spirals, you may be placing bands unevenly or accidentally twisting bands after the first row. Remember: only the first band should be a figure eight.
The Bracelet Is Too Short
Add a simple extension chain. Place several plain bands on the pegs one at a time, loop them as usual, and clip the end. You can also add a few extra beaded links if you want the design to continue.
The Bracelet Is Too Loose
Remove a few links before clipping, or use fewer beads next time. Large beads create extra length, so a bracelet that looks short on the loom may fit perfectly once it stretches around the wrist.
Creative Design Ideas
Once you understand the basic method, you can customize your loom band bracelets with beads in dozens of ways. Try alphabet beads to spell a name, initials, a team slogan, or a tiny inside joke. Use glow-in-the-dark beads for sleepover crafts. Match bead colors to school colors, holiday themes, or favorite outfits.
For a summer bracelet, use turquoise bands with white and coral beads. For a Halloween bracelet, try black bands with orange, purple, and green beads. For a birthday party craft, set up bowls of beads and let each guest design a bracelet. Just be warned: once people discover the bead bowl, everyone suddenly becomes a jewelry designer with very strong opinions.
Why Beaded Loom Band Bracelets Are Great for Beginners
Beaded loom band bracelets are excellent beginner crafts because they teach pattern recognition, hand-eye coordination, patience, and color planning. They also give fast results. Unlike some crafts that require drying time, measuring tape, or emotional recovery, this one gives you a wearable bracelet in a short session.
The project is also flexible. You can make it with a full Rainbow Loom, a mini loom, pencils, fingers, or a fork. That makes it perfect for classrooms, craft clubs, rainy afternoons, birthday parties, and “I need something fun to do that does not involve buying a new device” moments.
Extra Experience: What Making Loom Bands with Beads Teaches You
After making a few loom band bracelets with beads, you start to notice small details that make a big difference. The first lesson is that bead size matters more than bead beauty. A gorgeous bead with a tiny hole is basically a tiny plastic diva. It will refuse to cooperate, stretch your band, and make the whole process feel like threading spaghetti through a keyhole. A simple pony bead with a smooth, wide opening will often look better because it sits neatly and lets the bracelet stretch naturally.
The second lesson is that color planning saves time. When beginners dump all the beads into one pile and start grabbing randomly, the bracelet can still turn out fun, but it may look less intentional. A simple repeating pattern such as blue bead, white bead, yellow bead can make even inexpensive supplies look polished. If you are crafting with children, ask them to lay out the beads first. This turns the project into a mini design challenge and helps them practice sequencing without making it feel like homework wearing a craft hat.
The third lesson is to keep your tension gentle. Many beginners pull the bands too hard because they want the bracelet to look tight and secure. But loom bands need a little room to move. If you stretch each band aggressively, the bracelet can become stiff, uneven, or more likely to snap. A gentle downward tug after each loop is enough. Think of it as guiding the bracelet, not challenging it to a tug-of-war.
Another useful experience is learning when to use a hook and when to use fingers. Fingers are quick for plain bands, but a hook is much easier when adding beads. A smaller crochet hook can help pull the band through the bead cleanly. If the bead sticks, rotate it slightly instead of yanking. This tiny adjustment prevents broken bands and keeps the process calm.
Storage also matters more than people expect. Loom bands and beads are small, colorful, and mysteriously mobile. Use a divided craft box, muffin tin, ice cube tray, or zip-top bags to sort colors. If you are making bracelets at a party, give each person a small cup for selected beads. This prevents the classic craft-table event known as “the great bead avalanche,” which is exactly as dramatic as it sounds.
Finally, making loom bands with beads is a surprisingly good reminder that handmade projects do not need to be perfect. A bead may face sideways. A color may appear out of order. One side may be slightly tighter than the other. That is part of the charm. The bracelet still carries the fun of choosing colors, learning a pattern, and making something wearable by hand. With each bracelet, your rhythm improves, your designs get cleaner, and your confidence grows. Soon you will be making custom bracelets for friends, siblings, classmates, or anyone who makes the dangerous mistake of saying, “That’s cute, can you make me one?”
Conclusion
Now you know how to make loom bands with beads in six simple steps: plan the pattern, set up the first band, loop the base, add beads, continue to size, and finish with a clip. The project is beginner-friendly, colorful, affordable, and easy to customize. Whether you use pony beads, Perler-style beads, alphabet beads, or a mix of everything in the craft drawer, the key is to choose beads with wide holes, keep your tension even, and secure the bracelet properly.
A beaded loom band bracelet is more than a cute accessory. It is a small creative project that teaches patience, design, and problem-solving while giving you something fun to wear at the end. Not bad for a few rubber bands and beads, right?