Moving a Peloton Bike sounds simple until you are standing in a hallway with a premium exercise bike, a nervous helper, a touchscreen worth protecting, and a doorway that suddenly looks like it was designed for squirrels. The good news? A Peloton is movable. The better news? You do not need to treat it like a museum statue made of glass and monthly subscription fees. You simply need a plan.
This guide explains how to move a Peloton Bike safely in 15 practical steps, whether you are shifting it across the room, rolling it into a new workout corner, taking it downstairs, or preparing it for a full home move. The process focuses on protecting the touchscreen, stabilizing the frame, keeping small parts organized, avoiding floor damage, and reassembling the bike so it feels solid when you clip back in.
Peloton models vary by generation. Newer Peloton Cross Training Bike models weigh around 129 pounds, while Cross Training Bike+ models are heavier at around 144 pounds. Older Bike and Bike+ models may have slightly different dimensions and weights. In everyday moving language, that means one thing: this is not a feather duster. Get help, move slowly, and do not let pride be the third mover.
Before You Move: What Makes a Peloton Tricky?
A Peloton Bike is compact compared with a treadmill, but it is still a heavy, awkward piece of connected fitness equipment. The frame is sturdy, the flywheel adds weight, the stabilizers are wide, and the touchscreen is the part you most want to baby. The bike has front transport wheels, which are useful for short, smooth moves, but those wheels are not magic. They are not meant for stairs, gravel, thick thresholds, or a dramatic one-person wrestling match.
The safest way to move a Peloton Bike is to reduce risk before you lift anything. Remove accessories, unplug cables, protect the screen, plan your route, and decide whether the touchscreen should come off. For a simple room-to-room move on the same floor, you may only need to unplug the bike and carefully roll it. For stairs, trucks, storage, or long-distance moving, you should prepare it more thoroughly.
Tools and Supplies You May Need
- Moving blankets or furniture pads
- Bubble wrap or soft padding for the touchscreen
- Painter’s tape or stretch wrap
- Zip-top bags for bolts, screws, and small parts
- Permanent marker for labeling
- Allen wrenches or hex keys, depending on your model
- 15 mm wrench if you plan to remove pedals
- Furniture sliders or cardboard for floor protection
- Dolly, hand truck, or moving straps for stairs or truck loading
- At least one strong helper
Do not use packing tape directly on the frame, screen, seat, handlebars, or painted surfaces. It can leave sticky residue and turn your sleek bike into a craft project gone wrong.
How to Move a Peloton Bike: 15 Steps
Step 1: Decide How Far the Bike Is Moving
First, identify the type of move. Are you moving the Peloton a few feet, into another room, upstairs, downstairs, into a truck, or across the country? A short move on one flat level can often be handled with the transport wheels. A move involving stairs, tight turns, storage, or professional movers requires more preparation.
Use this rule: the farther the bike travels, the more parts you should protect or remove. A ten-foot roll does not require the same setup as a cross-state relocation.
Step 2: Check Your Model and Any Safety Notices
Before moving day, check your exact Peloton model. Bike, Bike+, and newer Cross Training Bike models may have different screen assemblies, weights, and hardware. If you own a Bike+ model, also check whether any recall or seat-post notice applies to your serial number. Moving is a perfect time to inspect the seat post, pedals, frame, and stabilizers for wear.
If anything looks cracked, bent, loose, or suspicious, pause the move and contact Peloton support or a qualified technician. A move should not become the moment you discover that “just one more ride” was optimistic.
Step 3: Take Photos Before You Touch Anything
Take clear photos of the bike from the front, back, sides, screen mount, cable connections, seat position, handlebar height, and any accessories. These photos act like a reassembly map. They are especially helpful if you remove the touchscreen, pedals, weight holders, bottle holders, or seat post.
Photos also help if you use professional movers. You can document the bike’s condition before it leaves your home, which is useful if you need to compare its condition after delivery.
Step 4: Power Down and Unplug the Bike
Turn the bike off, then unplug the power cord from the wall and from the bike. Coil the cable loosely and secure it with a twist tie or soft strap. Do not wrap it tightly around the frame or shove it under the bike. Power cords are not spaghetti, even if moving day makes your brain feel like noodles.
Place the cord in a labeled bag or small box. If you are moving the bike with other household items, label the bag “Peloton power cord” so it does not vanish into the mysterious land where remote controls and Allen keys go to retire.
Step 5: Remove Loose Accessories
Remove water bottles, towels, shoes, dumbbells, phone trays, heart-rate straps, floor mats, and any add-on accessories. If your bike has rear weight holders and you keep dumbbells there, take the weights off before moving. A loose dumbbell can scratch floors, dent walls, or create a slapstick scene nobody asked for.
Pack accessories separately. Small items should go into a labeled box. Heavy items, such as dumbbells, should be packed in sturdy containers that can handle the weight.
Step 6: Lower and Tighten Adjustable Parts
Lower the seat and handlebars to make the bike more compact. Tighten adjustment knobs and levers so the posts do not slide during transport. If you are moving a very short distance, this may be enough. For a longer move, consider removing the seat post or handlebars only if your model allows it and you are comfortable reassembling them correctly.
Do not force any part. If a post does not slide smoothly, check the adjustment mechanism rather than yanking it. Peloton parts are strong, but they are not improved by panic.
Step 7: Protect or Remove the Touchscreen
The touchscreen is the most vulnerable part of the bike. For a short roll across a room, you can usually leave it attached if the path is clear and the bike stays upright. For stairs, a moving truck, storage, or a long-distance move, removing the touchscreen is often the safer choice.
Screen removal differs by model. Some Peloton touchscreens use bolts or screws and cable connections that must be handled carefully. If you remove the screen, support it with one hand or have a helper hold it while you loosen the hardware. Disconnect cables gently by the connector, not by pulling on the wire. Wrap the screen in soft padding, place cardboard or a rigid backing over the display side, and label it clearly.
Never place heavy boxes on top of the touchscreen. That sounds obvious, but moving day has a way of turning common sense into a missing sock.
Step 8: Consider Removing the Pedals
Removing the pedals can make the bike narrower and reduce the chance of scraping a door frame or catching a pedal on a wall. Peloton pedals use opposite threading: the right pedal tightens clockwise, while the left pedal tightens counterclockwise. When removing pedals, remember that the left side behaves differently.
If you are not confident, leave the pedals on and protect nearby walls instead. Incorrect pedal removal or reinstallation can damage threads, and that is not the kind of cardio anyone wants.
Step 9: Measure the Route
Measure doorways, hallways, stair turns, elevator openings, and truck ramps. Compare those spaces with the bike’s width and length, including the stabilizers. Do not forget tight corners. A doorway may be wide enough, but the turn immediately after it may not be.
Walk the route before moving the bike. Remove rugs, shoes, toys, plants, laundry baskets, and anything else that could trip you. If you have pets, close them in another room. A curious dog plus a moving Peloton equals chaos with paws.
Step 10: Protect Floors, Walls, and Door Frames
Use cardboard, moving blankets, or furniture sliders to protect floors. Tape cardboard or padding to sharp corners and door frames if the route is tight. On hardwood, avoid dragging the bike. On carpet, move slowly because the front wheels may not roll as easily.
If you are moving through an apartment building, check elevator rules, padding requirements, and moving-hour restrictions. Some buildings require reservations for freight elevators. Discovering this while holding a Peloton in a lobby is not ideal.
Step 11: Use the Transport Wheels for Short Moves
For a same-floor move, stand behind the bike, hold the rear stabilizer, and carefully tilt the bike forward so the front transport wheels touch the floor. A helper should guide the handlebars and watch the screen area. Roll slowly and keep the bike balanced.
The front wheels are useful, but they are small. Avoid bumps, uneven surfaces, thresholds, gravel, and outdoor pavement when possible. If you must cross a threshold, slow down and lift slightly rather than ramming the bike like a tiny battering ram.
Step 12: Carry the Bike Carefully on Stairs
Stairs are where you should stop pretending this is a solo project. Use at least two people. One person should control the upper end while the other supports and guides the lower end. Keep the bike upright or slightly tilted as needed, and move one step at a time.
If the stairs are narrow, steep, curved, or slippery, hire professional movers. A Peloton is expensive, but backs, knees, and walls are also worth protecting. Use moving straps or a proper dolly only if you know how to secure the bike safely.
Step 13: Load It Securely in the Vehicle
If the bike is going into a truck or van, keep it upright whenever possible. Wrap the frame in moving blankets and secure it with straps so it cannot shift. Do not strap directly across the touchscreen, resistance knob, cables, or delicate parts. If the screen was removed, transport it separately in a padded, upright position.
Avoid placing heavy boxes against the flywheel, belt guard, screen mount, or pedals. The bike should be snug, not crushed. Think “secure passenger,” not “last suitcase in the trunk before vacation.”
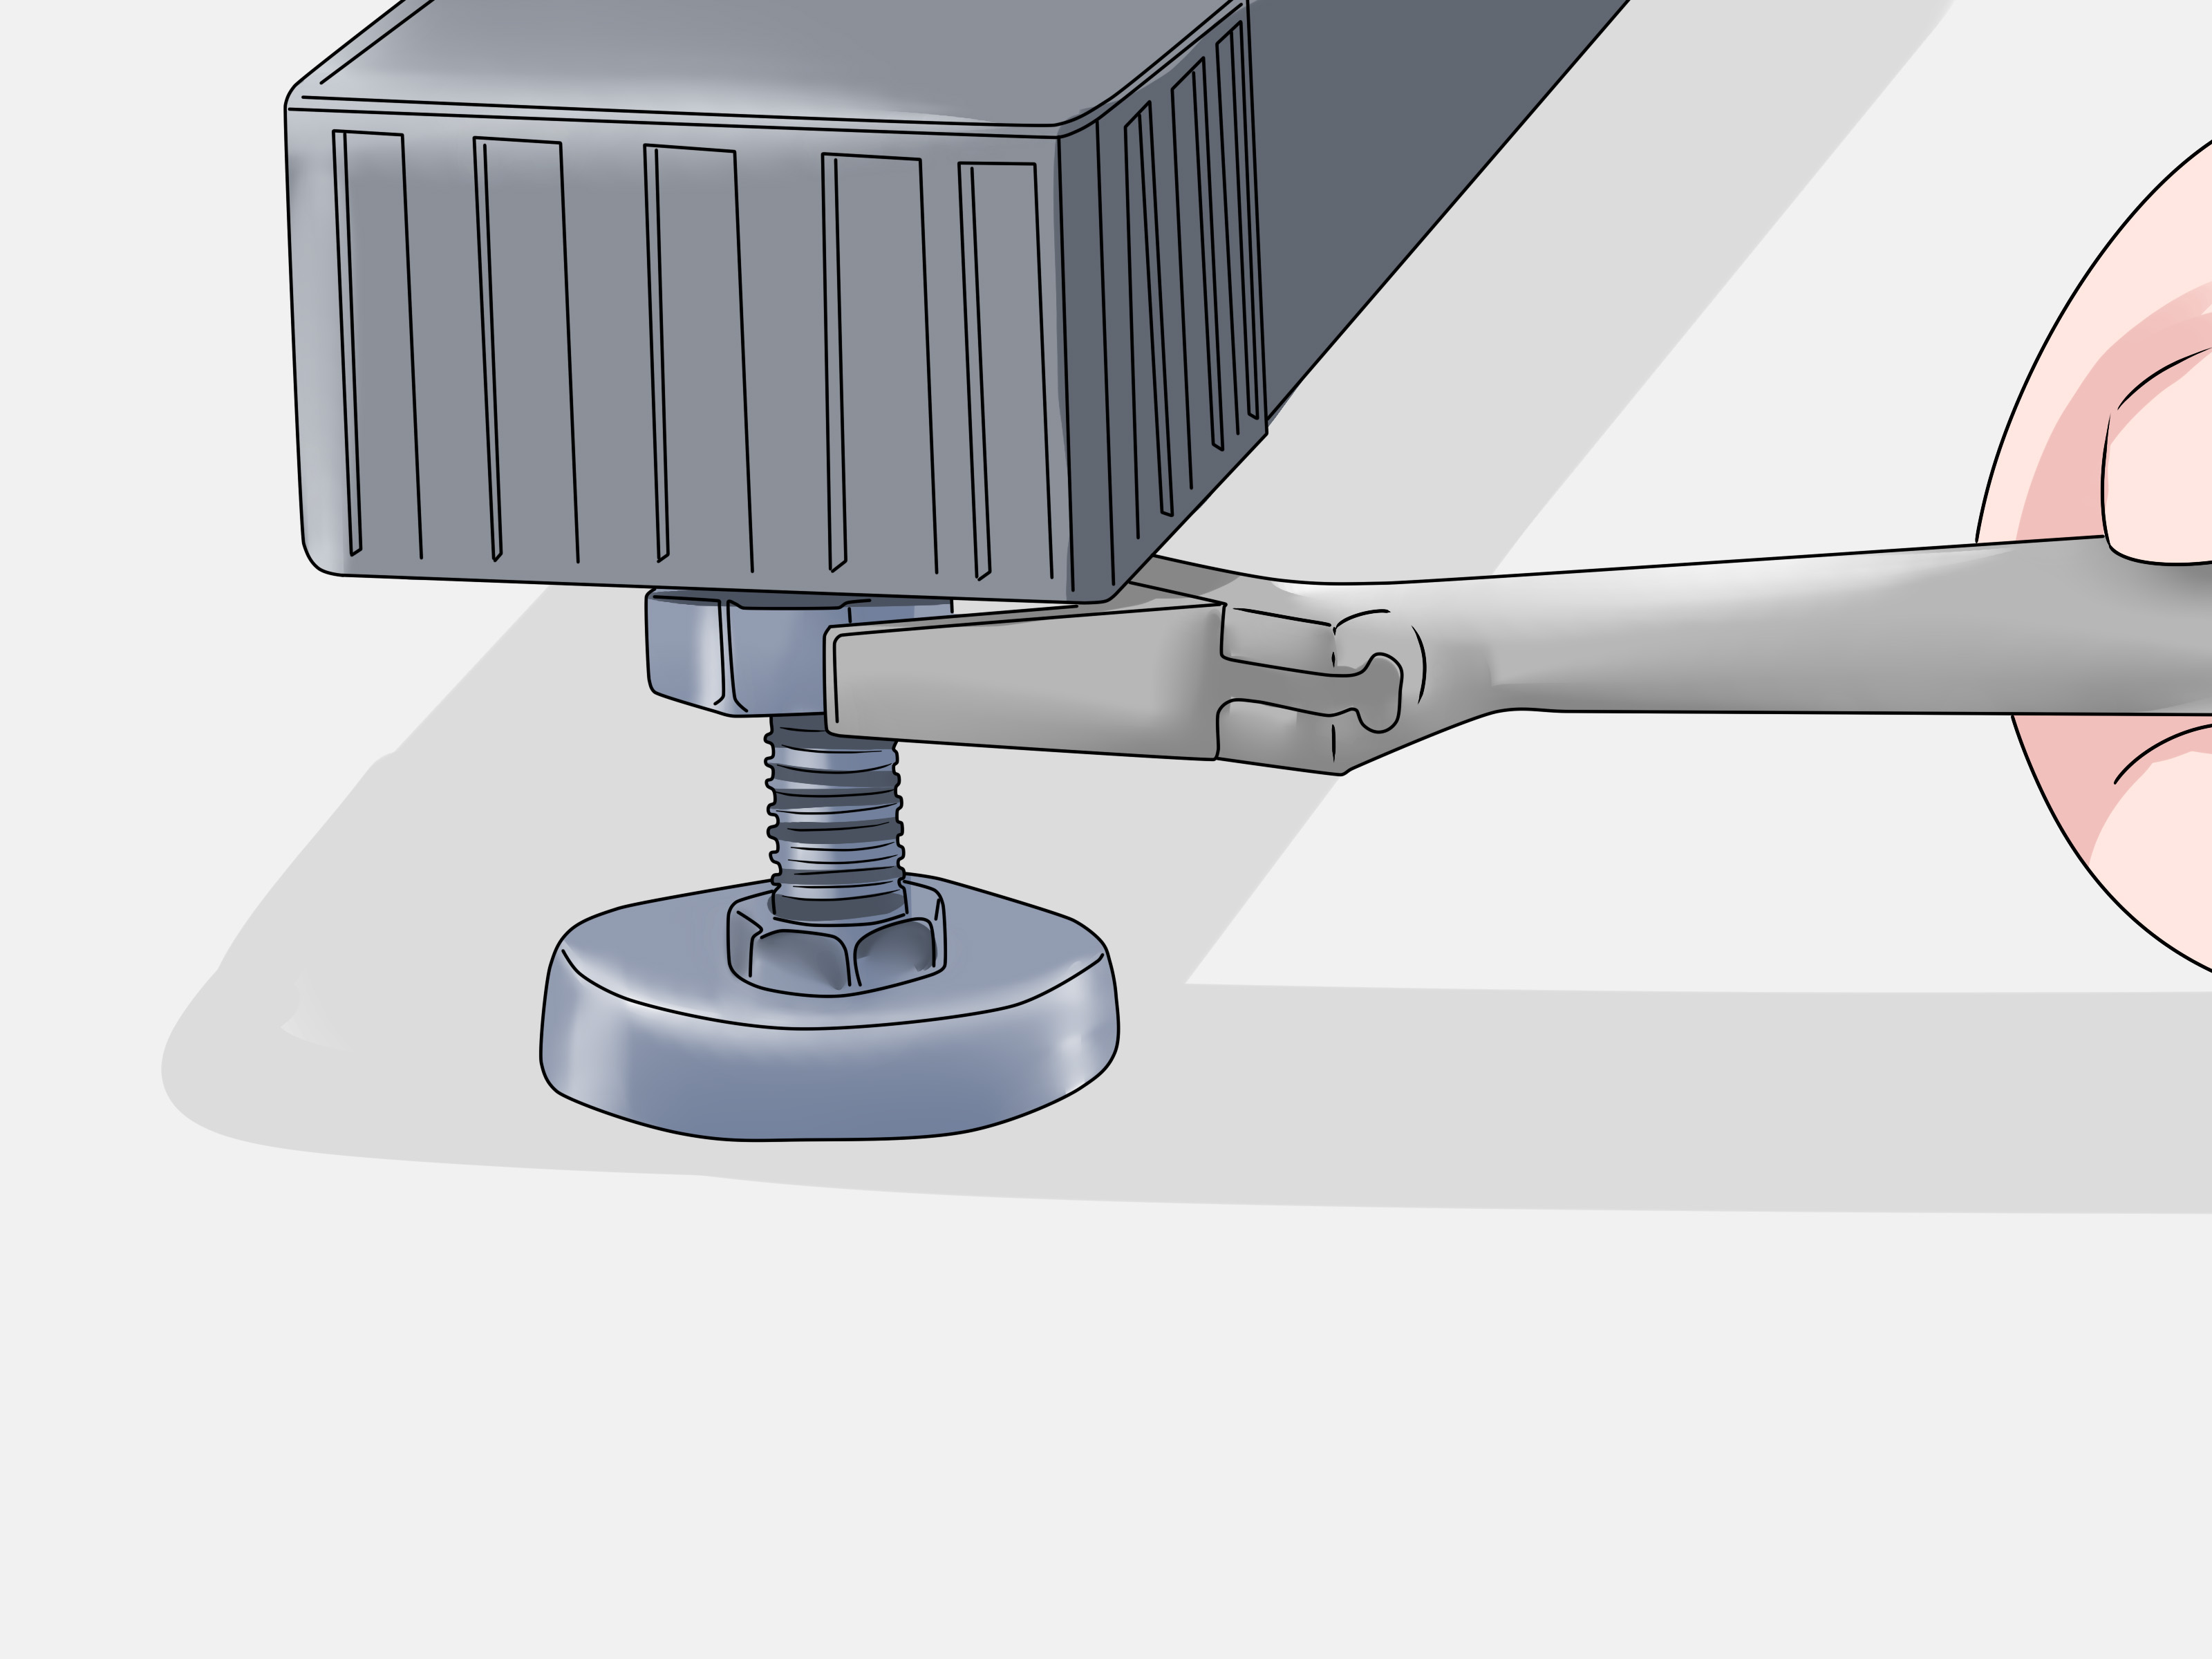
Step 14: Reassemble and Level the Bike
At the new location, place the bike on a stable, level surface. Reattach the touchscreen, pedals, accessories, and any removed parts according to your photos and model-specific instructions. Check that cables are connected correctly and not pinched.
Once the bike is in position, adjust the leveling feet if it rocks. A Peloton should feel firm before you ride. If it wobbles, do not ignore it. Level the bike, tighten loose parts, and verify that the seat and handlebars are secure.
Step 15: Test Before Your First Ride
Plug the bike in and power it on. Confirm that the touchscreen works, the pedals turn smoothly, the resistance knob responds, the emergency brake stops the flywheel, and the bike does not rock during light pedaling. Start with a low-intensity ride before jumping into a climb that makes your soul question its choices.
Listen for new clicks, scrapes, rubbing, or rattles. If something feels off, stop riding and inspect the bike. A careful test ride is better than discovering a loose pedal halfway through a personal-record attempt.
Common Mistakes to Avoid When Moving a Peloton Bike
Mistake 1: Leaving the Touchscreen Unprotected
The screen is not just a display; it is the command center of your Peloton experience. Protect it like you would protect a laptop or tablet. If the bike is being loaded into a truck, remove and pad the screen when appropriate.
Mistake 2: Dragging the Bike Across Floors
Dragging can damage hardwood, vinyl, tile, and even carpet. Use the transport wheels for short smooth moves, or use furniture sliders and floor protection when needed.
Mistake 3: Forgetting to Label Parts
Small screws and bolts love disappearing. Put every removed part in a labeled bag. Better yet, tape the bag to a wrapped accessory or place all Peloton parts in one clearly marked box.
Mistake 4: Moving It Alone
You might be strong. You might also be one awkward turn away from a dented wall and a very long sigh. Use a helper, especially for stairs and truck loading.
Mistake 5: Riding Before Checking Stability
After a move, always check the bike’s level, bolts, pedals, cables, and screen mount. A few minutes of inspection can prevent damage and improve ride safety.
Should You Hire Professional Movers?
Hire professional movers if your Peloton must go up or down stairs, through tight corners, into storage, or into a truck with many other items. Professional movers are also a smart choice if you have limited lifting help, back issues, building restrictions, or a long-distance move.
When hiring movers, tell them in advance that you have a Peloton Bike or Bike+. Ask whether they have experience moving fitness equipment, whether they use moving blankets and straps, and how they protect electronics. If the touchscreen is removed, pack it yourself or supervise how it is wrapped.
of Real-World Experience: What Moving a Peloton Actually Feels Like
The first thing people usually notice when moving a Peloton Bike is that it feels heavier than it looks. In photos, it appears sleek and compact, like a stylish fitness sculpture. In your hallway, it becomes a dense, oddly shaped roommate with a flywheel. The front transport wheels help, but they do not make the bike weightless. The most successful moves start with humility: clear the path, recruit a helper, and admit that “I’ll just scoot it over there” is not a plan.
A common experience is underestimating the touchscreen. Many owners focus on the frame because it is heavy, but the screen is what makes everyone nervous. It sticks out, catches corners, and feels exposed. When people remove the screen before a bigger move, they often say the bike suddenly feels less stressful to handle. It is still heavy, but there is less fear of bumping the most delicate part into a door frame. The key is patience. Take photos, disconnect cables gently, and wrap the screen separately. The screen should travel like electronics, not like a throw pillow.
Another lesson from real moves is that stairs change everything. Rolling a Peloton across a flat room can be almost pleasant. Taking it down basement stairs is a different personality test. The bike’s weight is not evenly distributed, so one person may feel more load than expected. Good communication matters. Say “step,” “pause,” and “tilt” out loud. Do not rush. If the staircase has a landing, use it as a reset point. The best movers are not the fastest; they are the ones who arrive at the bottom without new wall art shaped like handlebars.
People also learn quickly that padding is not optional. Door frames, baseboards, and corners seem to jump toward the bike during a move. A few moving blankets and pieces of cardboard can save a surprising amount of damage. Protect both the bike and the house. If you rent, protecting walls may also protect your security deposit, which is basically a second cardio goal.
For long-distance moves, the biggest practical tip is to keep Peloton items together. Power cord, screws, pedals, touchscreen hardware, and accessories should not be scattered across five boxes labeled “misc.” Put everything in one clearly marked Peloton parts box. When you arrive tired, hungry, and surrounded by cardboard, you will thank your past self for being organized.
Finally, the reassembly stage deserves respect. Many riders are excited to get back on the leaderboard and rush the setup. Do not. Level the bike, tighten the adjustment points, check the pedals, confirm the screen is secure, and do a gentle test ride. A moved Peloton can feel just like it did before, but only if you give it a careful reset. Think of it as the bike’s post-move warm-up. You would not sprint without stretching; do not ride without checking.
Final Checklist Before You Ride Again
- The bike is on a stable, level surface.
- The touchscreen is firmly attached and working.
- All cables are connected and not pinched.
- The seat and handlebars are tightened.
- The pedals are secure and rotate smoothly.
- The power cord is clean, dry, and routed safely.
- The resistance knob and emergency brake work correctly.
- No unusual scraping, clicking, wobbling, or rattling occurs.
Conclusion
Moving a Peloton Bike is absolutely doable when you treat it like what it is: a heavy fitness machine with sensitive electronics attached. The safest approach is to plan your route, remove loose accessories, protect or remove the touchscreen when needed, use help for lifting, secure the bike during transport, and inspect everything before riding again.
For a short move across one room, the front transport wheels may be enough. For stairs, trucks, or long-distance relocation, give the bike the full moving-day treatment. Wrap it, label parts, protect floors, and keep the screen safe. Your future self, your walls, and your leaderboard streak will all be grateful.