Scuffed leather shoes have a special talent for appearing right before a meeting, dinner date, wedding, or any other moment when your feet are expected to behave like responsible adults. One second your shoes look polished and confident; the next, the toe has a gray streak that says, “I fought a curb and lost.” The good news? Most scuffs on leather shoes are not permanent damage. Many are surface marks, displaced polish, dried leather fibers, or color loss that can be cleaned, conditioned, blended, and polished at home.
This guide explains how to repair scuffed leather shoes in 14 practical steps using simple tools: a soft brush, microfiber cloth, leather cleaner, conditioner, cream polish, wax polish, and a little patience. You do not need to be a professional cobbler to rescue your favorite oxfords, loafers, boots, heels, or leather sneakers. You only need to know what kind of leather you are working with, avoid harsh shortcuts, and treat the shoe like leathernot like a kitchen counter.
Before you start, remember this rule: leather is skin-like material. It can dry out, absorb oils, darken, scratch, stain, and crack when mistreated. So the goal is not to attack the scuff with superhero strength. The goal is to clean gently, restore moisture, replace lost color, smooth the finish, and protect the shoe so it stays sharp longer.
Before You Begin: Know What Kind of Scuff You Have
Not every shoe mark is the same. A light gray streak on black dress shoes may simply be transferred dirt or scraped wax polish. A pale line on brown leather may mean the finish has been rubbed away. A rough groove may be an actual scratch. And if you are dealing with suede or nubuck, stop right here before reaching for regular shoe polishthose materials need a different method.
Common types of leather shoe scuffs
- Surface scuffs: Marks sitting on top of the leather, often caused by rubber, dust, walls, chair legs, or other shoes.
- Color-loss scuffs: Areas where the dye or polish has been rubbed off, leaving a lighter patch.
- Light scratches: Thin lines that have disturbed the top layer of leather but have not cut deeply.
- Deep gouges: Cuts or missing leather that may require leather filler, recoloring balm, or professional repair.
- Patent leather scuffs: Marks on glossy coated leather that usually need gentle wiping and buffing, not heavy polish.
- Suede or nubuck scuffs: Marks on fuzzy or matte leather that require a suede brush, eraser, and protector spray.
Tools and Supplies You May Need
You do not need a suitcase full of fancy products, although shoe-care fans can absolutely turn this into a hobby with brushes lined up like tiny horses. For most scuffed leather shoes, gather the following:
- Soft horsehair brush or soft-bristle shoe brush
- Clean microfiber cloths
- Mild leather cleaner or saddle soap for smooth leather
- Leather conditioner or leather balm
- Cream polish matching the shoe color
- Neutral polish for minor shine work
- Wax polish for final shine and protection
- Cotton swabs for small scuffs
- Leather recoloring balm for faded or scratched areas
- Suede eraser and suede brush for suede or nubuck shoes
- Shoe trees, paper, or towels to hold the shoe shape
- Leather protector spray, if suitable for your shoe type
Always test cleaners, conditioners, polish, or balm on a hidden area first, such as the inside edge of the tongue or heel. Some leather darkens when conditioned, especially unfinished, aniline, oil-tanned, or very light brown leather. A small test patch can save you from turning tan loafers into “mystery espresso.”
How to Repair Scuffed Leather Shoes: 14 Steps
Step 1: Remove the laces and insert shoe trees
Start by taking out the laces. This gives you better access to the tongue, eyelets, and vamp. If your shoes have removable insoles and they are damp or smelly, remove those too. Insert cedar shoe trees if you have them. If not, stuff the shoes lightly with clean paper or towels. The goal is to hold the leather in its natural shape while you clean and polish.
Shoe trees also make the leather surface firmer, which helps when you are brushing or buffing. Just do not overstuff the shoe. You want support, not a foot-shaped balloon.
Step 2: Brush away loose dirt and grit
Use a soft shoe brush to remove dust, dried mud, and grit. Work from top to bottom in small circular motions or gentle strokes. Pay extra attention to seams, welts, toe caps, and the crease area where dirt loves to hide like it pays rent.
This step matters because dirt particles can scratch leather when rubbed with a cloth. Think of dust as tiny sandpaper. If you skip brushing and go straight to wiping, you may make the scuff worse.
Step 3: Wipe the shoe with a slightly damp cloth
Dampen a microfiber cloth with clean water and wring it out until it is barely wet. Wipe the shoe gently to remove surface soil. Do not soak the leather. Excess water can cause spotting, stiffness, or dark patches, especially on unfinished leather.
If the scuff disappears during this step, congratulationsyou had a surface mark, not a leather emergency. Dry the shoe with another clean cloth and move to conditioning or polishing as needed.
Step 4: Identify the leather type before applying products
Smooth finished leather can usually handle leather cleaner, conditioner, cream polish, and wax polish. Patent leather needs a lighter touch because it has a glossy coated surface. Suede and nubuck should not be treated with regular shoe cream or wax polish. White leather sneakers may tolerate a melamine sponge in small areas, but polished dress leather can be dulled by abrasive sponges.
If you are unsure, check the shoe label, brand care page, or product description. When in doubt, use the gentlest method first: brush, damp cloth, dry cloth, and spot test.
Step 5: Clean the scuffed area with leather cleaner
Apply a small amount of leather cleaner to a cloth, not directly to the shoe. Rub the scuffed area gently using small circles. For heavier grime, a small amount of saddle soap may help on smooth leather, but use it sparingly and remove residue with a damp cloth.
Never use bleach, harsh household degreasers, alcohol-heavy cleaners, or aggressive scrubbing pads on leather shoes. These can strip color, dry the leather, or leave the finish looking patchy. Your shoe should not smell like a bathroom-cleaning product after repair.
Step 6: Let the shoes air-dry naturally
After cleaning, let the shoes air-dry at room temperature. Keep them away from radiators, hair dryers, direct sunlight, fireplaces, and other heat sources. Heat can shrink leather, make it brittle, and create cracks that are much harder to fix than a simple scuff.
Most lightly damp shoes only need a short drying period before conditioning. If you used more moisture, give them longer. Leather repair rewards patience. Rushing with heat is how good shoes become sad shoes.
Step 7: Massage light scuffs with leather conditioner
For light scratches or dry-looking scuffs, apply a tiny amount of leather conditioner with a soft cloth or cotton swab. Massage it into the mark gently, then blend the conditioner across the surrounding panel so one spot does not look darker or shinier than the rest.
Conditioner helps moisturize leather fibers and can make shallow scratches less visible. Use a thin coat. Too much conditioner can leave a sticky film, attract dust, or darken the shoe. Leather likes moisture, but it does not want to swim.
Step 8: Use matching cream polish for color loss
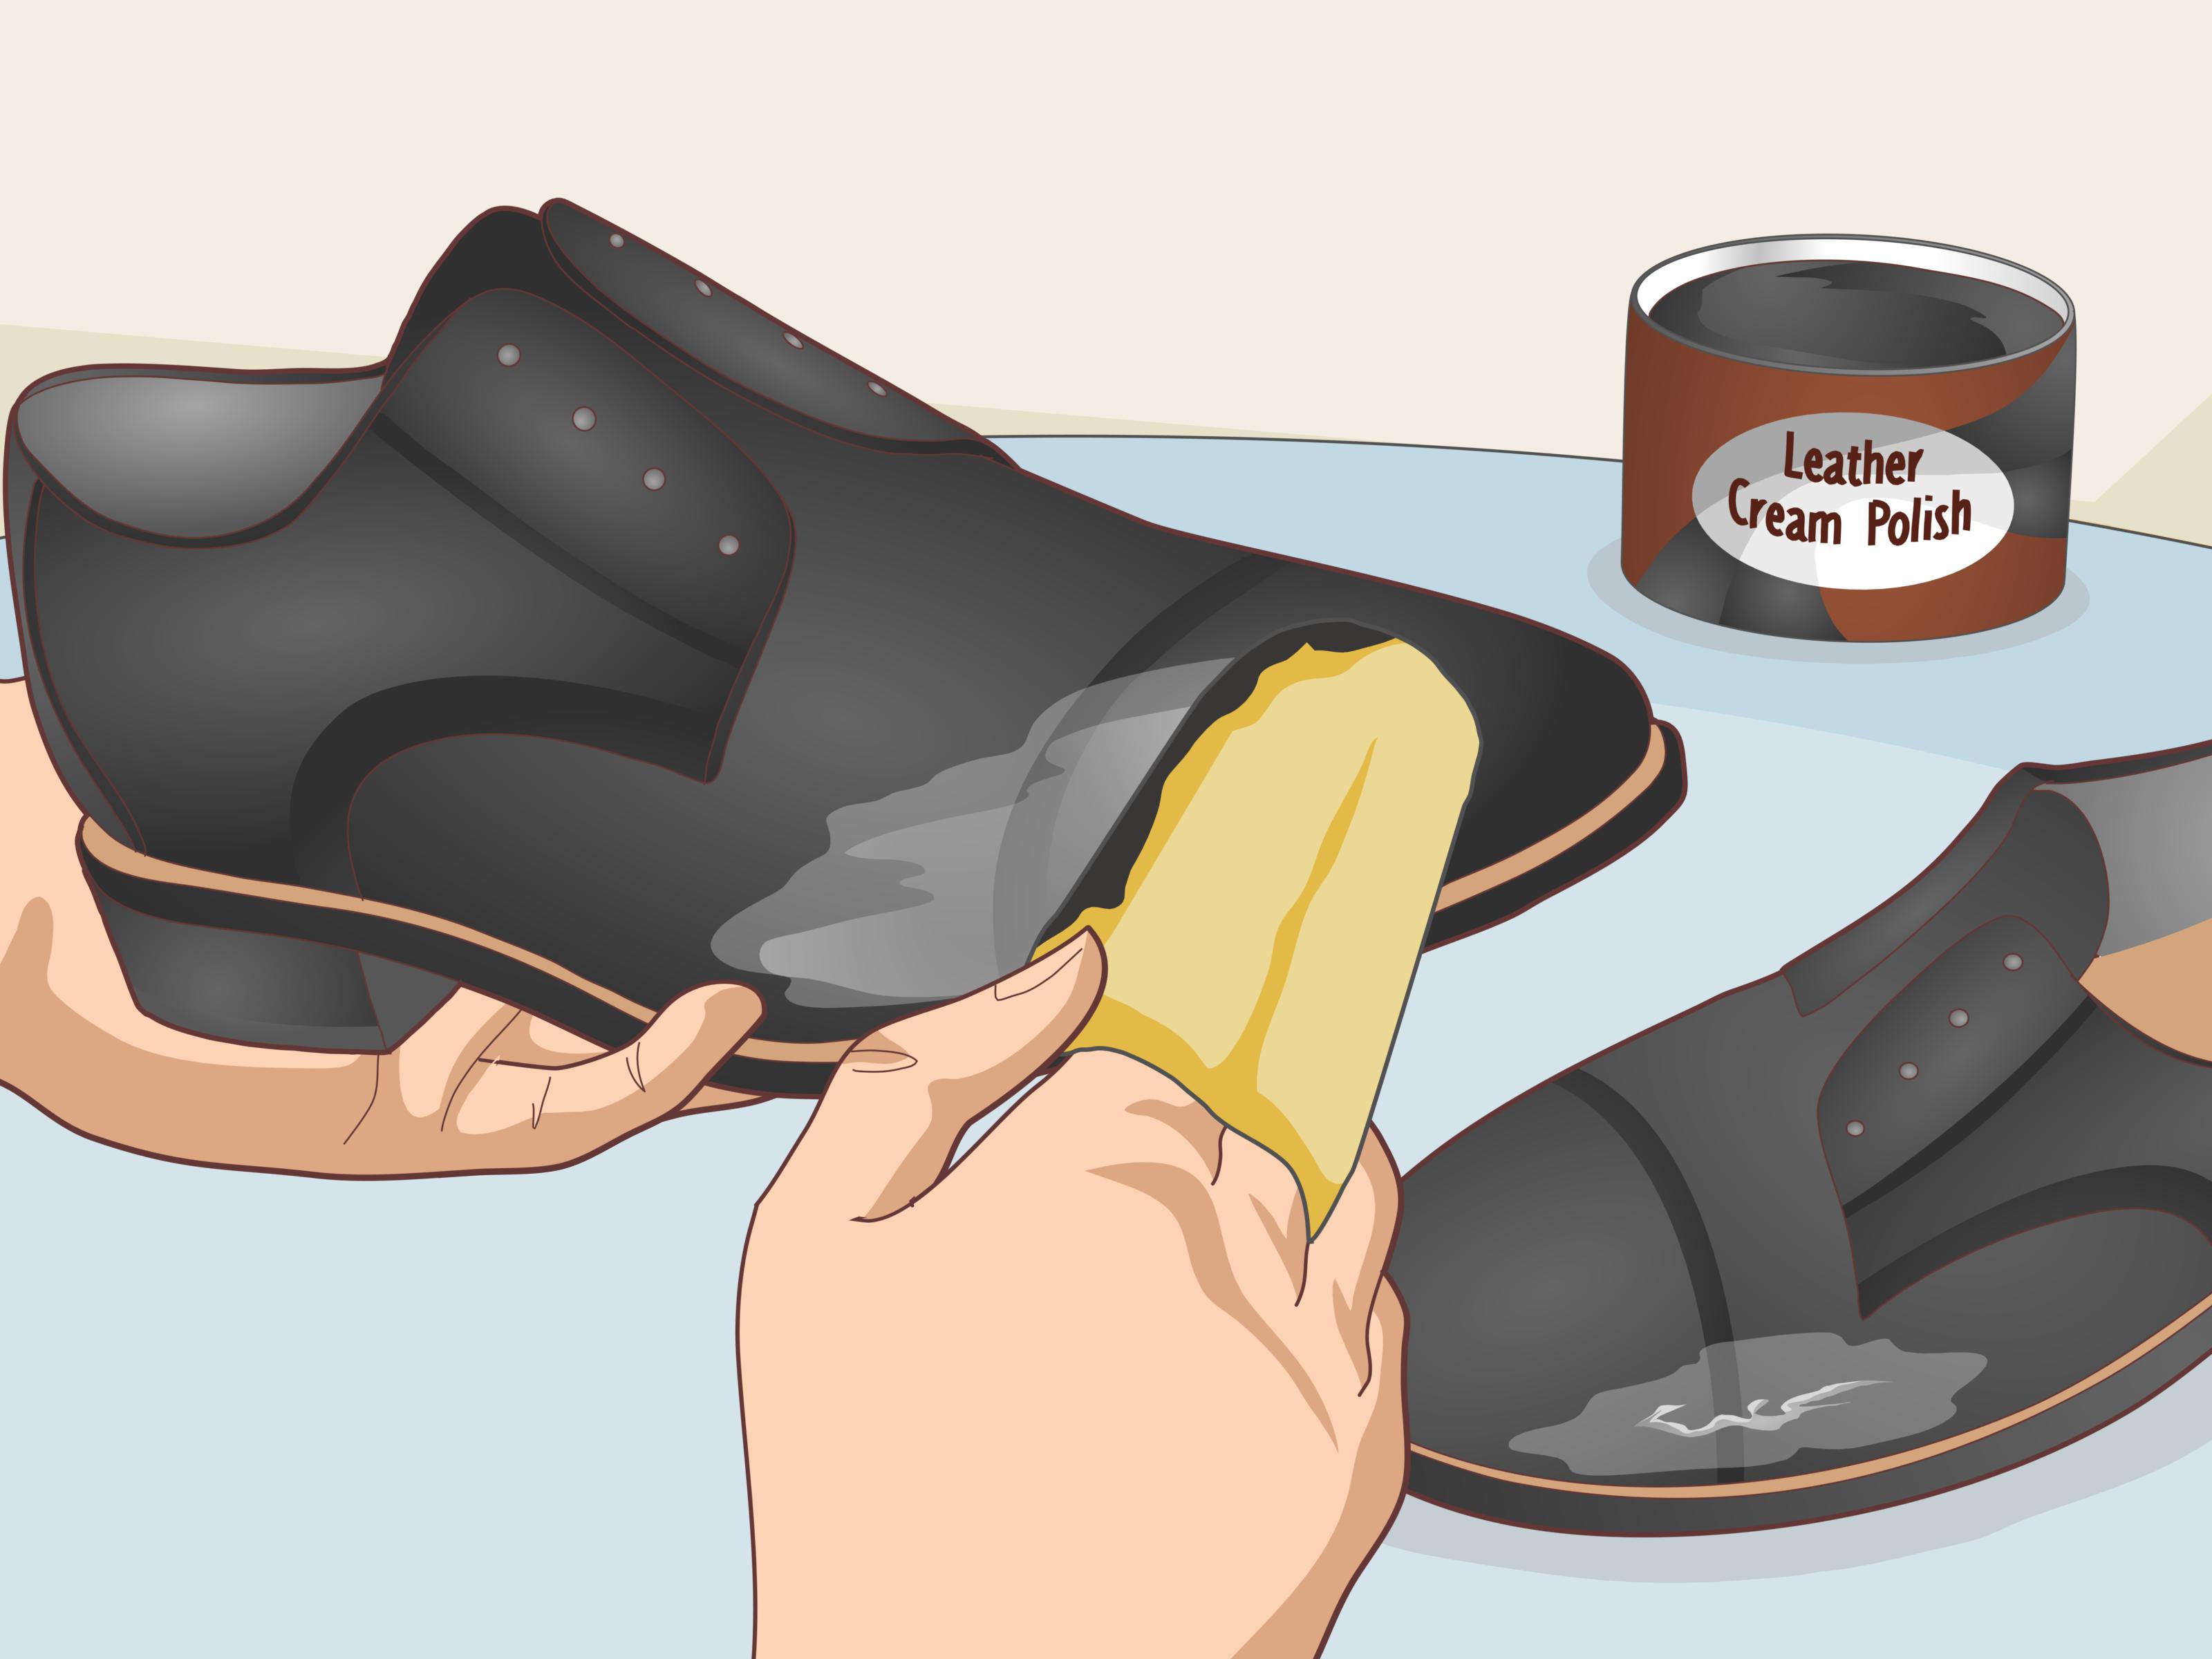
If the scuff has removed color, use a cream polish that closely matches the shoe. Cream polish is useful because it adds pigment and nourishment. Apply a small amount with a cloth or dauber brush, working it into the scuffed area first. Then lightly spread polish across the whole shoe or matching panel for an even finish.
For black shoes, matching is easy. For brown shoes, it can feel like choosing paint at a hardware store: chestnut, cognac, mahogany, walnut, dark chili, espresso, and sixteen cousins. If you cannot match the color exactly, choose a slightly lighter cream polish first. You can darken gradually, but reversing an overly dark patch is more difficult.
Step 9: Blend the repaired area into the surrounding leather
After applying cream polish, let it sit for several minutes, then buff with a soft brush. Look at the shoe in natural light. If the repaired spot still stands out, apply a second thin layer only where needed and blend outward.
The secret is feathering. Do not create a hard circle of product around the scuff. Blend the polish beyond the damaged area so the repair fades smoothly into the original finish. This is especially important on tan, burgundy, oxblood, and burnished leather shoes.
Step 10: Treat deeper scratches with recoloring balm or repair cream
If a scuff is still pale after conditioning and cream polish, it may need leather recoloring balm or a leather repair cream. Apply it very carefully with a cotton swab or small cloth. Build color in thin layers and allow each layer to dry according to the product instructions.
For a deep gouge where leather is actually missing, a leather filler may be necessary. That repair requires more precision: clean the area, apply filler, smooth it, let it cure, sand lightly if instructed, recolor, and seal. If the shoes are expensive, sentimental, or made from delicate leather, consider taking them to a cobbler instead of practicing surgery on your favorite pair.
Step 11: Handle patent leather scuffs separately
Patent leather has a glossy coated finish, so regular cream polish usually will not absorb the same way it does on smooth leather. For patent shoes, wipe dust away with a microfiber cloth, then use a damp cloth for light marks. A tiny amount of petroleum jelly or patent leather cleaner can help lift scuffs and restore shine, but use very little and buff well.
Avoid abrasive cleaners on patent leather because they can dull the glossy coating. Also avoid soaking it. Once patent leather cracks, the repair is rarely invisible, so prevention matters.
Step 12: Use a suede brush and eraser for suede or nubuck
If your shoes are suede or nubuck, do not use leather conditioner, cream polish, wax polish, or oily balms. Instead, make sure the shoe is dry, then brush the nap with a suede brush. Use a suede eraser or clean rubber eraser on scuffed areas, rubbing gently. Brush again to lift the fibers.
For stubborn marks, use a suede and nubuck cleaner made for that material. After cleaning, let the shoes dry fully and finish with a suede protector spray. Suede is like the cat of the leather world: beautiful, dramatic, and not interested in your regular rules.
Step 13: Add wax polish for shine and surface protection
Once the color looks even, apply a thin coat of wax polish to smooth leather shoes. Wax polish creates shine and adds a protective layer against minor scuffs and moisture. Focus on the toe and heel counters, where shine looks best and creases are minimal.
Use less wax on flexible areas like the vamp, where the shoe bends. Too much wax in crease zones can crack or flake. Let the wax haze, then buff with a horsehair brush or soft cloth until the leather looks clean and polished.
Step 14: Protect the shoes and prevent future scuffs
After repair, use a leather protector spray if it is appropriate for your shoe type. Hold the spray several inches away and mist lightly in a sweeping motion. Let the shoes dry completely before wearing them.
Prevention also means storing shoes properly, brushing them after wear, using shoe trees, rotating pairs, and avoiding wet conditions when possible. Keep a small cloth or travel brush handy if you wear leather shoes often. A quick wipe after a commute can prevent dirt from becoming a full weekend project.
Special Tips for White Leather Shoes
White leather shoes show every mark, speck, and mystery sidewalk encounter. For white leather sneakers, a damp microfiber cloth and mild cleaner may remove most scuffs. A melamine sponge can help with rubber soles and some white leather uppers, but use light pressure and test first because it is mildly abrasive.
For tougher marks, a small amount of baking soda paste may help on white leather sneakers, but it should be used gently and wiped away completely. Do not use this method on expensive polished dress shoes, delicate designer leather, or colored leather unless the brand specifically recommends it.
What Not to Do When Repairing Scuffed Leather Shoes
Many shoe disasters begin with confidence and a random internet hack. Avoid using nail polish, permanent marker on high-end leather, undiluted vinegar, bleach, window cleaner on smooth leather, toothpaste on colored leather, or cooking oils. These shortcuts may temporarily hide a mark but often create staining, dullness, stickiness, or long-term damage.
Also avoid over-polishing. If your shoes feel tacky or look cloudy, you may have applied too much product. Remove excess with a soft cloth, let the shoes rest, and buff again. Leather care is more like seasoning food than pouring concrete: small amounts, adjusted gradually, work best.
When to Visit a Professional Cobbler
Home repair works well for surface scuffs, light scratches, dull spots, and minor color loss. Visit a cobbler if the leather is deeply cut, cracked, peeling, badly stained, or torn near a seam. Professional shoe repair can include refinishing, dye work, patching, sole repair, heel replacement, and structural work that is difficult to do neatly at home.
You should also seek expert help for luxury shoes, exotic leather, vintage footwear, hand-painted patinas, or shoes with sentimental value. A cobbler has tools, dyes, fillers, and finishing products that are not always beginner-friendly. Sometimes the smartest DIY move is knowing when not to DIY.
Real-Life Experience: What Repairing Scuffed Leather Shoes Teaches You
The first time you repair scuffed leather shoes, you may expect a dramatic movie scene: sad shoes enter, heroic shoes leave, emotional music plays, maybe someone salutes. In reality, the process is quieter and more satisfying. You brush off dust, wipe away grime, massage conditioner into tired leather, and suddenly the shoes start looking less like they survived a parking lot battle.
One common experience is discovering that the scuff was not as bad as it looked. Black leather especially can be forgiving. A gray streak across the toe may simply be transferred material from a wall, curb, or rubber sole. After brushing and wiping, half the “damage” disappears. Then a little cream polish restores the color, and a quick buff brings back the shine. The lesson: do not panic before cleaning.
Brown leather teaches a different lesson: color matching matters. Many people grab the nearest brown polish and assume all browns are related enough to get along at dinner. They are not. A reddish-brown polish on a yellow-tan shoe can make the repair spot look strangely warm. A dark brown polish on cognac leather can create a muddy patch. The best approach is to start with neutral conditioner, then use a light matching cream polish and build slowly. Patience gives you control.
Another practical lesson is that conditioner can work small miraclesbut only small ones. It can soften the look of fine scratches and restore flexibility to dry leather, but it cannot replace missing color by itself. If the scuff looks pale after conditioning, pigment is needed. That is where cream polish or recoloring balm becomes useful. Think of conditioner as skincare and polish as makeup. One nourishes; the other improves appearance. Together, they do the job better.
Repairing scuffed shoes also changes how you store and wear them. Once you spend twenty minutes bringing a pair back to life, you become more aware of where you kick your feet under a desk, how often your shoes scrape car pedals, and why shoe trees are not just decorative wooden foot statues. Regular care starts to feel less like a chore and more like maintenance on something worth keeping.
The biggest takeaway is simple: leather shoes age well when you treat scuffs early. A small mark cleaned today is easier than a dried, dirty, widened scratch ignored for six months. Keep a brush, cloth, and neutral conditioner at home. Add black and brown cream polish if you wear dress shoes often. With those basics, most scuffs can be handled before they become permanent personality traits.
And yes, there is something oddly satisfying about looking down at repaired shoes and knowing you saved them yourself. Your shoes look better, your outfit looks sharper, and your wallet avoids an unnecessary replacement purchase. That is a quiet little victoryone polished toe at a time.
Conclusion
Learning how to repair scuffed leather shoes is one of those small skills that pays off again and again. Most scuffs are not the end of your shoes; they are simply a request for cleaning, conditioning, color correction, and protection. Start gently, identify the leather type, spot-test every product, and build the repair in thin layers. Smooth leather usually responds well to cleaner, conditioner, cream polish, and wax. Patent leather needs gentle wiping and buffing. Suede and nubuck require a brush, eraser, and special cleaner instead of traditional polish.
The best repair is also prevention. Brush shoes regularly, rotate pairs, use shoe trees, protect them from heavy moisture, and treat new scuffs quickly. Leather rewards consistency. Give it five minutes of care now, and it may give you years of polished, confident steps in return.