Setting sag on a dirt bike is one of those jobs that sounds painfully technical until you actually do it. Then you realize it is mostly measuring, adjusting, measuring again, and resisting the urge to call the shock collar bad names. The payoff is huge. Proper dirt bike sag helps your bike corner better, track straighter, hook up harder, and feel less like a shopping cart with handlebars. If your bike feels lazy in turns, twitchy at speed, or weirdly committed to trying to throw you into a bush, sag might be the first thing to check.
This guide breaks the process into 14 simple steps, using the real-world logic that suspension tuners and experienced riders rely on. You do not need a race truck, a crew chief, or a doctorate in spring preload. You need a few tools, a helper, and the patience to measure the same points more than once without improvising. That last part matters more than most riders want to admit.
Why Sag Matters on a Dirt Bike
Sag is how much the suspension compresses under weight. On a dirt bike, the two big numbers are rider sag (also called race sag) and static sag (also called free sag). Rider sag tells you how the bike sits with you on it in full gear. Static sag tells you how the bike settles under its own weight after rider sag is already in range.
Think of sag as the bike’s posture. Too much sag and the rear rides low, making the front feel light and lazy in corners. Too little sag and the rear rides high, which can make the front feel nervous, twitchy, and more eager to knife into turns than you asked for. Set the rear ride height correctly and suddenly your dirt bike stops arguing with physics and starts working with it.
Before You Start: Tools You’ll Need
- Bike stand
- Tape measure or digital sag tool
- Marker or masking tape for reference points
- Spanner wrench, preload tool, or punch and hammer depending on your shock
- A helper
- Your full riding gear
- Notepad or phone for measurements
- Owner’s manual for your bike’s recommended sag numbers
One important note before the 14 steps: different brands, bikes, and tuners may use slightly different measuring styles. Some like a near-vertical measurement, while others prefer a line that follows the rear axle arc more closely. Some riders measure while seated, others while standing in an attack position. The secret is not finding the internet’s loudest opinion. The secret is checking your manual, choosing a repeatable method, and being consistent.
How to Set Sag on a Dirt Bike in 14 Steps
Step 1: Check Your Bike’s Recommended Sag Numbers
Start with your owner’s manual or suspension setup sheet. That gives you the baseline target for your model. For many full-size motocross and off-road dirt bikes, rider sag usually lands somewhere around the low 100 mm range, while static sag often lands in the 30 to 40 mm neighborhood. Smaller bikes use smaller targets. Minis, for example, can be dramatically different, so never assume a 65cc bike wants the same numbers as a 450.
If you do not have the manual handy, use common industry numbers only as a starting point, not as gospel. Dirt bikes are like people on dating apps: the advertised numbers are useful, but the real story is in the fine print.
Step 2: Set the Bike Up in Ready-to-Ride Condition
Do not measure sag on a bone-dry bike with an empty tank and a cold drink sitting where your tool bag normally goes. Put the bike in realistic riding trim. That means normal fuel level, your usual tires, your usual gearing, and any accessories you ride with. If you wear a hydration pack, tool belt, chest protector, knee braces, or a heroic amount of snacks, wear all of it.
Sag is about how the bike sits with your real riding load, not your “I just rolled it out of the garage” load.
Step 3: Put the Bike on a Stand
Lift the bike so the rear wheel hangs free and the suspension is fully extended. This is your zero point. If you skip this and take your first measurement with the bike on the ground, your numbers can become misleading fast. The whole process depends on starting from full extension.
Step 4: Pick Two Repeatable Measurement Points
Choose one point on or near the rear axle and one point on the body or subframe above it. Mark the upper point clearly with tape or a marker. Use a point you can find again easily. A random guess near the fender edge does not count as precision.
Better yet, use solid points that do not flex. Some suspension tuners prefer measuring between fixed points that follow the swingarm arc more closely, because plastic fenders can flex and distort the reading. Either way, consistency is king. If you measure from Point A the first time and Point Kind-of-A the second time, your numbers will wander like a lost trail rider.
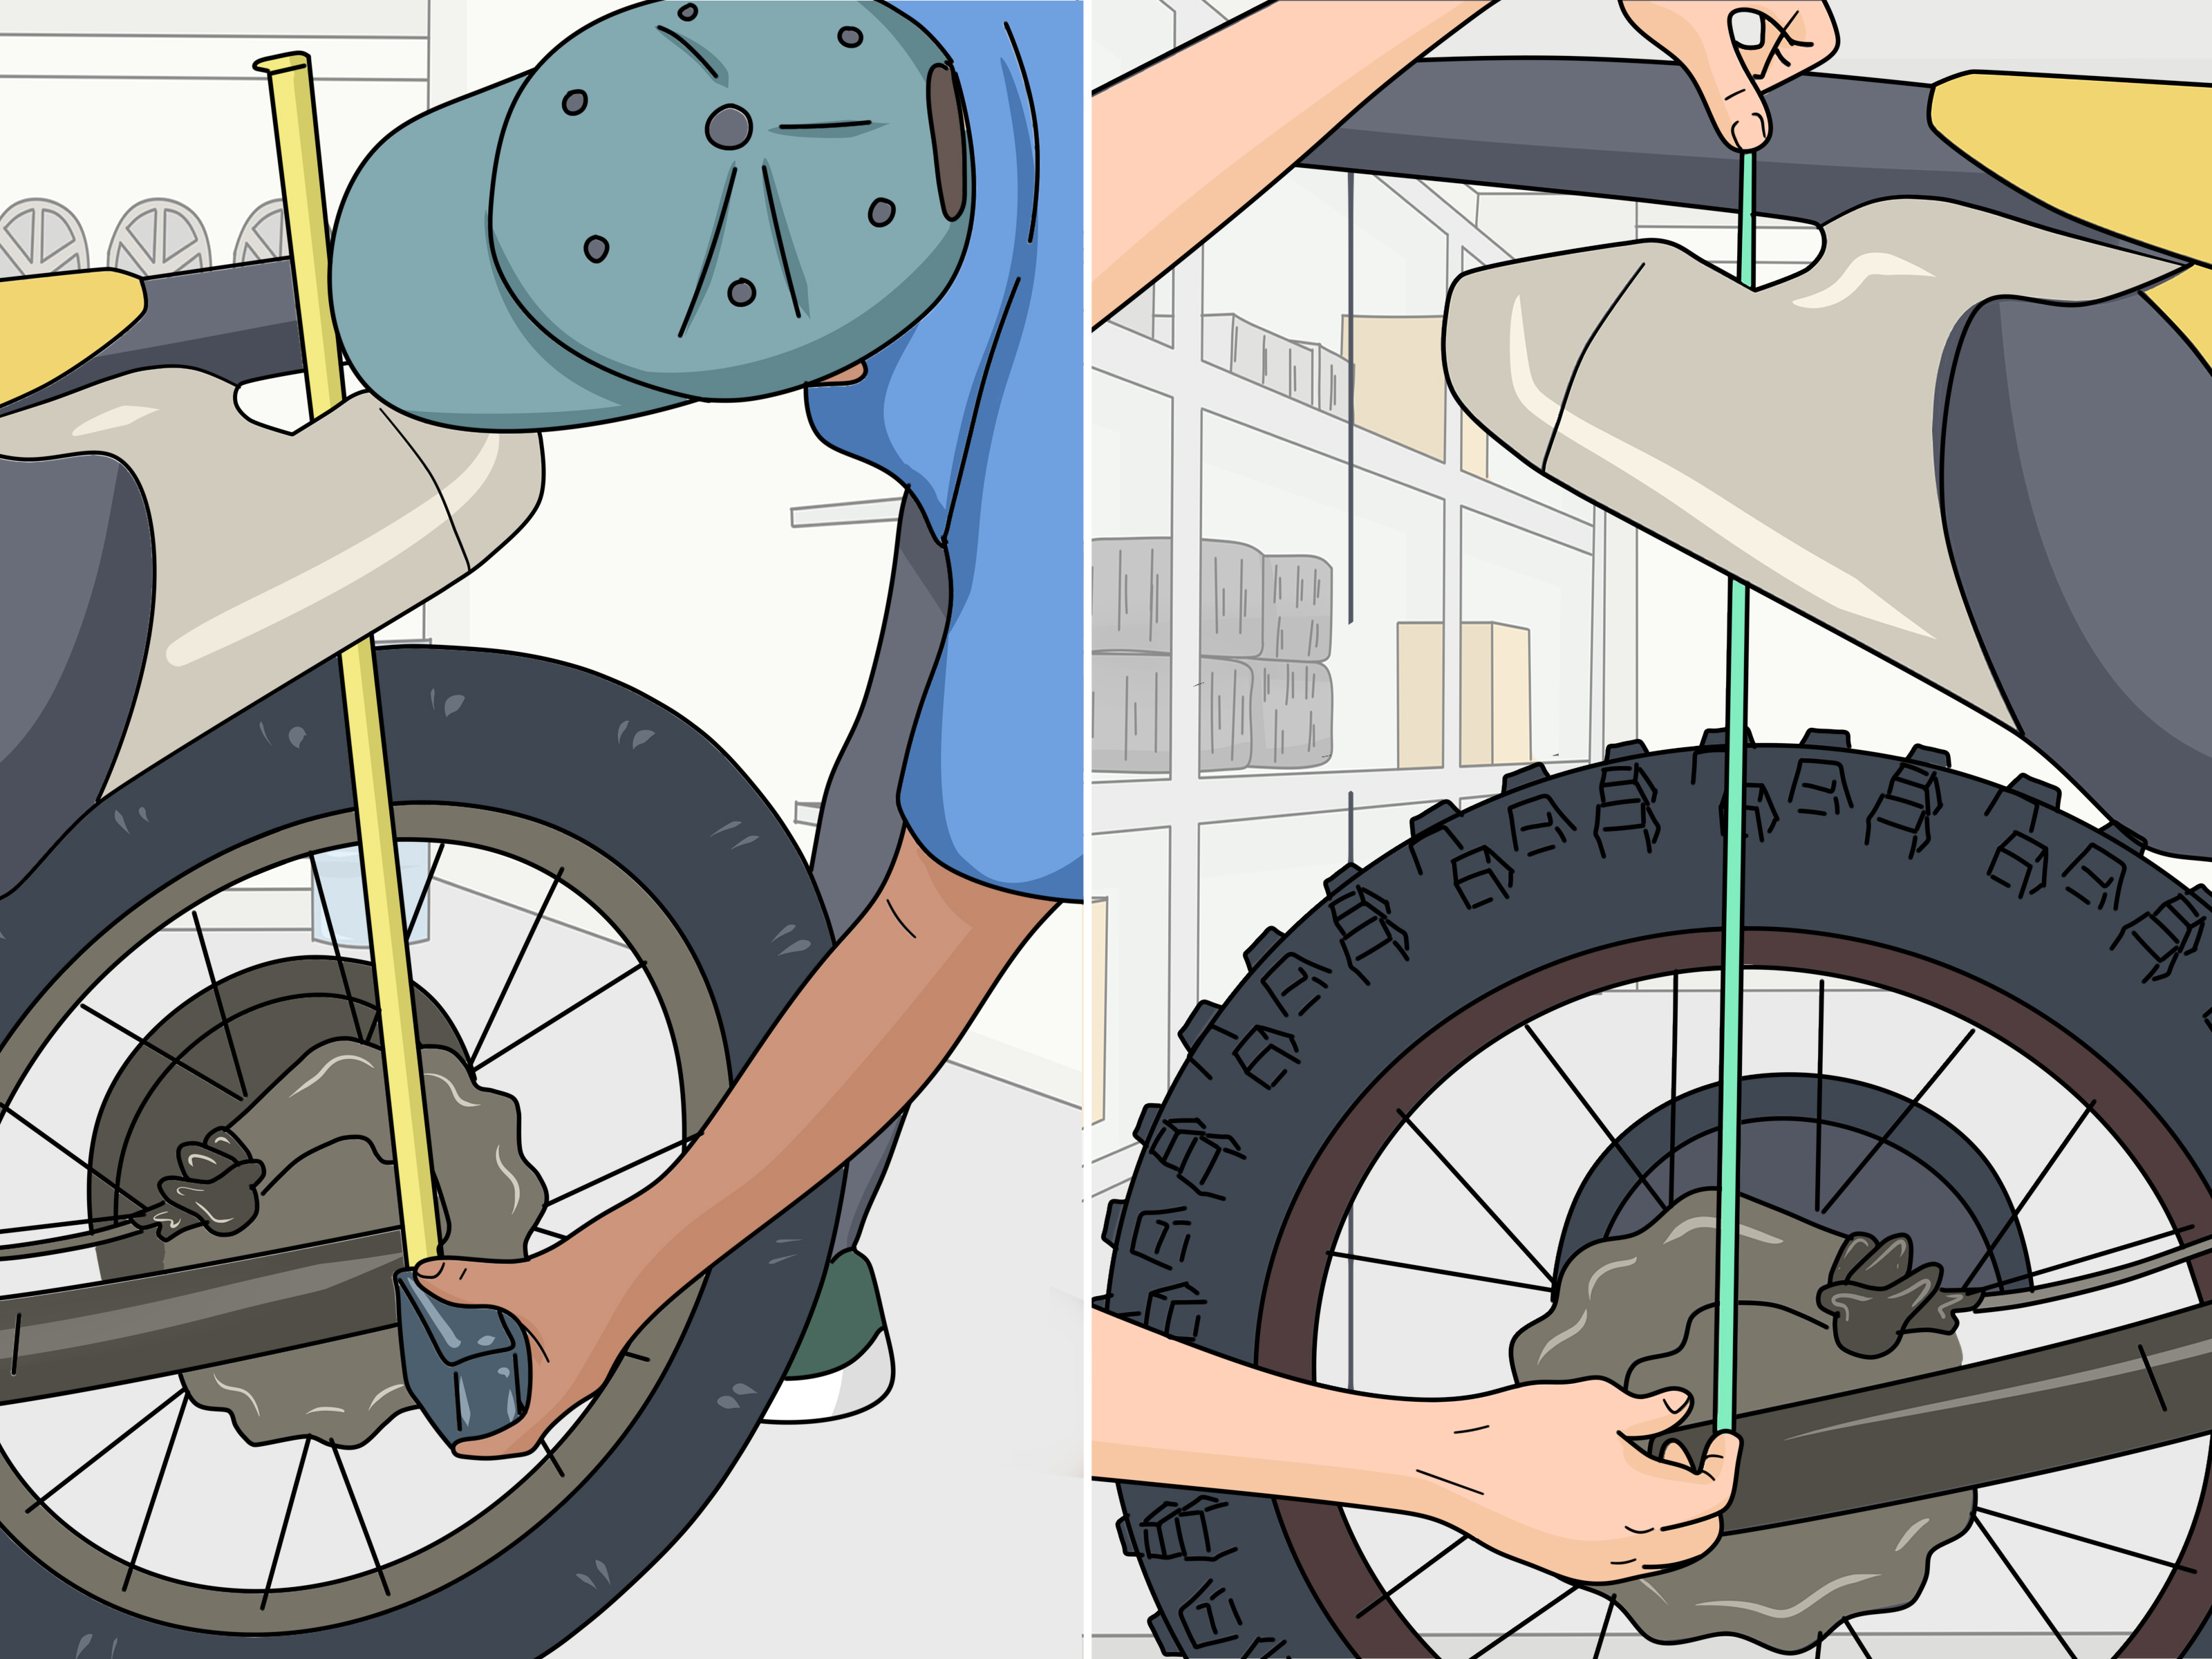
Step 5: Take the Fully Extended Measurement
With the bike still on the stand, measure from the rear axle to your marked upper point. Write down that number. This is your unloaded or fully extended measurement. Many riders label it L1.
Do not trust your memory here. The human brain is incredible, but it is also the same machine that forgets where it put the 10 mm socket.
Step 6: Measure Static Sag
Take the bike off the stand and let it rest on level ground with no rider. Hold the bike upright. Push down on the rear slightly and let it rise naturally so the suspension settles into place. Then measure between the same two points again.
Subtract this number from the fully extended measurement. That difference is your static sag.
Do not overthink it yet. You are collecting data. Static sag becomes more useful after rider sag is set, because then it helps tell you whether your spring rate is in the ballpark.
Step 7: Put on Your Full Riding Gear
Yes, all of it. Helmet, boots, protection, backpack, whatever you normally wear. Sag set in sneakers and a T-shirt may look close in the garage and feel wildly wrong on the track. Full gear weight matters. Suspension does not care that you planned to “estimate it.”
Step 8: Get Into Your Natural Riding Position
Now climb on the bike while your helper balances it upright. Keep your feet on the pegs and hands on the bars. Use the same body position every time you measure. Some tuners prefer seated measurement because it reflects how many riders corner and cruise. Others prefer standing because it is more repeatable on dirt bikes. A smart compromise is to use the position that best matches how you ride most often and then stay consistent with it.
The worst option is changing your position on every measurement and then blaming the bike.
Step 9: Take the Rider Sag Measurement
With you on the bike and settled into position, have your helper measure from the same lower point to the same upper point again. Some tuners like to bounce the bike lightly and let it settle before measuring. Others use a stiction-check method by lifting and lowering slightly, then averaging the two readings. Either way, the goal is the same: get a repeatable number with the bike settled naturally, not hung up on friction.
Subtract this measured length from the fully extended number. That difference is your rider sag.
Step 10: Compare Your Numbers to the Target
Now compare your rider sag to the target for your bike. For many full-size dirt bikes, the sweet spot is often around 100 to 105 mm, with some off-road riders going a bit more and some motocross riders preferring a slightly tighter number depending on the terrain. Smaller bikes commonly use smaller targets, so this is where that manual earns its keep.
Your static sag should also make sense once rider sag is close. On many full-size bikes, static sag somewhere around 30 to 40 mm usually means the spring rate is in the ballpark. If the rider sag is perfect but the static sag is weird, your spring may not be right for your weight.
Step 11: Adjust the Shock Preload Collar
If rider sag is too great, the rear is sitting too low. Add preload to reduce sag. If rider sag is too small, the rear is too tall. Remove preload to increase sag.
On many Japanese bikes, this means loosening the lock ring and turning the preload ring with a punch and hammer or a proper shock spanner. On some KTM, Husqvarna, and GasGas models, the preload ring design is different and often easier to turn with the correct tool. Do not attack the shock like you are opening a treasure chest. Clean the threads first if they are dirty and make adjustments carefully.
Step 12: Re-Measure Until You Hit the Target
After every preload change, repeat the measurement process. Yes, every time. Suspension setup is not a one-guess casino game. Small adjustments can make a noticeable difference, and your first tweak is not always the winner.
This loop matters:
- Adjust preload
- Settle the bike
- Re-measure rider sag
- Check static sag again
When you get close, slow down. This is where riders often overshoot the number, then undershoot it, then pretend “close enough” is a tuning philosophy.
Step 13: Use Static Sag to Judge Spring Rate
This step separates a quick setup from a smart one. Once rider sag is correct, look at static sag. If you had to add a mountain of preload to hit your rider sag target and static sag ends up very low, the spring is probably too soft for your weight. If static sag ends up very high after rider sag is set, the spring may be too stiff.
That matters because preload does not magically turn the wrong spring into the right spring. Preload adjusts ride height. Spring rate controls how the suspension supports weight through the stroke. If the spring is far off, you can chase numbers in the garage and still have a bike that feels strange on the trail.
Step 14: Test Ride and Fine-Tune
Once the sag numbers look right, ride the bike. Pay attention to how it behaves in three places: corner entry, mid-corner balance, and straight-line stability. If the bike feels slow to turn and pushes the front, you may have too much sag. If it feels nervous, twitchy, or deflects while charging through rough terrain, you may have too little sag.
Make small changes and keep notes. A dirt bike that feels amazing on a tight motocross track might want a slightly different balance for fast desert sections or technical woods riding. Sag is a starting point for chassis balance, not the final word in all suspension tuning.
Common Sag Ranges to Use as Starting Points
These are broad starting points, not universal commandments:
- Full-size bikes (125cc to 450cc): rider sag often around 102 to 105 mm, static sag around 30 to 40 mm
- 85cc to 100cc bikes: rider sag often around 80 to 90 mm, static sag around 25 to 35 mm
- 50cc to 65cc bikes: rider sag often around 70 mm, static sag around 25 to 35 mm
Again, your manual and your riding style should have the final vote.
Mistakes That Ruin Sag Measurements
- Taking the first measurement with the bike on the ground instead of fully topped out
- Measuring from different points each time
- Using flexible plastic as a sloppy reference point
- Checking sag without full riding gear
- Ignoring static sag after setting rider sag
- Trying to fix a wrong spring rate with preload alone
- Changing body position on every measurement
- Forgetting that terrain and riding style can justify minor changes from the baseline
How the Bike Feels When Sag Is Wrong
Too Much Sag
The rear sits low. The bike feels stable in a straight line but lazy in corners. The front can feel light, vague, and reluctant to bite.
Too Little Sag
The rear sits high. The bike may turn quickly, but it can also feel twitchy, nervous, and less planted in rough sections.
Correct Sag
The bike feels balanced. It tracks straighter, corners with less drama, and gives you the useful kind of confidence instead of the fake “I’ll send it” kind.
Real-World Experience: What Riders Learn After Setting Sag Properly
One of the most common experiences riders talk about after setting sag correctly is how much calmer the bike feels without any expensive parts being installed. Nothing shiny changed. No trick coating appeared. No new anodized miracle component arrived in the mail. Yet the bike suddenly starts turning with less wrestling, holding lines with less argument, and feeling more planted when the trail gets ugly. That is why so many experienced riders say sag is the first free performance upgrade.
Another common lesson is that many riders discover their bike was not “bad” at all; it was just mismatched to their weight or setup. A rider who thought the front fork was the problem often finds the real issue was the rear sitting too low. Someone blaming headshake on tire choice may discover the rear was too tall and unloading the chassis in fast sections. In other words, sag has a sneaky way of exposing problems that were never really problems in the first place.
There is also a funny emotional arc to the whole thing. At first, setting sag feels like one of those tasks “serious racers” do while normal humans just ride. Then you go through the process once, hit a good number, and take the bike out. Suddenly you become the person telling your friends, “Dude, set your sag before buying anything.” It is motorcycle adulthood. Taxes, tools, and unsolicited suspension opinions.
Riders who switch terrain notice this even more. A motocross setup that feels sharp on jump faces and berms may feel nervous in fast desert chop. An off-road setup that feels planted in rocks and roots might feel a touch lazy on a tight track. That is why experienced riders keep notes. They know the perfect number is often a small range, not a sacred single digit carved into stone by the suspension gods.
Many riders also learn the hard truth about spring rate. If the preload rings end up cranked into another zip code just to get the right rider sag, the bike may still feel off because the spring itself is wrong. When riders finally install the correct spring for their weight, the difference can feel bigger than expected. The bike settles naturally, corners more predictably, and stops giving that “almost right, somehow still weird” feeling that comes from forcing the wrong spring to pretend it belongs there.
Perhaps the best experience, though, is confidence. When the bike feels balanced, the rider relaxes. When the rider relaxes, the bike works better. That loop matters. Sag is not just a garage number. It is part of how the motorcycle communicates with you. Set it right, and the bike feels like a willing partner. Set it wrong, and it feels like you are negotiating with a caffeinated mule.
Conclusion
If you want your dirt bike to handle better without spending a fortune, set the sag correctly. It is one of the most important setup steps you can do, and it affects almost everything: turning, stability, traction, comfort, and confidence. Start with your bike’s recommended target, measure carefully from repeatable points, adjust preload in small increments, and use static sag as a reality check for spring rate. Then ride, take notes, and fine-tune for the way you actually ride.
Because in dirt biking, as in life, balance matters. Especially when the ground keeps trying to leave.